There is no comparison between Virtual Private Network or VPN to protect your privacy. Someone will track you next, your own internet service provider will not be able to know, what websites you are visiting or what you are doing on the internet. If you talk about getting a VPN service, there are many free and paid options available in the market. Free service providers also provide unlimited service and encrypt everything between the device and the internet. But the problem is, you can not rely on free providers, whether they are saving your private data. Kenona goes to VPN Provider but all your browsing history goes from Internet activity. So how do you make your home computer (Windows PC) VPN server?
From this article, show you how you can create your own VPN server without installing a separate software on your Windows PC! So let's get started ...
Own VPN Server
If you want to host VPN on your own computer and you want to connect VPN to different devices, then your host computer must always be kept on-the-go. You can create a VPN server through any operating system. Mac, Linux, Windows - There are different methods for each operating system, to set up your server. But in this article I will just teach you how to create VPN from Windows operating system. Kona Windows operating system has build-system, making its own VPN.
If you do not want your computer to be always on the go, but you can host your VPN by purchasing Rasbari Pi and installing the open VPN server there. Rasbari Pi is a mini computer, which can be worth 4 thousand rupees. You can also host your VPN server by renting a server from the web hosting provider, if you want, to save some money from the Traditional VPN service.
And yes, before starting the work, you want to say another thing, you should install your VPN server right now, when you know more about network, router, network security, firewall etc. If not, then your VPN server is likely to be hacked.
Windows PC made VPN server!
You can create a Point-to-Point Trial Protocol (PPTP) type VPN server using the Windows operating system's build feature. This trick will support Windows 10, Windows 8.1, Windows 7. But those who have updated their computers with Windows 10 Creator updates, this trick will not work.
The VPN server does not work in the Windows 10 Creator Update, the Kano Routing and Remote Access Service fails to run in Windows 10 Creator Update. Although everyone knows this problem, but Microsoft has not yet provided updates. But there are lots of tricks, such as by editing the registry, it can be fixed, yet I will be late for receiving an official update. And those who have Windows 10 or 8.1, or 7 of any earlier version, can complete this trick successfully.
VPN server setup guide
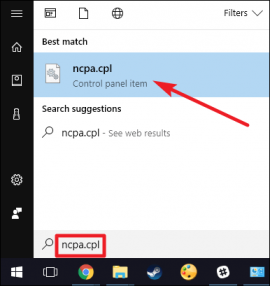
To create a VPN server on Windows computer, first you have to go to the "Network Connections" window. The fastest way to go there is to open the search open or open Windows 10 kernel, then type "ncpa.cpl" from the search result, you can move to that window.
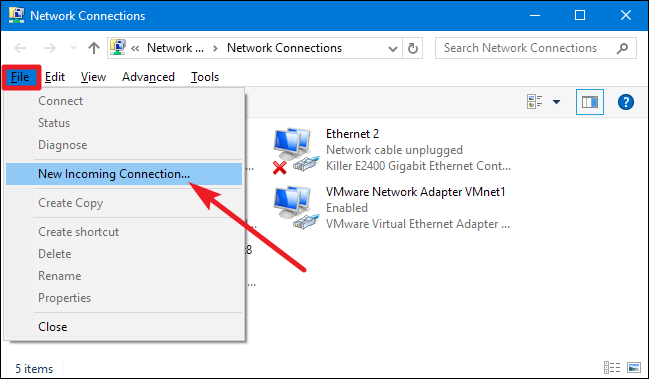
Press the "alt" key in the Network Selection window, so that all the menus are stacked. Now go to "File" from the menu and then select the option "New Incoming Connection".
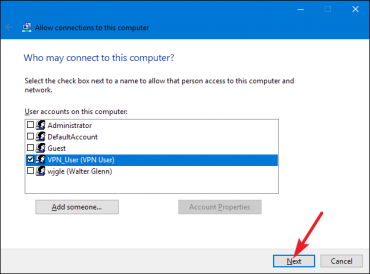
Now you have to select the user account where you will be able to access it remotely. Here you can add a different user by clicking the "add someone" button. However, if you want to run a VPN server using the user account, use a very strong password in the account, if possible, create a server from a limited account, which does not have admin permissions.
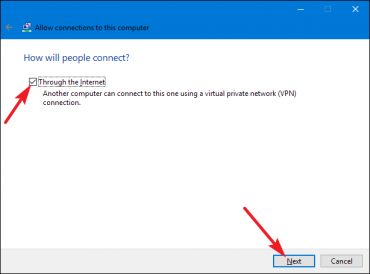
After selecting user you will need to press next button. On the next page, the "Through the Internet" option should be marked and started, so that the VPN server can be transmitted through the Internet. Although only one option is available here, but if you use the Internet using the modem, then the VPN server can also be made live on the Internet from the modem.
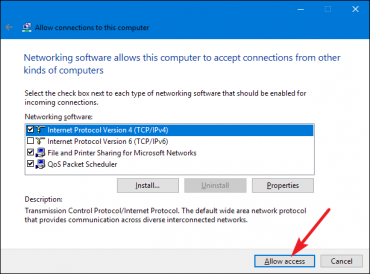
Then after pressing the next button, the following page will appear where you have to set up the network protocol. Select the IPv4 here and uncheck the file and print share, you do not want to be able to connect with your computer, either access your files or print a print command on your computer.
Once everything is set up properly, click on the "Allow Access" button.
There is no work, Windows will automatically start installing VPN under your selected user account. Slow down for a few seconds, this will work out. After that your VPN server will be up and running. In Windows 10 Creator Update, your process will end here, which means that VPN service can not be started.
Diameter, this is how your VPN server was created. If you want to disable or delete the server, go to the "Network Connections" window and delete the "Incoming Connections" item and finish the job.
Router setup
Your VPN server will start running under the local network, connecting with the same IP address will connect the user. But if you want to access your server from the Internet, then forward the port to your router. Login to your router setup page (since the setup process for different modular router is different, do not give the screenshot) and forward the IP address of the computer to the 1723 port of the VPN server installed. Diameter work done (if there is a problem while forwarding the port, you can comment below).
For security only, the router will only connect the VPN to the partition using the firewall, just keep the inbound traffic aloud of its IP address. Of course, you must have a public IP and you can also set up your DNS server on your computer. VPN can connect with domain name in it.
Now the connection to the server to connect!
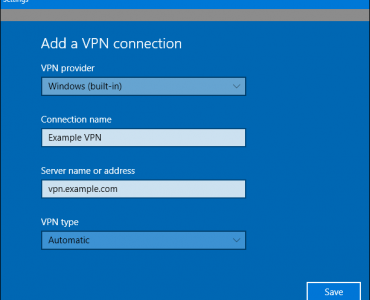
Now go to the option of connecting VPN to a separate computer, go to the search for the Windows computer and enter the "VPN" result. Now the IP address that you will be asked for. If there is a server IP address, then you can enter the domain name if you have set up the DNS server. Diameter, then your computer will be comfortably connected to your own VPN server!
- So, see how easy it is to set up your own VPN server. Yes, easy to water! However, you can install different software in Linux and create a more advanced VPN server, and if you do not want to host the server on the computer, then you can setup VPN using Raspberry Pie. If you want Linux tutorial in the next article, then please comment me below.

