Tools:
• 10mm Cup & Ratchet with extension
• T25 Torx Screw Driver
• T20 Torx Scree Driver
• Flat Head Screw Driver
• Phillips Head Screw Driver
Hello,
If you are like me and have search on how to replace the window regulator on a Jeep Liberty 2008 to 2012, you probably have not found anything. Most searches yield the previous Jeep Liberty model 2007 and back.
Now, these mechanisms are clearly cheap and most window glass just fall thru your door because the whole window regulator fails. Motor don’t fail though.
It is important to make clear that the window regulators have different system between the front doors and the rear doors.
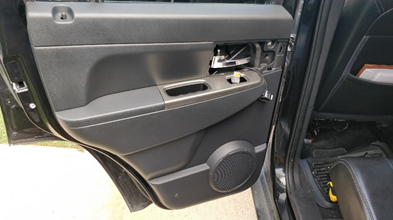
For the Front Door (DRIVERS SIDE):
Pry the cover of the chrome door handle, and use a 10MM cup to remove the panel screw.
On the bottom part of the panel there is a round cover, behind it is a Phillip Screw, remove it.
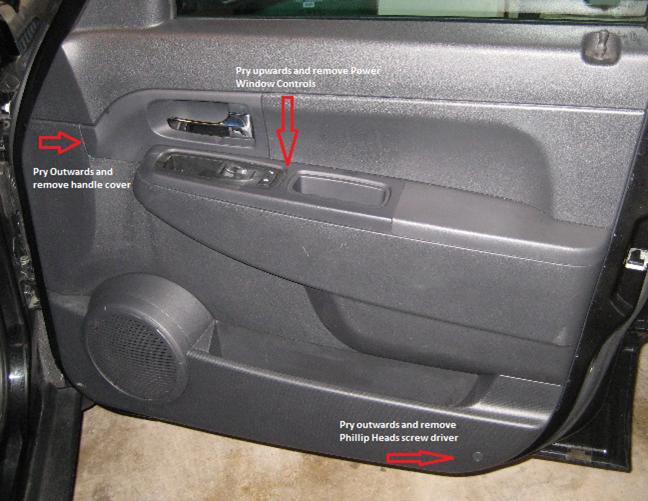
Pry upward the power window controls and after disconnecting the switch, with an upward force, lift the door panel, and remove it.
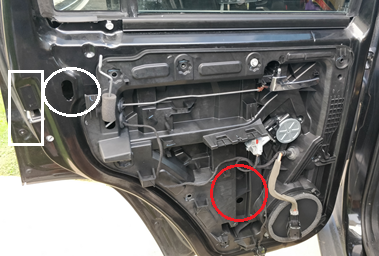
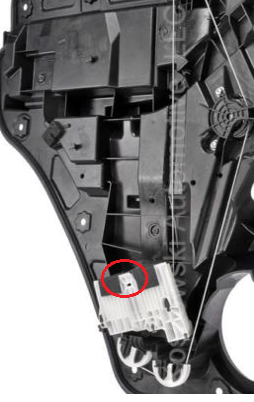
After the panel is removed. You will need to reconnect the power window controls, put the key in accessory and lower the window enough, until you see the white clip shown below, thru the hole in the assembly (marked red above).
Use a flat head screw driver to press that clip (you will need help from another person to lift the window glass up). Pressing that clip will loosen the window glass for your helper to lift up. After is loose please be safe and fix the window with a screw driver, cardboard or shim so it does not goes down again.
After you free the window glass proceed to:
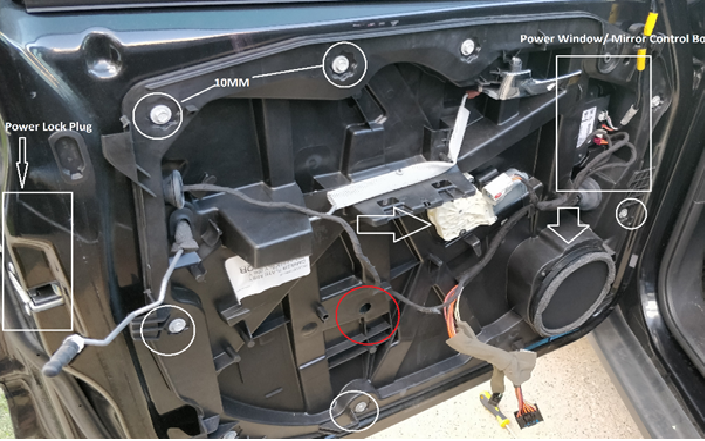
a. Remove all 10MM bolts
b. Disconnect the power window motor
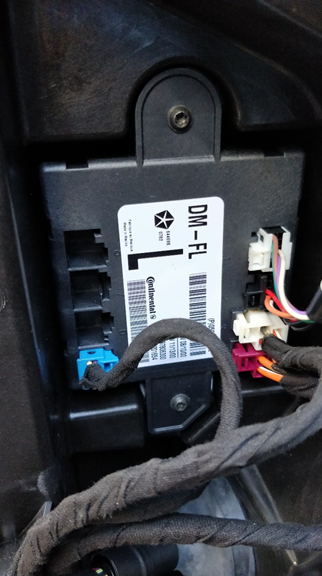
c. Disconnect the power window / power mirror control box
d. Disconnect the power window controls
e. Remove speaker and disconnect it.
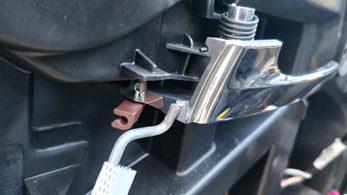
f. Pry the brown plastic connector to the door handle to free it from the locking mechanism (you can use some plyers to do this), Picture below.
After all of the listed items in step 6 are disconnected or removed. Proceed to separate the window regulator assembly from the door itself. Now you will need to hold it away from the door and disconnect the power lock connection to the lock actuator (this is the last connector).
Once you disconnect the Lock Actuator plug, you can now remove the old window regulator assembly.
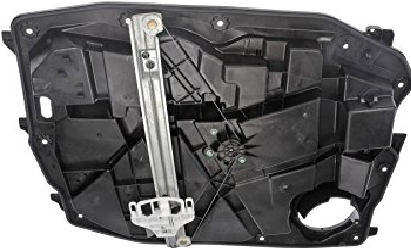
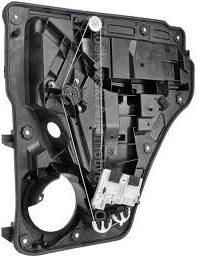
You will notice that the new assembly, only brings the new regulator and motor. This means you have to transfer to the new assembly the following:
a. Transfer the speaker
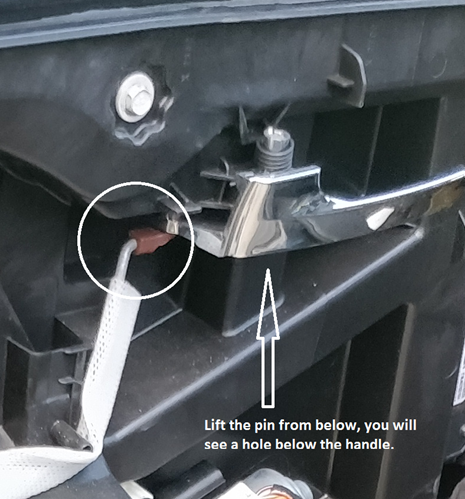
b. Transfer the chrome handle, lift from below with a very fine screw driver or other pin, this will lose the pin that holds the handle to the door.
c. Driver’s side has the power window and power mirror control box, remove it from the old assembly and install it in the new one (take a picture of where the plugs are connected that way you know where to put them back).
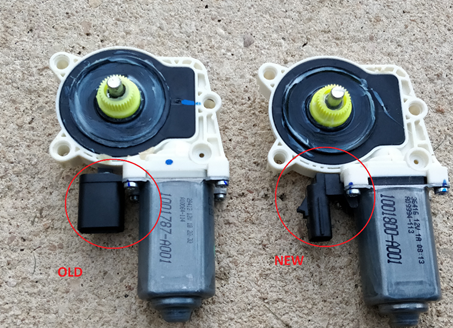
d. BEWARE the driver side window regulator that I bought had a different connector plug on the motor, so I had to remove the old motor and install it in the new window regulator assembly. (Its plug and play). Picture below.
- Once all the parts are transferred to the new Window Regulator assembly, reverse the disassembly process.
*** Pro tip – make sure you present the new assembly to the door and make way to the metal rods for the door lock and the handle first, then connect the Door Lock actuator plug. (Notice that you will have to make way of the entire electric wiring harness first)
Now that you have the wiring harnessed run thru the new assembly, the lock rod and handle thru the gateway holes, and the lock actuator connected, the speaker mounted; proceed to present the new actuator on the door, and sample test various 10MM bolts to fix the panel.
Once the panel is fixed:
a. Connect the power window controls and lower the regulator mount to the level of the very same hole where the glass was loosened.
b. Let your helper or companion loose the glass and lower it until you see it reach for the assembly, once there press the plastic clip with a flat head screw driver in order for the glass to clip in the assembly.
c. Once the glass is secure, proceed to complete all the installation of the bolts, and connectorsReverse the disassembly process for the panel, and you should have a working power window.
Rear Driver Passenger Door:
Proceed to follow the door panel disassembly from the Driver’s door:
This door will have the twitter speaker on the door handle cover
In order to complete the removal of this door window regulator you will have to note the following.
a. The door lock actuator assembly will need to come out (white rectangle picture above, actuator is inside the door).
b. In order to completely remove the door lock actuator, you will need to use a 10MM socket to loosen the nut thru the hole marked by the white circle.Marked in red is the hole opening for you to lower the window and press the white retainer clip, as you same did with the driver’s door.
*** PRO TIP – this door regulator assembly does NOT have railing, unlike the driver’s side; this means that after the window glass is removed you SHOULD NOT USE THE POWER WINDOW CONTROL TO MOVE UP THE WINDOW GLASS PLASTIC BRACKET!!! IF YOU DO THIS IT WILL FALL OFF!!!!
The window glass ACTS as its own rail system!!! You have to connect the window glass while the white bracket is down (as it comes from the factory). I learnt this the hard way!!!.
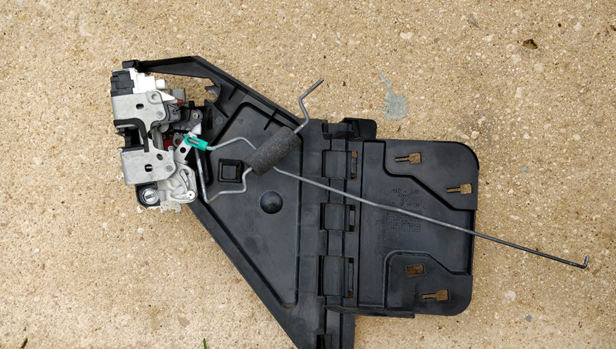
To remove the door lock actuator unscrew the follow in torx screw bolts.

Picture Below shows the door lock actuator assembly when it’s out.
Once the Window is held up with a shim, and the old window regulator is out, proceed to do the following:
a. Transfer Speaker to the new window regulator assembly.
b. Transfer the chrome door handle to the new window regulator assembly.
c. Install back the door lock actuator
d. Run the wiring harness thru the new window regulator and connect the door handle and door lock hardware.
e. Connect the door lock actuator wiring harness plug. (this will be a little uncomfortable).
f. Once the new window regulator assembly is in, proceed to lower the window glass. Somebody will need to push from above, while you press the white clip in the glass bracket on the new regulator, the same as you did on the drivers side.Once the glass is clipped to the new assembly, connect the power window controls and test it. You want to make sure this is not derailed, so it functions properly.
If the window moves as it should and the power window works, proceed to complete all the installation reversing the disassembly process.
Zoom in on the bracket you have to press when removing the window glass:
Rear
Front
Congratulations @ricar27! You received a personal award!
Click here to view your Board
Do not miss the last post from @steemitboard:
Congratulations @ricar27! You received a personal award!
You can view your badges on your Steem Board and compare to others on the Steem Ranking
Vote for @Steemitboard as a witness to get one more award and increased upvotes!