A Step-by-Step Guide to Monetizing Your Knowledge PART 4
With your website up and running, it's time to take things up a notch by incorporating advanced features that will truly make your shop stand out. In this tutorial, I will walk you through the process of creating category organization, customized feed and more elements for your social shopping website.
By the end of the tutorial, you will have a website with the shop well-organized in categories and subcategories, as well as showcase books, newsfeeds, checklists, contact forms and other widgets– all designed to enhance your visitors' experience.
Summary:
Step 1: Discovering Your Shop's Theme
Step 2: Creating a business object
Step 3: The Main Menu
Step 4: Adding Lists
4.1 Setting Up Your Lists

4.2 Establishing Subcategories

4.3 Adding Products

4.4 Launching a website with the business object

4.5 List Avatars
Step 5: Adding "Books"
Step 6: Adding pages
Step 7: Adding a custom newsfeed
Step 8: Adding widgets
Step 9. Sorting
What's next?
Links & Resources:
Widget for YouTube gallery: https://elfsight.com/youtube-channel-plugin-yottie/
Link to a page with all projects: https://www.waivio.com/object/ewg-social-gifts-projects/webpage
A Step-by-Step Guide to Monetizing Your Knowledge
Social Shopping (Concept): here
Your Shop on Waivio (PART 1): here
Add Products in a Click - Waivio Chrome Extension (PART 2): here
Simple Shop (PART 3): here
A Complete Guide to Importing Products on Hive
How to Add a Product (PART 1): here
How to Import Products on Hive with DataFinity (PART 2): here
How to Export Products from Spreadsheet (PART 3): hereundefined
Step 1: Discovering Your Shop's Theme
The foundation of a successful shop lies in its theme. It's time to brainstorm and identify what resonates with you and your potential customers. Whether it's camping products, baby products, fitness gear, makeup, or any other niche, pick a theme that aligns with your interests and expertise.
Step 2: Creating a business object
To organize your shop effectively, we will need to create a business object specifically for your shop. If a similar-themed website already exists, you can search for it and open the existing business object. Then, you can contribute to its development by adding more products or categories to it.
However, if you're starting from scratch, click the "write post" button and under "Create New Object," click on "business". Assign a name to your business – it can match your website, such as "baby.social.gifts". Click on the link to open the newly created business object in a new tab.
Step 3: The Main Menu
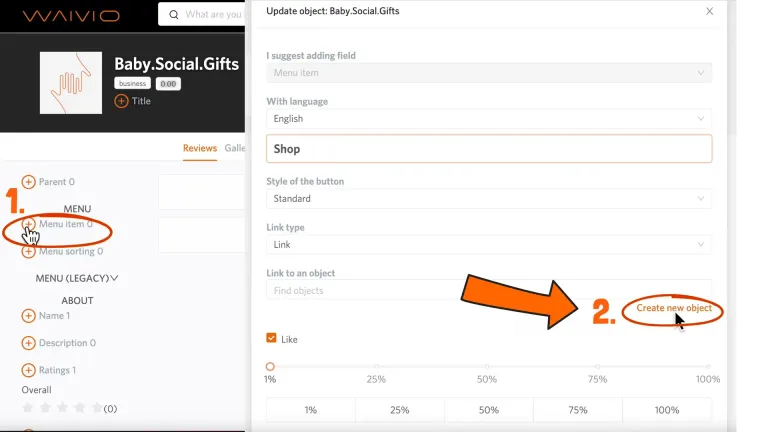
A business object has its own menu. When this object is linked as the base object on the website, this object's menu will be shown as the main menu on the website. For our object, the first menu item will be a Shop.
Click "+Menu item", then "Create new object"
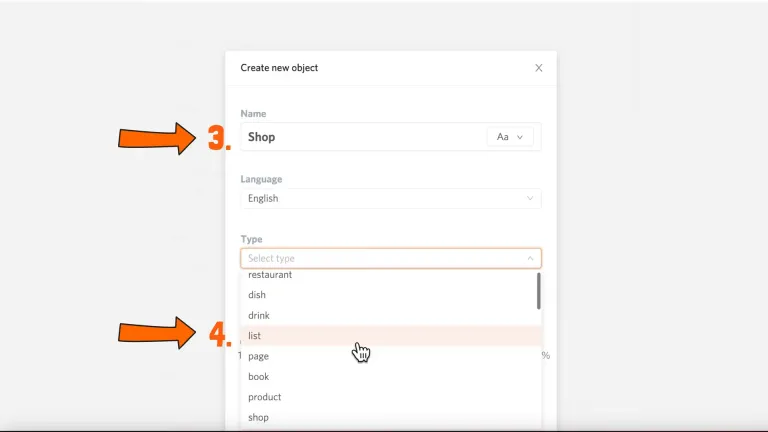
We will create a new object with that name and select "list" as its type because the shop will contain links to other lists, products, or pages.
Later in this Shop list, we can create other sub-lists (subcategories), such as Clothing, Food, and Nursery.
The next menu item will be a Bookstore. This is also going to be a separate list with links to books related to our topic.
If you want some help to establish categories for your website, you can use ChatGPT. Use a prompt like "Suggest categories and subcategories for an online [your theme, e.g. fitness] shop.", and ChatGPT will give you some ideas. You can review the categories generated by ChatGPT and select the ones that align with your vision.
Step 4: Adding Lists with Products
4.1 Setting Up Your Lists
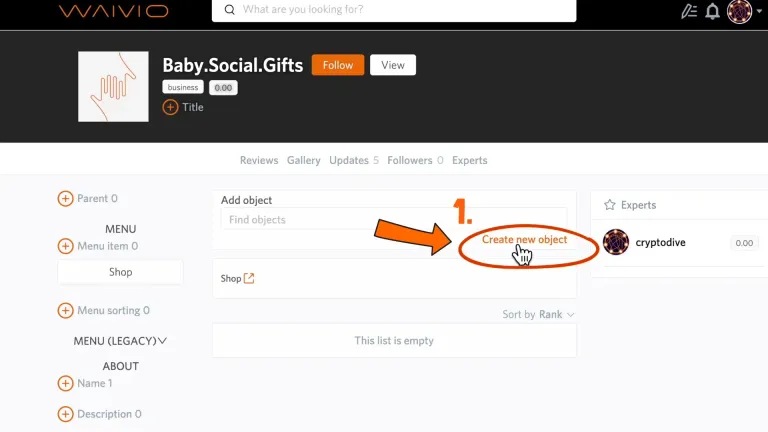
Let’s start with creating categories in our Shop. It's empty right now, but let's add our higher-level categories to it, such as clothing, feeding, and nursery. To add a category, click "Create new object".
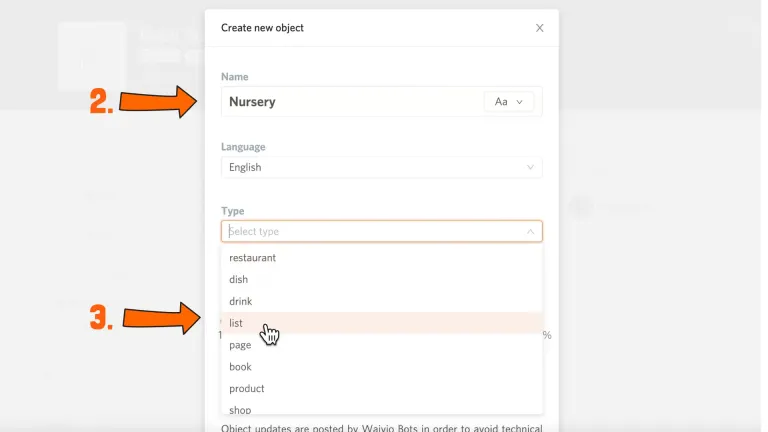
Write the name of the category, such as "Nursery", and again choose the "list" as the type, since our category will have subcategories such as beds, mattresses, storage solutions, decor and so on.
If you already have lists created, you can add them by searching for them in the search bar.
4.2 Establishing Subcategories
After adding all the general categories, we can add subcategories to organize the shop's inventory even further.
For instance, let's add subcategories to "Nursery,". Click on the category– you will see that now you are in "My Shop -> Nursery".
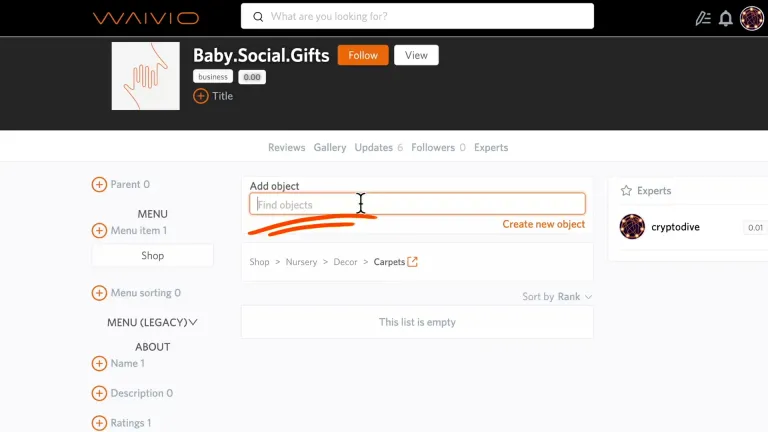
Here, we can repeat the process: click "Create new object", write the name of the subcategory such as "Decor", and choose a "list" as the type.
Similarly, you can create sub-subcategories. For example, decor can be further broken down into wall stickers, posters, carpets and so on.
4.3 Adding Products
When a category is specific enough and doesn't need a further breakdown, you can add products to it. For example, you can add products by searching for them in the search bar.
If you can not find the products you want to add to your website here, you can easily add them using the Waivio’s Chrome extension. Check out the tutorial on the extension for more details.
If you want to add multiple items, you can check out the series of tutorials on importing products on the Hive blockchain to learn a quick way for bulk importing.
You may also find using chatGPT helpful to find the best products for the shop. For instance, a prompt like this: "Provide a list of top 20 products according to user reviews for [your product category, e.g. baby mats] (according to your knowledge as of 2021)". And ChatGPT will generate a list of products you can choose from.
To add products, search for them by name or ASIN number. I recommend recording ASIN numbers of products during the data import, as product names can vary while product numbers remain constant. Then, click on the product and click “Submit.”
4.4 Launching a website with our business object
To launch a website using this business object - navigate to "Tools," then under "Websites," click on your website's name. In configuration, replace the base object with the business object we've just created.
4.5 List Avatars
Now our products are nicely organized in categories. However, the categories appear rather dull with default images as icons. Let's change that and add some images!
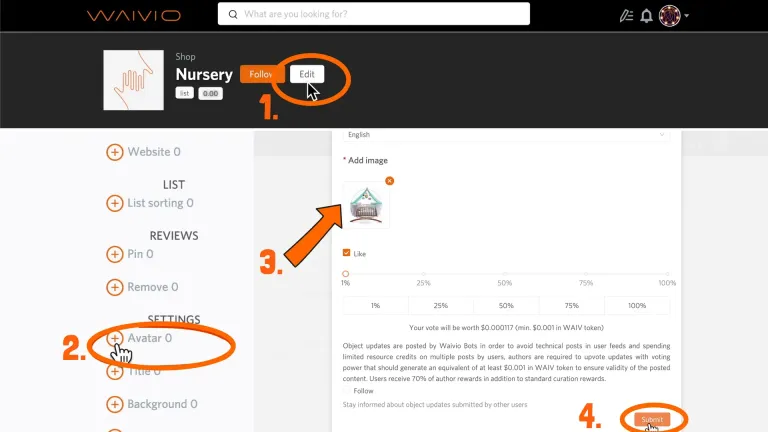
Head over to the business object and click on the category, such as "Nursery." Click on the hyperlink at the top to open the category list in a new tab. Here, you can easily add an avatar image to your category (list).
Click "Edit," navigate to "Settings," and click on "Avatar." Upload your image or provide a link. For instance, here, I used an AI-generated image from Midjourney. Click "Submit," and that's it!
Let's add images to other categories. All the images I am uploading were generated by Midjourney – if you are curious to learn how check one of our tutorials about using AI tools for creating great-looking shops.
Now that you know how to add lists of products - you can experiment with how you arrange them on your website. For example, coffeetime.social.gifts has three lists with products "Equipment", "Accessories", and "Coffee". Whereas camping.social.gifts – has all the products under "Shop". It also has a menu item called "Books". Books is a list of object type "books".
In addition, camping.social.gifts has other menu items, such as a Checklist, which is a simple page with information. Camplife is a newsfeed with posts about camping. Legal is a list of pages added to all websites hosted by Waivio. Legal page is added automatically to all websites but you can also add your own legal documents in a similar way. Let's add these elements to our website.
Step 5: Adding "Books"
Let’s start by adding a menu item called "Books" that will contain top books for children and parents. Click "Create new object" and enter "Books" as the name. For the type, select "list". Once the list has been created, you can add categories to it, such as "Parenting books", "Baby board books", and "Storybooks".
Then, let’s add some books. This is a very similar process to adding products - just search for the ASIN number of the book and click “Submit”.
Step 6: Adding pages
Let’s also add a page to our website with a checklist of all the baby products every new parent should have.
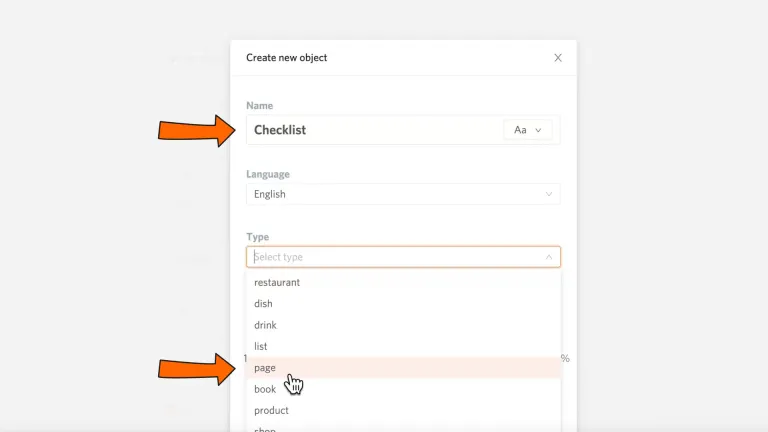
Add a new menu item, click “Create new object” -> enter a name as it would appear on your website menu, e.g. “New Parent Checklist.” For the type – choose “page”, and click “Confirm”. Then, you can add content such as an article or a checklist – then just click “Ready to Publish” and “Submit”.
Step 7: Adding a custom newsfeed
Let's move on to custom newsfeeds. Hive is an active social blockchain where many users create posts on various topics. We can filter relevant posts using hashtags that match the topic of the website.
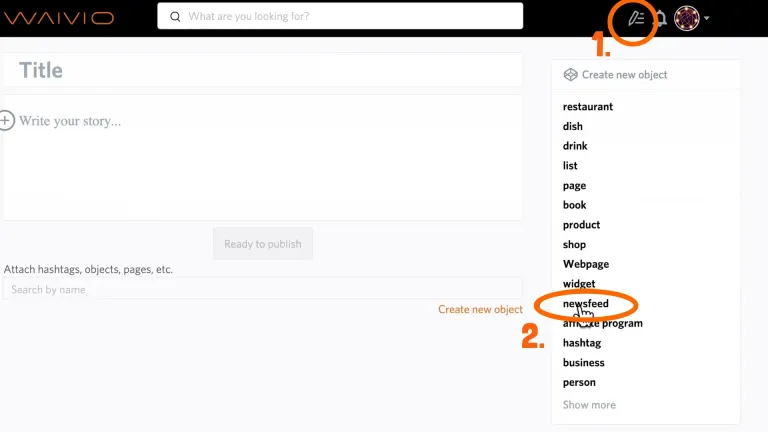
The easiest way to add a custom newsfeed is to click on “Write post” button and choose "newsfeed" from the selection.
Enter a name, such as “Community”, We will link this newsfeed to our business object later after we are done configuring it.
To configure the newsfeed, open this newsfeed object in a new tab.
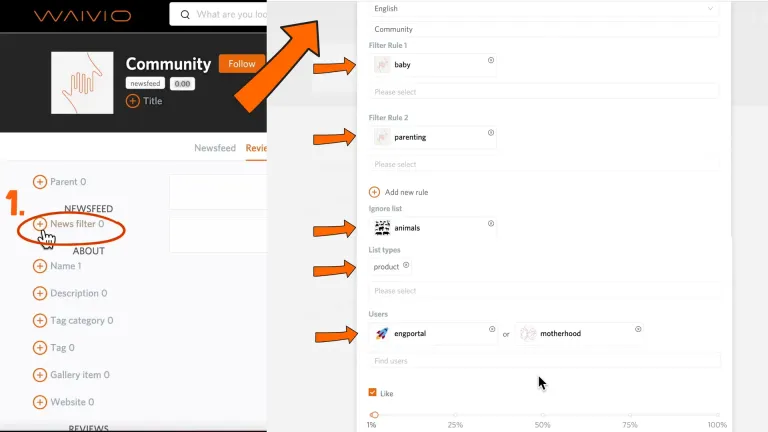
Click on "Edit", then click on "Newsfilter."
Here, you can add filter rules to display only a specific type of posts:
For example, for my website, I can add a "baby" hashtag in Filter Rule 1. And click "Add new rule" to add a "parenting" hashtag in Filter Rule 2. This will show posts that have these hashtags.
You can also filter out certain posts. For example, I don't want to see posts that are related to "animals" that might have a "baby" hashtag in them. So I will put "animals" in the Ignore Rule.
Another way to personalize your news feed is by choosing the type of object (e.g., a book, a product, a place, etc.) And only the posts related to that category will be displayed on your newsfeed. For example, to show all the posts on baby and parenting products, I can add "product" in this field.
To show baby and parenting posts only from specific users, I can add these users in the “users field”.
If you want to show all the posts of a specific user, like your dedicated channel, then remove all the other filters and just add that user.
Now to link the newsfeed to our business object – let’s open our business object. Click on Menu item. Enter a name for the newsfeed as it would appear on your website's menu. In the search bar, look for your newsfeed by a name or a permlink. There might be a lot of objects with the same name, so I recommend searching by the premlink, as it is a unique identifier of the object. It’s located on the object’s link after object/ e.g. this is the object's link https://www.waivio.com/object/5xjmmi-community and the premlink is 5xjmmi-community
Click "Submit" once the object is found.
Step 8: Adding widgets
If you want to integrate Google Forms, Calendly, or other external tools with your website, you can do so by adding widgets.
Click on “Write post” button and choose a "widget" from the selection – enter a name, such as “Contact Form”.
Your widget will now be created. We will link it to our business object later.
To configure the widget, open it in a new tab.
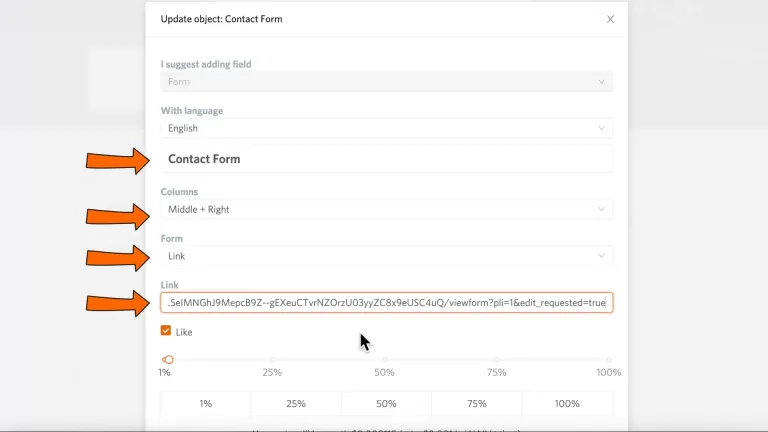
In the widget object window, click "Edit"; under "Widget", click to add a "Form".
For example, let's add a Google Form. Have the link ready.
First, add a title (such as,"Contact Form"). Under columns, you can choose how much space you want the form to fill. For example, if you choose a middle column, the form will fill only the middle column, but if you choose "entire width" the form will fill all three columns. For Google Forms, I recommend selecting Middle + Right. Then, select the form type – a link or a widget. For Google Forms, select a link. Then, copy the Google Forms link and paste it into the space provided. Then click Submit.
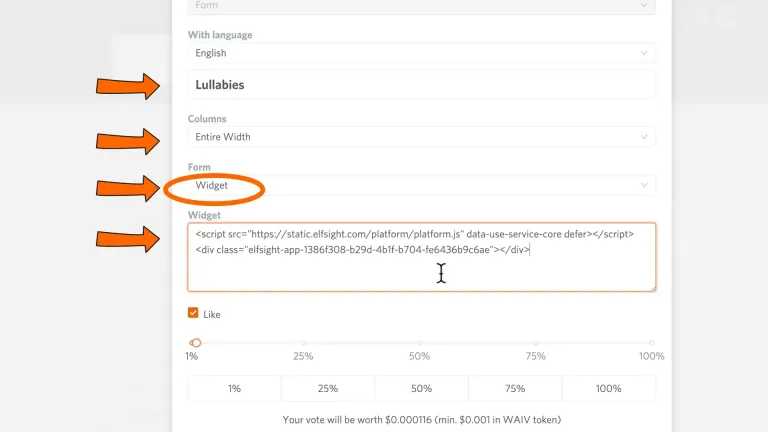
If you want to paste the widget embed code instead of the link, then select "widget" as the form type and enter the widget embed code in the space provided. Here is the website where you customize your widgets: https://elfsight.com/widgets/
Let’s link the widget to our business object –open the business object. Click on "Menu item" and enter a name for the widget as it would appear on your website's menu, in the search bar – look for the widget by a name or a premlink. Click "Submit" once the object is found.
Step 9. Sorting
Finally, you can change the order of menu items as they would appear on your website. Click on "Menu sorting", drag and drop to rearrange the menu items in the desired order. Click "Submit".
You can also sort the items inside the categories lists. Lists have their own sorting option. Open the list in a new tab – “Edit” – under “List” click on “List Sorting” – and rearrange the items in the desired order.
By integrating categories, feeds, informative pages, and more, we've transformed the website into a fully functional and captivating platform. While I made some suggestions for the website structure, you can arrange your website any way you envision.
What's next?
Congratulations! You've taken your shop from an idea to a well-structured platform that aligns with your theme!
You've laid the groundwork for an exceptional shop that's tailored to your expertise and passion. With great product organization, newsfeed, and information pages, your shop is ready to showcase an array of products that cater to your audience's needs and interests.
Your website is ready to captivate visitors, monetize your expertise, and offer an engaging and immersive experience to anyone exploring your shop. Best of luck on this exciting venture!
Now it's time to think about how to market your website to bring it to a larger audience and boost your revenue. In the upcoming tutorials, we will discuss SEO tools, marketing and analytics strategies that you can implement for your website. Stay tuned for exciting insights and valuable tips!
#waivio #waiv #hive #hiveblockchain #shop #hivetutorial #business #commerce #amazon #shop #ecommerce #hiveblockchain #crypto #cryptocurrency #features #hivefeatures #product #brand #marketing #entrepreneur undefined#hobby #leo #peakd #leofinance #items #shopping undefined#affiliatemarketing undefinedundefined#items #leo #peakd #hive-engine #rewards #revenue #e-commerce #walmart #socialshopping #shopping

With Waivio tools, you can build your dream social shopping website. Whether it's makeup, fashion, home decor, tech gadgets or fishing gear - the possibilities are endless. Have you thought about what you want your social shop to feature? 🤔
That's sounds interesting... I thought about it some time ago. Definitely will study more.
Tks for sharing
Congratulations @cryptodive! You have completed the following achievement on the Hive blockchain And have been rewarded with New badge(s)
Your next target is to reach 2250 upvotes.
You can view your badges on your board and compare yourself to others in the Ranking
If you no longer want to receive notifications, reply to this comment with the word
STOP