Microsoft Visual Basic 6 Professional (step by step)
Programming step
Number of items
- Create the user interface.
7 objects
- Set the properties.
10 properties
- Write the program code.
2 objects
Another way to think about the Lucky Seven program is to use the following algorithm, or list of programming steps. Creating an algorithm can be a useful starting point when developing a program.
Creating the User Interface
In this exercise you’ll start building Lucky Seven by creating a new project and then using controls in the toolbox to construct the user interface.
Microsoft Visual Basic 6 Professional (step by step)
Create the user interface
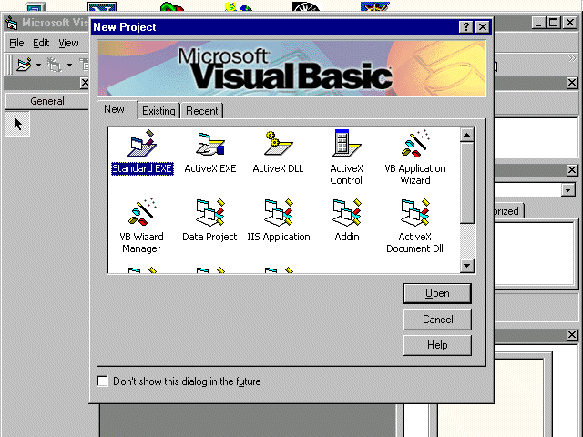
On the File menu, click the New Project command.
You start a new programming project by clicking the New Project command on the File menu.
Click No if you are asked whether you want to save any changes to the StepUp program from Lesson 1. This removes the StepUp program from memory.
Click OK to create a standard 32-bit Visual Basic application.
Visual Basic cleans the slate for a new programming project and displays in the center of the screen a blank form you can use to build your user interface.
Now you’ll enlarge this form, and then you’ll create the two buttons in the interface.
Position the mouse pointer over the lower-right corner of the Form window (not the Project Container window) until the mouse changes into a sizing pointer, and then increase the size of the form to make room for the objects in your program.
As you resize the form, scroll bars appear in the Project window, as shown in the following illustration:
To see the entire form without obstruction, resize the Project Container window to remove the scroll bars and move or close the Properties window, the Project window, and the Form Layout window.
Now you’ll practice a command button object on the form.
Microsoft Visual Basic 6 Professional (step by step)
tip
Confused by all this resizing? Don’t sweat it. You’re working with two windows here: the Project Container window and the Form window (which fits inside the Project Container window). The troublesome part is that you resize each window by using the resizing pointer in the lower-right corner of the frame, and these two corners tend to overlap a bit. To get more real estate to design your projects, you may want to run Windows in 800 x 600 mode, which you can do by clicking the Windows desktop with the right mouse button, clicking Properties, clicking the Settings tab, and then moving the Desktop Area slider to 800 x 600.
Click the CommandButton control in the toolbox, and then place the mouse pointer over the form.
CommandButton control
The CommandButton control is selected, and the mouse pointer changes to crosshairs when it rests on the form. The crosshairs are designed to help you draw the rectangular shape of a command button. When you hold down the left mouse button and drag, the command button object takes shape and snaps to the grid formed by the intersection of dots on the form.
Try creating your first command button now.
Move the mouse pointer close to the upper-left corner of the form, hold down the left mouse button, and then drag down and to the right. Stop dragging and release the mouse button when you have a command button similar to the one shown here:
The name of the command button is Command1.
Microsoft Visual Basic 6 Professional (step by step)
A command button with selection handles appears on the form. The button is named Command1, the first command button in the program. (You might make a mental note of this button name—you’ll see it again later when you write your program code.)
You can move command buttons by dragging them with the mouse and you can resize them by using the selection handles whenever Visual Basic is in design mode (whenever the Visual Basic programming environment is active). When a program is running, however, the user will not be able to move interface elements unless you have changed a special property in the program to allow this. You’ll practice moving and resizing the command button now.
Move and resize a command button
Drag the command button to the right by using the mouse.
The command button snaps to the grid when you release the mouse button. The form grid is designed to help you edit and align different user interface elements. You can change the size of the grid by clicking the Options command on the Tools menu and then clicking the General tab.
Position the mouse pointer on the lower-right corner of the command button.
The grid helps you design your user interface.
When the mouse pointer rests on a corner or a side of a selected object, it changes into a sizing pointer. You can use the sizing pointer to change the shape of an object.
Enlarge the object by holding down the left mouse button and dragging the pointer down and to the right.
When you release the mouse button, the command button changes size and snaps to the grid.
Use the sizing pointer to return the command button to its original size, and then move the button back to its original location on the form.
Now you’ll add a second command button to the form, below the first button.
Add a second command button
Click the CommandButton control in the toolbox.
CommandButton control
Draw a command button below the first button on the form. (For consistency, create a command button of the same size.)
Move or resize the button as necessary after you place it. If you make a mistake, feel free to delete the command button and start over.
You can delete an object by selecting the object on the form and then pressing Del.
Microsoft Visual Basic 6 Professional (step by step)
tip
As you create labels in this exercise, take a look at the pop-up box that appears next to the labels as you draw them. This box, which contains horizontal and vertical measurements, is called a sizing box. The numbers give the horizontal and vertical dimensions, respectively, of the object you are creating. The numbers are in units of measure called twips; a twip is one-twentieth of a point. (A point is 1/72 inch, so a twip is 1/1440 inch.) You can use the sizing box to compare the relative sizes of objects you’re creating. After you create the object, the same information is also displayed on the right side of the toolbar.
Now you’ll use the Label control to add a descriptive label to your form. This will be the fourth and final label in the program.
Click the Label control in the toolbox.
Create a larger rectangle directly below the two command buttons.
When you’ve finished, your four labels should look like those in the following illustration. (You can resize the label objects if they don’t look quite right.)
Now you’ll add an image box to the form to display the stack of coins the user wins when he or she draws a seven and hits the jackpot. An image box is designed to display bitmaps, icons, and other artwork in a program. One of the best uses for an image box is to display a piece of Visual Basic clip art.
Microsoft Visual Basic 6 Professional (step by step)
Add an image
Click the Image control in the toolbox.
Image control
Using the Image control, create a large rectangular box directly beneath the three number labels.
When you’ve finished, your image box object should look like the following:
This object will be called Image1 in your program; you’ll use this name later in the program code.
Now you’re ready to customize your interface by setting a few properties.
Setting the Properties
As you discovered in Lesson 1, you can change properties by selecting objects on the form and changing their settings in the Properties window. You’ll start setting the properties in this program by changing the caption settings for the two command buttons.
Set the command button properties
Click the first command button (Command1) on the form.
The command button is surrounded by selection handles.
Double-click the Properties window title bar.
The Properties window is enlarged to full size, as shown in the illustration on the following page.
Please mail me or read my next post to see the rest of the article.... thank you.
luckywise21wanted@gmail.com.
