For a home scale use, the most popular systems are homemade Rubbermaid worm bins or stacking trays commercial products such as the Worm Cafe, the Worm Factory etc... Those stacking trays systems are what call flow through or vertical flow systems, this means we add the food scraps at the top, then, the content migrate to the bottom and when mature, you collect the compost from the bottommost tray. Both systems work well but they have their limits and become inefficient if you have a lot of food waste to compost. In fact, a single worm bin of that style (about 55cm x 37cm) is usually not enough to compost all the food waste generated by a small family, especially when you follow safe feeding techniques such as the pocket feeding method and use a good quantity of bedding material at each feeding to reduce chance of failure. My family of 3, generates on average 8 to 10 Litres of food waste per week and I need at least 4 worm commercial bins like the Worm Cafe or Can-O-Worms. At one time, I had 8 of them so I could compost more waste but it was tedious to maintain.
As I got more involved in worm farming, I was browsing a lot of forums and especially Facebook groups on the topic. That's where I discovered another type of worm bins called CFT (Continuous Flow Through) systems.
The idea is to have a bin that is not only large enough to be able to compost a larger volume of waste, but it would also be optimized to compost the waste more efficiently and to reduce the effort from the harvest of the vermicompost. Like the flow through bins, the CFTs are also fed from the top but being a single compartment, you don't have any heavy trays to move around. The vermicompost is harvested from the false bottom. This process allows you to not interrupt the worms in their continuous work.
Here are some specifications of a CFT worm bin
The height
To be considered a real CFT, the bin needs to ideally at 60 cm (24 inches) in height from bottom to the top. 50 cm (20 inches) is the strict minimum.
The reasons behind this are:
- compost worms prefer to live near the surface close to the food layer. The minimum height is given to the CFT so that it keeps most of the worms from the bottom, thus, allowing harvesting an almost worm-less vermicompost. That means you don't have to sift to separate the worms, that saves you time but also contribute to a better quality vermicompost because the sifting process destroys some microorganisms such as fungi.
- the height is also to give enough time for the food waste to properly compost and for the vermicompost to mature. It also gives time for microorganisms with slow cycle such as fungi to develop and for cocoons to hatch and baby worms to migrate to the surface.
- at this height, the larger mass will compact the vermicompost at the bottom, preventing the vermicompost from self-harvesting and forcing the worms to migrate upward.
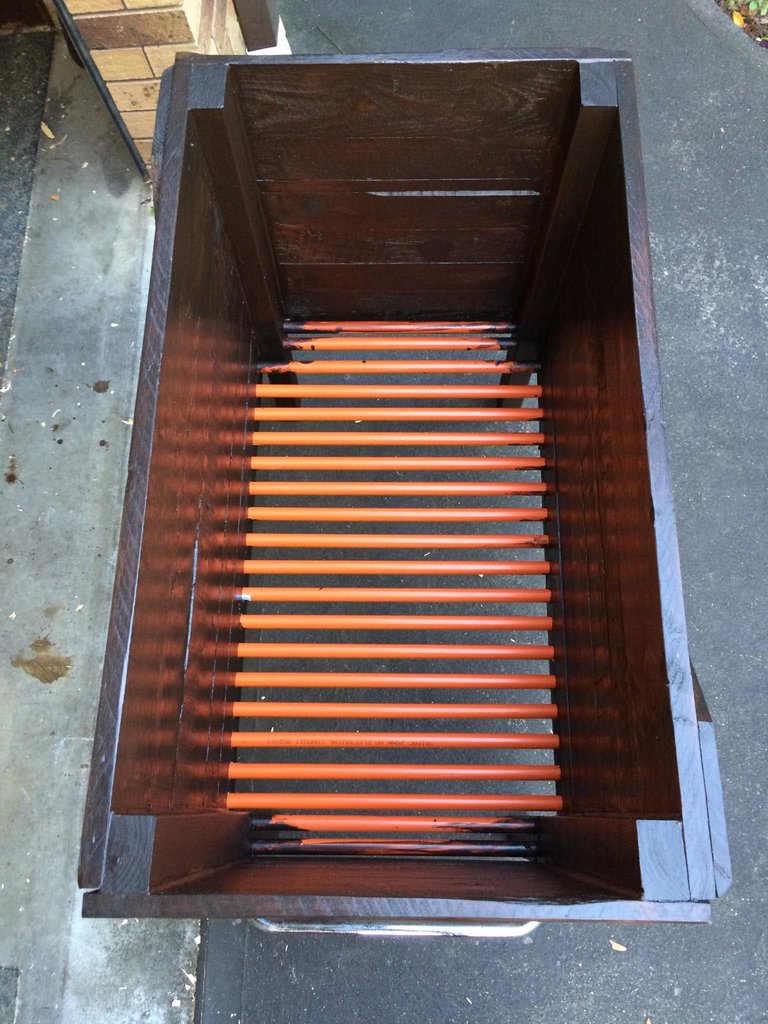
The false bottom
A CFT does not have a closed bottom like regular worm bins. The solid bottom is replaced with bars or a grid (for large commercial scales systems). The CFT is elevated off the ground by 30 cm (12 inches) or more to facilitate the harvest from the bottom. With bars, this process is done by using a rake and scratching the compost through the bars. With the grid system, a blade will be pulled along the bottom by a motor, slicing the vermicompost few centimetres above the grid, the motor also vibrates the bin and the vermicompost falls through the grid.
One other benefit of the false bottom is that it provides an additional air input at the bottom. During the waste composting process, gases are formed and water evaporates, this leaves a void which will be replaced by air sucked in from the sides and from the bottom when possible. In a regular plastic worm bin, this natural aeration/ventilation process is not very efficient, this is why the vermicompost from these systems is often wet or muddy. With a CFT, this extra input of air (oxygen) in large quantity, especially those made of wood where air can get in through the cracks and gaps on the sides, will boost the number of all the beneficial aerobic organisms including the worms. More organisms means a more performant composting process. A CFT can, hence, host population of double the size of that from a plastic worm bin of same dimensions.
The setup of a CFT
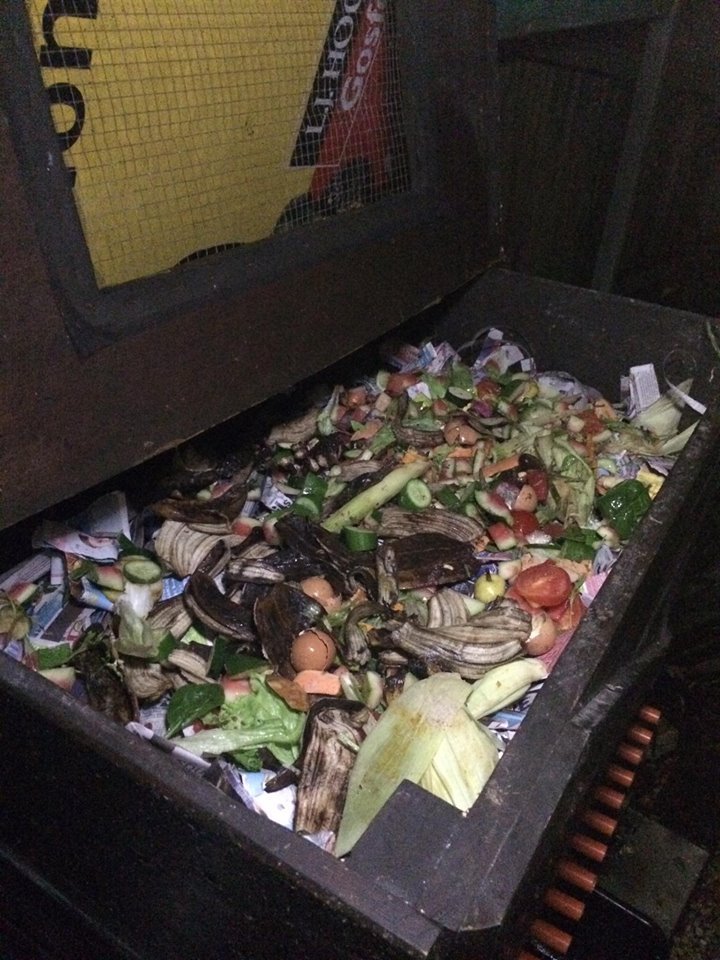
We usually start a CFT made of bars with a layer of about 5 cm (2 inches) of corrugated cardboard sheets folding them upwards against the sides going up about 20 cm (8 inches). Then you need to add fresh and moist (not wet) bedding material such as corrugated cardboard or newspaper (shredded or hand-torn) for a thickness of 30 cm (half the height of the bin). This serves two purposes:
- It will hold the content of the bin while it is breaking down and start compacting. After a while, that layer of cardboard will also break down by the organisms of the worm bin and the vermicompost should be able to hold in place on its own.
- This thick bedding material will keep the worms off the bottoms at the beginning.
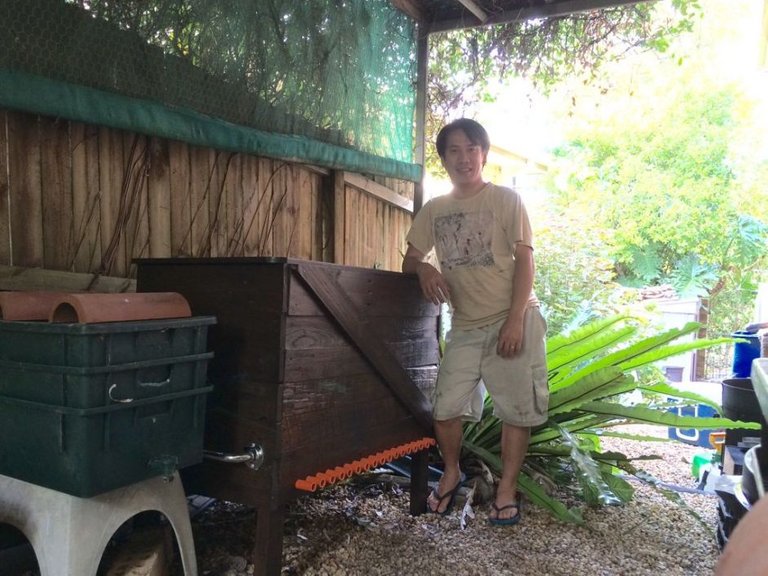
Here is a video of the setup of Gargantua, my homemade CFT:
The surface area
In order to efficiently compost food waste, we need more worms, however, increasing the volume by increasing the depth of the bin is not the solution because compost worms prefer to live near the surface. So we need to increase the surface area. Personally, I think a CFT should have a surface area of at least 60x60 cm (24x24 inches), Gargantua (my homemade CFT) has a surface area of 100x60 cm (40x24 inches).
Easy maintenance
With a single compartment, you don't have heavy trays to lift and move around. This makes it much easier to maintain, feed the worms and harvest the vermicompost.
Due to its larger volume, the mass of content is also increased. That larger mass provides thermal stability of the vermicompost. It's like leaving a glass of cold water and a jar of cold water at ambient temperature, the glass of cold water will warm up faster than the jar. What that means for the worm farmer is that he or she won't have to worry too much about a heatwave during the summer, the worms will have a lot of cool places to retreat to and in a mild winter, the heat is preserved long enough during the nights to keep the worms active.
With a regular plastic worm bin, it is generally advised to not water it at all because it keeps moisture too well. However, with a CFT, we need to water it once a week in order to keep the bottom moist as the constant contact with air will dry it out. Start with one litre and adjust accordingly if you see the water seep through the bottom.
Feeding the worms in a CFT
Overfeeding is one of the major issues with new worm farmers. With a CFT, you can feed the worms once a week by adding food and bedding material all over the surface area to about 5 cm (2 inches) of thickness. If something goes wrong in the food layer, the worms will bury themselves down, there is plenty of neutral space for them. That does not mean you can be careless though...
Easy harvest
The harvest is easy, but the wait is long.
You need to wait until the CFT is full up to the top before harvesting it for the first time. This can take anywhere from 9 to 24 months! It took mine about 16 months, if memory serves. All depends on various criteria including the initial worm population size and all sort of conditions. But once that level is reached, you can harvest regularly. If you are feeding the worms pre-hot-composted horse manure, you can harvest 5 cm (2 inches) weekly, if you are feeding food waste, you will be harvesting monthly as food waste compacts much more than manure as it breaks down. With Gargantua (my DIY CFT), 5cm of harvest is 100x60x5 cm = 30 litres = 8 gallons of vermicompost.
Here is a video of me harvesting Gargantua for the first time:
With a 60x60 cm (24x24 inches) CFT, a harvest of 5 cm is about 18 litres or 4.7 gallons for vermicompost. You just need to be patient.
For those who are handy, here are some construction plans:
| Photo | Description |
|---|---|
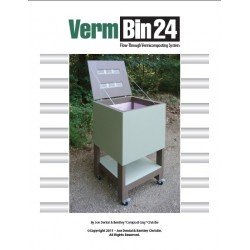 | The VermBin-24 is available in the form of a plan to build it yourself. |
 | The Beast CFT is a terrific CFT made by an Autralian worm farmer. |
If you are not a keen DIYer, you can buy a CFT. One of the size of Gargantua can be rather expensive to buy, commercial ones are in 4 digits prices... But here are some possible products:
| Photo | Description |
|---|---|
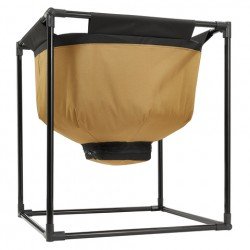 | The Urban Worm Bag is a very new product created by Steve Churchill, a friend of mine. It was inspired by the Worm Inn Mega and comes with a lot of improvements. It's definitely a product I recommend and I will as soon as I can make a little video of the free model I've received for review. This product is currently only available to USA and Canada. |
 | The Worm Inn Mega was inspired by the Worm Swag. It's a fabric worm bin which allows better aeration of the vermicompost. |
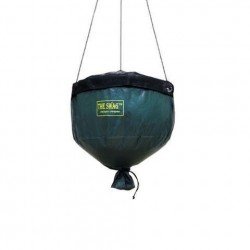 | The Worm Swag is not considered a real CFT because its depth is less than the minimum required. But I'm using two personally and really love them. Some worms are coming out the bottom during harvest but there are much much more left on the top. It's an Australian product that can sometimes be found abroad. |
Related content
- Use plenty of bedding material in your worm farm
- Four common worm species used in worm farming
- The better the ventilation, the happier the compost worms
- Blending or freezing food waste for compost worms
- Composting with worms in an apartment
- Do worms really not eat meat. Understanding relative quantities
- How to feed your compost worms
- How to set up a worm bin
- What does a worm cocoon look like
- 10 myths in worm farming
| Do more on Steem | |
|---|---|
 | On Steem, Witnesses are playing the important role of providing a performant and safe network for all of us. You have the power to choose 30 trusty witnesses to package transactions and sign the blocks that will go in the Steem blockchain. Vote for me via SteemConnect to help me do more useful projects for the community. |
| Join me on Homesteaders Online's Discord | |
| If you are Australian (even abroad), join #teamaustralia! |

Protect your money against Phishing Scam!
Cryptos accounts are the target of international scammers because they want your hard earned money!
Those people are very clever and in a moment of inattention, you've given them your login and password!
I've created a Chrome extension that can help you detecting scam links!
Install Steemed Phish Chrome desktop browser extension now!
Password and Private Keys security
You all know that your Steem password is the access to all your STEEM, SBD, posting, transferring, everything... right?
So, please, follow those simple steps and keep yourself safe:
- Apart from the initial setup of your account, NEVER use your password ANYWHERE, if stolen, it will give full control to your Steem account.
- Backup your password and keep it somewhere safe. Use a password manager like Lastpass, print it on paper and put it in a safe (no kidding). If you forget your password, no one can help you out.
- To login for creating content and curating, use your Private Posting Key
- To make transfers and account operations, use your Private Active Key
- To encrypt and decrypt memos, use your Private Memo Key
Made a worm box last year. Have a pond on our farm and find it easier to get the worms from the worm box then digging for them when the grandkids visit. Boy do they get excited when the hook into one.

Especially excited when they hook 3 huge ones in a row😃👩🌾🤠🍺
Sweet! What type of worms do you use ?
I wonder if you have tried using EM-1 bokashi to speed up the composting process.
I have used them and they work well and it smells nice kinda sweet.
Teraganix is the only place I know you can purchase them I have been using them for more than 7 years with good results. I want to try to build a big bin and use both worms and the Em-1
Great Post thanks for sharing it!
Hello.
I have not used EM-1 but I have used LaB that I spray on the food scraps before covering them with fresh bedding material and it does help.
I’m planning to replace the regular way to make LaB with the whey from making milk kefir that contains LaB and other probiotic bacteria.
Congratulations! This post has been upvoted from the communal account, @minnowsupport, by quochuy [witness] from the Minnow Support Project. It's a witness project run by aggroed, ausbitbank, teamsteem, theprophet0, someguy123, neoxian, followbtcnews, and netuoso. The goal is to help Steemit grow by supporting Minnows. Please find us at the Peace, Abundance, and Liberty Network (PALnet) Discord Channel. It's a completely public and open space to all members of the Steemit community who voluntarily choose to be there.
If you would like to delegate to the Minnow Support Project you can do so by clicking on the following links: 50SP, 100SP, 250SP, 500SP, 1000SP, 5000SP.
Be sure to leave at least 50SP undelegated on your account.
Greetings again Huy=)
I wanted to say thanks for your inspiration from this post! I had some time this weekend to build a CFT system from some of the info you provided. I made mine a little differently but same concept... check out my post here if you have time, let me know what you think!
-Paul
You did very well with the construction. You should use paint or a sharpie to make marks every 6 inches so you know the depth of the content. This will help in the future. You only need to reach 24 inches before starting to harvest, no need for more or it’s just wasting time.
As I asked on your post, have you filled half the barrel with bedding material?
great work!! this is a new concept to me, but one that is coming at the perfect time. we have waaaay too much organic matter for the worms and i think we need some method to cool them off. they've been getting too hot and wet for us to maintain easily. will study this method/your post more! we have a lot on our plate right now, but really love aligning with the worms. resteemed @the-hearth, @mountainjewel's earth-centered curation. thanks @quochuy, glad to see a post from ya! :)
Hey long time no see. You need a larger system where you can mix the fresh organic waste with dry bedding material in order to control moisture and allow enough neutral space for the worms. If you have any questions, give me a shout
Hello again @quochuy, how are you doing my friend?
Wanted to let you know that you been picked up for my weekly curation digest on the topic of sustainability.
Your post will be Upvoted and REsteemed by @msp-curation bot on behalf of MSP.
Thanks for writing awesome content and if you have some time, make sure to check out some of the other posts from this week.
Sustainability Curation Digest #8 🌜 🌽🍑 by Carpedimus - MSP
Keep up with the great work :) and thanks for sharing!
Hey! Thank you for the curation.
I will check the others too.
You are welcome :)
this is amazing. I'm bookmarking this to come back to as a project. I've never been very successful at worm farming and I think it's because it gets a bit hot and I forget about them. I'd really like to give it anohter go, and this is the best set up I've ever seen. Thanks for sharing! Resteeming!
Thanks!
If you often neglect the worms, then a larger system will help you. Even a simple large wooden crate.
Check out my ebook:
http://little.wf/e/worm-bin-setup
Also this one:
http://little.wf/e/10vermistakes
Thanks a ton.. I will check it out. You have superinspired me. I love worms!!!
Very nice Huy. Do you add organic material like dead leaves or grass? Do you have any problems with bugs or flies feeding on the top surface of food scraps?
Here are my bins.
I have been using them for a long time, more than 15 years. They have good ventilation and I have set them up on stone to get them off the ground more. I used to have a real problem with little black flies feeding on my food scraps but now I just always have a layer of leaves, straw or grass on top and I add new material just under it. This keeps the flies out.
My system is not as efficient as yours. I fill one bin 2/3 full and then stop adding to it and let it cook. Then I switch to the other bin. It takes a year to fully decompose the contents and I remove it all at once. I do stir and water the bins regularly.
In this CFT bin, I use mainly kitchen scraps and occasionally horse manure and other garden waste. I don’t mind the bugs, they are part of the ecosystem. As for flies, they are controlled with various method combined:
In your system, if you can get a good C:N ratio and control moisture and air then you should be able to raise the heat and increase the Composting speed a little bit.
Love all the food you have in your cft. I can feed mine like that now that I precompost the greens for a week but even in the winter when I would top feed fresh greens on half the bin it would turn into a hot compost pile. How do you keep BSFL out of your CFT with that large of a screen on the lid? Really informative. I always look forward to seeing some good vermicomposting articles on here.
How thick of a layer of food were you adding? Mine does get warm but not hot.
On the lid is a chicken wire mesh not a screen. But even with a screen then BSF would lay there eggs on the top and side of the lid and the larvae would find their ways in. The only thing that helps a bit is a BSF bin nearby
I would feed a very thin layer on top but it would always get super hot even when it was in the 20's outside. I had to pocket feed just one section of the four but it would still build up good heat. Now that I precompost my greens it stays cooler then the outside does. Really like your CFT build though. I am going to start a few custom built ones to fit certain spaces I have available.
Thank you for all of the great info! It's ultra generous for you to provide the plans and all. Upvoted and followed!
Hello @quochuy, thank you for this great information=) I am in the same situation with some smaller worm bins and was thinking about doing something like this.. I was wondering if you thought a bin like this could survive a cold winter outdoors? If not, do you think it smells more than the smaller bins or would attract bugs positioned indoors?
Hi. It will depends on how cold the winter is, how long for and the size of your bin. You can always add extra insulation and increase the feeding as to generate heat. But there are limits.
As for smell it smell just the same as a small bin as long as you do things well. That is not overfeeding and always add sufficient amount of dry bedding material.
Check the following article for feeding method:
https://steemit.com/vermicomposting/@quochuy/how-to-feed-your-compost-worms
thank you for the information @quochuy. I own a vegetarian food cart and we have a fair amount of weekly scraps to compost. I think a bin like this will help a lot with our waste and hopefully can keep it indoors to compost year round. I'm going to read through your previous posts and look forward to building something like this=)
@guanyu my pleasure, let me know if you have any further questions.
This post has been featured in the @offgrid-online Weekly Review curation: offgrid-online Weekly Review - Issue#2. Thank you for sharing you knowledge and experience :)
Thank you! I appreciate