Repository
Electron GitHub Address
https://github.com/electron/electron
My GitHub Address
https://github.com/pckurdu
Project GitHub Address
https://github.com/pckurdu/Synchronization-Application
What Will I Learn?
- You will learn system tray in electron
- You will learn read file and write file in file system
- You will learn interval service in angularjs
- You will learn Date() function in javascript
- You will learn what is getCurrentWindow used for in electron
Requirements
Requirement Atom Editor
Requirement Electron
Requirement AngularJs CDN
Difficulty
Intermediate
Tutorial Contents
In this tutorial I will show you the process of synchronizing two files using electron.
I will identify two files. The first file will be the modified file, and the second file will be the copy of the first file. I will synchronize the contents of two files with each other at specific time intervals.
To synchronize files, you need to be able to read and write the file contents. I will do file operations using the file system.
I will use the system tray in the electrons because the file synchronization process runs in the background.
Since I need to synchronize at specific intervals, I will use the interval service in AngularJS.
Let's start.
First I explain the files I use in the application.
-package.json // setting file for electron application
-main.js // The main file of the electron application
-index.html // The front-end file of the electron application
-important // the basic file to be synchronized
-copy // backup file to be synchronized
-synchronization.png // to be used for system tray icon
Let's start with coding main.js
const {app,BrowserWindow}=require('electron')
const url=require('url')
const path=require('path')

let win;

function createWindow(){
  win=new BrowserWindow({
    width:900,
    height:700,
    frame:false
  })

  win.loadURL(url.format({
    pathname:path.join(__dirname,'index.html'),
    protocol:'file:',
    slashes:true
  }))

  win.openDevTools()
}

app.on('ready',createWindow)
I made the window frameless to prevent the end user from accidentally closing the window.
I did this by doing frame:false when doing BrowserWindow definition.
We can now set the system tray. Open index.html.
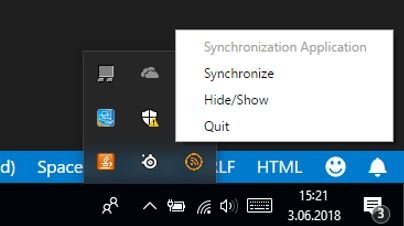
System tray is a menu outside of your application window. On MacOS and Ubuntu, it is located on the top right corner of your screen. On Windows it is on the bottom right corner. We can create menus for our application in system trays using Electron.
To create a system tray we need the Tray module and the Menu module.
const {remote} = require('electron')
const {Tray, Menu} = remote
We must create a tray from the tray module. Next we need to create a menu template for the tray.
         let tray = new Tray('synchronization.png')


         const trayMenuTemplate = [
            {
               label: 'Synchronization Application',
               enabled: false
            },

            {
               label: 'Synchronize',
               click: function () {

               }
            },
            {
               label: 'Hide/Show',
               click: function () {

               }
            },
            {
               label: 'Quit',
               click: function () {

               }
            }
         ]
We will use it as a parameter in the tray module. If we define the icon path, we will use the image for the tray.
We defined 4 operations in the menu. For now, only their names were written and click events were written. We will define each feature in the click function in the future.
We must set this template as a menu.
let trayMenu=Menu.buildFromTemplate(trayMenuTemplate)
When you use the menu tray that comes up, the system tray becomes ready.
tray.setContextMenu(trayMenu)
We can now synchronize the files.
Let's define the file system and file names.
let fs = require('fs')
let importantfilename = 'important'
let copyfilename = 'copy'
I will perform synchronous operations in a function.
function Synchronize()
            {
                let data=fs.readFileSync(importantfilename, 'utf-8')
                console.log(data)

                fs.writeFile(copyfilename,data,(err)=>{
                    if(err)
                        console.log(err)
                })
            }
We read the data in the important file with the readFileSync function.
We keep the resulting data in a variable and write this data to the copy file with the writeFile function so the files will be synchronized when this function is run.
Now let's write the Synchronize function in the click function in the Synchronize named menu.
        {
               label: 'Synchronize',
               click: function () {
                Synchronize()

               }
            },
so the synchronization process will occur when the Synchronize menu is clicked.
We can now use interval service.
With interval service, we can do the operations we want to do at certain time intervals.
We first need angular cdn to use angularjs.
<script src="https://cdnjs.cloudflare.com/ajax/libs/angular.js/1.6.5/angular.min.js"></script>
Define the interval service. It is set to run for 1 second. Before we must do angular and controller adjustments .
var app = angular.module('myApp', []);
            app.controller('myCtrl', function($scope, $interval) {

                $interval(function () {
                    Synchronize()
                    //console.log("Clicked on synchronize")
                 }, 1000);
             });
We used the synchronization method in the interval service. Thus a sync function will operate in 1 second.
for the operation of AngularJS codes we must define it in the body tag.
<body ng-app="myApp" ng-controller="myCtrl">
We can change the time setting. 1000 * 60 * 60 * 24, we can set it to synchronize once a day.
Set the other menu buttons.
The hide / show named menu button needs to hide and show the electron window.
Since we are in the index.html page, we can access the electron window with the getCurrentWindow function.
            {
               label: 'Hide/Show',
               click: function () {
                let win= remote.getCurrentWindow()
                win.isVisible() ? win.hide() : win.show()

               }
            },
Quit named menu button needs to close the application process.
           {
               label: 'Quit',
               click: function () {
               remote.app.quit()

               }
            }
Finally, we may want to know when the last time it was synchronized.
I'll put a p-tag on the screen and let's print the time when this script is synchronized.
<div>
        <p id="p"></p>
</div>
function WriteScreen(){
                var p=document.getElementById("p");
                var date=new Date().toLocaleTimeString("en-US")
                //var date=new Date().toLocaleDateString("en-US")
                p.innerText="Synchronized Date "+date;
            }
With the Date function we can access the current time.
We can edit the synchronized menu button and interval.
           {
               label: 'Synchronize',
               click: function () {
                Synchronize()
                //console.log("Clicked on synchronize")
                WriteScreen()
               }
            },
var app = angular.module('myApp', []);
            app.controller('myCtrl', function($scope, $interval) {

                $interval(function () {
                    Synchronize()
                    //console.log("Clicked on synchronize")
                    WriteScreen()
                 }, 1000*60*60*24);
             });
Conslusion
Now our file synchronization process has become ready for our application. moreover, we can see the last synced date. I thank you for your interest.
Curriculum
https://steemit.com/utopian-io/@pckurdu/what-are-standard-dialogs-in-electron
Proof of Work Done

Thank you for your contribution.
While I liked the content of your contribution, I would still like to extend few advices for your upcoming contributions:
Looking forward to your upcoming tutorials.
Your contribution has been evaluated according to Utopian policies and guidelines, as well as a predefined set of questions pertaining to the category.
To view those questions and the relevant answers related to your post, click here.
Need help? Write a ticket on https://support.utopian.io/.
Chat with us on Discord.
[utopian-moderator]
Hey @portugalcoin
Here's a tip for your valuable feedback! @Utopian-io loves and incentivises informative comments.
Contributing on Utopian
Learn how to contribute on our website.
Want to chat? Join us on Discord https://discord.gg/h52nFrV.
Vote for Utopian Witness!
I always wanted to learn electron programming language. You really made a very nice contribution. I will follow your future contributions because you work hard and understandably in your tutorials.
I'm looking forward to your upcoming tutorials.
Cheers!
Thank you for your comment I hope I can win your liking in future contributions
Hey @pckurdu
Thanks for contributing on Utopian.
We’re already looking forward to your next contribution!
Contributing on Utopian
Learn how to contribute on our website or by watching this tutorial on Youtube.
Want to chat? Join us on Discord https://discord.gg/h52nFrV.
Vote for Utopian Witness!