Repository
Electron GitHub Address
https://github.com/electron/electron
My GitHub Address
https://github.com/pckurdu
This Project GitHub Address
https://github.com/pckurdu/Alarm-Application-Using-node-notifier
What Will I Learn?
- You will learn creating notifications for all platforms in the Electron
- You will learn electron system tray
- You will learn create an electron context menu and to use this menu in tray
- You will learn the setInterval function with jQuery
- You will learn the Date function and its subfunctions getHours () and getMinutes ()
- You will learn electron remote module
Requirements
Difficulty
Intermediate
Tutorial Contents
Notifications are everywhere nowadays. We need notifications on desktop as much as we need in our mobile phones applications. I thought it was an application where we could use notifications in electron applications.
In this tutorial I'll show you how to do an alarm application using electron notifications.
We need to run the desktop application continuously on the backplane because we are going to apply the alarm. We need to set the electron application as the system tray to run the backplane. I will also show you the electron system tray to do this.
Since electron notification only provides API for mac, it can not be used for windows and linux. we will use the node-notifier npm module, which allows us to generate notifications for mac, windows and linux instead.
node-notifer is used in 3 steps in electron applications:
- Downloading node-notifier module to computer
We need to write the following npm command in the application folder for this.
npm install --save node-notifier
The node-notifier will be downloaded into the folder called node_modules when the download is completed.
- Loading node-notifier to use
const notifier = require('node-notifier');
- With the notify function, we can create a simple notification.
notifier.notify('Hello pckurdu');
We created our first notification, when we run the notify function, the notification occurs and a notification appears as shown in the following image.
Now that we've shown how notifications are generated, we can start coding our apps.
We will ask the end user to set a time in our alarm application and remind you of this setting when the current time is equal to the set time.
The desktop application does not need to be run when the time is set. We will get the application back plan and make it both work and not visible.
Let’s coding and enjoying!
The codes necessary for electron implementation are written in main.js file
In main.js
const {app,BrowserWindow}=require('electron')
const url=require('url')
const path=require('path')

let win;

function createWindow(){
  win=new BrowserWindow({
    width:900,
    height:700,
    frame:false
  })

  win.loadURL(url.format({
    pathname:path.join(__dirname,'index.html'),
    protocol:'file:',
    slashes:true
  }))

  win.openDevTools()
}

app.on('ready',createWindow)
First, let's adjust the electron application to the system tray.
In script.js
const {remote} = require('electron')
const {Tray, Menu} = remote

let tray = new Tray('alarm.png')

const trayMenuTemplate = [
           {
              label: 'Set Alarm',
              click: function () {
                let win= remote.getCurrentWindow()
                win.isVisible() ? win.hide() : win.show()

               }
           },
           {
               label: 'Quit',
               click: function () {
               remote.app.quit()

               }
            }

        ]
let trayMenu = Menu.buildFromTemplate(trayMenuTemplate)
tray.setContextMenu(trayMenu)
In the code snippet above I set the application to system tray. Let me explain these codes.
Tray and context menu both must be imported into the application.
const {Tray, Menu} = remote
We can create a tray using the tray function and we can create a tray image by typing the image path for the tray into the tray function .
let tray = new Tray('alarm.png')
We can give the tray commands by creating a menu. in this example I created set alarms and quit menus.
I can access the current application window with getCurrentWindow function.
The window opens or closes when the set alarm menu is clicked, but continues to work to app.
The created menu template is assigned a menu so that you can use tray with this menu.
let trayMenu = Menu.buildFromTemplate(trayMenuTemplate)
tray.setContextMenu(trayMenu)
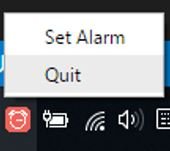
When the application runs, the tray looks like the picture below.
We can now configure the window according to whether we set the application as a tray.
I will split the window into two areas.
I will set the alarm on the left side and on the right side I will write the current time to inform the user.
I use bootstrap to design the application so I'll first install bootstrap.
<link href="https://stackpath.bootstrapcdn.com/bootstrap/4.1.1/css/bootstrap.min.css" rel="stylesheet"
    integrity="sha384-WskhaSGFgHYWDcbwN70/dfYBj47jz9qbsMId/iRN3ewGhXQFZCSftd1LZCfmhktB" crossorigin="anonymous">
I will place two inputs and a button to set the time and send the message to the user on the left.
On the right side one input is enough
In index.html
<div class="container">
        <div class="jumbotron">
            Set Alarm
        </div>
        <div class="row">
        <div class="col-md-6">
                <div class="form-group">
                        <label>Set Alarm:</label>
                        <input type="time" class="form-control" id="alarm" placeholder="Enter Alarm">
                </div>
                <div class="form-group">
                        <label>Message:</label>
                        <input type="text" class="form-control" id="message" placeholder="Enter Message">
                </div>
                <button type="submit" class="btn btn-default" id="btnSet">Set</button>
        </div>
        <div class="col-md-6">
              <p id="pTime" class="alert alert-info"></p>
        </div>
    </div>

    </div>
I'll use the jQuery setInterval function to show the current time.
The setInterval function is used to make a specific job in a specified time period.
To use jQuery we need to download it to the application folder.
Let us now install jquery using the npm command .
npm install --save jquery
We need to define it before using jQuery.
We can define jquery with the command let $ = require ('jquery') and use the $ mark as jquery.
Let's print the current time in ptime id on a input with function.
function getTime()
            {
                var time=new Date();
                $('#pTime').text("Current Time: "+time.toLocaleTimeString());

            }
With the Date () function, we can capture the current date and access the hour, minute, second with localTimeString.
If we use the setInterval function to run this getTime function and set the time to 1000, the setInterval function runs the getTime function in each second.
setInterval("getTime()",1000);
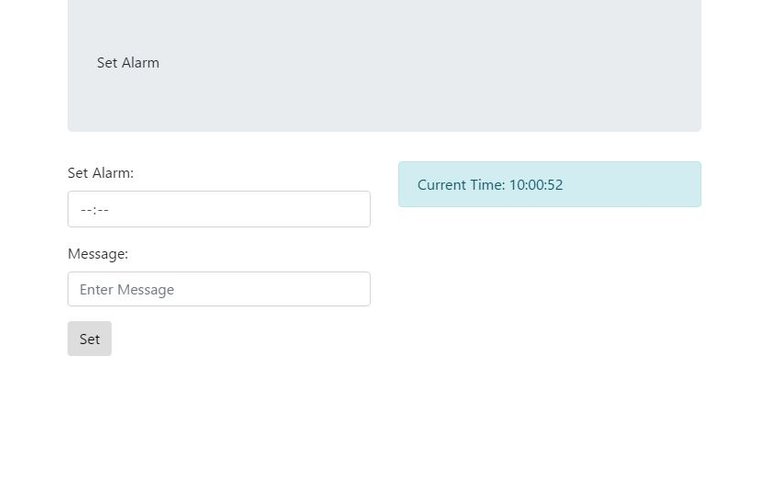
The application window will look like the one below.!
We can now grab the set time when the button is clicked.
With the getHours () and getMinutes () functions, we can access the hour and minute of the time.
We must first separate the set time and check the equality with the current time.
$('#btnSet').on('click', () => {
                    let [hours,minutes]=$('#alarm').val().split(':');
                    let message=$('#message').val();

                    setInterval(function(){
                        var time2=new Date();
                        let hours2=time2.getHours();
                        let minutes2=time2.getMinutes();
                        if(hours==hours2 && minutes==minutes2)
                        // the notify function will come
                     }, 15000);
                })
An hour and minute equality will be checked in 15 seconds.
We can create a notification now.
We must first import the node-notifier.
const notifier = require('node-notifier');
Then we can create the notify function in the setInterval function.
notifier.notify({
                            'title': 'Click to turn off the alarm',
                            'message': message,
                            'icon': 'reminder.png',
                            'sound': 'alarm-clock.wav',
                            'wait': true
                            });
- With the title property, we can set the notification header.
- With the message property, we can set the notification message.
- With the icon property, we can set the notification icon.
- With the sound property, we can play sounds at the time of notification.
- We can wait for notification with wait property.
We can catch the notification time with the notification events next to them, or we can take action when the notification is closed.
notifier.on('click', (obj, options) => {
          console.log('notification clicked')
     });
We can print the console when the notification is clicked.
Conslusion
With this tutorial you can now add audio and pictures that can create your own desktop notifications.
You can also interact with the end user with notification events.
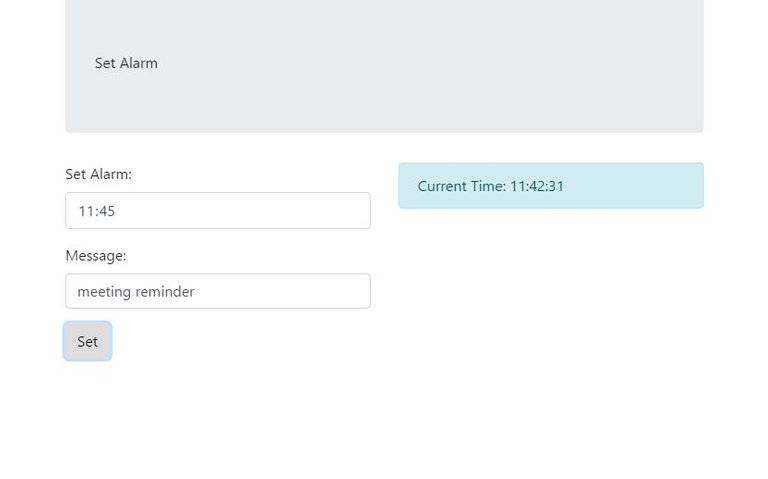
Let's run the application and look at the images.
The alarm was set at 11:45 o'clock here. At 11:45 a notice will be sent every 15 seconds and the set tone will sound and when it is clicked, we set the hours and minutes variables to zero.
notifier.on('click', (obj, options) => {
                                hours=0;
                                minutes=0;
                            });
Thank you for your interest
Curriculum
File Synchronous Operation with Electron
Routing Operations in Electron Application
How to Login Electron Application with Child Windows
Proof of Work Done
https://github.com/pckurdu/Alarm-Application-Using-node-notifier


I thank you for your contribution. Here are my thoughts on your post;
There are some punctuation and structure mistakes in your paragraph. I suggest you to double check your post on spelling, grammar, structure, and punctuation. Having these mistakes makes your post hard to read and understand. A tutorial must be formal and easily understood.
As your concept in the tutorial is already well covered in the documentation, explaining it with an example was unnecessary. So, I suggest you dive into more complex concepts in electron or find another project which hasn't got any or ill documentation.
Titles show what your post is about, so use them wisely. As you're teaching concepts with the examples, it is wise to write them on your titles, so keep doing that. But, positioning them is also essential. The main thing you're teaching in the tutorial is an electron module, not the example. Instead of writing the example to the head of the title, change the position of it. So that way, you can directly catch readers/viewers attention to what you teach instead of the example. I'll give an example of what I meant;
Your contribution has been evaluated according to Utopian policies and guidelines, as well as a predefined set of questions pertaining to the category.
To view those questions and the relevant answers related to your post, click here.
Need help? Write a ticket on https://support.utopian.io/.
Chat with us on Discord.
[utopian-moderator]
Thank you for reviewing and commenting.
Hey @pckurdu
Thanks for contributing on Utopian.
We’re already looking forward to your next contribution!
Contributing on Utopian
Learn how to contribute on our website or by watching this tutorial on Youtube.
Want to chat? Join us on Discord https://discord.gg/h52nFrV.
Vote for Utopian Witness!