What Will I Learn?
This tutorial covers the topics on creating an example of simple addition calculator on GUI by using PyQt5 package in Python.
- First of all you will learn how to setup PyQt5 package by using PyCharm Community Edition 2017.3.4 x64.
- Then, you will learn init() constructor and initUI() method.
- Then you will learn QLineEdit, QPushButton, QVBoxLayout, addWidget, setWindowTitle, setLayout, clicked.connect, sender, setText, QApplication methods which are belongs to PyQt5 package and QtWidgets subpackage.
- Then you will learn how to use clear method.
- Then you will learn why we need to use sys.exit(app.exec_()) command.
- Then you will learn how to create a simple addition calculator by using upside methods on GUI by using PyQt5.
Requirements
- Windows 8 or higher.
- Python 3.6.4.
- PyCharm Community Edition 2017.3.4 x64.
- PyQt5 package (also for this package you need to upgrade your pip version to 9.0.3. We could not apply PyQt5 package for below pip version from 9.0.3).
Difficulty
This tutorial has an indermadiate level.
Tutorial Contents
In this tutorial, we will work on PyQt5 package to create a GUI and create a simple Addition Calculator to show how the PyQt5 package works.
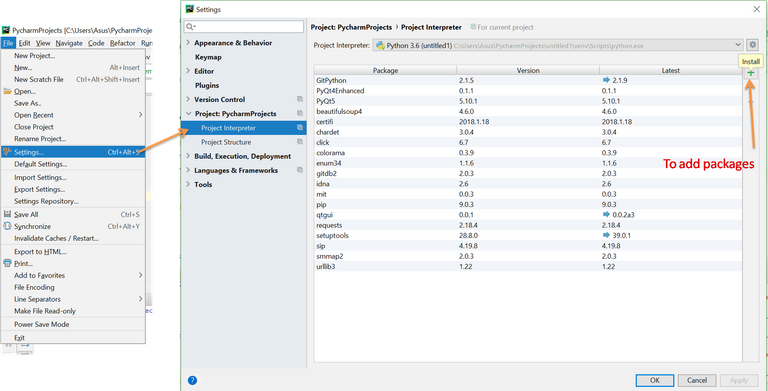
Firstly, to work on PyQt5 package we need to install the package. To install the package we will use PyCharm Community Edition 2017.3.4 x64 and also you can find the installment of the packages in detailed in our previous tutorials.

Then you need to search PyQt5 package and download it:

As we said in the requirements part, you need to upgrade your pip packageversion up to 9.0.3. You can easily upgrade your pip version on PyCharm. If you have lower version it will be shown on the project interpreter settings an by double click it then you can upload it easily:

Ok, let's move to our code to to make a simple Addition Calculator. First of all, we need to import PyQt5 package and from that package we wil use QtWidgets subpackage. For this tutorial we need just QtWidgets so we do not need to import other packages:
import sys
from PyQt5 import QtWidgets
The QtWidgets module contains classes that provide a set of UI elements to create classic desktop-style user interfaces [1].
After importing the packages we will create a class. Our class name is SimpleMathWindow and it inherits from QtWidgets.QWidget.
QWidget has many member functions, but some of them have little direct functionality; for example, QWidget has a font property, but never uses this itself. There are many subclasses which provide real functionality, such as QLabel, QPushButton, QListWidget, and QTabWidget [2].
We used init() constructor method to call inherited class which helps us not to write in each line to call our inherited class. Just we need to write self. it will be enough. Actually, you can change the name of variable self. but when we search websites they always suggest of usage of this as self.. Here is the code:
class SimpleMathWindow(QtWidgets.QWidget):

    def __init__(self):
        super().__init__()
To understand this code is a little bit tricky. We are adding some methods or all of them to self. to get rid of using longer lines and helps to code seen compact. For example, think of animal class, we have subclasses fish, lion etc. Each animal has a method such as eating, hunting, running. We can add these methods to self. function by using upper commands. Also, you can find a good article about this here
The reason we use super() is so that child classes that may be using cooperative multiple inheritance will call the correct next parent class function in the Method Resolution Order (MRO).[3]
For MRO you can find a good article here
self.Interface()
We created an user interface and called it Interface.
Now we can start write main body:
    def Interface(self):
        self.screenDisplay = QtWidgets.QLineEdit()
        self.num0 = QtWidgets.QPushButton('0')
        self.num1 = QtWidgets.QPushButton('1')
        self.num2 = QtWidgets.QPushButton('2')
        self.num3 = QtWidgets.QPushButton('3')
        self.num4 = QtWidgets.QPushButton('4')
        self.num5 = QtWidgets.QPushButton('5')
        self.num6 = QtWidgets.QPushButton('6')
        self.num7 = QtWidgets.QPushButton('7')
        self.num8 = QtWidgets.QPushButton('8')
        self.num9 = QtWidgets.QPushButton('9')
        self.sign0 = QtWidgets.QPushButton('0')
        self.signClear = QtWidgets.QPushButton('Clear')
        self.Calc = 0
We define a function to call self. and we used QLineEdit, QPushButton methods to create buttons and a line to transfer our data which is belongs to buttons. Each of them has a property of self. which is inherited from QtWidgets.QWidget.
        box = QtWidgets.QVBoxLayout()
        box.addWidget(self.num0)
        box.addWidget(self.num1)
        box.addWidget(self.num2)
        box.addWidget(self.num3)
        box.addWidget(self.num4)
        box.addWidget(self.num5)
        box.addWidget(self.num6)
        box.addWidget(self.num7)
        box.addWidget(self.num8)
        box.addWidget(self.num9)
        box.addWidget(self.signClear)
        box.addWidget(self.screenDisplay)
Then we add boxes which belong to button. To do that we used QVBoxLayout which creates vertical box layout. You can create also by manually such as:
    num0.move(330, 64)
    num1.move(0, 0)
    num2.move(110, 0)
    num3.move(220, 0)
    num4.move(0, 32)
    num5.move(110, 32)
    num6.move(220, 32)
    num7.move(0, 64)
    num8.move(110, 64)
    num9.move(220, 64)
    sign0.move(330, 32)
    signClear.move(330, 0)
    screenDisplay.move(0, 96)

    w.setGeometry(100, 100, 440, 128)
You can see the output here:

As you see, you can move your button anywhere by using move method and also you can define your screen size as well by using setGeomety method.
        self.setWindowTitle('Calculator (Addition)')
        self.setLayout(box)
We can give a title for our screen and we defined our layout as a box and it will give like this:

self.num0.clicked.connect(self.button)
        self.num1.clicked.connect(self.button)
        self.num2.clicked.connect(self.button)
        self.num3.clicked.connect(self.button)
        self.num4.clicked.connect(self.button)
        self.num5.clicked.connect(self.button)
        self.num6.clicked.connect(self.button)
        self.num7.clicked.connect(self.button)
        self.num8.clicked.connect(self.button)
        self.num9.clicked.connect(self.button)
        self.signClear.clicked.connect(self.button)
To get an reaction (some variables to show or keep) from the buttons we used clicked.connect. Also we used button method which will be explained in the next part. That will be the transfering the data which belongs to button to a variable and it keeps data to calculation.
    def button(self):
        sender = self.sender()
        if sender.text() == '1':
            self.Calc = self.Calc + (int(sender.text()))
            print(self.Calc)
            self.screenDisplay.setText(str(self.Calc))
        elif sender.text() == '2':
            self.Calc = self.Calc + (int(sender.text()))
            print(self.Calc)
            self.screenDisplay.setText(str(self.Calc))
        elif sender.text() == '3':
            self.Calc = self.Calc + (int(sender.text()))
            print(self.Calc)
            self.screenDisplay.setText(str(self.Calc))
        elif sender.text() == '4':
            self.Calc = self.Calc + (int(sender.text()))
            print(self.Calc)
            self.screenDisplay.setText(str(self.Calc))
        elif sender.text() == '5':
            self.Calc = self.Calc + (int(sender.text()))
            print(self.Calc)
            self.screenDisplay.setText(str(self.Calc))
        elif sender.text() == '6':
            self.Calc = self.Calc + (int(sender.text()))
            print(self.Calc)
            self.screenDisplay.setText(str(self.Calc))
        elif sender.text() == '7':
            self.Calc = self.Calc + (int(sender.text()))
            print(self.Calc)
            self.screenDisplay.setText(str(self.Calc))
        elif sender.text() == '8':
            self.Calc = self.Calc + (int(sender.text()))
            print(self.Calc)
            self.screenDisplay.setText(str(self.Calc))
        elif sender.text() == '9':
            self.Calc = self.Calc + (int(sender.text()))
            print(self.Calc)
            self.screenDisplay.setText(str(self.Calc))
        elif sender.text() == '0':
            self.Calc = self.Calc + (int(sender.text()))
            print(self.Calc)
            self.screenDisplay.setText(str(self.Calc))
        else:
            self.screenDisplay.clear()
            self.Calc = 0
Here is teh calculation part when user push a button. We used sender method to understand that which button is the pressed one. To understand that we just make a simple if statement and if this statment is true then that data is kept by a variable. Also to clear the whole data we used clear method which is belongs to Python itself. clear method is not a function for PyQt5 package.
app = QtWidgets.QApplication(sys.argv)
Window = SimpleMathWindow()
sys.exit(app.exec_())
Here we used QApplication method which is related to initialization, finalization the system. Then we end up our class. In PyQt5 the exec_() method starts the event loops (here our new window) and up to close the loop it will continue. When you do not use this method the window will open and close immediately because the program needs a starting loop and the this loop will maintain until the user cancel the window.
Ok we tried to explain the PyQt5 GUI package. Here is the full code:
import sys
from PyQt5 import QtWidgets


class SimpleMathWindow(QtWidgets.QWidget):

    def __init__(self):
        super().__init__()

        self.Interface()

    def Interface(self):
        self.screenDisplay = QtWidgets.QLineEdit()
        self.num0 = QtWidgets.QPushButton('0')
        self.num1 = QtWidgets.QPushButton('1')
        self.num2 = QtWidgets.QPushButton('2')
        self.num3 = QtWidgets.QPushButton('3')
        self.num4 = QtWidgets.QPushButton('4')
        self.num5 = QtWidgets.QPushButton('5')
        self.num6 = QtWidgets.QPushButton('6')
        self.num7 = QtWidgets.QPushButton('7')
        self.num8 = QtWidgets.QPushButton('8')
        self.num9 = QtWidgets.QPushButton('9')
        self.sign0 = QtWidgets.QPushButton('0')
        self.signClear = QtWidgets.QPushButton('Clear')
        self.Calc = 0

        box = QtWidgets.QVBoxLayout()
        box.addWidget(self.num0)
        box.addWidget(self.num1)
        box.addWidget(self.num2)
        box.addWidget(self.num3)
        box.addWidget(self.num4)
        box.addWidget(self.num5)
        box.addWidget(self.num6)
        box.addWidget(self.num7)
        box.addWidget(self.num8)
        box.addWidget(self.num9)
        box.addWidget(self.signClear)
        box.addWidget(self.screenDisplay)


        self.setWindowTitle('Calculator (Addition)')
        self.setLayout(box)


        self.num0.clicked.connect(self.button)
        self.num1.clicked.connect(self.button)
        self.num2.clicked.connect(self.button)
        self.num3.clicked.connect(self.button)
        self.num4.clicked.connect(self.button)
        self.num5.clicked.connect(self.button)
        self.num6.clicked.connect(self.button)
        self.num7.clicked.connect(self.button)
        self.num8.clicked.connect(self.button)
        self.num9.clicked.connect(self.button)
        self.signClear.clicked.connect(self.button)


        self.show()

    def button(self):
        sender = self.sender()
        if sender.text() == '1':
            self.Calc = self.Calc + (int(sender.text()))
            print(self.Calc)
            self.screenDisplay.setText(str(self.Calc))
        elif sender.text() == '2':
            self.Calc = self.Calc + (int(sender.text()))
            print(self.Calc)
            self.screenDisplay.setText(str(self.Calc))
        elif sender.text() == '3':
            self.Calc = self.Calc + (int(sender.text()))
            print(self.Calc)
            self.screenDisplay.setText(str(self.Calc))
        elif sender.text() == '4':
            self.Calc = self.Calc + (int(sender.text()))
            print(self.Calc)
            self.screenDisplay.setText(str(self.Calc))
        elif sender.text() == '5':
            self.Calc = self.Calc + (int(sender.text()))
            print(self.Calc)
            self.screenDisplay.setText(str(self.Calc))
        elif sender.text() == '6':
            self.Calc = self.Calc + (int(sender.text()))
            print(self.Calc)
            self.screenDisplay.setText(str(self.Calc))
        elif sender.text() == '7':
            self.Calc = self.Calc + (int(sender.text()))
            print(self.Calc)
            self.screenDisplay.setText(str(self.Calc))
        elif sender.text() == '8':
            self.Calc = self.Calc + (int(sender.text()))
            print(self.Calc)
            self.screenDisplay.setText(str(self.Calc))
        elif sender.text() == '9':
            self.Calc = self.Calc + (int(sender.text()))
            print(self.Calc)
            self.screenDisplay.setText(str(self.Calc))
        elif sender.text() == '0':
            self.Calc = self.Calc + (int(sender.text()))
            print(self.Calc)
            self.screenDisplay.setText(str(self.Calc))
        else:
            self.screenDisplay.clear()
            self.Calc = 0


app = QtWidgets.QApplication(sys.argv)
Window = SimpleMathWindow()
sys.exit(app.exec_())
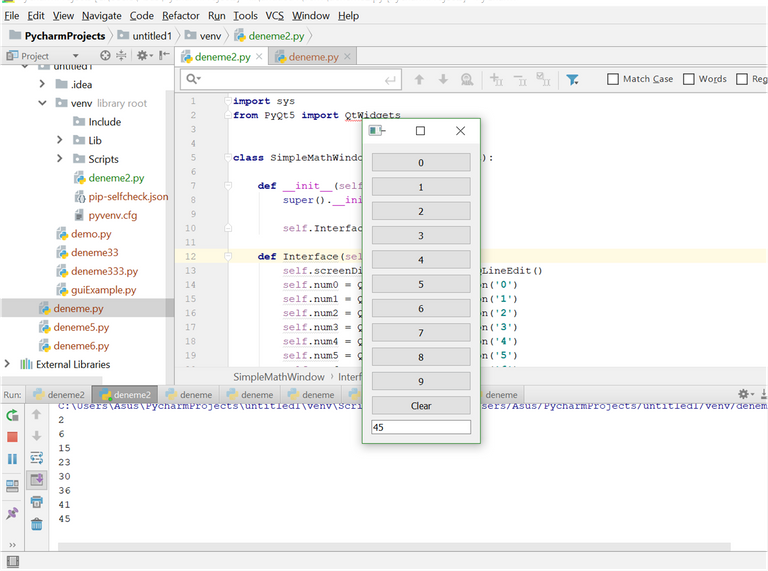
And here is the results:

Here we push 2, 4, 9, 8, 7, 6, 5, 4 and each time it calculates the addition. Up to this point we will create a simple calculatur in the next article.
If there is anything misunderstood or unexplained part you can contact us.
Curriculum
Here is the list of related tutorials we have already shared on Utopian that make up a Course Curriculum
- Example of Steemit Analysis by Using Python #Tutorial-1
- Creating Package and Subpackage in Python #Tutorial-2
Posted on Utopian.io - Rewarding Open Source Contributors
Thank you for the contribution. It has been approved.
You can contact us on Discord.
[utopian-moderator]
Thanks for your support...
Hey @rdvn, I just gave you a tip for your hard work on moderation. Upvote this comment to support the utopian moderators and increase your future rewards!
Hey @onderakcaalan I am @utopian-io. I have just upvoted you!
Achievements
Community-Driven Witness!
I am the first and only Steem Community-Driven Witness. Participate on Discord. Lets GROW TOGETHER!
Up-vote this comment to grow my power and help Open Source contributions like this one. Want to chat? Join me on Discord https://discord.gg/Pc8HG9x
Thanks to @utopian-io community..
Congratulations! This post has been upvoted from the communal account, @minnowsupport, by onderakcaalan from the Minnow Support Project. It's a witness project run by aggroed, ausbitbank, teamsteem, theprophet0, someguy123, neoxian, followbtcnews, and netuoso. The goal is to help Steemit grow by supporting Minnows. Please find us at the Peace, Abundance, and Liberty Network (PALnet) Discord Channel. It's a completely public and open space to all members of the Steemit community who voluntarily choose to be there.
If you would like to delegate to the Minnow Support Project you can do so by clicking on the following links: 50SP, 100SP, 250SP, 500SP, 1000SP, 5000SP.
Be sure to leave at least 50SP undelegated on your account.