
Repository
https://github.com/jcodec/jcodec
What Will I Learn?
- How to create a screen recording application
- How to create a simple GUI with swing for better recording controls
- Replace use of While Loop with Timer and TimerTask to schedule and execute recording task
Requirements
- System Requirements : Java JDK, Eclipse IDE or Netbeans IDE
- OS Support for Java : Windows, macOS, Linux
- Required Knowledge : A fair knowlege of Java
Resources for Java and this tutorial
- Oracle Website: https://www.oracle.com/index.html
- Java Docs:http://www.oracle.com/technetwork/java/javase/documentation/api-jsp-136079.html
- JCodec Library : http://jcodec.org/
- Timer and TimerTask https://www.journaldev.com/1050/java-timer-timertask-example
Difficulty
- Basic
Tutorial Duration 30- 35 Minutes
Tutorial Content
This tutorial series covers how to make a recording software using Java. Below is a recap of Part 1
Part 1 - In the part one of this tutorial series,
- We implemented screen capturing using Java Robot class.
- The captured screens were stored in an ArrayList and then,
- Looped through the List to get the stored frames ready for encoding
- The encoding was achieved using JCodec library
For today's tutorial, we are going to improve on our screen recording program. The list below is how far we will go in today's tutorial.
- Create a simple GUI for Our Recording program
- Implement a Time Counter Class
- Implement Video recording task with the TimerTask Class
- Adjust the Frame Rate
- Implement Stopwatch(Time Count) task with TimerTask Class
With this in mind, lets get started
STEP 1 : Create a simple GUI
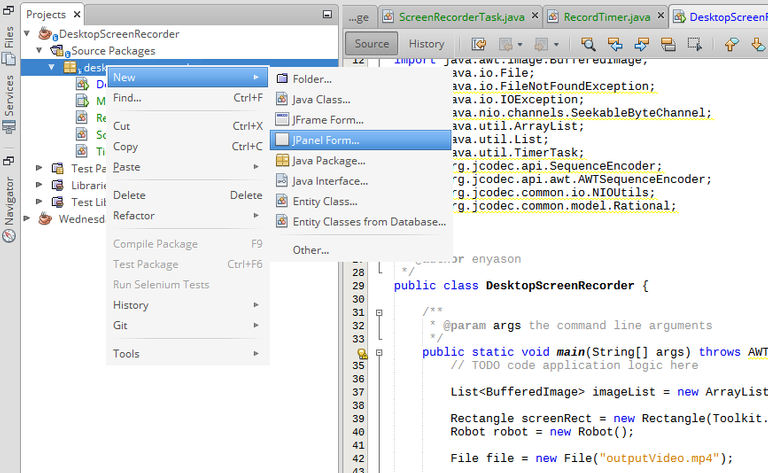
- Add a frame to the project as shown in the image below
- The generated class should look like this
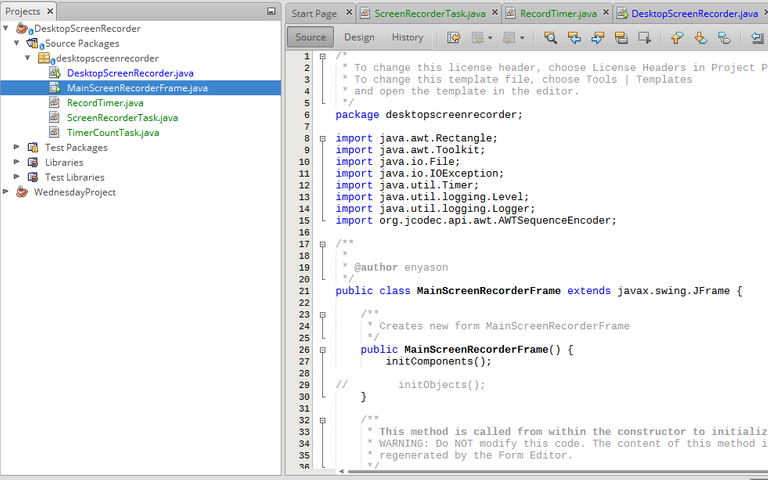
- To design the frame, navigate to the design view by clicking on the design tab. See the red rectangle portion of the image above
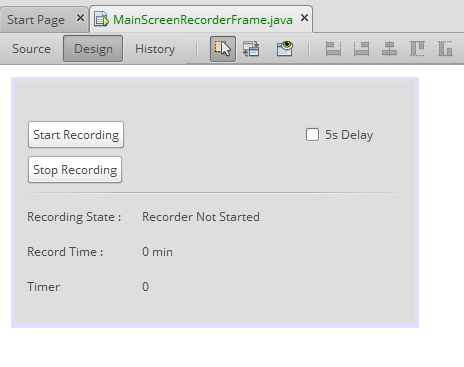
- Layout your frame to look like in the image below. Be free to use your own design if available.
STEP 2 : Implement the time Counter Class
Create a new Class RecordTimer.
This class is more like a utility class that will help us implement a stop watch, returning time time in seconds, minutes or hour
public class RecordTimer {

    // the starting time
    private static long startTime;

    // the stopping time
    private static long stopTime;


    // method to reset the time values
    public static void reset() {

        startTime = 0;
        stopTime = 0;
    }

    // method to start the timer

    public static void start() {
        startTime = System.currentTimeMillis();
    }

    // method to stop the timer
    public static void stop() {
        stopTime = System.currentTimeMillis();

    }

    // method to get the timer duration in miliseconds
    public static long getTimeInMilliSec() {
        return stopTime - startTime;
    }

    // method to get the timer duration in seconds
    public static long getTimeInSec() {
        return (stopTime - startTime)/1000;
    }

// method to get the timer duration in min
    public static long getTimeInMin() {
        return (stopTime - startTime)/(60*1000);
   }
}
Code explanation
- First we declare two variables; startTime and stopTime to hold the current and previous time
- reset method basically clears the timer and reset the variables to 0
- start method set the startTime to current time in milliseconds at any instance
- stop method sets the stopTime to the current time in milliseconds at another instance(future time)
- getTimeInMilliSec() returns the time elapsed in milliseconds
- getTimeInSec() returns the time elapsed in seconds
- getTimeInMin() returns the time elapsed in minutes
STEP 3 : Implement Screen recording task with the TimerTask Class
In the Part 1 of this tutorial, we used a while loop to implement the screen recording. This was done for simplicity sake. To enhance and improve on our program, we will implement the TimerTask and Timer classes for task scheduling.
Create a TimerTask for Screen Recording as shown below
public class ScreenRecorderTask extends TimerTask {

    //declare variables
    AWTSequenceEncoder encoder;

    Robot robot;
    Rectangle screenDimension;

    BufferedImage image;

    public ScreenRecorderTask(AWTSequenceEncoder sequenceEncoder, Rectangle rectangle) {

        encoder = sequenceEncoder;
        screenDimension = rectangle;

        try {
            robot = new Robot();
        } catch (AWTException ex) {

            Logger.getLogger(ScreenRecorderTask.class.getName()).log(Level.SEVERE, null, ex);
        }

        RecordTimer.start();

    }

    @Override
    public void run() {

        System.out.println("encoiding...");
        image = robot.createScreenCapture(screenDimension); //capture current screen

       try {
            encoder.encodeImage(image); //encoding image files
        } catch (IOException ex) {
            Logger.getLogger(ScreenRecorderTask.class.getName()).log(Level.SEVERE, null, ex);
        }
    }
}
Code explanation
- The class ScreenRecorderTask extends the TimerTask Class, which implements the run() method
- The method implemented (i.e run ) is where our screen recording task will be executed.
- We initialize our encoder and our the rectangle from the constructor with its parameters.
- Also in the constructor we are going start the time recorder with RecordTimer.start()
- In the run method, we capture the current desktop screen using the robot class
- Then we encode the image with the encoder.
- This method runs continuously until the task is canceled.
STEP 3 : Implement Time Count task with the TimerTask Class
To keep count of the time used for the entire process, and have it display to the user, we are going schedule a task with the timer class. Lets implement a class as shown below
public class TimerCountTask extends TimerTask{

    //declare variables
    JLabel label;
    int timeInSec = 0;

    public TimerCountTask(JLabel jLabel) {
        label = jLabel; // initialize the label
    }

    @Override
    public void run() {
        label.setText(""+timeInSec+"s"); // set the label text to current count value

        timeInSec++; //increment count by one
    }

}
Code explanation
- Firstly we declare the variables needed
- We initialize the label in the constructor from its parameter
- In the override method, we set the text of the label to the current value of the counter variable (timeInSec) and then increment the counter
STEP 4 : Handle Button Press for the Start Recording Button
On press of this button, we want to initialize our sequence encoder and then schedule the screen recording task.All this happens in this class : MainScreenRecorderFrame.java. Now Lets walk through the code .
 private void buttonStartRecordingActionPerformed(java.awt.event.ActionEvent evt) {
        initObjects("record3");// initialize encoder object
        isRecording = true; // set recording state to true

        int delay = 1000 / 24; // delay for the task

        RecordTimer.reset(); // reset stoptime and starttime to 0

        //initialize timer for recording
        timerRecord = new Timer("Thread TimerRecord");
        //initialize timer for counting
        timerCount = new Timer("Thread TimerCount");

        //create a new Task for screen recroding
        recorderTask = new ScreenRecorderTask(encoder, rectangle);

        //create a new task for time counting
        countTask = new TimerCountTask(labelTimer);

        //schedule task for screen recording and time counting
        timerRecord.scheduleAtFixedRate(recorderTask, 0, delay);
        timerCount.scheduleAtFixedRate(countTask, 0, 1000);

        recordStateLabel.setText("recorder Started...");


    }
Code explanation
Basically what happens in this method is:
- We create instances of ScreenRecorderTask and TimerCountTask
- Create instances of timerRecord and timerCount
- schedule the ScreenRecorderTask and TimerCountTask using the timers
STEP 5 : Handle Button Press for the Stop Recording Button
private void buttonStopRecordingActionPerformed(java.awt.event.ActionEvent evt) {


        if (isRecording) {

            RecordTimer.stop(); //set the stop time

            recordStateLabel.setText("Recording Stopped");
            recordTimeLabel.setText("" + RecordTimer.getTimeInSec());

            //cancle the timer for time counting here
            timerCount.cancel();
            timerCount.purge();

            // stop the timer from executing the task here
            timerRecord.cancel();
            timerRecord.purge();

            //cancel the tasks scheduled
            recorderTask.cancel();
            countTask.cancel();

            try {

                encoder.finish();// finish  encoding
                System.out.println("encoding finish " + (RecordTimer.getTimeInSec()) + "s");
                recordStateLabel.setText("recorder Stopped...");
                recordTimeLabel.setText(""+RecordTimer.getTimeInMin()+"min");

            } catch (IOException ex) {
                Logger.getLogger(MainScreenRecorderFrame.class.getName()).log(Level.SEVERE, null, ex);
            }

        }
 isRecording = false; //set recording state to false

    }
Code explantion
Basically what hapens in this method is that:
- First we check if the recorder is running
- If true, the codes in the IF block are executed to cancel all created timers and tasks
STEP 6 : Adjust The Frame Rate For the Encoder
In the Part 1 of this tutorial series, the output video was a bit too fast. So after playing around with the frame per second parameter of the sequence encoder i finally came up with a value (24/4). See the code below for the implementation.
encoder = AWTSequenceEncoder.createSequenceEncoder(f, 24 / 4);
STEP 7 : Test The Software
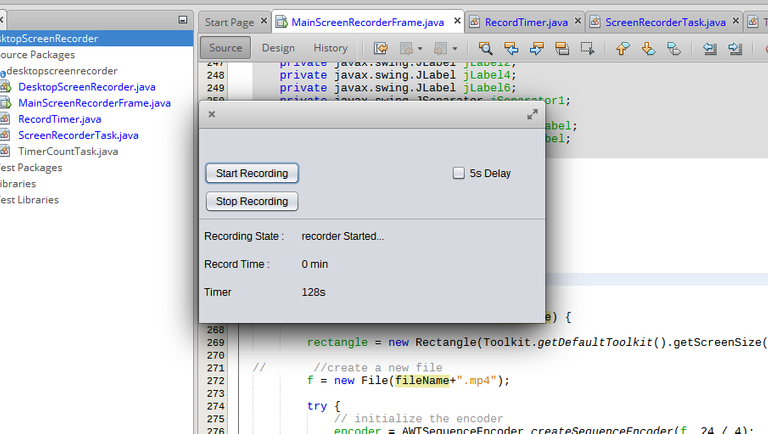
With all steps taken, our software should work as shown in the images below
Recorder running
Recorder Stopped
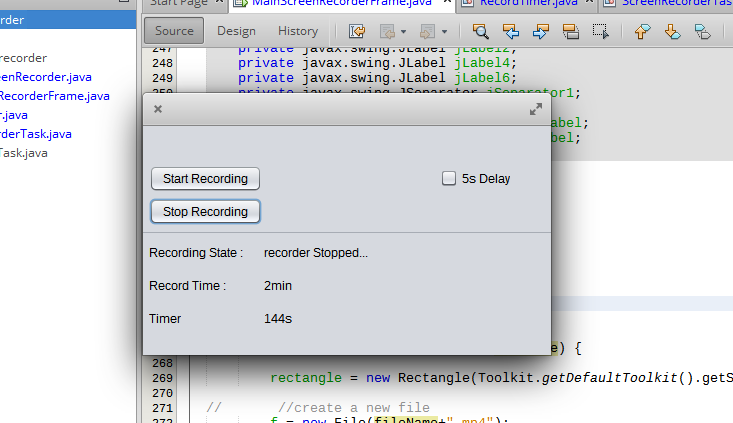
The Output of a Test Run gave the video below
Curriculum
Proof of Work
The complete source code can be found on gitHub
Thank you for your contribution.
I'm waiting for more tutorials!
Your contribution has been evaluated according to Utopian policies and guidelines, as well as a predefined set of questions pertaining to the category.
To view those questions and the relevant answers related to your post, click here.
Need help? Write a ticket on https://support.utopian.io/.
Chat with us on Discord.
[utopian-moderator]
Thank you for your review, @portugalcoin!
So far this week you've reviewed 23 contributions. Keep up the good work!
Thanks @portugalcoin for moderating my contribution.
Hey @ideba
Thanks for contributing on Utopian.
We’re already looking forward to your next contribution!
Want to chat? Join us on Discord https://discord.gg/h52nFrV.
Vote for Utopian Witness!
Hi @ideba! We are @steem-ua, a new Steem dApp, computing UserAuthority for all accounts on Steem. We are currently in test modus upvoting quality Utopian-io contributions! Nice work!
Thanks @steem-ua