
Source: locust.io
In this Internet age, end users demand software that is fast, fluid, and robust. Releasing software with so many bugs into it may affect the user's experience and will certainly make a bad impression on yourself as a developer. Any project that is implemented without the proper amount of testing performed thoroughly would lead to failure. Testing is very important and is an ongoing process. It happens during development, it happens in the testing phase at the hands of the QA, and it happens just prior to production and it happens post-production. Before we proceed with the UI, we need to touch on testing first. In order to become a great developer, we need to have the habit of performing tests. There are different kinds of tests. Today well just focus on unit testing and load testing (using locust.io).
What Will I Learn?
At the end of this tutorial, you are going to be able to:
- Define what is testing
- Perform unit testing using Django
- Define what is load testing
- Perform load testing using locust.io
Requirements
- Python (latest version)
- Pip (included in the Python installer)
- Any text editor or Integrated Development Environment (IDE) of your choice
Difficulty
We will be discussing testing testing. This tutorial is intermediate in level. You should already know how to code in python and what classes are and how it can be inherited. This tutorial assumes that you were following this tutorial from the very start. If you have not, check the curriculum below to go to the beginning of this lesson.
Tutorial Contents
What are tests exactly and why are they important?
Testing is the systematic process of looking for error/s in a software application or program so that the application functions accordingly to what was planned.
There are different kinds of tests centered on the different aspects of software. Below are some of the many types of tests we can perform.
Unit Testing
Unit testing is the testing of an individual unit or group of related units. It is often done by the programmer to test is doing what is giving the expected result.
Integration Testing
Integration testing is testing in which a group of functions or units are combined to produce a result.
Functional Testing
Functional testing is the testing to ensure that the specified functionality required in the system requirements works. It falls under the class of black box testing.
System Testing
System testing is the testing to ensure that by putting the software in different environments (e.g., Operating Systems) it still works. System testing is done with full system implementation and environment. It falls under the class of black box testing.
Stress Testing
Stress testing is the testing to evaluate how system behaves under unfavorable conditions. Testing is conducted at beyond limits of the specifications. It falls under the class of black box testing.
Performance Testing
Performance testing is the testing to assess the speed and effectiveness of the system and to make sure it is generating results within a specified time as in performance requirements. It falls under the class of black box testing.
Usability Testing
Usability testing is performed to the perspective of the client, to evaluate how the GUI is user-friendly? How easily can the client learn? After learning how to use, how proficiently can the client perform? How pleasing is it to use its design? This falls under the class of black box testing.
Acceptance Testing
Acceptance testing is often done by the customer to ensure that the delivered product meets the requirements and works as the customer expected. It falls under the class of black box testing.
Regression Testing
Regression testing is the testing after modification of a system, component, or a group of related units to ensure that the modification is working correctly and is not damaging or imposing other modules to produce unexpected results. It falls under the class of black box testing.
Beta Testing
Beta testing is the testing which is done by end users, a team outside development, or publicly releasing full pre-version of the product which is known as beta version. The aim of beta testing is to cover unexpected errors. It falls under the class of black box testing.
Source: codeproject.net
In programming, one should have a test first mentality. It is the most ideal to write a test before you write code. It will save you more time and will allow you to be more productive by identifying your mistakes before proceeding.
How can I perform tests using Django?
To create a test, go to the app directory and create a tests.py file. After, paste the code below.
from django.test import TestCase
from django.contrib.auth.models import User
from app.models import ToDo

class ToDoTestCase(TestCase):
    def setUp(self):
        user = User.objects.first()
        ToDo.objects.create(created_by=user, text='Go Swimming', done=True)
        ToDo.objects.create(created_by=user, text='Go Dancing', done=False)

    def test_go_swimming(self):
        """Test if we went swimming"""
        to_do = ToDo.objects.get(text="Go Swimming")
        self.assertEqual(to_do.done, True)

    def test_go_dacing(self):
        """Test if we went dancing"""
        to_do = ToDo.objects.get(text="Go Dancing")
        self.assertEqual(to_do.done, False)
The snippet above tests the ability of the ToDo model to create database entries. Before each method of the ToDoTestCase class is invoked, the setUp method is called first. In this method, you need to setup the data you want to store the database before you perform the tests. The 2 methods test_go_swimming and test_go_dancing tries to assert if what you created in the setup method was actually saved by the function. If all went well, you will be able to see a result like the one below. To run the stest enter the activate virtualenv, launch the command line and enter the command below.
Command:
$ python manage.py test
You should receive a result like this.
Creating test database for alias 'default'...
System check identified no issues (0 silenced).
..
----------------------------------------------------------------------
Ran 2 tests in 0.000s

OK
Destroying test database for alias 'default'...
Receving an OK result means all tests have passed. Now lets, change the code and intentionally create a failing test case.
from django.test import TestCase
from django.contrib.auth.models import User
from app.models import ToDo

class ToDoTestCase(TestCase):
    def setUp(self):
        user = User.objects.first()
        ToDo.objects.create(created_by=user, text='Go Swimming', done=True)
        ToDo.objects.create(created_by=user, text='Go Dancing', done=False)

    def test_go_swimming(self):
        """Test if we went swimming"""
        to_do = ToDo.objects.get(text="Go Swimming")
        self.assertNotEqual(to_do.done, True)

    def test_go_dacing(self):
        """Test if we went dancing"""
        to_do = ToDo.objects.get(text="Go Dancing")
        self.assertNotEqual(to_do.done, False)
If you noticed, we changed the assertEqual method to assertNotEqual. This means we will assume that we did not go swimming and we went dancing (which are false). Entering the test command again would result to something like below.
Creating test database for alias 'default'...
System check identified no issues (0 silenced).
FF
======================================================================
FAIL: test_go_dacing (app.test.ToDoTestCase)
Animals that can speak are correctly identified
----------------------------------------------------------------------
Traceback (most recent call last):
  File "D:\new_proj\app\test.py", line 19, in test_go_dacing
    self.assertNotEqual(to_do.done, False)
AssertionError: False == False

======================================================================
FAIL: test_go_swimming (app.test.ToDoTestCase)
Animals that can speak are correctly identified
----------------------------------------------------------------------
Traceback (most recent call last):
  File "D:\new_proj\app\test.py", line 14, in test_go_swimming
    self.assertNotEqual(to_do.done, True)
AssertionError: True == True

----------------------------------------------------------------------
Ran 2 tests in 0.000s

FAILED (failures=2)
Destroying test database for alias 'default'...
Tests failed because it did not do what it was supposed to do. From the command line, we can trace where did it go wrong and correct our code from there.
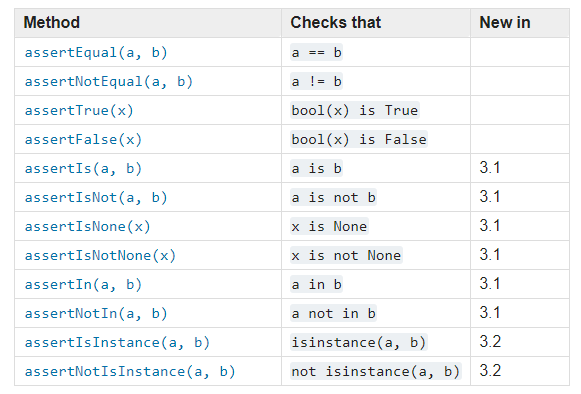
There are also different kinds of assertions. We can mix and match different assertions with the type of test cases that we want. Please refer below.
Source: docs.python.org
Each different function needs different testing strategies. Visit other resources to be guided on how to create test cases properly.
What is load testing?
As the best known and most commonly conducted type of performance testing, load testing involves applying ordinary stress to a software application or IT system to see if it can perform as intended under normal conditions. It is related to its bigger, more brutal cousin, stress testing, but load testing ensures that a given function, program, or system can simply handle what it’s designed to handle, whereas stress testing is about overloading things until they break, applying unrealistic or unlikely load scenarios.
Source: smartbear.com
In short, load testing tries to simulate hundred if not thousands of users using at the same time and check if the server can handle the load. For now, our app only has a 'to do' API. As we go along, we will create more complex API which will really test our servers.
What is locust.io and how can I perform tests using it?
Locust is an easy-to-use, distributed, user load testing tool. It is intended for load-testing web sites (or other systems) and figuring out how many concurrent users a system can handle.
Source: docs.locust.io
Since locust.io is open source, we can leverage it to test our Heroku API server.
To install, launch the command line and enter the command below.
$ pip install locustio
After that, we create a folder outside of our project. Name the folder to anything you want and create a locustfile.py file. After creating, copy and paste the code below.
from locust import HttpLocust, TaskSet
import json

def create_to_do(l):
    data = {
        "text": "Do something new",
        "done": "false",
        "created_by": 1,
        "updated_by": 1
    }
    l.client.post("/api/to-do/", data=json.dumps(data))

def get_to_do(l):
    l.client.get("/api/to-do")

class UserBehavior(TaskSet):
    tasks = {get_to_do: 2, create_to_do: 1}

    def on_start(self):
        self.client.headers['Content-Type'] = "application/json"
        self.client.headers['Authorization'] = "Bearer nonadmintoken123"

class WebsiteUser(HttpLocust):
    task_set = UserBehavior
    min_wait = 5000
    max_wait = 9000
The code above tries to simulate what a typical user would do. We create 2 types of user actions. The first one is create_to_do wherein the user creates a new task by sending a POST request to the server. The second one is get_to_do wherein the user fetches his or her to-dos from the server via a GET request. The min_wait and max_wait variable represents the amount of time before a user creates a new action. The min_wait variable represents the minimum time in milliseconds before the user performs another action. The max_wait represents the maximum limit. In the UserBehavior class the tasks variable represents the tasks the user will make and the weight of which it will perform it. The bigger the weight, the higher the frequency.
Again, using what we've learn from the previous tutorials, we can create different types of user actions based on the different HTTP requests. Hit save and then launch the command line from where the locustfile.py was created and enter the command below.
$ locust --host=<Your Heroku URL here>
Take note to replace '' with the URL from your Heroku server. If all went well, you should see something like the one below.
[2018-02-09 09:55:40,427] DESKTOP-GCMSG2P/INFO/locust.main: Starting web monitor at *:8089
[2018-02-09 09:55:40,429] DESKTOP-GCMSG2P/INFO/locust.main: Starting Locust 0.8
Open a browser and go to http://localhost:8089/. You should see something like the one below.
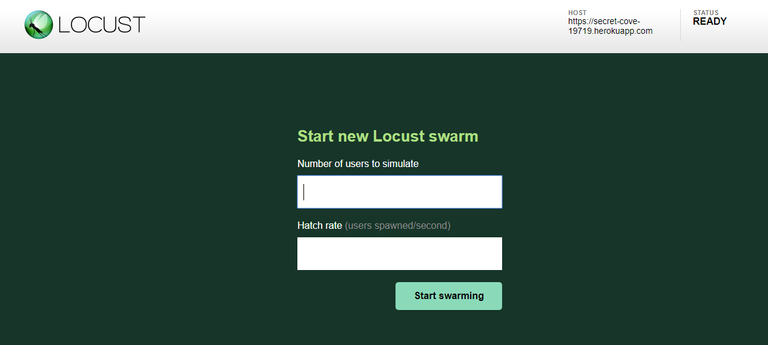
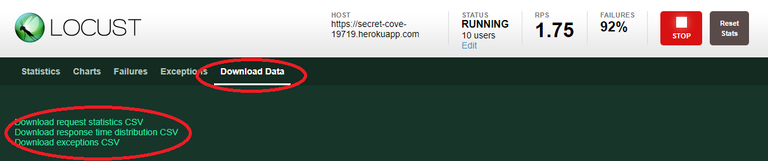
In the interface, we can simulate the number of users we want to continually use our app (Numbe of users to simulate) and the number of users that will appear every second (Hatch Rate). To start, enter any quantity you like and start swarming. You should see results like the one below.

You can gather a lot of data from the web interface. You can check the number of failures in the requests made. The average response time of your server and many more. Locust.io also provides CSV files for the test results. To do this, just go to the download data tab and choose from the three options. The data from these CSVs can be imported to excel and can provide useful data for further analysis.
Curriculum
This is part 8 of the ongoing tutorial of building a single page application by using both Django and ReactJS. Next time, we will now do the part of the app that the end users will see. We will officially start building our UI using ReactJS.
Part 1: Installing Django with Virtual Env
Part 2: Django Deployment to Heroku Cloud
Part 3: Using the Django Admin + PostgreSQL
Part 4: Handling of Static Assets in Heroku
Part 5: Implementing RESTful API
Part 6: Implementing OAuth2.0 with Django Oauth Toolkit
Part 7: Authorization via Permissions / Django REST Swagger
Posted on Utopian.io - Rewarding Open Source Contributors
Thank you for the contribution. It has been approved.
You can contact us on Discord.
[utopian-moderator]
Hey @rufans, I just gave you a tip for your hard work on moderation. Upvote this comment to support the utopian moderators and increase your future rewards!
@burdagay, I like your contribution to open source project, so I upvote to support you.
Your contribution cannot be approved because it does not follow the Utopian Rules.
You can contact us on Discord.
[utopian-moderator]
Hi there. Yes, you are correct in saying that the Django related code was from the Django Documentation Page but this tutorial was not solely focused on Django. It was more focused on load testing using locust.io. The repository I've pointed to was also locust.io. I also related all the content to the project I've been working on. I just added Django testing to have a basic overview of testing using Django since the topic was about testing. Can this not be reconsidered?
Thank you for the contribution. It has been approved.
Awesome! Thank you.
Hey @burdagay I am @utopian-io. I have just upvoted you!
Achievements
Suggestions
Get Noticed!
Community-Driven Witness!
I am the first and only Steem Community-Driven Witness. Participate on Discord. Lets GROW TOGETHER!
Up-vote this comment to grow my power and help Open Source contributions like this one. Want to chat? Join me on Discord https://discord.gg/Pc8HG9x