What Will I Learn?
Write here briefly the details of what the user is going to learn in a bullet list.
- You will learn about HandsonTable UI spreadsheet component
- You will learn how to integrate a spreadsheet in your web application
- You will learn how to setup a simple web page for the spreadsheet integration
Requirements
- You must have basic knowledge on how to create a website
- You must have basic JavaScript knowledge
- You need Text Editor, browser and internet connection to download resources if necessary
Difficulty
- Intermediate
Tutorial Contents
Introduction
HandsonTable Community Edition is an open source JavaScript Spreadsheet used in producing spreadsheet component for web applications. HandsonTable is a JavaScript and HTML 5 User Interface (UI) component that you can integrate in your applications. It supports Vue, React, Angula and Polymer.
For this tutorial, we are going to design a simple web page and integrate the HandsonTable spreadsheet using HTML5 and JavaScript. There are many ways where HandsonTable can be such as editing a database, analyzing sales or financial reports, data management etc.
There are various features that HandsonTable provide such as sorting of data, validating data, conditional formatting, freezing, resizing and moving rows/columns, adding comments to cells etc. for this tutorial, we are going to make use of data sorting, resizing rows/columns, adding columns and dragging cells to populate data.

STEPS
Setting up Web page
Follow the steps below carefully to achieve the desired goal;
- Launch your text editor and create a file named “index.html”.
- Declare the standard HTML5 elements used in defining a document;
 <!doctype html>
<html lang="en">
  <head>
    <meta charset="utf-8">
    <meta name="viewport" content="width=device-width, initial-scale=1, shrink-to-fit=no">
    <meta name="description" content="">
    <meta name="author" content="">
    <title>Utopian-io – HandsonTable Spreadsheet Web Component</title>
  </head>
<body>

</body>
</html>
- We will use bootstrap’s HTML/CSS framework to set up the web page. I downloaded and included it locally. Visit the website https://getbootstrap.com/ to also download or use their CDN links.
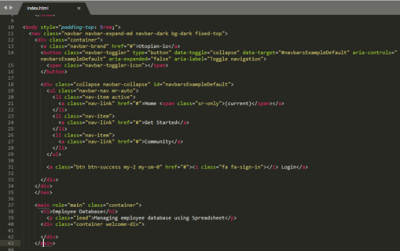
- We add the following piece of code from the picture below within the body tag to setup the navigational menu and main body of the web page.

Preview of the page in browser

Integrating HandsonTable Spreadsheet
We are now going to integrate the HandsonTable Spreadsheet into our web page. First, head over to the HandsonTable Community Edition website https://handsontable.com/community-download to download it. We have the option of downloading the Zip Archive, installation through npm or including the CDN links directly into our web page.
For this tutorial, we are going to use the CDN links. The CSS and JS links are;
CSS:
<link href="https://cdnjs.cloudflare.com/ajax/libs/handsontable/0.35.1/handsontable.min.css" rel="stylesheet">
JS:
<script type="text/javascript" src="https://cdnjs.cloudflare.com/ajax/libs/handsontable/0.35.1/handsontable.min.js"></script>
Copy the CSS CDN link and paste within the <head> tag after bootstrap and the JS after the bootstrap JS file at the bottom of the page.


To add the spreadsheet, we need to create a <div> tag within the main body of the page.
<div id="employee">
</div>

Add the following JavaScript code to initialize the spreadsheet;
<script type="text/javascript">
var data = [{
  "first_name": "Martita",
  "last_name": "Nutkins",
  "email": "mnutkins0@nifty.com",
  "gender": "Female",
  "ip_address": "80.215.109.49"
}, {
  "first_name": "Coletta",
  "last_name": "Carnall",
  "email": "ccarnall1@umich.edu",
  "gender": "Female",
  "ip_address": "81.195.227.229"
} ]
</script>
The piece of code above is JSON Data. The var data stores the list of employees. The JSON data was generated using https://www.mockaroo.com/. A tool used in generating mockup data.
var container = document.getElementById(employee);
        var hot = new Handsontable(container, {
          data: data,
          rowHeaders: true,
          colHeaders: false,
          colHeaders: ['Firts name', 'Last name', 'email', 'Gender', 'IP Address'],
          columnSorting: true,
          sortIndicator: true
        });

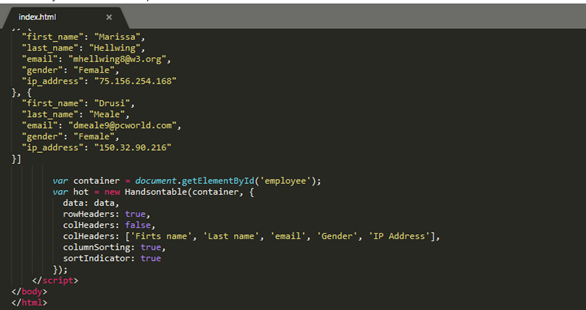
Add the following piece of code above after var data is enclosed to initialize and configure the spreadsheet;
Meaning of the HandsonTable options we used;
- data: data, = reference the variable data we store the JSON objects
- rowHeaders: true, = to display a counter for the rows populated
- colHeaders: false, = this disables the default spreadsheet column header of ‘A-Z’
- columnSorting: true, = this enables data sorting
- sortIndicator = true = this displays an arrow on a sorted column
For more options check the handsonTable Spreadsheet documentation
It’s working…

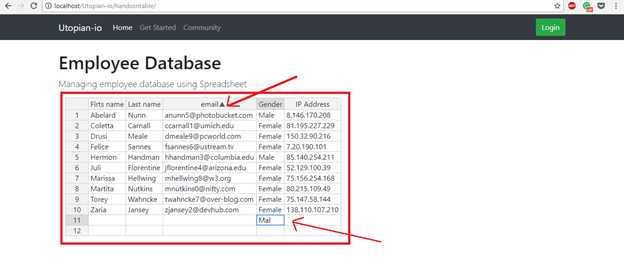
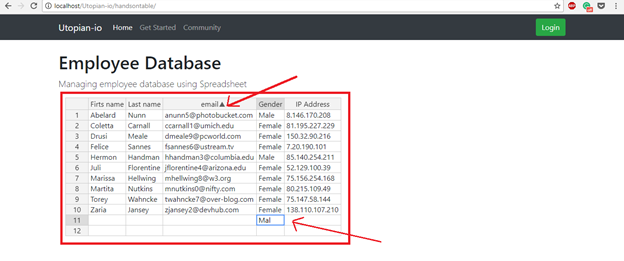
As you can see the arrows highlighting the key areas we worked on. The top arrow shows the email was sorted and displaying the sortIndicator. The second arrow shows that two rows were drag and data is being inputted into a cell.
Source Code
The full source code;
<!DOCTYPE html>
<html lang="en">
  <head>
      <meta charset="utf-8">
      <title>Utopian-io | How to create a Spreadsheet component using HTML and JavaScript</title>
      <link href="css/bootstrap.min.css" rel="stylesheet">
      <link href="https://cdnjs.cloudflare.com/ajax/libs/handsontable/0.35.1/handsontable.min.css" rel="stylesheet">
  </head>
<body style="padding-top: 5rem;">
  <nav class="navbar navbar-expand-md navbar-dark bg-dark fixed-top">
    <div class="container">
      <a class="navbar-brand" href="#">Utopian-io</a>
      <button class="navbar-toggler" type="button" data-toggle="collapse" data-target="#navbarsExampleDefault" aria-controls="navbarsExampleDefault" aria-expanded="false" aria-label="Toggle navigation">
        <span class="navbar-toggler-icon"></span>
      </button>
      <div class="collapse navbar-collapse" id="navbarsExampleDefault">
        <ul class="navbar-nav mr-auto">
          <li class="nav-item active">
            <a class="nav-link" href="#">Home <span class="sr-only">(current)</span></a>
          </li>
          <li class="nav-item">
            <a class="nav-link" href="#">Get Started</a>
          </li>
          <li class="nav-item">
            <a class="nav-link" href="#">Community</a>
          </li>
        </ul>
        <a class="btn btn-success my-2 my-sm-0" href="#"><i class="fa fa-sign-in"></i> Login</a>
      </div>
    </div>
    </nav>
    <main role="main" class="container">
      <h1>Employee Database</h1>
        <p class="lead">Managing employee database using Spreadsheet</p>
      <div class="container welcome-div">
           <div id="employee">
           </div>
      </div>
    </main>
    <script src="js/jquery.min.js"></script>
    <script src="js/bootstrap.min.js"></script>
    <script type="text/javascript" src="https://cdnjs.cloudflare.com/ajax/libs/handsontable/0.35.1/handsontable.min.js"></script>
    <script type="text/javascript">
          var data = [{
          "first_name": "Martita",
          "last_name": "Nutkins",
          "email": "mnutkins0@nifty.com",
          "gender": "Female",
          "ip_address": "80.215.109.49"
        }, {
          "first_name": "Coletta",
          "last_name": "Carnall",
          "email": "ccarnall1@umich.edu",
          "gender": "Female",
          "ip_address": "81.195.227.229"
        }, {
          "first_name": "Drusi",
          "last_name": "Meale",
          "email": "dmeale9@pcworld.com",
          "gender": "Female",
          "ip_address": "150.32.90.216"
        }]
        var container = document.getElementById('employee');
        var hot = new Handsontable(container, {
          data: data,
          rowHeaders: true,
          colHeaders: false,
          colHeaders: ['Firts name', 'Last name', 'email', 'Gender', 'IP Address'],
          columnSorting: true,
          sortIndicator: true
        });
    </script>
</body>
</html>
Curriculum
Follow more of my tutorials below;
- https://utopian.io/utopian-io/@aliyu-s/how-to-add-a-content-management-system-cms-to-an-existing-website
- https://utopian.io/utopian-io/@aliyu-s/how-to-create-a-quick-and-beautiful-landing-page-using-bootstrap-4
- https://utopian.io/utopian-io/@aliyu-s/how-to-integrate-a-rich-wysiwyg-text-editor-in-a-website
Posted on Utopian.io - Rewarding Open Source Contributors
Thank you for the contribution. It has been approved.
You can contact us on Discord.
[utopian-moderator]
Hey @roj, I just gave you a tip for your hard work on moderation. Upvote this comment to support the utopian moderators and increase your future rewards!
Thank you!
@aliyu-s, Approve is not my ability, but I can upvote you.
This is no doubt a valid contribution, can only imagine how much time you put into this. Good job 👍
Thank you @adiveharry
Hey @aliyu-s I am @utopian-io. I have just upvoted you!
Achievements
Suggestions
Get Noticed!
Community-Driven Witness!
I am the first and only Steem Community-Driven Witness. Participate on Discord. Lets GROW TOGETHER!
Up-vote this comment to grow my power and help Open Source contributions like this one. Want to chat? Join me on Discord https://discord.gg/Pc8HG9x