Welcome to creating your very own comic book! Have you had an idea for a comic book sitting in your brain, but you always say "I'll do it later, when I have more time." or "I have to wait until my illustration skills are better." What you need to do is start now. I promise, if you work an office job, you have time. And I promise, the only way your skills are going to get better is from practice and creating a comic book is an immense amount of practice for you! So start now!
I have been doing this for about three years now, so this is my cumulative knowledge from trial and error that I want to pass down to you.
Reminder; this is just my way of doing this. This is by no means a professional way or a “right” way to do it. But it works for me because I value organization, being thrifty, and time management. I developed this system because I can work on most of these steps on the bus or during lulls at the office. Plus, most of my supplies are cheap and accessible. If you’re looking for a guide that explains proper page sizes or bleed or margins or what pens and paper are best to use, this is not it. This is how to start right now and get progress without waiting on any excuses about being "proper" or "good enough". You are good enough already!
You will need:
-A reliable ball point pen, bonus if you have no idea where it came from. If you want to be spendy, I really enjoy Frixion pens because they make clean thin lines, plus they're erasable.
-Mini sticky notes, like the ones used for marking pages in books
-Large 3x5 inch sticky notes (Your office might have these in the supply drawer because they're a bad size for offices, but they're a great size for sketches)
-A notebook that can fit four 3x5 sticky notes in one page clearly
-Nice drawing paper for the final pages, but a kind that you can put through your printer (No Bristol, sorry. I haven’t figured out how to make that work yet.)
-Pencils, pens, markers, or whatever you want to use to create your final pages
-A scanner (Or a scanning app like CamScanner for your phone, or a trip to Staples. I had mine scanned for cheap because the guy working the machine liked my stuff.)
-A photo editing program (I use GIMP; it’s free, safe to download, and I think it’s easy.)
-A lot of tiny bursts of free time
Let’s get started! (Tip: this first part works for plots for anything- not just comics!)
ONE- You need an idea. Write out everything you can think of about this idea, like where the story takes place, what kind of society the story is set in, the characters you want in the story, scenes you want included, how you want it to start and end.
If you’re anything like me, you’ll likely get stuck in the middle, not sure how to get the characters to move from beginning to end seamlessly.
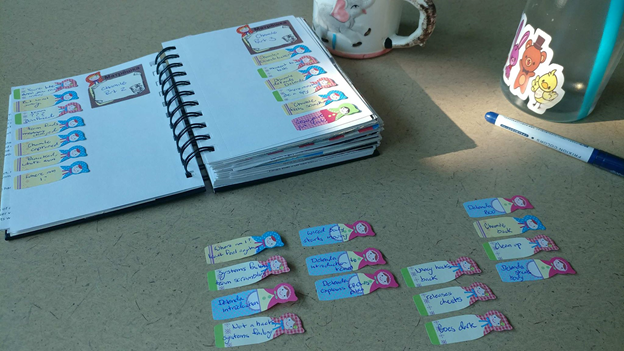
TWO- Take your page-marker sticky notes and write one event on each. Lay them out on a table or desk in front of you, and start trying to put it together like a puzzle. Let the characters “talk” to you. This was very hard for me at first- it was my story not theirs!! But the characters will feel robotic and lifeless if you don’t let them “make their own decisions”. What would your character do? Why would they do it?
Also, feel free to move your sticky notes around! We used sticky notes for a reason. Rearrange them, see if it gives you any ideas. Keep this up until you have a line from beginning to end. Does it make sense? Congrats! Now if you need to, add in some details and look it over. Pat yourself on the back.
THREE- Take your line of sticky notes and use them to summarize your story in a few paragraphs. More detailed or longer works might take a whole page, but most stories can be shortened down in summery form to half a page or so. Reading this over, do you notice any other holes you forgot to fill? Try to fix those now. Think of this as the blurb at the back of a book, except it includes the ending. Once you have a nice summery of how you want your story to go, try showing it to some friends and see if they think it is interesting, and make sure to ask if anything was confusing. This way, you can use their feedback to make sure it’s a strong story.
FOUR- is writing a script for your comic. While there is a standardized format for most scripts, if you’re not using it professionally, like hiring an artist instead of drawing it yourself, you don’t have to worry about formatting. Here are some general tips for writing a comic script.
-Establish setting first. Make sure your characters have a background and the reader will know what it is. Describe it well so later you can draw it easier. This gives life to your world and makes a comic a million times more interesting and professional looking.
-Establish characters second. What do the characters look like? What sets them apart from one another? How can you tell their personality from their looks? Is it their expression? Their clothing? Their body language?
-Establish action third. Describe how the character or environment is moving.
-Establish dialogue fourth. This one is pretty self-explanatory, but I’ve had to be reminded that not everyone talks the same way! Just like we sit and people watch to see how people move and look differently, try to listen to how different people use words and structure their sentences. If everyone in the book talks the same way, it will get boring, and maybe even confusing.
If anything changes, then make a note of that in the script. Here’s an excerpt from one of my scripts so you can see what I mean.
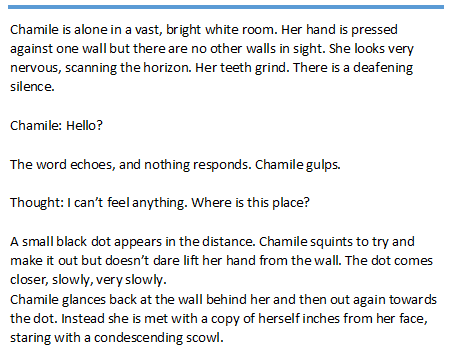
This step requires a lot of patience, especially if your story is a long one. But take your summery and sentence-by-sentence use it to construct your script. The great thing about the script, other than keeping your head on straight with all your ideas, and giving you a great place to look back to when you blank on what to draw, is the next part.
So you’ve finished your script! Horray! That took a lot of effort and time and I’m really really proud of you!
Now show it to your friends, and when you’re done showing it to your friends, show it to your art teacher, your English teacher, your parents, to people you can hire on Simbi and get people to tell you what they like about it and what they don’t like about it. Once you have that, you can edit it until it is a beautiful pile of sparkling gold prose.
But we didn’t come here for prose.
FIVE- Turn that script into a work of art. Except all of it will be on those big sticky notes we got at the beginning. No really, stick with me.
Each sticky note is going to be one page. Now I don’t use them, but if you want, try starting out by picking a panel layout from a collection of blank layouts, like this one
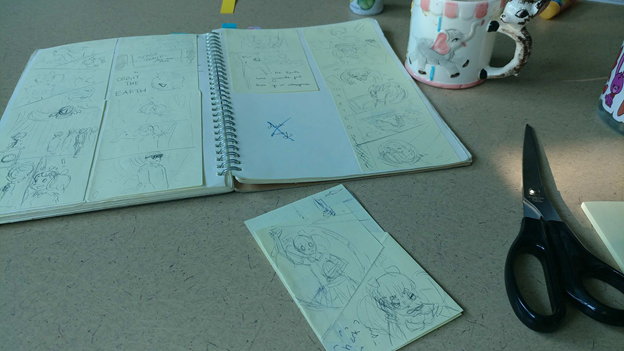
Once you have a layout, start sketching in stick figures of the characters, backgrounds, and speech bubbles. Get a feel for the flow of the page, the format, and the balance.
Maybe you want to draw a certain scene first. That’s fine! Drawing out of order is great- especially with sticky notes. Keep them in your notebook in a 2x2 grid on each page. Rearrange them as needed. Add more, take away some. Hate how a panel looks? Redraw the page on a new sticky note and slap it on top of the old one. Cut out panels and rearrange them.
This process will take EVEN LONGER than the script, most likely. But, this is all for your baby! So keep going! You’re doing great! Looking over all the work you’ve done, don’t you feel proud?
SIX- This step is what most people jump straight into, making their work feel rushed, messy, and confusing. This is the “magic” part. Drawing your comic.
If you prefer digital art, that’s fine. I just like drawing on paper better because my hands are really shaky when I try and use a tablet.
Take your beautiful book of thumbnails, scan them all into your computer. This is for people using traditional media as well! Scan those babies in!
Now, blow them up to the size of your printer’s paper, lighten the colors so it’s juuuuust visible, and print them out so they take up a full page. (Or don’t, if you’re doing it digitally.) Now, sketch and ink the final page on top of your draft thumbnail. If you mess up, print it out again and start over.
Now, do what you do to make a picture. I can’t help you there, there are a million tutorials on how to draw and I’m no expert on it.
WOW! You made your comic!!!! Great job!! Well, you’re almost done! Scan those pretty pages in again and fiddle with them to make them nice and clean. Find some nice free fonts to use for dialogue and sound effects or anything else. There’s great resources for that online, just make sure you choose a font that’s legal for you to use.
Decide if you want to color in your work, or use fills and textures (like photographs, or patterns), halftone or stippling (think old American comics), or screentones (usually used in manga works). You don’t have to, but I think it looks nice and adds a dynamic property to your images.
SEVEN- Printing is hard and you’re probably inpatient and you might curse like a sailor while trying it. You can skip this part if you want. It's really just for yourself, as most distribution of indie comic books will be done online, not in print.
The hard part is formatting it to be printed.
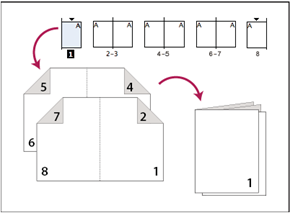
This would be the formatting for an 8 page book, you would have to have the pages in this order in your document (and remember we’re folding it hamburger style, so two per page per side) It looks very scary, and I’m not going to lie. It kinda is. If you have a program through your school or work that can format this for you, use it! The rest of us are stuck manually fiddling with the pages in a Word document.
Order would be:
[8 1 2 7] [6 3 5 4]
If you have more or less pages to your comic (And remember, this includes your cover page and back page.) and you probably do, then you can just do this over again for every 8 pages of your comic, and then bind it as a kettle stitch. If you’re comics pages aren’t a multiple of 8… well…
Honestly, this is probably the hardest part if you don’t have a program to do it. I'd recommend just having plank pages at the end so you don't have to do the math.
Binding is so much easier. Fold your printed pages in half, and make sure they’re all in order. Then take a sewing needle and some thread (I like to use embroidery floss) and follow this handy video
And guess what! You’re done!! I’m so proud of you! That was a lot of hard work and you did it!
What now? There's lots of great places online to share your comic. But first, take a good long rest and realize you've done something wonderful.
Congratulations @briarbun! You have completed some achievement on Steemit and have been rewarded with new badge(s) :
Click on any badge to view your own Board of Honor on SteemitBoard.
For more information about SteemitBoard, click here
If you no longer want to receive notifications, reply to this comment with the word
STOP