Hola apreciados, ¿Cómo están? Espero que muy bien!
Saben; hoy quiero comentarles que en estos días he estado ocupada con muchas actividades y quería entregar a tiempo un proyecto en el curso que estoy haciendo de piñatas, lo que significaba que estaba falta de tiempo. Aunado a esto, tenía que preparar mi almuerzo para llevar al trabajo al día siguiente. Por ahora, yo trabajo en un Supermercado como cajera y esto amerita llevar mi comida todos los días.

Por estar tan ocupada en mi proyecto, quería cocinar algo que fuera rápido, rico y nutritivo; entonces recordé esta receta muy sencilla que tanto me gusta y se las quiero compartir.
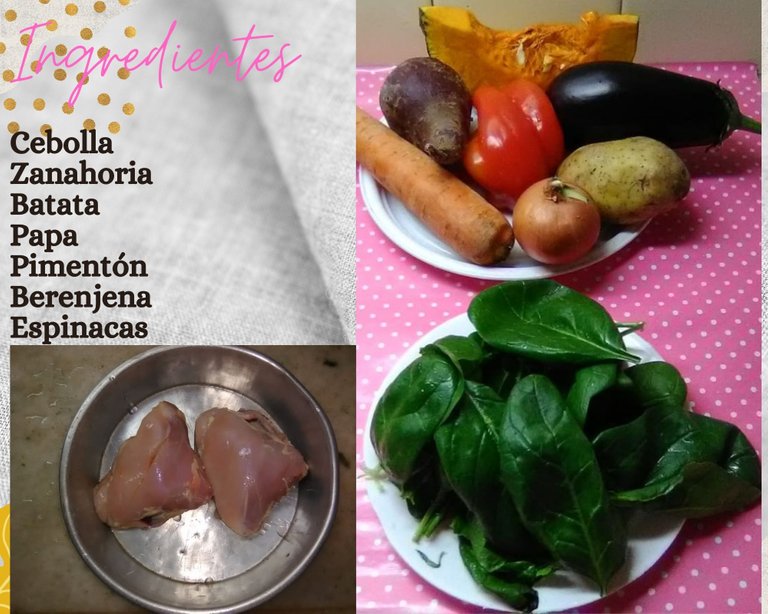
Como de costumbre, busqué mis ingredientes preferidos; las verduras y las hortalizas. Esta receta es muy fácil ya que una vez que montas todas las capas, llevas al horno y puedes continuar con tu lista de actividades, mientras la comida se cocina sola de una manera práctica.
Primero que todo, puse a descongelar dos cuadril pequeño de pollo, limpié con vinagre, unté sal al gusto y coloqué en un recipiente, luego comencé a picar los ingredientes...
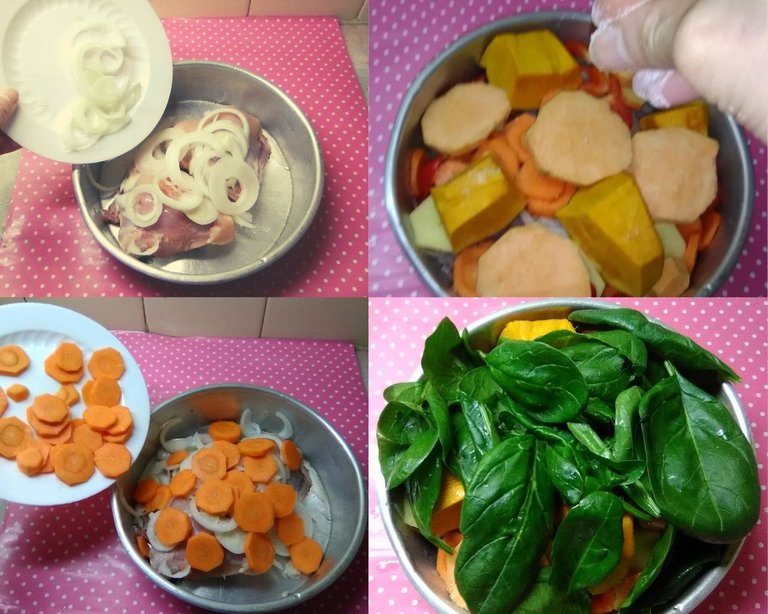
Luego de salar el pollo inicié a poner las capas una a una; comencé con la cebolla como mi primera capa, seguido la zanahoria, ésta me gusta ponerla de segunda porque es la más duras entre todas mis verduras, tercero las papas, y así fui añadiendo el resto de las capas hasta completar las 7 capas.
Estas verduras las puedes cortar en la forma de tu preferencia, a mí en lo particular me gusta en forma de rodajas.
Sazoné con un poco más de sal, añadí aceite común, tapé y metí al horno por 35 minutos.

Ustedes pueden agregar más condimentos como comino, pimienta, orégano cualquiera que les guste y si tienen aceite de oliva sería genial.
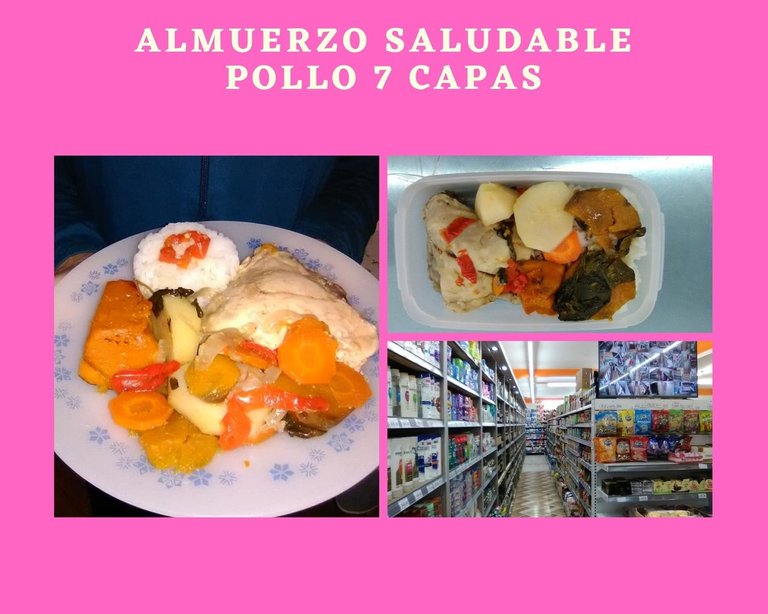
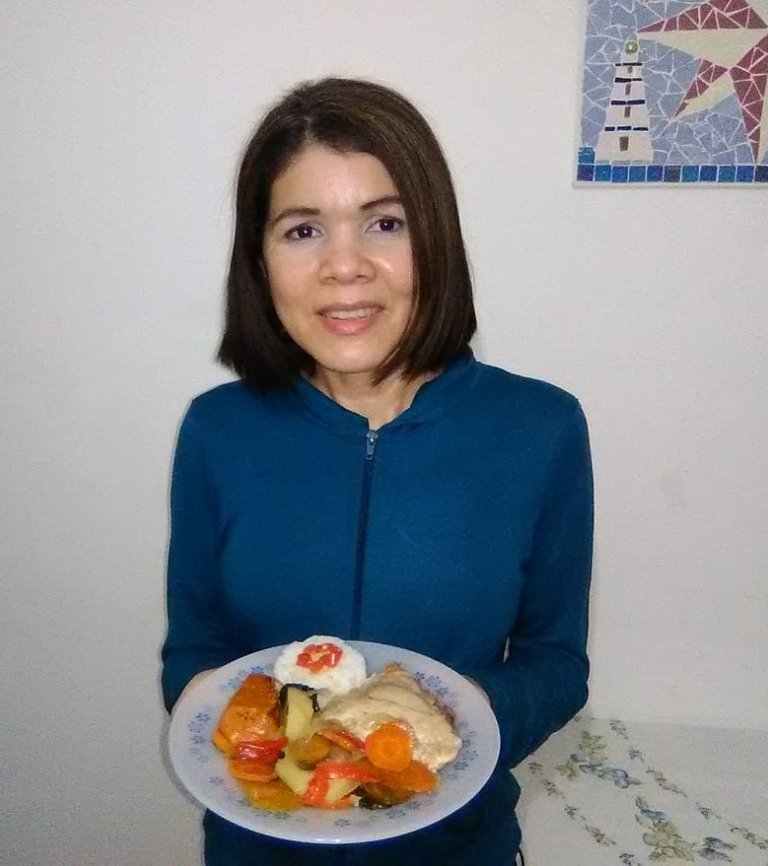
Aquí les presento como quedó mi plato de pollo de 7 capas, con un valor añadido de arroz para degustar y quedar bien saciada. Puse en mi bandeja de costumbre para llevar mi almuerzo al Supermercado y listo!
Bueno, espero le haya sido de utilidad y se animen a prepararlo también en casa.
Un abrazo como siempre!
Maríg,
Nota:
Todas las fotos fueron tomadas de mi celular Alcatel Modelo 5544R.
Traducción por: https://www.deepl.com
Las fotos fueron editadas por canvas.
Hello dear ones, how are you? I hope very well!
You know; today I want to tell you that these days I have been busy with many activities, I wanted to deliver on time a project in the piñata course I am doing, which meant that I was short of time and in addition to this, I had to prepare my lunch to take to work the next day. For now, I work in a Supermarket as a cashier and every day I need to bring my lunch.

Being so busy with my project, I wanted to cook something that was quick, tasty and nutritious; then I remembered this very simple recipe that I like so much and I want to share it with you.
As usual, I looked for my favorite ingredients; vegetables. This recipe is very easy because once you assemble all the layers, take it to the oven and you can continue with your list of activities, while the food cooks itself in a practical way.
First of all, I defrosted two small chicken rumps, cleaned them with vinegar, rubbed salt to taste and placed them in a bowl, then I started chopping the ingredients.
After salting the chicken I started to put the layers one by one; I started with the onion as my first layer, followed by the carrot, I like to put it as the second layer because it is the hardest of all my vegetables, third the potatoes, and so I added the rest of the layers until completing the 7 layers.
These vegetables can be cut in the shape of your preference, I particularly like them in the shape of slices.
I seasoned with a little more salt, added regular oil, covered and put in the oven for 35 minutes.
You can add more seasonings such as cumin, pepper, oregano, whatever you like and if you have olive oil it would be great.
Here is how my 7-layer chicken dish turned out, with an added value of rice to taste and be well satiated. I put it on my usual tray to take my lunch to the supermarket and that's it!
Well, I hope you have found it useful and I encourage you to prepare it at home as well.
A hug as always!
Maríg,
Note:
All photos were taken from my Alcatel Model 5544R cell phone.
Translation by: https://www.deepl.com
The photos were edited by canvas.