Hey steemers!

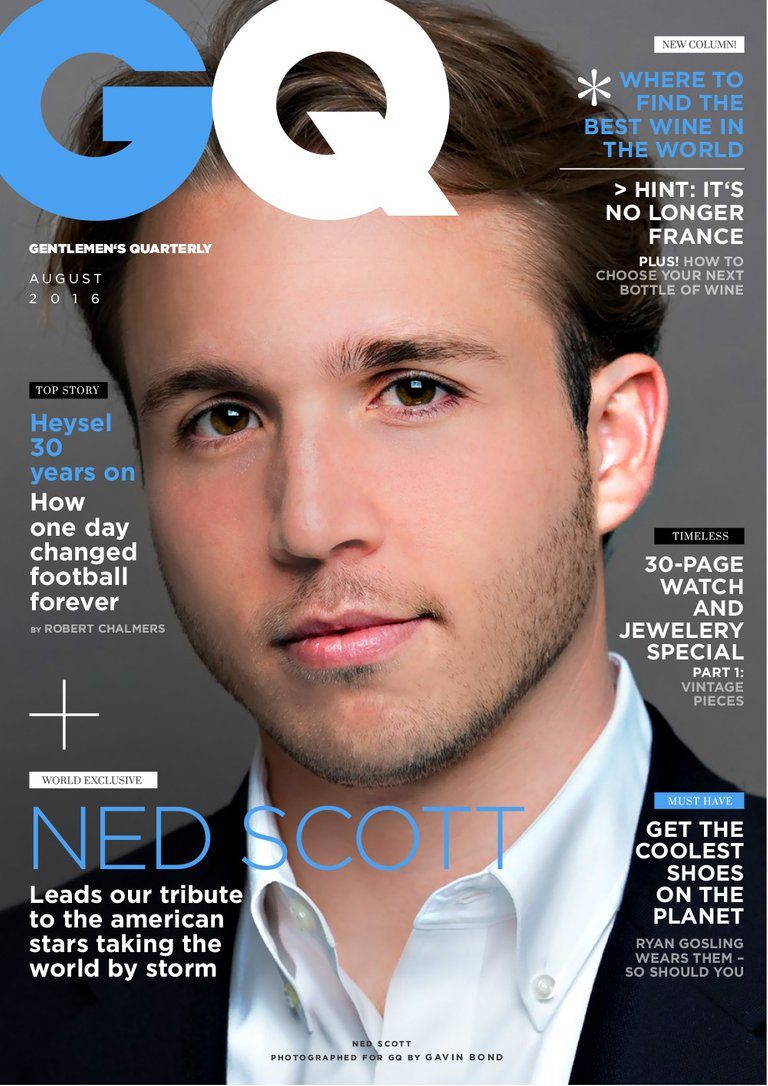
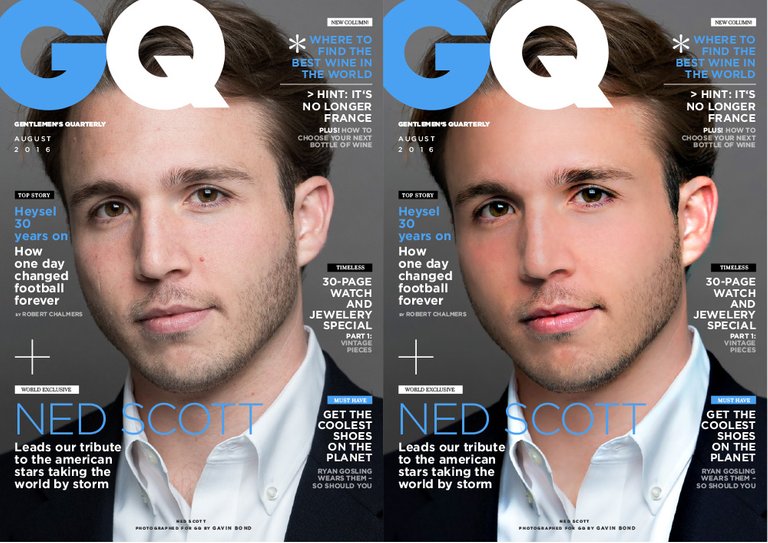
Today I wanted to work on a Photoshop tutorial and came across an image of Ned and decided to make a fun cover for GQ. The challenge was to make it look like a real GQ cover, not only the design or typography but most important the cover image itself. The better the original of course, the better the outcome. So I had to use what I could find. The basis was not too bad, talking about resolution and quality of the pic in general.
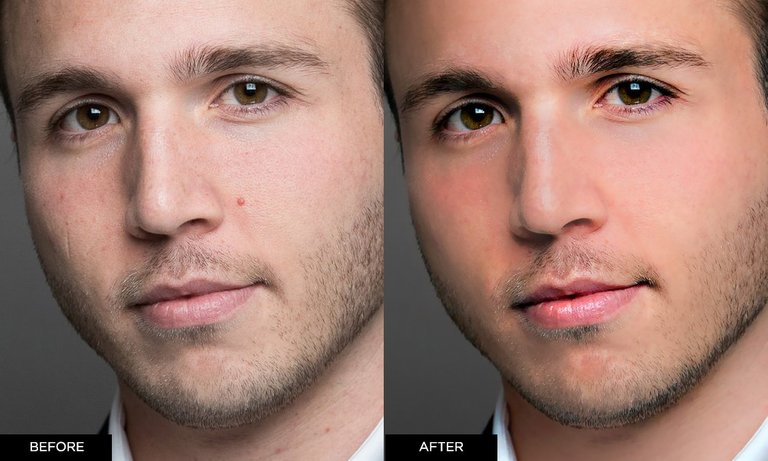
Even the best shots need some touches. Everyone does it, you won’t find an image on a magazine cover that hasn’t been touched and modified.
This little tutorial only shows whats possible today with Photoshop and is by no means any offense. I’ll guide you through the single steps, point to some important things and show you some before/after comparisons.
I’ll proceed on the assumption that you
a) are using Photoshop and
b) know how to use it, in general.
Let’s go.
Step 1:
Create a new layer, actually duplicate your image so you have 2 similar layers. The reason I always do it is simple: If I don’t like the interim results on this specific layer I can simply delete it and start from the original one again.
Step 2:
Use the „clone stamp“ and work on all the details you think are necessary, you can see all the details I worked on, they are marked with a red circle (plus a few others).

Step 3:
Save this layer by duplicating it again so you don’t lose what you have done so far. Go to FILTER > Sharpen > Unsharp Mask. Use whatever you think looks best to sharpen the image. Use something fairly medium, too much will make it look bad. If it’s too much you can still use the opacity of the layer to lower the effect. That’s why we have made a single layer.

Step 4:
Duplicate your layer again; Create a new Adjustment layer (Layer > New Adjustment Layer > Curves and/or levels) to adjust the look to your needs;
Step 5:
Smooth the skin but keep the details, not an easy task!
- Duplicate your top layer once again an go to FILTER > BLUR > Gaussian Blur and make the image really blurry
- convert this layer to a smart object > right click mouse and chose „convert to smart object“, this will allow you to adjust the opacity of the blur
- Create a mask for this smart object, fill it with black
- use a white „paintbrush“, approx. 30% opacity, blurred edges, and color all the parts white which should be blurred, avoid parts of the face that create the contour e.g. eyes, mouth and hair, focus on the skin only.

Note: This is a very quick tutorial and probably the fastest way to smooth the skin. You’ll loose details which will be visible on high resolution prints, there are many tools and filters available to make sure you don’t lose these details. We only have screen resolution here so this way is pretty perfect.
I used about 50% opacity for the blur layer to get a perfect mix for the smoothness and the original details, you can still see the pores of the skin.

Step 6:
Hue/Saturation
Create a new Adjustment layer (Layer > New Adjustment Layer > Hue/Saturation) to increase the saturation, that means, enhance the colors. Not too much of course, just slightly. You’ll end up having a natural looking skin, fresh and vital.

Step 8:
Reduce / combine all visible layers to 1 single layer and duplicate it again – make sure you have a copy of the layers – and repeat Step 3 again, only difference this time: the layer only has about 50% opacity now and gives the final result a sharper general look again.

Maybe the steps sound simple, it’s just a few.
I spent 4 hours on it though :)


Hope you enjoy! I hope Dan as well :)
Maybe we’ll see him there anytime soon :)
Have a great sunday.
I wonder what @ned thinks of this? What an amazing job you did!
Thanks for info.
Regards
The viking of Norway @xpilar
This is amazing! I absolutely love it!
I feel like a noob over here with my Gimp and my editing!! LOL!
But I'm sure you've had years of practice right? Or some type of training?
What field are you in? Is this part of your job? because you are truly amazing! I'd love to see tutorials from you on how to do this!!
Followed :)
Hey @kaylinart! Thank you so much! I've started to work with photos, editing and layouts in general back in 1996. I'm running my own business (agency) since 2006 with a focus on CorporateDesign. So it is my daily business :) Thank you very much for the compliment! I'll definitely consider to make another tutorial or even more, there are so many things to talk about, people seem to be interested :) Cheers!
Great information for picture editing! Thank you so very much. Namaste :)
You're very welcome, thank YOU! Namaste :)
@sascha I know your skills are far better than mine, but maybe you would have better luck than I making a fun photoshop contest! I tried to pit @cryptoctopus vs. @donkeypong but @donkeypong won being the only submission (even without any photoshop haha. Photoshop Contest Donkeypong Vs. Cryptoctopus Steemlebrity Deathmatch
You have a bigger platform / reach so you mayget some more submissions than I did.
that's hilarious, the Wired cover with @dan!
It's not his fault. I couldn't make GQ either lol. If it was only a colander he would have made the flying spaghetti monster worshippers happy.
Thank you, @sascha, for such a detailed tutorial. Bookmarking this one too. Still working on my PS skills. It's hard to remember all the steps, so I love posts like this.
And Dan on GQ. Nice touch.
Hi @fairytalelife! I'm an admirer of your work, thanx for posting here!
Thank you - it's mutual, then!
Tutorial is on point.
although, to all the people reading this: IF you dont have the money for Photoshop, you can do all of this in GIMP. Free software. you dont have to pay a dime ;)
As a photoshop user, i still learnt something xD thanks
Happy to hear, cool!
Thanks for the awesome tutorial @sascha!
I dabble in Photoshop, and I'll give your tutorial a try next time I'm editing a profile picture or any picture with faces as a matter of fact.
Cheers!
Thank you @albertfall! Appreciate it, very cool!
My pleasure @sascha!
Photoshop has become a verb. It is amazing how media has used this tool to shift our perception of people, beauty, and what is real. It is an incredible tool. Thanks for tutorial and showing many before/after pictures which really highlight the differences.
One question. It seems like most 'photoshoping' makes people look better. Is is tougher to make them look worse? (older, weathered, sick, mean, etc.?). Do you teach such anti-social techniques?
Hi @mrosenquist! Thank you very much! Yeah, photoshop, the mighty tool to trick everyone. lol. It is indeed very tough to make people look worse, you can't just tune down the colors and stuff, you need to work on the skin etc. I've never done it, never had to do it, thankfully:) Sorry!
I see what you did there.
But really, awesome tutorial, you went a little far as we all do while editing images for a living. Not sure about removing that mole though, for many it's a very distinctive and elegant feature, I think the magazine would have left it there.
On a side note, it's cool to see a man for a change as if women were the only targets of the magazines!
Hi @moonjelly! You're right, absolutely. I was thinking about to keep it, but it's really just about 'possibilities' here. :) Thank you very much!
You're welcome, I'm very glad to see your post trending and having success.
the difference a few clicks can make. thanks for the 'how-to'! :)
You're welcome!
bookmarked!
Thanx!
You look great either way Ned lol
Ned is handsome just the way he was
Yeah, of course! But that's not the purpose of the post like I said in the introduction. It's a tutorial about what photoshop can do and additionally how media / magazines work today. :) "How his picture could look like". :)
I know I know :) I couldn't resist, sorry
congrats)

It is interesting to read :)) I have here a good picture, for example, if you do not use the computer processing. @foxkoit I like B&W images very I hope you too.
Very nice job.... in your next work @sascha try to "give me" hair LOL
You took a human and turned him into a ken doll! He looked like a rugged gangster before. No reason to hide peoples true features with digital makeup. @sascha
Hi @flandude. That's the world we live in. It's the people, magazines and industry that ask for these kind of images and look. It's simply a tutorial ‘how to‘, everything else is just a matter of taste and I respect yours.
I understand I just think the whole thing is just strange! Thanks for sharing though!
Fantastic Read! Thank You!
Thank you very much @kaytlynkirskey!
Do you ever use Lightroom for photo editing? I use Lightroom for my photos and occasionally use GIMP. Great job with this tutorial.
Hi @corinnestokes! Thank you! From time to time yes, depending on the image. Even Bridge does an amazing job. Cheers:)
Very helpful post! It did make me think of this too..
Awesome tips. Using the blur (step 5) is gold. And unsharp mask is like god-mode! So powerful.
Hi @chrislegaspi! Sometimes it's just the little things :)
This post has been linked to from another place on Steem.
Learn more about linkback bot v0.3
Upvote if you want the bot to continue posting linkbacks for your posts. Flag if otherwise. Built by @ontofractal