Dear Steemians!
Long time no post! This is a short tutorial related to sequence photography. You'll have to excuse my laziness I've been working on my thesis.

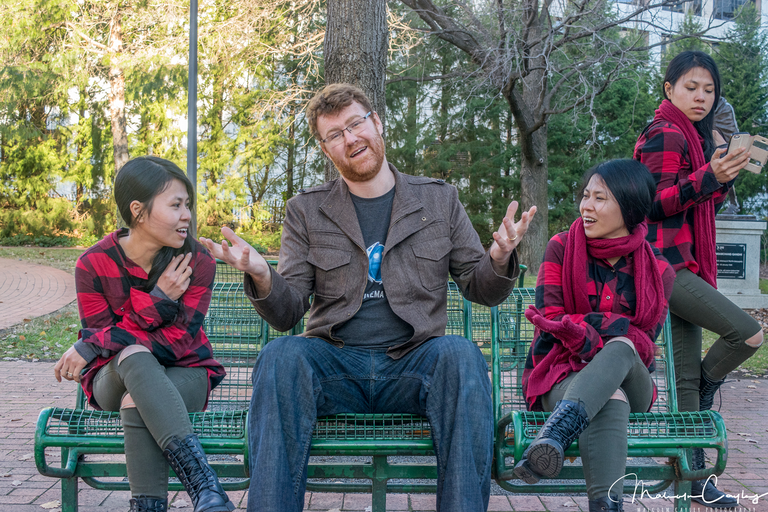
When your wives keep cracking jokes about you. Self-Portrait 2016
Sequence photography is where you have the same individual multiple times in the same frame. This technique is really old and can be done using film but the method would differ. In this short post I'm only going to talk about digital sequence photography. Georges Méliès was probably the first to use this technique in films. He would use black backgrounds to control which part of the emulsion would be exposed and expose the film multiple times to place himself many times in the frame. The technique for digital still images is basically the same except obviously done differently.
"The Four Troublesome Heads" (1898) by Georges Méliès.
In order to take sequence photos you need:
- a camera you can set to manual
- a tripod or something to keep the camera steady
- a static scene that is unlikely to dramatically change during the shoot
A manual camera is necessary because if the focus changes during the shoot it might need to be adjusted later on during final composition, which may make life difficult for you. A tripod and static scene are required for the same reason: if you want to work beyond adding elements shoot on a windy day with lots of background movement. Otherwise, I would pick a simple scene on a calm day for best results.
For the above image I shot 4 photos.
- The background "plate" without any of the actors in it
- Individual photos for each pose
We shot a few different poses before deciding on the final composition. Choosing a scene with easy to see markers (like the seats in the above) makes composition easier because you can judge space and set your actors accordingly. My left hand is close to @ness.james but not too much that it breaks the illusion. If I had to re-shoot, I would change this; but otherwise I think it still conveys the magic of sequence photography.
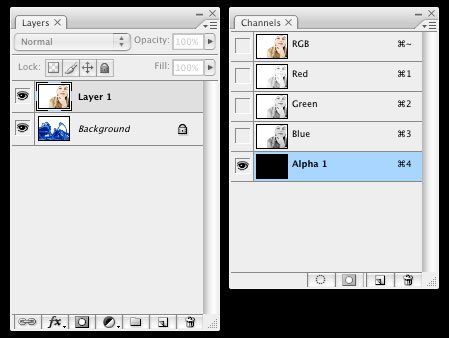
Alpha Channels
Alpha channels are black and white. They're used to compose new elements into a photograph or movie clip and hide the fact that they really don't belong there. Basically, white reveals; black conceals.

Here we can see a "matte" like a cutout being used to separate the background from the "element", in this case a basketball with player. The matte can be drawn out or painted on in Photoshop or any other editing program. I use Photoshop but it's a common editing technique across many software.

If RGB are the colour channels, then RGBA is colour plus the alpha channel. The alpha channel controls transparency.
Technique

In Photoshop the box icon with the circle in the centre is the alpha mask button. Click it to add an alpha mask to your layer. Every image should be imported on a separate layer. Click the mask for each layer. Using pure black and white values, paint the mask around the areas you want to leave opaque and the areas you want transparent. The trick is to maintain consistency between shots by picking the right times and locations. Shooting a background plate first and then focusing only on the elements you want for the rest allows a tiered structure to form from the layers.
The bottom layer is the background plate. Each additional layer above that will have each element you want to add to your frame. Painting the mask around each element will allow you to adjust each layer to your liking before making overall adjustments to the entire image. Painting masks is a pain but you get used to it. The more effort you put into it the better it looks.
Ideas
Try out some of your own ideas. For instance:
- Running across a frame
- Dancing couples
- Sports
- Water drops
- Anything that has motion in it that you would like to see many times in the same shot.
Thinking in terms of motion is difficult for still photographers. Sequence photography is a great way to bring out your mind from thinking of static scenes towards dynamism, fluidity, and motion. Freeing yourself from composing just a single pose is groundbreaking if you haven't done it before. Try it out and expand your capabilities as a photographer!
I've only taken the one finished photo using this technique. I want to get out there and shoot some more and writing this post is partly to share my knowledge and partly to light a fire under me :) If you want more examples just google "sequence photos".
Thanks for reading :) As always, questions, comments, and polite feedback most welcome. If you try out some sequence photos after reading this share them below! If you have used these techniques before share some sequence photos below in the comments :)
Excellent tutorial @deterrencepolicy. I will have to dig up my photos of sequence photography from some 9 years ago. Upvoted, resteemed & DPS.
Sounds great @photo-trail can't wait to check them out :)
Thanks for taking the time to explain this! I keep considering getting into photography, but the main roadblock for me is getting a camera.I don't want to get a nice camera and then only use it a couple times :/
I had similar misgivings when I forked over the cash for the Nikon I currently use. After I looked up some cool things I could learn with the camera and all the different photos I could do without spending more money on more equipment I was convinced that this is more of an investment in quality images rather than being just another "good" I would use a few times. You can't put a price on quality memories especially if you put the time into using learning how to use it through online tutorials - we live in a lucky time when all the information you need is out there for free! I highly recommend the camera I used to take this photo: Nikon's D3300 but it's kinda old now so I'm sure they have an updated model.
Cheers glad you enjoyed the post and if you do buy one I'd love to see the results :)