A what? Some readers will probably ask themselves after reading the title of this post. For those that do not know what a neutral-density filter is, it is a filter that all travel photographers should carry with them as it is the only filter that you should apply before taking pictures, while most other filters can also be applied post production.

What is a neutral-density filter?
A neutral-density filter (abbreviated ND filter and sometimes referred to as grey filter) is basically a sunglass for your camera. It is a filter to reduce the amount of light entering the lens without changing color or hue. Using a neutral-density filter allows the photographer to use aperture, exposure time or for example ISO-settings that would otherwise result in overexposed photos.
Why should you use a neutral-density filter?
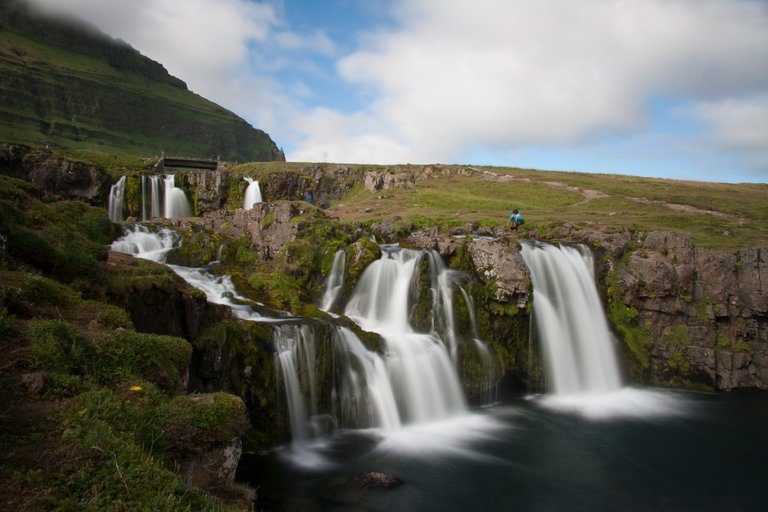
Most people know those amazing night time shots of light trails. These images are taken with long exposure settings. Usually a shutter speed between 10 and 20 seconds. When you want a similar effect during day time, there is way too much light to use long shutter speeds or an open aperture. Your picture will quickly become overexposed. To make sure that your picture won’t be overexposed, you can use a neutral-density filter.
You can use a neutral-density filter for time-lapse photography: a neutral-density filter allows you to take pictures such as the light trail that are needed for time-lapse photography. For landscape photography: the neutral-density filter allows you, for example, to blur water, creating a misty effect. And for architecture photography: by using an extreme long shutter speed, you can filter out people.

Different neutral-density filters
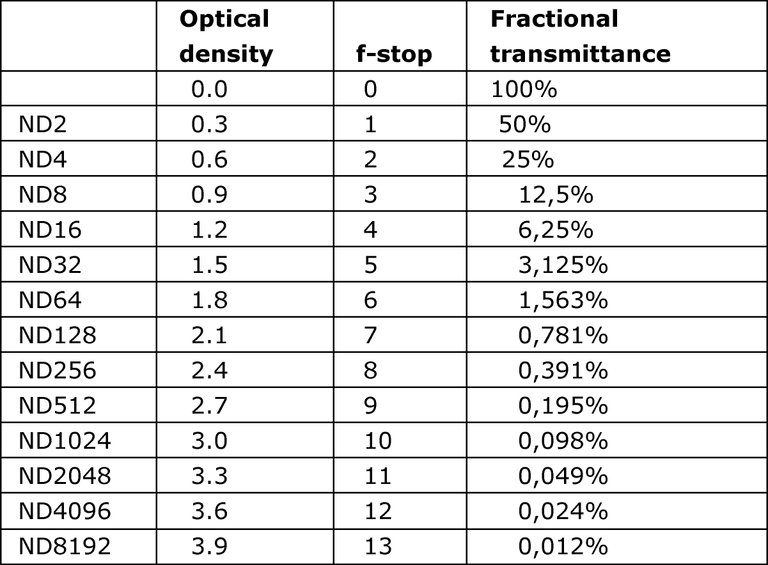
There is a variety of neutral-density filters available. It can therefore be difficult to figure out which type of neutral-density filter you need for your setting. To make it even more complicate, every manufacturer uses their own terms to indicate the strength of the filter. For example, an ND2 has an optical density of 0.3, an f-stop reduction of 1 and a fractional transmittance of 50%. This means that when you use an ND2 filter, you need go back one step in your settings. For example from a shutter speed of 1/250s to 1/125s, or aperture from f4.0 to f2.8, or ISO from 100 to 200. The stronger the filter, the more steps you have to go back in settings to take your picture. See below.

Variable neutral-density filters
Seeing the table above, one might conclude that you need a whole range of neutral-density filters to be entirely flexible in your shooting. That is true. However, there are also variable neutral-density filters. Variable neutral-density filters work by placing two polarizing filters together. By rotating the front polarizing filter, you stop a certain amount of light. However, variable neutral-density filters affect the image quality and can even results in undesired effects (such as a large cross in the middle of the frame when using a wide angle lens). For photography, separate neutral-density filters are therefore the best way to go.
Would you like me to write more photography tutorials? Let me know in the comments.
Don’t forget to Upvote, ReSteem, Comment or to Follow Me if you liked this post!
Congratulations @aegir!
Your post was mentioned in the Steemit Hit Parade for newcomers in the following category:
I also upvoted your post to increase its reward
If you like my work to promote newcomers and give them more visibility on Steemit, consider to vote for my witness!
Thanks!
Hi aegir,
Visit curiesteem.com or join the Curie Discord community to learn more.
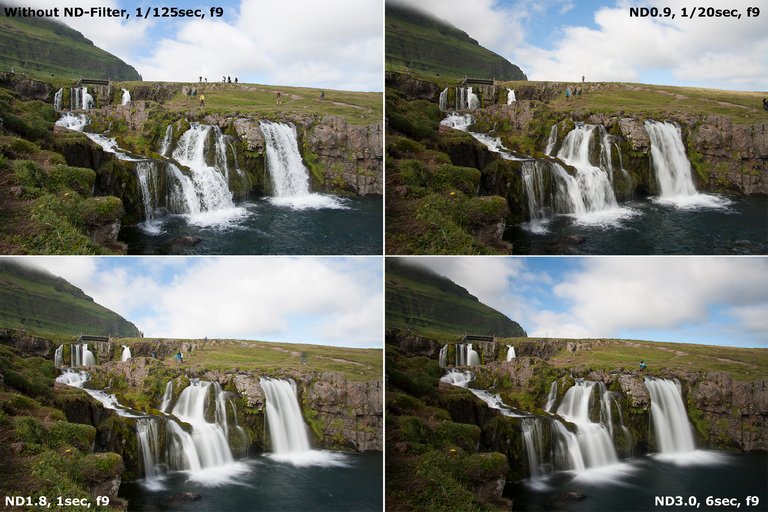
Well you just answered some questions for me, thank you! I’m new to photography and I think you explained this in a way that is easy for a beginner to grasp, thank you for that. The visuals really help as well, it’s nice to see the effects that the different lenses have. I hope you continue with these tutorials!
Thanks! Yes, I will write more tutorials in the future. There are many topics that can be covered, I just have to figure out which one to do first :)
I am a hobby photographer (I'm not sure if I can even call myself like that) and I always wanted to take a photo of a waterfall with this beautiful effect. I went to the waterfall during the day. It was bright and sunny and it was simply impossible to make a shot that I wanted. The picture got overexposed so quickly! This seems to be a great solution. Thank you for sharing and yes, please do more tutorials. I'm sure it will be very helpful. Your explanation is easy to understand.
Thanks! Yes, images are quickly overexposed. ND-filters are great tool for this. Though, it can be a bit difficult to find the right ND-filter for the image you want to create if you haven't used ND-filters before, but that is the fun thing about photography: it won't harm anybody if you just keep on trying. You are already taking great pictures, so I am sure you will master the use of ND-filters soon :)
Thank you! I'm planning to get a new camera and will get some filters with it too :) Hearing from YOU that I am taking great pictures is a honor!
While doing pictures we never think how to improve the quality of the pictures, because in first instance because nobody knows that there is something with the help of that you can improve it and the second may be because nowadays so many people taking photographs and many calling themselves photographer because of few successful pictures.
I found it very educating and in easy words explained the idea of using ND filters and when looking at the result that is obvious, with NF filters the result is much better. Of course it is understandable that there are many other grading of them but for those who would like to do something with their pictures like offering their service or selling they need to know that and I think it is great that you are doing such tutorial :)
Thanks. I agree. Because camera technology has advanced, everybody can take awesome photos. However, understanding how your camera works other than the automatic function is something completely different, but can truly enhance your photos.
The photo of that waterfall looks so magical! Photography is sure a lot of work, it really is about passion.
I love how you were able to explain all of the in detail, you did put it in an easy way for almost everyone to grasp.
I will love to go into photography someday so a post like this I'd definitely educative for me. And that table up there is so handy!
Thanks! Great to hear that this post was easy to understand. More tutorials will follow soon.
That's great!
Hi @aegir, thank you so much for sharing this tutorial. I have always wondered how photos (like your first photo) were taken that is able to show a beautiful, smooth stream of water from a waterfall or a river raft. I like photography but I only have my smartphone currently. I enjoy viewing beautiful photographs. I am clueless about cameras, sorry if this question sounds silly. This neutral-density filters, is it a lense or something that you insert into the front of your camera? And I think the quadrant photos helped to show the difference with the different filters and settings which is good for this tutorial. I would like to read more of your tutorials and possibly, hopefully be able to invest in a good camera myself. My challenge is not knowing how to choose a camera, which is why I stick to my smartphone.
This is a good learning point for me as well: I should have included a picture of a filter. Good point! There are different types of filters, they either screw on to the lens like this one or you need a frame into which you insert the filter, like this one. And there is the new Canon R camera that allows you to insert a filter behind the lens, but you do need an adapter for this to work.
Actually, there are also neutral density filters for phone camera's. I have never used one, so I cannot tell you how good they are, but you might want to check this.
It is indeed very difficult to choose the right camera, there are so many good camera's out there today. Hmm, sounds like this could be another tutorial topic. Who knows I will write about different camera's in the future. For now, just keep in mind that it is not the camera that takes the picture, but the person behind it. Even with a phone camera, you can make awesome photos!
Ah nicee!! Thank you @aegir. I was thinking of something like that and the one for the phone is cool. Yes, yes please, it would really help to have a tutorial on how to choose a camera. And also, how to use smartphone to take awesome photos!! :) Happy Sunday there @aegir. Thank you!!