Winter is the darkest time of the year and does not often make us happy with full lighting. However, only winter has a special freshness, variety and uniqueness of the color palette. In order to take pictures with the best lighting, you may well have to get up early, leave the house before the sun rises and spend at work all day long before sunset. Make an effort on yourself and you will be rewarded with a rich lighting that changes with every second. Dress up warmer if you do not want your “batteries” to drain faster than the camera's battery. If you prefer to spend an extra hour in bed, then there is great news for you: during the winter months the sun is lower, so you can continue shooting all day and get beautiful, well-lit shots.
The snow whirls, flies, flies ... Photographing snow
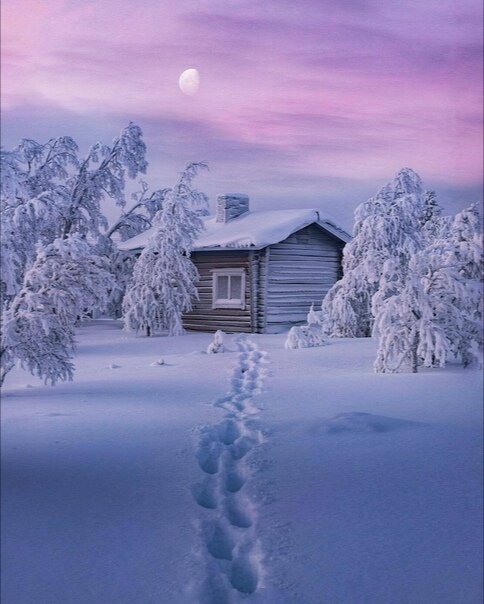
The real frost and snowfall are quite rare in the winter lately, therefore it is so important for photographers not to miss the “real winter” visit. To get pictures of fresh, clean, untrodden snow you need to leave the house early. In addition, if you are not too lazy to go out before sunrise, you will get a unique opportunity to catch in the frame the magical light of the sunrise - the contrast of a warm, golden sky and cold, bluish snow for stunning photos. But most importantly, make sure that the camera battery is fully charged - in cold weather a large amount of energy is consumed.
The dazzling white sky and the snow-covered landscape are able to recreate supernatural, amazing, bright images in gorgeous black and white tones. You do not need to try to put everything in the frame - the minimum is often quite enough. Use optics with average zoom values to fix trees, snow-covered roofs, clearly defined statues and other graphic elements in the frame against a clean white sky. If the photo is dominated by white areas, be sure to check the underexposure after the test image (see below). You can also recreate the light tone of your photos in Photoshop.
When shooting snow-covered landscapes or city landscapes, try to think in an original way to create memorable photos. Snow is a magnificent blank canvas, ideal for clear objects. Bother to find bright colors for a special contrast on pure snow. For example, red objects create a winning combination with white: telephone booths, mailboxes and road signs.
If it snows, experiment with different shutter speeds for all sorts of effects. Slow shutter speeds allow you to capture the movement of snow, creating an attractive "flickering" effect, which is often seen in winter shots. Working in the “Priority shutter speed” mode allows you to quickly use various settings. Normal shutter speed is good to use in conditions when there is almost no wind, within 1/15 sec or slower. With strong gusts of wind pick up a higher shutter speed.
Think twice about using flash when it snows. The light will reflect on the falling snowflakes, which are closer to the flash and, thus, there will be a bright spots effect on the photo. This effect can only be used in creative shots.
Winter is a time of low, mean sunlight, which will help to highlight the texture on the snow - lean down to get the maximum effect. Low sunlight provokes long shadows - use them to distract the viewer from the foreground to the object and add depth to your picture. Shadows on the snow can create interesting abstract images. Position yourself so that you and your tripod do not cast a shadow on the image — stand in the shadow so that you can hide your outline.
When you use rectangular filters, there may be a situation where there is not enough space for the lens cap, which is used to eliminate lens reflections. Cover your lens with your hand or, better yet, make your shot, and then cover the lens with your shadow provided that the camera is located on a tripod. Otherwise, your photos will turn out blurry, with poor contrast, if you do nothing.
Correctly adjust the exposure
The main thing is to remember that during the shooting of the snow, the camera settings and the autoexposure system may get lost. This will mainly cause your camera to tune to a medium tone. Instead of determining the degree of illumination of the image, the degree of reflection is determined. In cases where the semitones harmonize (for example, a gray car against the background of a green field) - no problem. But what about dark frames, such as a black cat in a black basement? The camera adjusts to a semitone and the pictures look blurry. The same situation is observed during the shooting of dazzling white snow: the camera adjusts to a semitone, so the snow looks flat and gray as a result.
To return the snow-white brightness to the pictures of snow, you need to help your camera. Below are three ways to achieve white, not gray snow cover.
Turn off the light meter and apply overexposure
Turning off the metering of bright areas of snow and adjusting the positive exposure compensation, you will return to the snow its bright white color. Focus the camera on the object, then adjust the zoom to a bright area of snow in the frame. Use the exposure compensation button (+/-) to add a value between + 2/3 and + 1 2/3 EV, depending on the brightness of the snow - the brighter it is, the larger the value you need to use. Then, take the meter reading and press the AE lock button (AE-L). Alternatively, use the manual exposure setting and set the correct combination of overexposure and shutter speed.
- Turn off halftone metering and underexpose
Instead of measuring the snow cover, fix the exposure index of the halftones of the frame - for example, gray rock, a building or a sidewalk - with a word of what surrounds you. There is no need to adjust the positive exposure compensation using color effects in order to “trick” to bring your camera's exposure meter to an underexposure state: the snow will automatically become bright without it. In fact, you need to adjust a small underexposure in order to eliminate glare in the snow caused by fast shooting (having the appearance of burned out, blurred areas). Check the histogram - if its level reaches the right side, use the exposure compensation button within the range of values from -1/3 to -1 EV from the original half-tone exposure indicators.
- Easy way - just use a histogram.
At the time of using the film, it was very important to be precise with setting the exposure of the “snow” frame - the slightest mistake crossed out all the work and delivered a lot of disappointment. Therefore, it is doubly pleasant that digital cameras with histograms greatly facilitate the work of the photographer and eliminate annoying errors. If you do not fix an important moment and you have enough time in stock, aim the lens, take a test shot and check the histogram. Is the level in the center of the histogram? Add some positive exposure compensation to return brightness. Is the histogram index in the right corner? Add negative exposure compensation.
A large amount of bright snow in this picture led to an “underexposure” - the empty right corner of the histogram.
Setting the value to 2/3 of the positive exposure compensation made the white color brighter without loss of detail.
Manufacturers of cameras use various metering systems and exposure algorithms in SLR cameras. The more expensive the model, the more perfect the functions. However, in fact, it may turn out that you need very little or no need to compensate for the exposure of the “snow” frames. In fact, you may find that your camera copes well with the transmission of the brightness of the snow, that you just need to add a bit of negative exposure to eliminate the effect of high light areas. Learn your camera settings and how it works with different levels of snow coverage. Take a picture in RAW-format, and not in JPEG in order to be able to accurately adjust the exposure.
Blue-blue frost lay on the wires ... Photographing frost
To get good shots of frost, you need to get up and leave the house early. Frost is most often observed early in the morning and in the wee hours, and the combination of soft light and deep ice textures can be sacrificed for the sake of sleep and capture amazing moments.
Crisp frost will transform any shot, be it a rural landscape, close-ups of your garden or city park. Whatever the subject, the approach is the same - we do everything quickly! The touch of the rays of sunlight, a little warmer just a degree - and the magic disappears. Although it can play into your hand, allowing you to capture the contrast of cold shadows and patches of warm sunlight in the frame.
When shooting frost, the most suitable option is to combine low ISO values for better picture quality and a small aperture (high f-values, such as / 16, f / 22) to increase the frame depth. The light level will be low at the beginning of the day, so it’s better to use a tripod, apply a mirror lock if your camera has this function (usually in the menu) and turn on the self-timer. Of course, you can release the shutter with the remote control, but this additional device will be awkward to hold in frozen fingers on a frosty morning.
If you are working with close-ups, make sure that your breath does not fall on the subjects, and you do not touch them when you move the tripod. Also choose a dark background for these shots to highlight the frost.
Background lighting can make the frost shine, although you will most likely have to adjust the exposure. The brightness of the background lighting can “confuse” your camera and lead to an “underexposure”, but it all depends on how large the object is and how intense the background lighting is. You may have to add some positive exposure compensation. If the dark background takes up too much space in the frame, the camera may overexpose the frame and the object will be blurred. Add negative exposure compensation. Check the histogram after the first shot and adjust the exposure if necessary.
Nature has no bad weather ... How to photograph fog and cloudy weather in winter
We advise you to follow the weather forecast for the winter photography season. The most favorable weather situation for your work is a weak high-pressure area, which in turn causes cold, almost windless clear nights. The result of these phenomena is morning mist and fog.
It is worth arriving at the place of shooting as early as possible, since the most favorable lighting is observed immediately after sunrise, when it illuminates everything around with golden light. Weather conditions in winter are transient, so you need to move faster. When the sun is high in the sky, the moisture can evaporate very quickly. Make sure that you have decided on the place and subject of the shooting, if you want to have time to take pictures.
One of the problems that many novice photographers face when shooting overcast morning and fog is accurate exposure. Even the most advanced meter can make a mistake while working in a gray-white fog - as it happens when shooting snow. These weather conditions reduce exposure and as a result, the pictures are dirty gray and dark. This problem is quite simple to solve: you just need to add a positive exposure compensation. You need to adjust the value in the range from +1/2 to +2 EV depending on the brightness of the frame (brighter scenes "confused" the light meter in the direction of greater underexposure).
Shooting with a telephoto lens will reduce the effect of fog, so it is advisable to adjust the white balance, which will give the frame a completely different look. Even taking into account the fact that in most situations when shooting outdoors, you turn on auto white balance or daylight, you can do a lot by experimenting with the settings.
Changing the white balance to the “tungsten” mode, the coldness of foggy or frosty frames will be enhanced. It is always much better to save a snapshot in RAW format and make any white balance settings in a special program for editing RAW files, which will give you the freedom to change and process frames at your discretion without risk of loss of the quality of the final image.
@janioa7, thank you for supporting @steemitboard as a witness.
Click on the badge to view your Board of Honor.
Once again, thanks for your support!