Hey Steemians - I've been trying to be a good Steemian myself, and so have not only been commenting and upvoting, but also have been providing insights to other artists. So I was telling @rainite about ways to improve 3D- it was a few comments on a 3D post, explaining the levels of detail... The correct evolution for a 3D (though, also applies to 2D) pieces.
So here's the image:
The steps of a 3D created image:
Modelling:
1)Primary Detail - Basic shapes
2)Secondary Detail - Refined shapes- add details.
3)Tertiary Details - Fine details.
4)Posing
Rendering
5)Materials / Textures
6)Lighting
7)Camera
8)Final Render
9)Compositing/painting
^^ The above are not the numbers that you see on the images below.
These are not in exact order, as the order can be swapped out based on your preference.
We start with modeling (the art of creating things in 3d)
I was telling @rainite that great 3D should look good just fine without any textures. The other stuff can enhance it... but great 3d should look just fine plain. So, I thought I'd take my own advice, and create something that looks peachy without textures or a paintover.
So here's what's called a turntable - it's a spinning version of the model, so you can see it from all sides. As it changes colors, what you're seeing is just a change of material. It's often wise to change materials, to see what the details look like... Different materials show different materials differently - metal might be more reflective, some materials show too much detail- too much detail? How can that be? Well... The materials may have Sharpening Filters built in to make them look better, but they are an inaccurate reflection of the model + material, and when you 3D print, the final piece may be too round/blurry. But don't worry... this isn't a tutorial on 3D printing, that's a whole other ball of wax.
The thing I was explaiing to @rainite is the 3 phases of geometry.
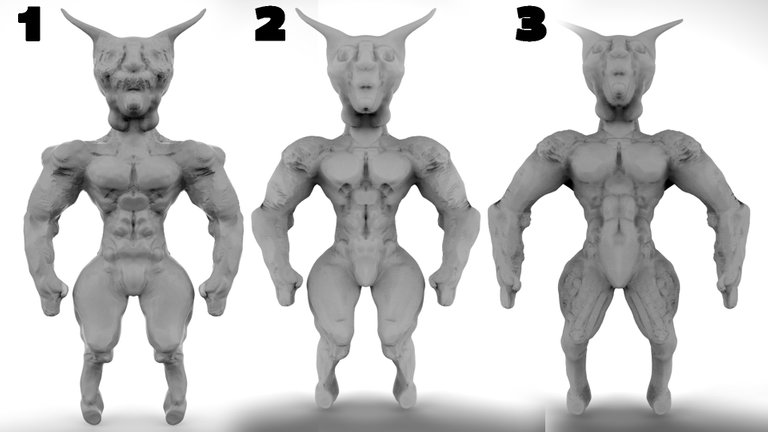
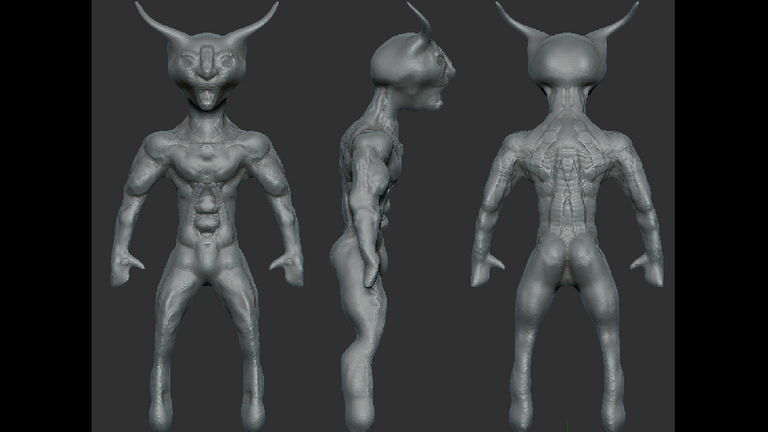
1)Basic Geometry - I think I've gotten the order of the images mistaken - 3 and 1 might be swapped. As you look through the 1-6 images, you can see the model getting lightly refined...... from basic plain geometry (3) to clearly defined anatomy, an improved pose (not to be confused with posing - I'll touch on that shortly)- changing the rotation of the legs, the posture, etc..
Basically, Primary Geometry is coming up with the base shape... You should be able to look at the Silhuette (shape without any lighting - like... a completely black shadow) and know what you're looking at. You can do phase 1 with just primitives (cubes/spheres/cylinders) - and you can tell what your intention is for the piece.
Secondary details are refining it.... adjusting the shapes, smoothing things out, carving detail into it (not too much), so that you can tell what you want... but you're really refining it here... But not too much -- In fact.. I'd say that I didn't even enter Tertiary Details on this one (I might do a part 2 of this). A piece can be completed in just secondary.
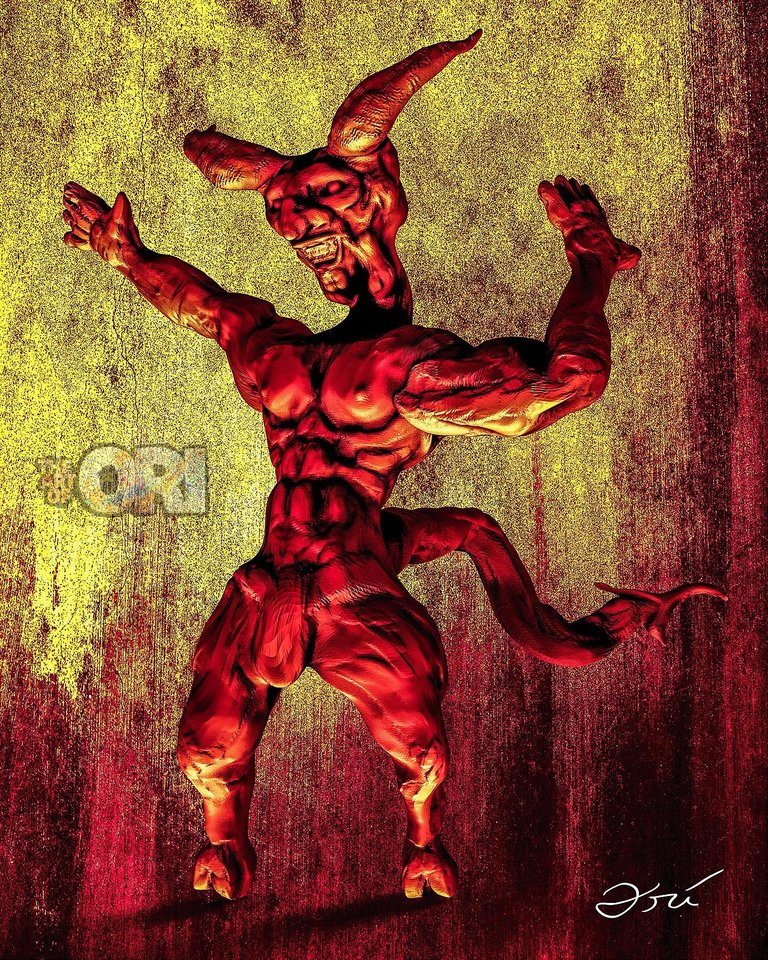
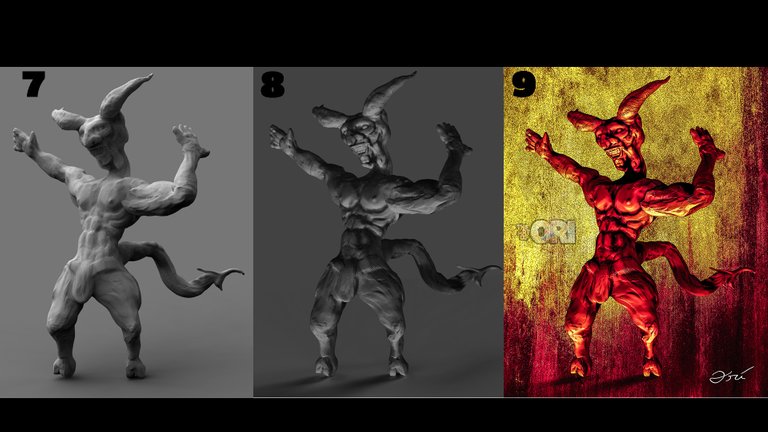
So #7 - what's that? 'cause things look different now.... THIS is what I referenced earlier as posing. It's changing the pose of the model. How are they standing? Where are they looking? What are they doing? How are they in relationship to other items/characters in the scene? A complex scene can have A LOT of posing :)
Now the difference between #7 and #8 is the lighting. Lighting can make a great big difference in everything. Especially mood. See how in #7 the lighting is coming from above - and in #8 the lighting is coming from below... Think "Flashlight during telling horror stories by a campfire".
Image #9 is the composite -- I added a piece of rusty metal as the background, and gave a light red tint to everything.... This is not the same as texturing a piece. That would be painting the scales on the demon, giving the horns more of a bone feel. But basically in the compositing/paintover stage you fix glitches, add enhancements, change the colors... You turn it from a 3d piece to a finished image... There's many things that you can fix much faster in photoshop than you can in 3D. This particular image did not require any painting over to repair. It was just made to show you the progress from stage 1 to stage 2.
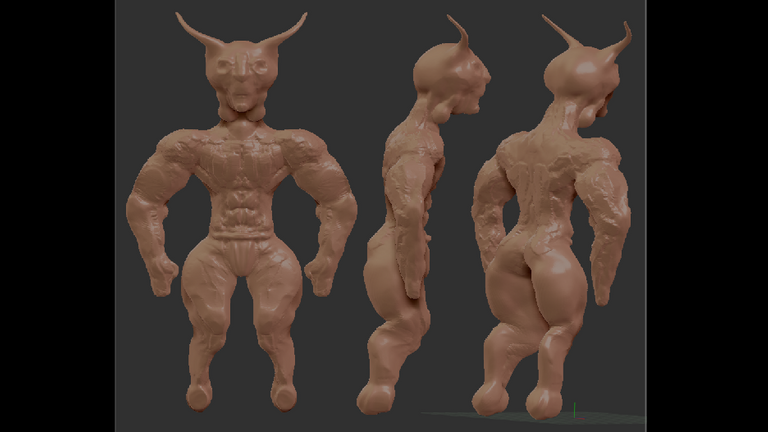
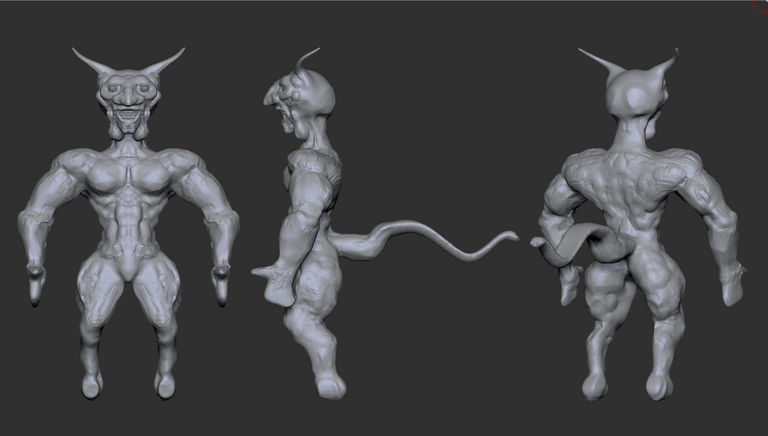
Here's a few other progress shots. You can see the shapes get more and more refined... a tail appears.. Hooves take form, etc...
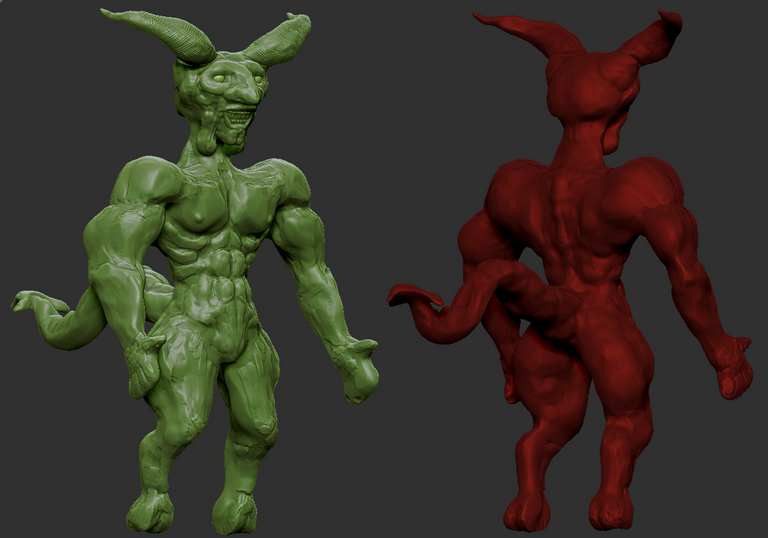
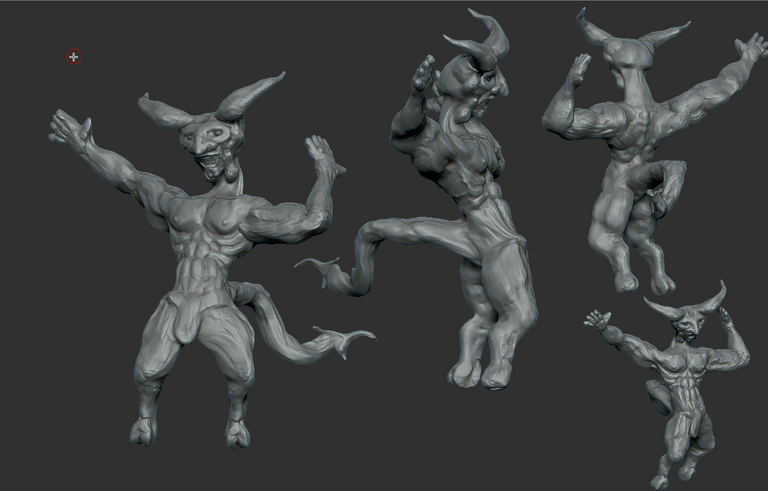
My software crashed part way (tip #1: save often!) - so I didn't get to record the entire process of creating this... The sculpture started as a sphere, and was stretched and carved to become what it needed to. While I didn't get the whole thing, here's a quick clip (greatly sped up) of what it looks like working in 3d... Here I am adding detail to the horns and changing their shape.
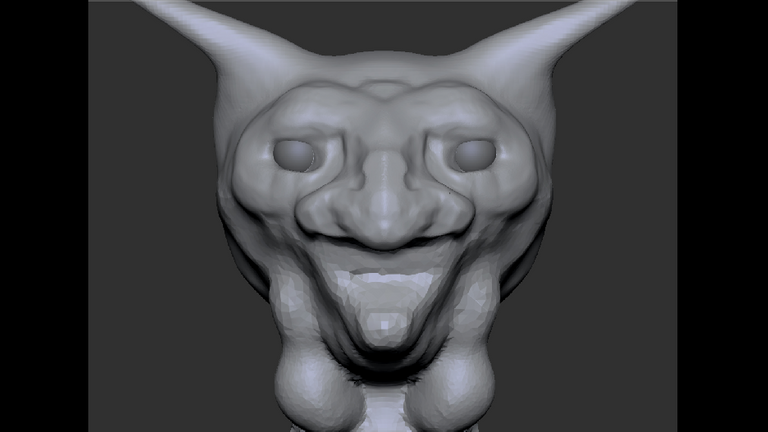
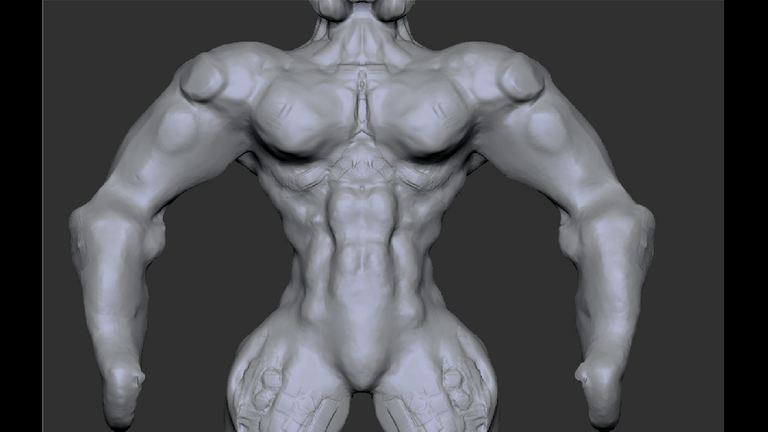
The closeup of the head - the top of it is further refined, thus is smoother, than the bottom- which is still in extremely low-rez. Most people add too much geometry too quickly. Same applies to the closeup of the body.
So there you have it. I'm basically out of characters to use, so I'll stop here.
Make sure to follow / vote / resteem --I post new stuff daily, and strive to make it good.


This look like an online tutorial, we are fond of 3D images but never might be botherd about how it gets into its shape. So this post is really worth to have a look and learn or maybe at least a know how on technology or techniques behind this great animation.
Good to see, there is a reminder too for everyone to make sure works are often to be saved or one would get lost everything in the middle of the work.
The Monster looks good and it is quite funny to see its different shapes, poses etc in its under construction stage. By the way I think you are a professional from the way you explained the stuff.
Posted using Partiko Android
Thanks for the kind and insightful feedback. I am a professional in most things I do, but mostly by attitude. I am a professional artist, though I don't do much in 3d, I've done 3d, used to want a career- in 3d, and i keep tinkering with it. I'm also a professional explainer of things.
Posted using Partiko Android
I loved your answer dude. Probably that best profssional way to answer. Haha, Professional explainer, Is it a designation in any companies in your area.
Happy to meet you over here.
Posted using Partiko Android
Great post you made and I love that devil. Warm colours, he is hot! 💕
Posted using Partiko Android
this is what I call quality post
serious content, I am constantly coming back to the Steemit for the people like you. great job
That's about the nicest thing that someone can say to me on this platform, I think. Thank you! Thrilled that someone likes the content (Writing a sequel right now)
This model doesn't need the other texture maps to look the way it is, it only needs the demonic map. XD That grin and the pose gives me the impression that he's so proud of his demonic abs haha.
Jokes aside, I think the problem with the order of 3 phases detail happens mostly when I don't have an absolutely clear image of the model in my head or reference images. Models like normal human figure and the skin detail is not that difficult, but sometimes things like monsters, robots, and all that imaginative fun can be a bit tricky to figure out which details must be made first. Having too much or too little ideas for a single model in mind doesn't really help with this case. Or at least that's how I always feel.
And, God, I really need to learn about compositing. >.<
All this time I've been focusing on getting better at sculpting and modeling, leaving compositing down below my to-do list. Looking at your red-tinted render, I've watched a couple of compositing tutorials but didn't know that compositing can have an effect that strong. Thank you for the tips, the unintentional reminder (to learn compositing), and congrats for getting curied! You deserve it ^^
I'm not even sure that I'd look up the word compositing. Rather I'd look up what to do with your 3d app + photoshop. While technically it is compositing, googling comparing will more likely show you after effects, nuke, and other things which are for compositing film... taking the video, motion tracking, masking, color correction/ grading, adding your 3d, green screen, etc.. useful, but not what I'd prescribe to you at this juncture. But if you type blender and photoshop, or zbrush and photoshop. Or finishing your blender in photoshop, etc. You'll get stuff that's useful.
Posted using Partiko Android
And by the way, I decided to follow your suggestion about looking for kitbash too. I've found a good kit and will try it on that tv bot that I posted soon. Let's see if I can apply tertiary details nicely to it... .
Thank you theartofori! You've just received an upvote of 28% by artturtle!
Learn how I will upvote each and every one of your posts
Please come visit me to see my daily report detailing my current upvote power and how much I'm currently upvoting.
This post was shared in the Curation Collective Discord community for curators, and upvoted and resteemed by the @c-squared community account after manual review.
@c-squared runs a community witness. Please consider using one of your witness votes on us here
Hi theartofori,
Visit curiesteem.com or join the Curie Discord community to learn more.
Congratulations @theartofori! You have completed the following achievement on the Steem blockchain and have been rewarded with new badge(s) :
You can view your badges on your Steem Board and compare to others on the Steem Ranking
If you no longer want to receive notifications, reply to this comment with the word
STOPLove the gamification of the platform @steemitboard - keeps it fun and interesting. I really enjoy your posts. I've been posting for far longer than a week, every single day though--- haven't seen the "every single day" award (on my profile- seen it on others') - what gives? :)
Congratulations @theartofori!
Your post was mentioned in the Steem Hit Parade in the following category: