The first time I saw my kitchen, my realtor and I had a hearty laugh. The selling agent had advertised the space as a "gourmet kitchen". I think many people have a picture that comes to mind when they hear the words "gourmet kitchen" and "cook's dream". What I pictured looked a little something like this:

(Image via one of my favorite stores, www.lowes.com)
What we saw instead was this:
.jpg)

I knew immediately that this would be one room that would quickly receive attention, even though I wouldn't be able to afford a total upgrade immediately. However, as I stated in my previous DIY blog post, waiting for and working for what I want are two things I can do like a boss!
Everything in the kitchen needed to be touched: cabinets, counter tops, back splash, floors. Where does a DIY-er even begin?? I usually choose my next project very scientifically: whatever bothers my eyes the most gets taken care of next. After I scraped the popcorn off my ceiling and took off five (yes, FIVE!) layers of stained and torn wallpaper off the living room walls, the kitchen was the next project. I figured the biggest bang for my buck would refacing the cupboards.
My first job was to degloss the cupboards with some TSP. I planned to paint them to give the kitchen an updated color scheme. After that was finished, I hauled all of the doors and drawers to the basement to do something about that awful routed border. My plan was to use 1/4" thick boards that were about 2.5" wide, which would cover almost all of the border (with the exception of the curved parts in the corners.) For the drawers, I needed to use 1.5" wide boards. I used a chop saw, a nail gun, an air compressor, and some wood glue. It surprisingly only took a few hours to finish putting the trim around all of the doors and drawers.
![19[1].jpg](https://images.hive.blog/768x0/https://steemitimages.com/DQmWoLC66KV4z4uRz9TDQy9R4L9HFymPfhCzb8ekipuonyi/19%5B1%5D.jpg)
![15[2].jpg](https://images.hive.blog/768x0/https://steemitimages.com/DQmTPuiZphHDMk5mePg3rSvwrRE4LfJnnFxKeJwdH8GCfjh/15%5B2%5D.jpg)
![13[1].jpg](https://images.hive.blog/768x0/https://steemitimages.com/DQmTuL3yQkY9B57LHzRaSLrHPHtRmSZedPB7CaHkZvcgcPD/13%5B1%5D.jpg)
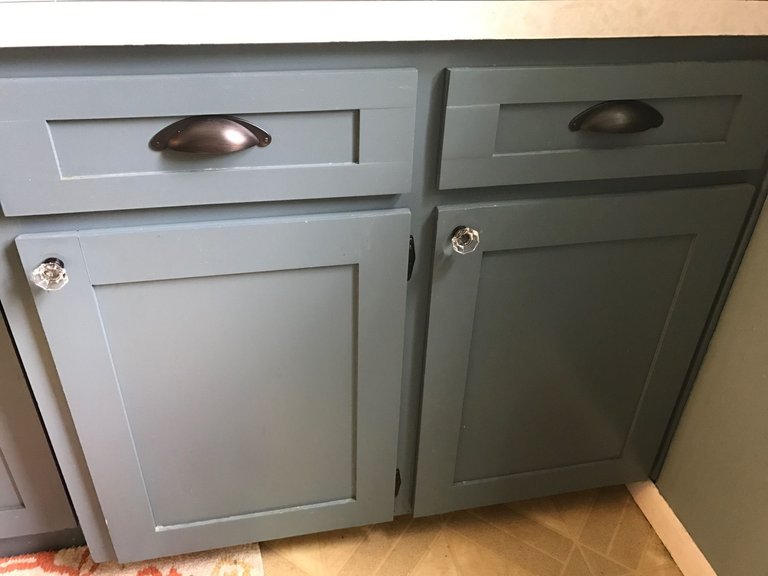
I did need to fill in the curved parts of the border with wood filler to erase that offending line. After priming and painting, I rehung the drawers and voila! I had almost new cupboards in just a weekend. I very much wanted to paint them a rich navy; however, I was concerned that it would make the room extremely dark. Instead, I went with a smokey blue color. When this coat of paint needs to be redone, I think I will do the navy cupboards for a change. In keeping with the time period and character of my house, I chose glass knobs and oil rubbed bronze cup pulls. All of the doors in the house have glass knobs, so I really wanted to continue that in the kitchen as well.
![16[1].jpg](https://images.hive.blog/768x0/https://steemitimages.com/DQmZnBg8xEbRnMweZjfzr293U8ZPKSnfH9LVD8xe1fWbTWR/16%5B1%5D.jpg)
![17[1].jpg](https://images.hive.blog/768x0/https://steemitimages.com/DQmTfVZSei84B7TtZsH7pz4vuWbxyqN92VpsCxoQzwQUJN3/17%5B1%5D.jpg)
![18[1].jpg](https://images.hive.blog/768x0/https://steemitimages.com/DQmRFb5kdsqfDgxMJDvMwbjkXmhe4ykyPd6V3DyHJxbXfgG/18%5B1%5D.jpg)
This was actually a super fun project (except for rehanging the doors...I hated that part!) It was my first time using a chop saw and nail gun. I had borrowed a friend's saw, and after completing this project, bought one of my own. Hopefully you enjoyed this trip down memory lane with me, and stay tuned for Phase 2 of the kitchen: the flooring! I'm in the process of picking it out as I type; however, if I go with the hand-scraped bamboo floors I am strongly considering instead of the tile as I had originally planned, I may have someone else do them so I know they are done right (and maybe can learn how to do them myself!)
Would you go with hand scraped bamboo or tile? I would love to hear your thoughts! Anything will be better than what is currently there.

looks great!! Thanks for information too! Really like the color you picked.
Thank you! Sometimes picking the color is the hardest part for me because I love so many of them!
Wow! That's a lot of work!