Hey everyone,
Recently, I read a post by @mengene explaining how deep learning was used in biology. It inspired me to write this article about how I used a neural network in a microfluidic project, and how you can apply the same technology to your own project very easily!
What I was trying to do
Let's start at the beginning, my job during this project was to assist Marc PRUDHOMME, a Ph.D. student on parts of his thesis. He had previously built multiple devices capable of generating micro-bubbles, but to know the size of the bubbles he needed to click on the borders of multiple bubbles to get a good approximation of the diameter of the bubbles. This procedure takes a lot of time and the images from the microscope are not the clearest pictures I have ever seen. So he asked me if I could automate the process to speed up the experiments.
After a "thorough" search on the internet, I found 2 ways of detecting circles in a picture :
- Circle Hough Transform
- Neural Networks for Object Detection
The first one is already implemented in a well-known python module named OpenCV. It seemed pretty simple to use at first glance.
The second solution needed a dataset created manually and painfully, plus I had no idea of the time needed for training the network. So I went with the Hough Transform.
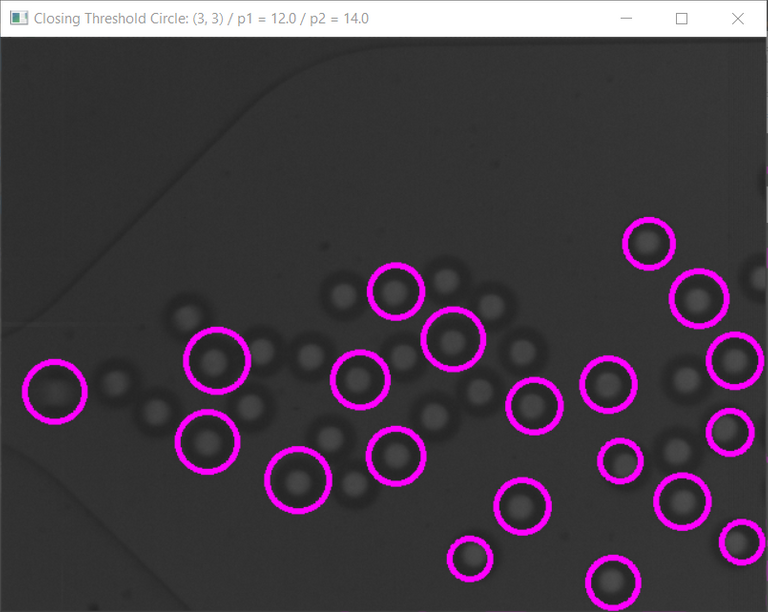
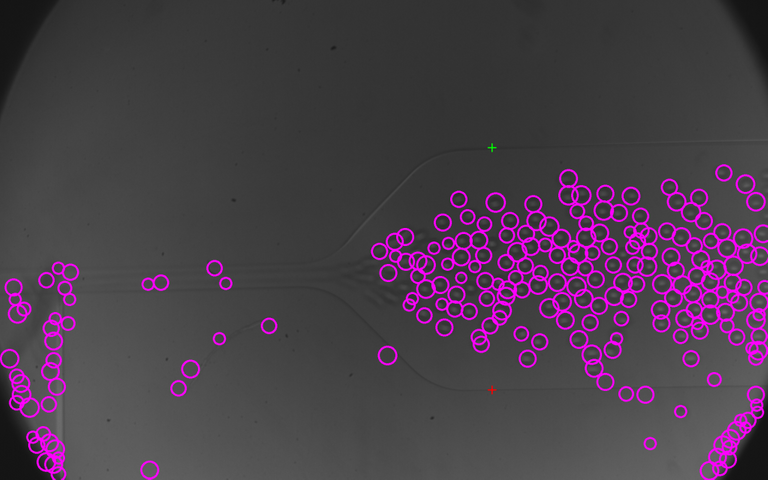
What I didn't anticipate was that it was very difficult to find concentric circles and I needed to tweak the parameter for the slightest variation in the luminosity or size of the bubbles, meaning that it took time to get the measurement needed. Too much time. Here is an example of what I could manage to get once the parameters were pretty much dialed in :
And what it can look like if it's slightly off :
I tried harder for a few days but dropped this solution just before the Christmas holidays because of the amount of effort needed each time the image was slightly different.
That's when, I'm not exactly sure how, maybe a space-time anomaly, I had some free time during the holidays. I decided to give the neural network a chance.
Getting started with Neural Networks for Object Detection
So I was looking for architectures that would allow me to easily train a neural network with my own dataset. But it didn't only need to classify the images, I also needed the coordinates of the bounding boxes to measure the bubbles.
I remembered YOLO (You Only Look Once), a neural network capable of such glorious feats. 4 years later, the architecture was already at its fifth version (from different authors), and from my point of view this one was the easiest to try. So here is the process with YOLOv5!
Preparing a good dataset
I wasn't ready to spend days creating a dataset so I choose 20 images from the pictures I had at the time. My criteria were to choose the more diverse possible pictures to train the network for almost any conditions it could encounter. I also wanted to draw the bounding boxes for every bubble in the pictures but there was a lot in each picture so I decided to crop the pictures to contain around a dozen of bubbles each.
Combined with the discovery of the website MakesSense.ai, a website that let you draw easily the bounding boxes, this took the creation of the dataset to wrap speed and it was done in a matter of hours.
So once, you have your pictures selected, separate them into 2 folders, one with the majority of the pictures (16 for me) for the training part and the other with fewer images (I choose 4) for the valuation part.
Then import the pictures from the first folder in MakeSense.ai after clicking on the "Get Started" button. Then click on "Object Detection" and fill the labels in the next window, I just want to detect bubbles so I put the name "Bubble" as the only label. You can also load labels if you already have a file.
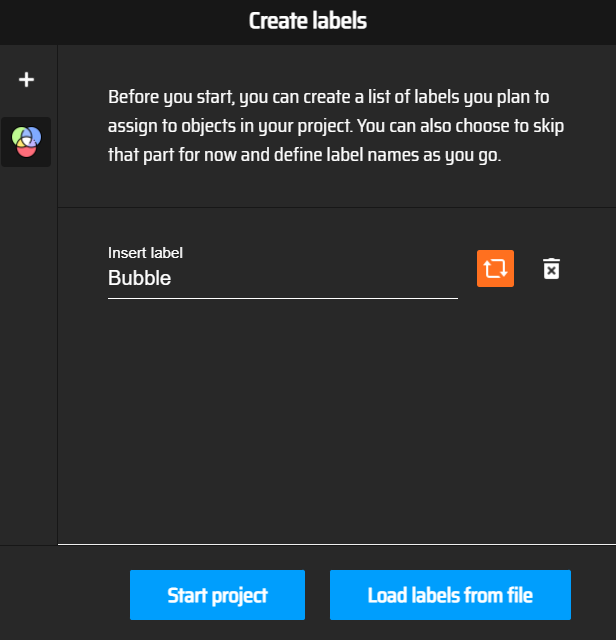 Screenshot of the MakeSense.ai website, where you put your labels
Then click on "Start Project" and draw the bounding boxes on the images and attribute a label to each of them :
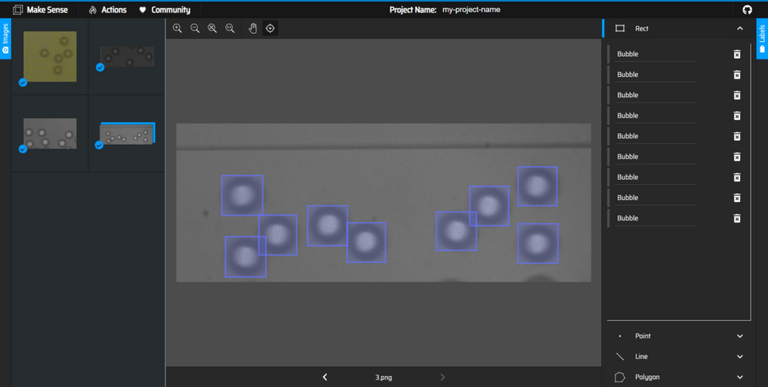 Screenshot of the MakeSense.ai website, where you draw bounding boxes
When you are done with the boxes of all images, click on "Actions -> Export Annotations" :
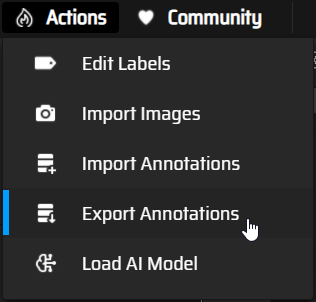 Screenshot of the MakeSense.ai website, Actions panel
Then check the case about the YOLO format and click "Export". You will get a zip file with a text document containing the labels (just a number in fact) and the coordinates of the bounding boxes.
Do the same thing for the second folder.
When you have all your annotations you can create a folder that you name as you like (I choose "trained_data") where you create a file with the .yaml extension (I put bubble.yaml). Inside this file, you will define the path to the images used for the training and the ones used for the valuation but also the number of classes (nc) and the names of the different classes in the same order as in MakeSense.ai :
train: train_data/images/train
val: train_data/images/val
# Classes
nc: 1 # number of classes
names: ['Bubble'] # class names
Then create these folders :
train__data
│
├───images
│ ├───train
│ │ "Put the images for training here"
│ │
│ └───val
│ "Put the images for valuation here"
│
└───labels
 │
 ├───train
 │ "Put the text files from MakeSense.ai for the training images here"
 │
 └───val
 "Put the text files from MakeSense.ai for the valuation images here"
Place the images in the corresponding folders under images and the annotations in the labels folders. You should have something that looks like this :
train_data
│ bubble.yaml
│
├───images
│ ├───train
│ │ 0.png
│ │ 1.png
│ │ 10.png
│ │ 11.png
│ │ 12.png
│ │ 13.png
│ │ 14.png
│ │ 15.png
│ │ 16.png
│ │ 2.png
│ │ 3.png
│ │ 4.png
│ │ 5.png
│ │ 6.png
│ │ 7.png
│ │ 8.png
│ │ 9.png
│ │
│ └───val
│ 0.png
│ 1.png
│ 2.png
│ 3.png
│
└───labels
 ├───train
 │ 0.txt
 │ 1.txt
 │ 10.txt
 │ 11.txt
 │ 12.txt
 │ 13.txt
 │ 14.txt
 │ 15.txt
 │ 16.txt
 │ 2.txt
 │ 3.txt
 │ 4.txt
 │ 5.txt
 │ 6.txt
 │ 7.txt
 │ 8.txt
 │ 9.txt
 │
 └───val
 0.txt
 1.txt
 2.txt
 3.txt
You are now ready for training!
Training your Neural Network
This part is going to take some time, but it's the turn of the computer to work and not you. First, you need to install Git, Python and pyTorch. You can also test everything we are going to see here with a simple click on my Google Colab if you don't want or cannot install things on your computer (just put your training data on GitHub and change the link in the code). Then you just have to click on "Runtime -> Run All" to execute all the commands and see what they do.
Once pyTorch is installed, open a terminal in the folder of your choice and execute each line one after the other :
git clone https://github.com/ultralytics/yolov5
cd yolov5
pip install -qr requirements.txt
Copy your training data in the folder yolov5. Then we are going to use this command to train the network, but before executing it, let me explain the different terms :
python train.py --img 640 --batch 8 --epochs 80 --data train_data/bubble.yaml --weights yolov5s.pt --cacheThe training phase of the neural network is realized by the program train.py inside yolov5, it needs these arguments :
- --img : size of the images (if the feature are not relatively too small it's a great idea to leave it at 640)
- --batch : total batch size (depends on your configuration)
- --epochs : number of times it's going to try to get better, I put 60 to test if it works and 700 to have a decent result)
- --data : path of the yaml file created before
- --weights : wich type of network you want to generate, see this page for more details about this.
- --cache : cache images to ram
When the program is done, it will prompt these lines explaining where it stored the best neural network obtained and its stats :

What you need to look for here, is to get the mAP (mean Average Precision) values as close as possible to 1. The number after mAP represent the ratio of the intersection of the area predicted and the area you selected, over the union of theses 2 areas. If they match perfectly, this number is 1, if they don't cross this number is equal to 0. Here I found that having a mAP of 99.5% for a 50% overlap (mAP@0.5=0.995) is good enough for what I'm trying to do.
It's also possible for the training program to stop if it doesn't find anything better in 100 epochs, then you will get this message :

You can also find some plotted stats for the graph lovers in results.png under the runs/train/exp folder, you can see the evolution of the precision and the errors :
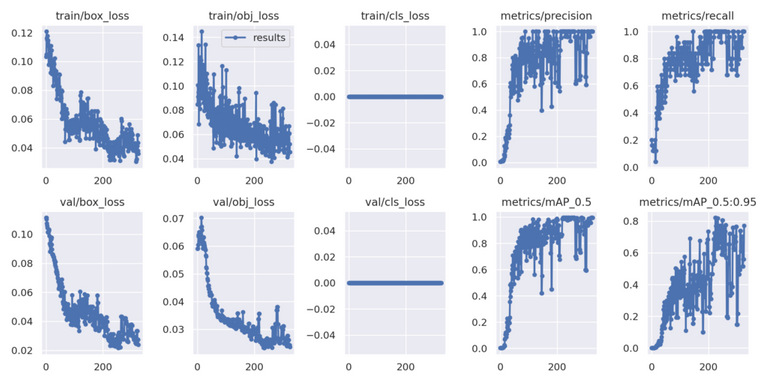
The training program always stores the best and the last results.
Using your Neural Network:
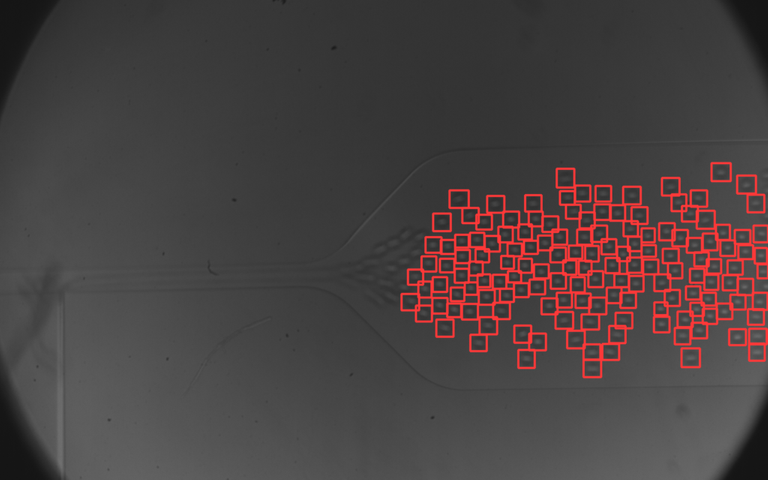
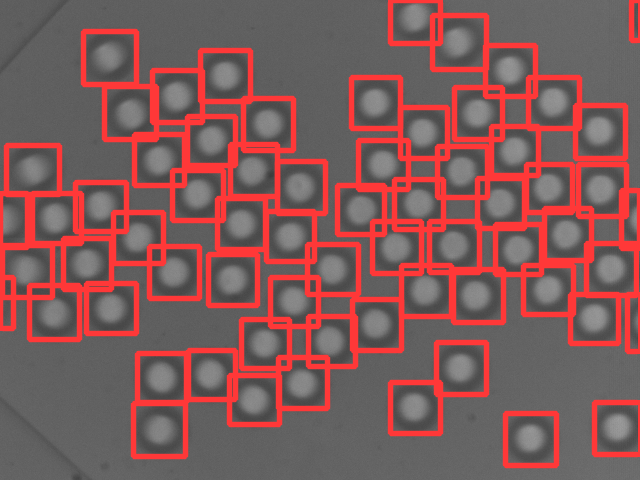
With this next command you can test your neural network on any pictures you want (change the name of the exp folder to match the one you want to choose) :
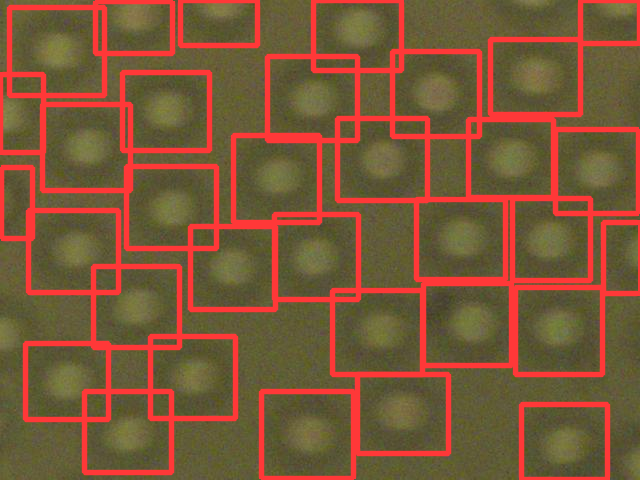
python detect.py --weights runs/train/exp/weights/best.pt --img 640 --conf 0.7 --source train_data/tests/0.png --hide-labelsThe result will be stored in runs/detect/exp (a number will be added after the folder name each time you use the program). Don't hesitate to play with the confidence threshold (--conf) between 0 and 0.99 to see more or less bounding boxes. Here are some examples :
You can also do detections on all images in a folder if you don't specify the file :
python detect.py --weights runs/train/exp/weights/best.pt --img 640 --conf 0.7 --source train_data/tests/ --hide-labelsYou can stop here or if you want to use your model in your own python program you can test this example by just changing the path of the model (where I wrote 'best500s') and the path of the image:
# Example from pytorch : https://pytorch.org/hub/ultralytics_yolov5/
import torch
# Model
model = torch.hub.load('yolov5','custom',path='best500s',source='local') # or yolov5m, yolov5l, yolov5x, custom
# Images
img = '0.png' # Path of the image you wwant to test
# Inference
results = model(img)
# Results
results.show() # or .show(), .save(), .crop(), .pandas(), etc.
print(results.pandas().xyxy)
The last line will print the coordinates of all the boxes found, it's what I needed to measure the size of the bubbles.
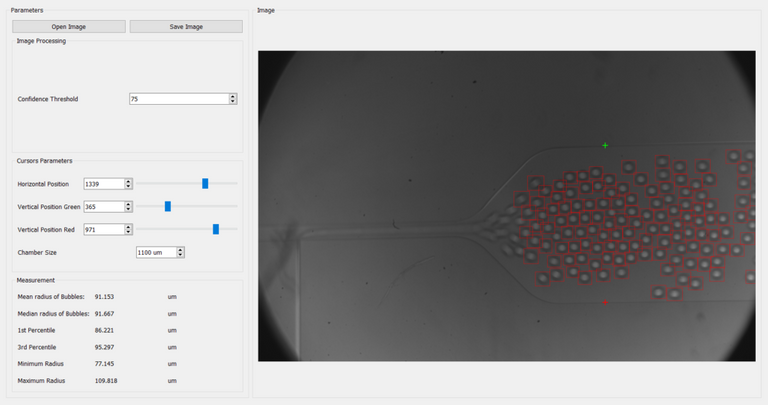
You can include these few lines in any of your programs, here I created a user interface with PyQT to change the picture easily, select a confidence threshold, and use 2 cursors to set the scale, the programs output various stats about the bubbles:
Conclusion
Here we are, now you know how to train your own YOLO model. We have seen that you don't need hundreds of images to train your model if you have a great diversity of images and time to train your model.
Thank you for reading through this post !
Source :
All the images of bubbles are being used here with the permission of the Phd student.
Nice article. I will look into this again soon. Just want to mention that Siraj Raval is a confirmed fraud. Lot of plagiarism and other stuff. See this
Thank you! Sorry, I wasn't aware of this, I will look for another source about YOLO, thank you for mentioning it.
Thanks for your contribution to the STEMsocial community. Feel free to join us on discord to get to know the rest of us!
Please consider delegating to the @stemsocial account (85% of the curation rewards are returned).
You may also include @stemsocial as a beneficiary of the rewards of this post to get a stronger support.
Would 20 images not be a bit a too small number? This could be probably found by testing against a larger sample. Have you tried this?
I didn't know about the Yolo algorithm and I have tried to look for an association of YOLO and jet images in the context of hadronic collisions (jet images are a thing in particle physics). Whereas I have found some hits, I was unable to find actual works that use it (only "rival" methods seem to be considered). I have no idea why (either there is a reason or this has never been tried).
Thank you for your comment :)
It's exactly what I thought at first, but I tried anyway because I thought that simple features of the objects I was trying to detect and the clear background could mean that I could achieve my goal with a small dataset. I didn't take the time to test on various sizes of datasets so here we go :
For this, I used the pets dataset available here: https://www.robots.ox.ac.uk/~vgg/data/pets/ ( and here to have it to the correct format https://public.roboflow.com/object-detection/oxford-pets/1 )
I will only work on one breed, there are around 200 images per breed. So I have uploaded another version here with 2 datsets at 200 epochs :
If you want to test it by yourself you can do it here :
https://colab.research.google.com/drive/1dpNYAnuAY6xdH02ooIkzuujiLSvO97Wo?usp=sharing
Here is the result at the end of the training for the big one :
And for the small one (it's much faster to train and the precision is slightly below) :
But when testing the models, the small one was significantly worse, not detecting most of the dogs, as the one trained with the big dataset found most of the dogs.
So yes, the size of the dataset is important but for features like circles in almost controlled environment 20 pictures were sufficient. But as the complexity of the objects and images increases, you will need bigger datasets. And I found that increasing the number of epochs can compensate a little bit for a dataset too small.
Yeah I haven't found any examples of jet images used with YOLO either, maybe the algorithm isn't fit for this kind of detection. Do you know a small dataset (in case I have to convert the boxes) I could try it on ? I only found this one for the moment : https://zenodo.org/record/3602254#.YfPyn_DMJPY
I have unfortunately no time to test it by myself. I am so overwhelmed at the moment.
For a particle physics dataset, I would need to generate those images by myself. Depending on the time you have and how continuously you could inject energy in such a potential project, I can maybe discuss with a colleague and start a real project with you on this matter. Would it be compatible with your studies?
Cheers!
Unfortunately, I have neither the time nor the expertise for such a project, sorry.
Yeah I knew it ;)