LET THERE BE LIGHT
Admittedly, the title is a bit sensational. This article is not about any technical parameters, the favourable price or the coolness factor. I have not compared all possible torches and put them through their paces. I simply took the pictures from the last two years and looked at which torches I have used. I can't say for sure whether the order of my top 10 is actually correct, but it will be about right.
I will briefly describe why and what I use each torch for. I will also include the important technical parameters and the price. Some torches are not or no longer available.
Zugegeben, der Titel ist etwas reißerisch. Es geht in diesem Beitrag nicht um irgendwelche technischen Parameter, den günstigen Preis oder den Coolness Faktor. Ich habe nicht alle möglichen Taschenlampen verglichen und auf Herz und Nieren getestet. Ich habe einfach die Bilder der letzten zwei Jahre genommen und geschaut, welche Taschenlampen ich verwendet habe. Ob die Reihenfolge meiner Top 10 tatsächlich stimmt, kann ich nicht mit Sicherheit sagen, aber so ungefähr wird das stimmen.
Ich werde für jede Taschenlampe kurz beschreiben warum und wofür ich sie verwende. Außerdem werde ich die wichtigen technischen Parameter und den Preis angeben. Einige Taschenlampen sind nicht oder nicht mehr erhältlich.
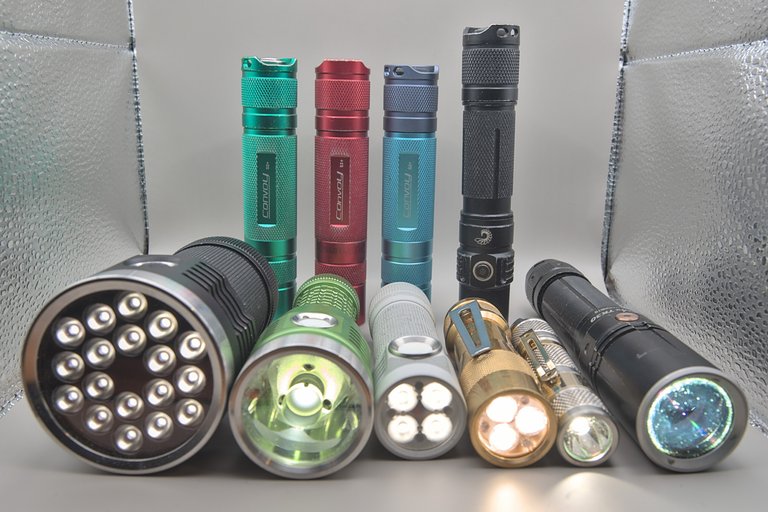
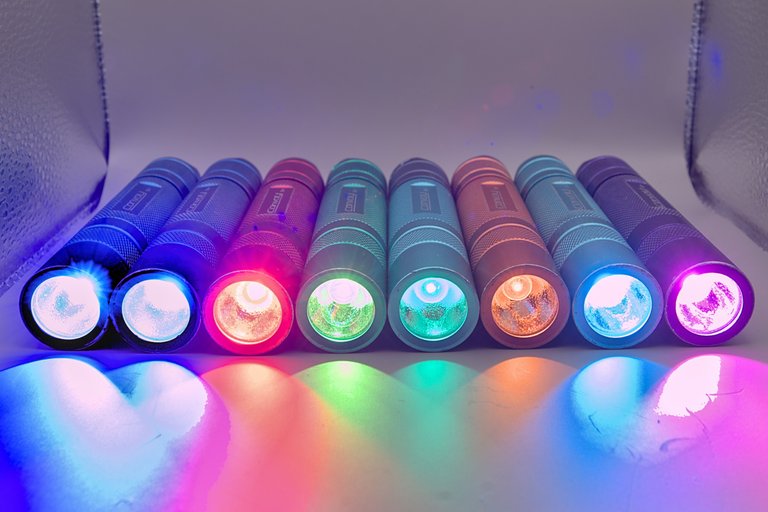
In front, from left to right: Emisar D18, Noctigon DM11, Emisar D4K, Lumintop FW3A, Lumintop Tool AA, Fenix TK35 White Laser
Rear, from left to right: Convoy S2+ green, red, blue, Lightpainter Ryus Lightworks

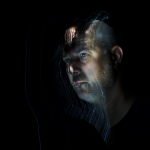
10 - FENIX TK35 WHITE LASER
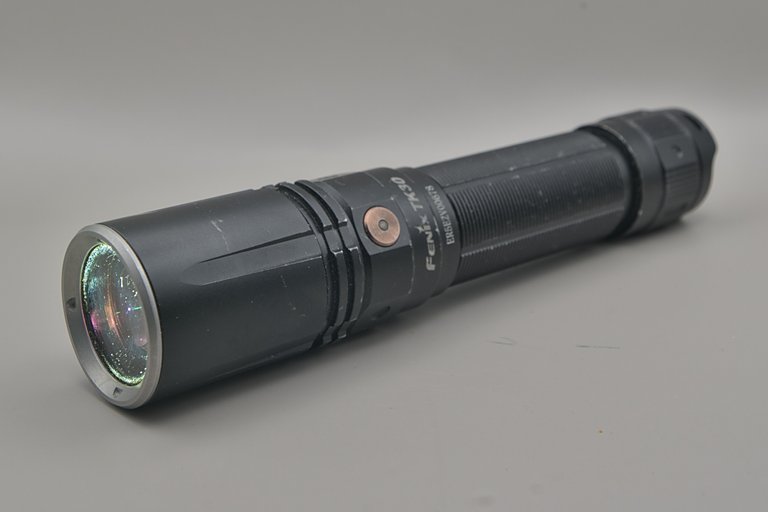
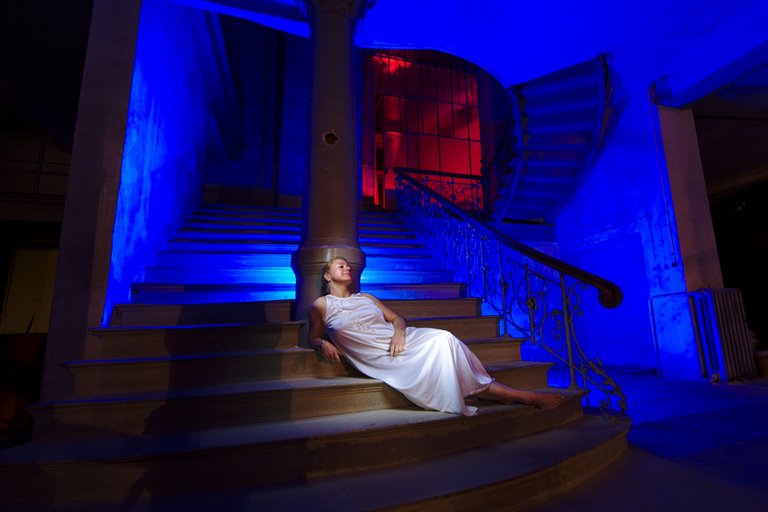
The Fenix TK35 is no ordinary torch. This LEP lamp uses a laser to excite a phosphor layer to glow and emit it through the lamp head via mirrors and lenses. The beam angle is very small. The light range is correspondingly large. With the specified 600 lumens, the TK35 shines over 1000 metres. When using it, you should be very careful and never look into the beam of light and make sure that no other people or animals are hit by the beam of light.
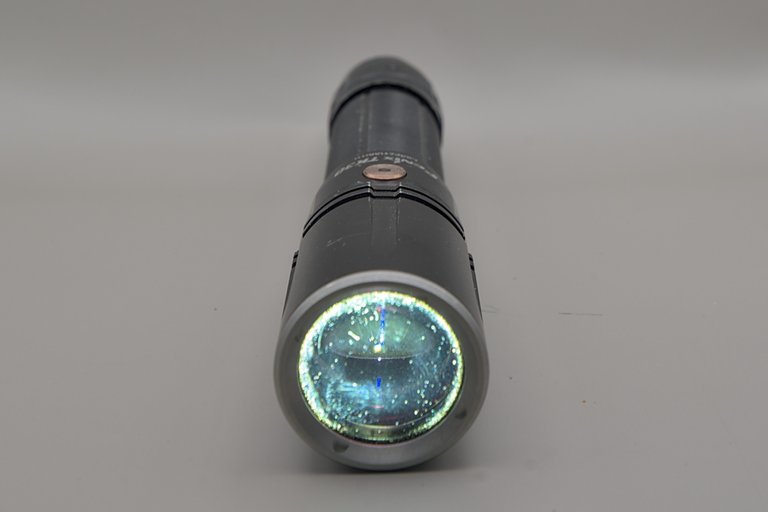
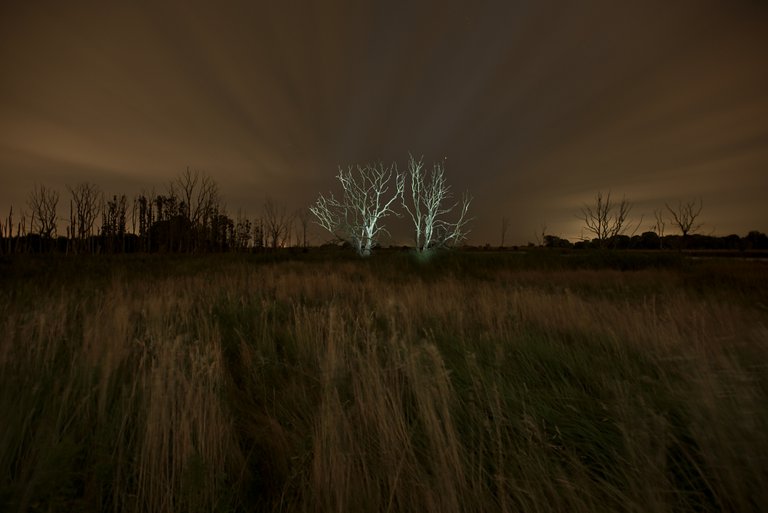
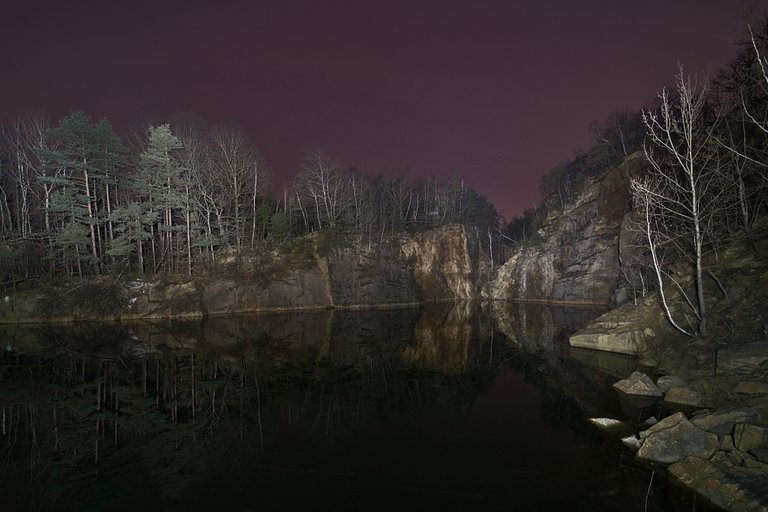
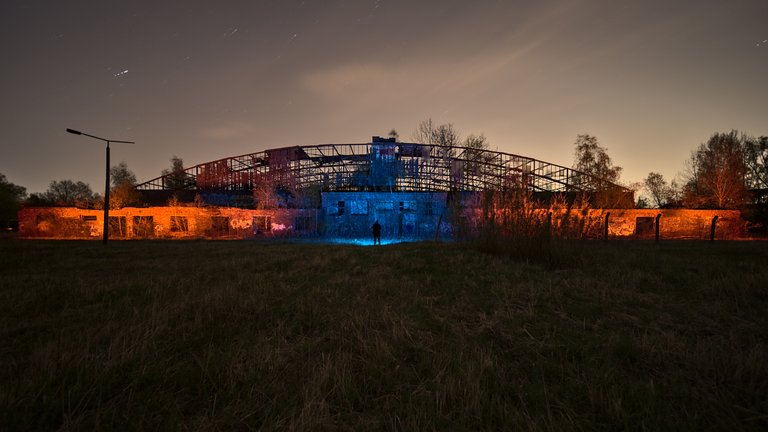
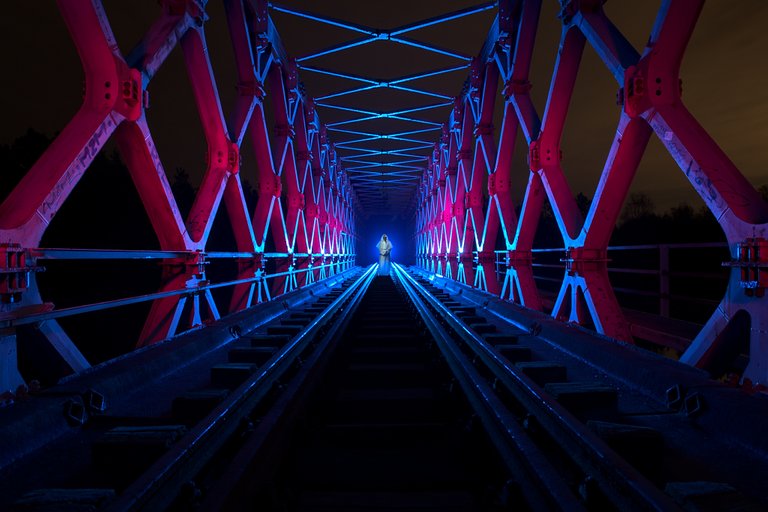
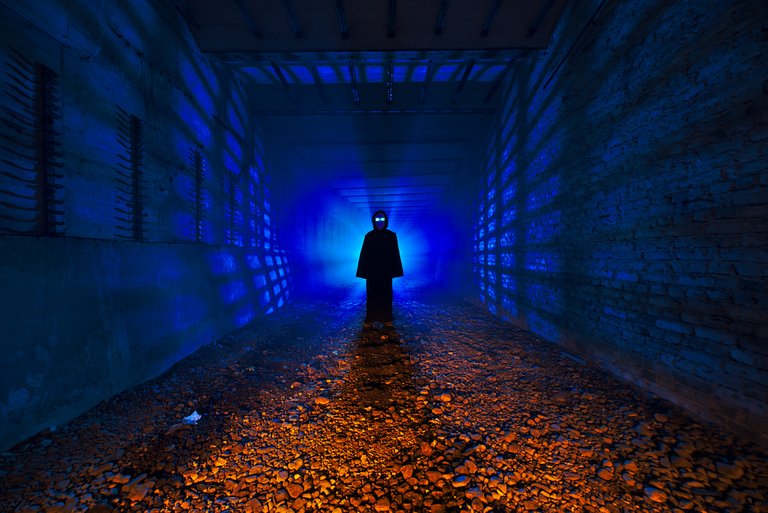
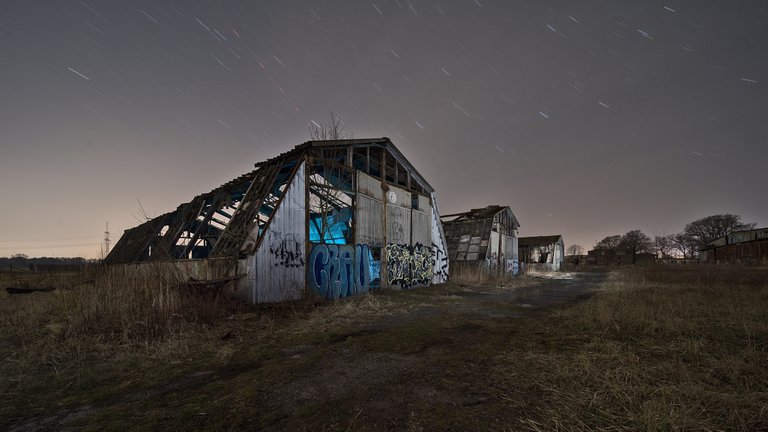
I use the TK35 to illuminate inaccessible things at a great distance. In addition, it is possible to clearly delineate silhouettes. However, this requires a large distance between the lamp and the model. The very narrow light cone of the TK35 is clearly visible in the example image.
The price for the TK35 and comparable LEP lamps is quite high, you have to transfer 250 to 300€ to the online dealer to call such a lamp your own. The TK35 is powered by a 21700 rechargeable battery. This can be charged via a USB C charging socket integrated in the lamp.
Bei der Fenix TK35 handelt es sich nicht um eine gewöhnliche Taschenlampe. Bei dieser LEP Lampe wird mit einem Laser eine Phosphorschicht zum leuchten angeregt und über Spiegel und Linsen durch den Lampenkopf emittiert. Der Abstrahlwinkel ist sehr klein. Die Leuchtweite dementsprechend groß. Mit den angegebenen 600 Lumen leuchtet die TK35 über 1000 Meter weit. Bei der Verwendung sollte man sehr vorsichtig sein und niemals in den Lichtstrahl blicken und sicherstellen, dass keine anderen Personen oder Tiere mit dem Lichtstrahl getroffen werden.
Ich verwende die TK35 einerseits um unerreichbare Dinge in großer Entfernung zu beleuchten. Darüber hinaus ist es möglich Silhouetten klar abgegrenzt darzustellen. Dazu ist allerdings ein großer Abstand zwischen Lampe und Model nötig. Im Beispielbild ist der sehr enge Lichtkegel der TK35 gut zu sehen.
Der Preis für die TK35 und vergleichbare LEP Lampen ist recht hoch, 250 bis 300€ muss man zum Onlinehändler transferieren um solch eine Lampe sein eigen zu nennen. Betrieben wird die TK35 mit einem 21700 Akku. Dieser lässt sich über eine in der Lampe integrierte USB C Ladebuchse laden.
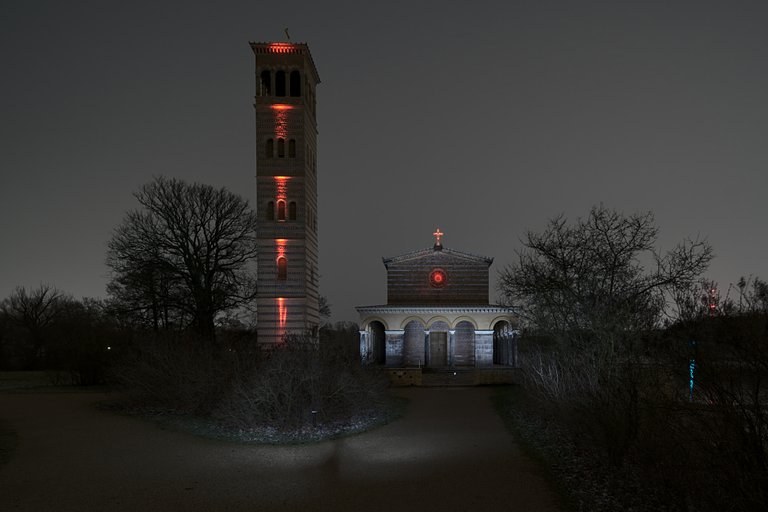
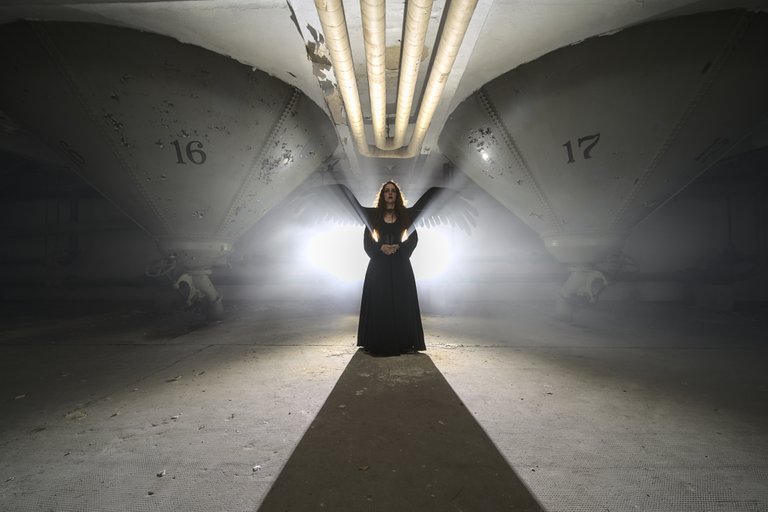
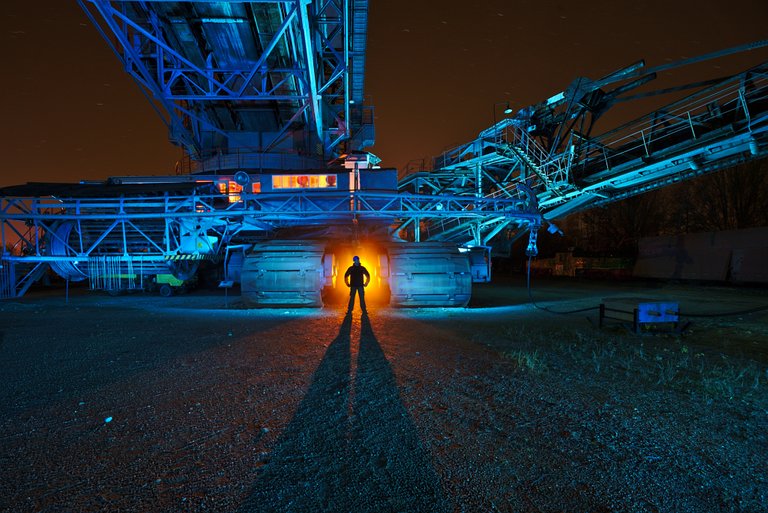
In the next picture, I shone the TK35 into the sky behind the bell tower.
Im nächsten Bild habe ich mit der TK35 hinter dem Glockenturm in den Himmel geleuchtet.

9 - NOCTIGON DM11

The Noctigon DM11 has a narrow beam angle thanks to a special lens, a thrower for your trouser pocket. I use this torch to illuminate areas at a greater distance. It is fitted with a SFT-40 LED with 5000K. Colours are reproduced naturally. It is powered by a 21700 rechargeable battery. This is not included in the scope of delivery. The DM11 currently costs $37. It is available in the manufacturer's online shop.
Die Noctigon DM11 hat durch eine spezielle Linse einen engen Abstrahlwinkel, ein Thrower für die Hosentasche. Diese Taschenlampe verwende ich um Bereiche in größerer Entfernung gezielt zu beleuchten. Verbaut ist eine SFT-40 mit 5000K LED. Farben werden natürlich wieder gegeben. Betrieben wird sie mit einem 21700 Akku. Dieser ist nicht im Lieferumfang enthalten. Die DM11 kostet aktuell 37$. Erhältlich ist sie im Onlineshop des Herstellers.
https://intl-outdoor.com/led-flashlights/noctigon-dm11-1-21700-middle-range-thrower.html

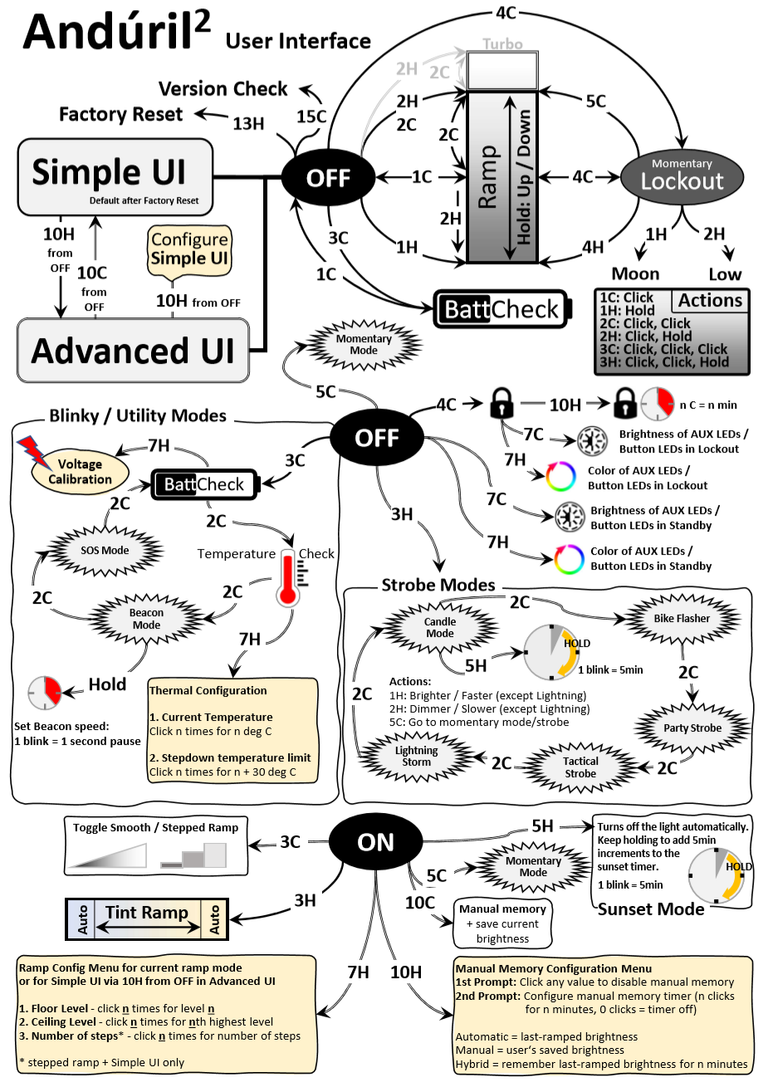
The DM11 can be fitted with various LEDs, like almost all torches from Emisar and Noctigon. The SFT-40 emits a maximum luminous flux of 1800 lumens. The torch is controlled using the Anduril UI. In addition to infinitely variable brightness control (ramping), other operating modes are also possible. Operation in momentary mode is also possible.
Die DM11 kann mit verschiedenen LEDs bestückt werden, wie fast alle Taschenlampen von Emisar und Noctigon. Mit der SFT-40 wird ein maximaler Lichtstrom von 1800 Lumen emittiert. Gesteuert wird die Taschenlampe mit der Anduril UI. Neben stufenloser Helligkeitsregelung (Ramping) sind weitere Betriebsarten möglich. Auch eine Bedienung im Momentary Mode ist möglich.
8 - LUMINTOP FW3A


Three LEDs are installed in the small housing of the FW3A, in my example Nichia 219C. Alternatively, the torch is available with Cree XP-L or Luminus SST-20. The FW3A produces the highest luminous flux with the Cree LED, 2800 lumens. However, the light is much more attractive with the Nichia and Luminus LEDs due to the higher colour rendering index. The FW3A is also controlled via the Anduril UI (see above). The small torch, priced at around €50, can be used both for light painting tools and for illumination. The light cone is quite wide and very homogeneous.
The required 18650 battery is usually not included in the scope of delivery. The battery must be able to deliver a continuous current of at least 10 amps. Otherwise the FW3A will not light up at full brightness. In the worst case, the battery will be damaged. A few last units are still available on Amazon. The FW3A is apparently no longer in production.
Im kleinen Gehäuse der FW3A sind drei LEDs verbaut, in meinem Exemplar Nichia 219C. Alternativ ist die Taschenlampe mit Cree XP-L oder Luminus SST-20 erhältlich. Den größten Lichtstrom jagt die FW3A mit den Cree LED raus, 2800 Lumen. Allerdings ist das Licht wegen des höheren Farbwiedergabeindex mit den Nichia und Luminus LEDs viel ansehnlicher. Die FW3A wird ebenfalls über die Anduril UI gesteuert (siehe oben). Die kleine Taschenlampe zum Preis von ca. 50€ kann man sowohl an Light Painting Tools auch zur Ausleuchtung verwenden. Der Lichtkegel ist recht weit und sehr homogen.
Der benötigte 18650 Akku ist gewöhnlich nicht im Lieferumfang enthalten. Der Akku muss einen Dauerstrom von mindestens 10 Ampere abgeben können. Andernfalls leuchtet die FW3A nicht mit voller Helligkeit. Im schlimmsten Fall nimmt der Akku Schaden. Einige letzte Exemplare sind noch bei Amazon erhältlich. Die FW3A wird offensichtlich nicht mehr produziert.
7 - LUMINTOP TOOL AA
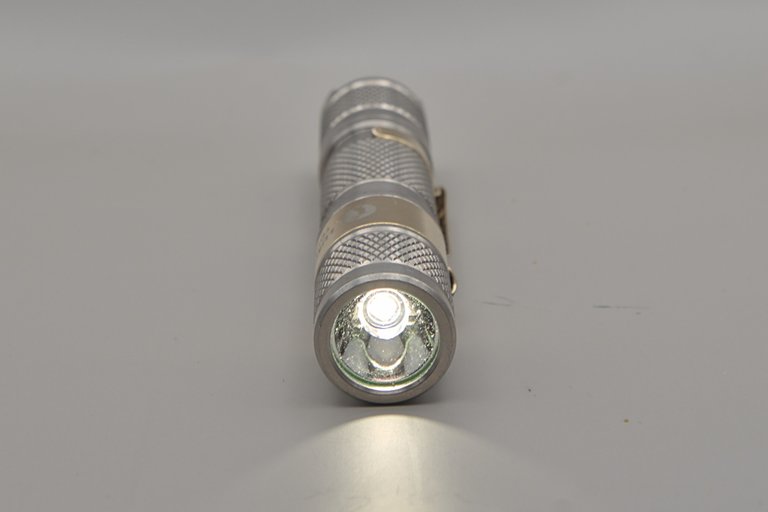
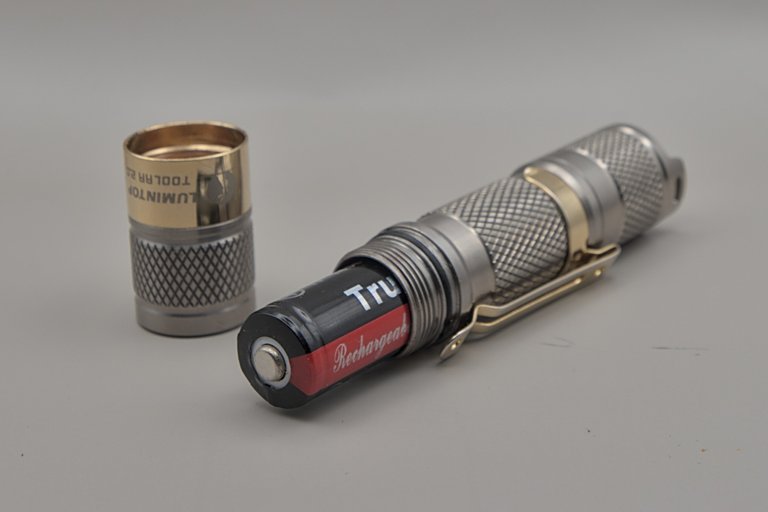
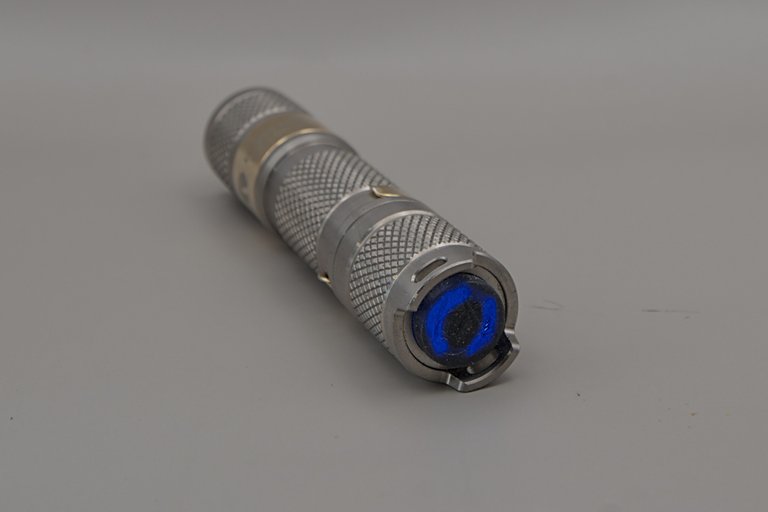
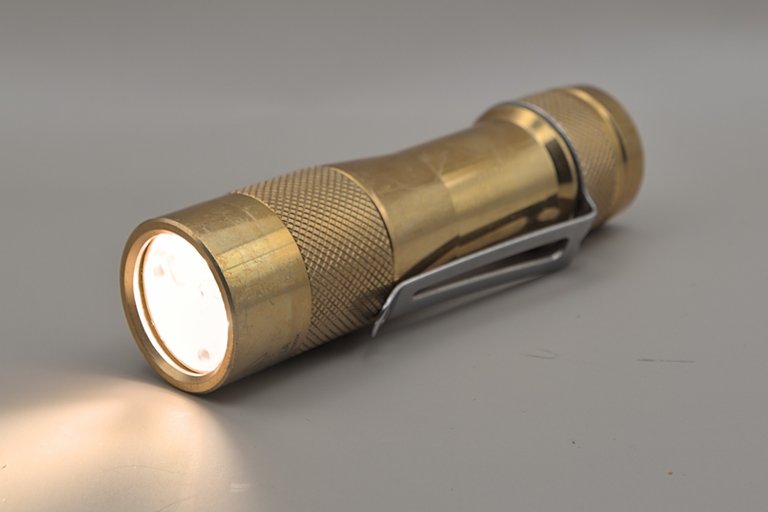
The small Tool AA is powered either by an AA battery or a 14500 LiIon rechargeable battery. With the latter, the specified maximum luminous flux is 650 lumens. In reality, the torch is brighter. I measured around 900 lumens. Very impressive for the size and the low price of €20 for the aluminium version.
I use the flashlight with a battery.
Die kleine Tool AA wird entweder mit einer AA Batterie oder mit einem 14500 LiIon Akku betrieben. Mit letzterem liegt der angegebene maximale Lichtstrom bei 650 Lumen. In der Realität ist die Taschenlampe heller. Ich habe ungefähr 900 Lumen gemessen. Sehr beeindruckend für die Größe und den geringen Preis von 20€ für die Variante aus Aluminium.
Ich verwende die Tool AA zum Beleuchten von kleinen Objekten und an kleineren Light Painting Tools.
6 - EMISAR D18
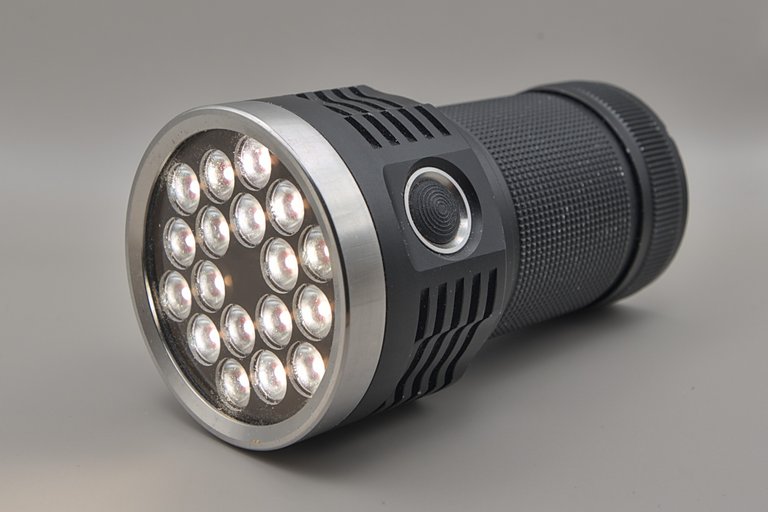
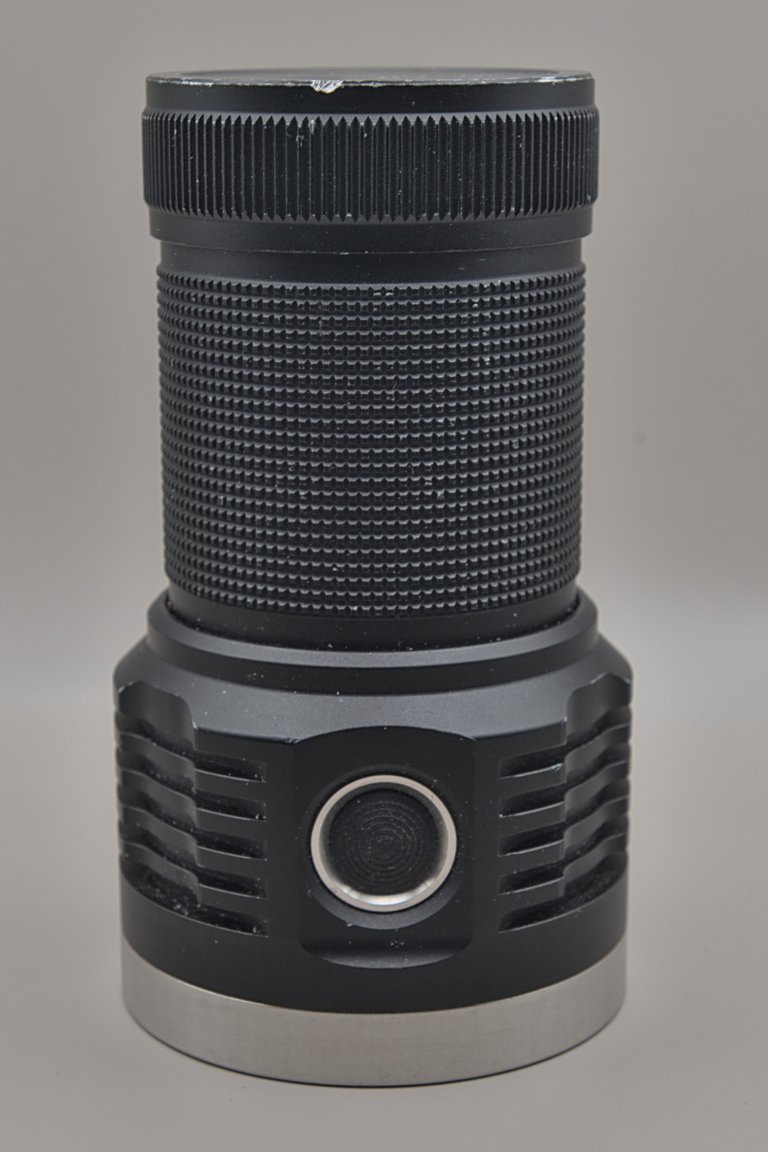
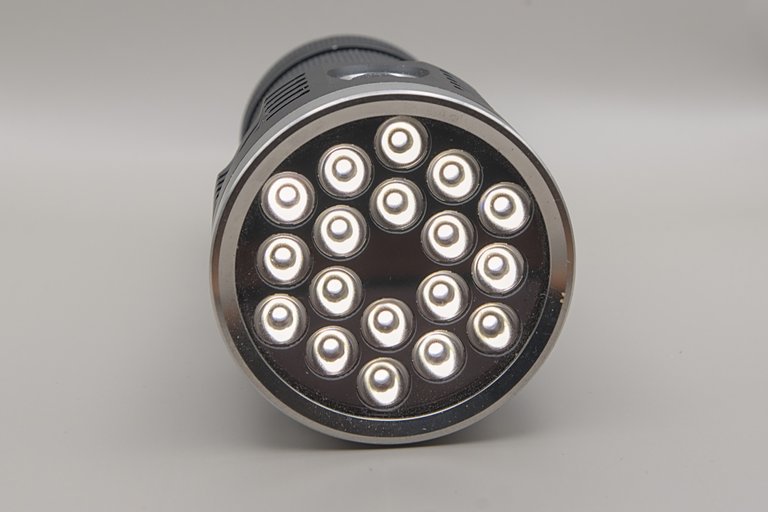
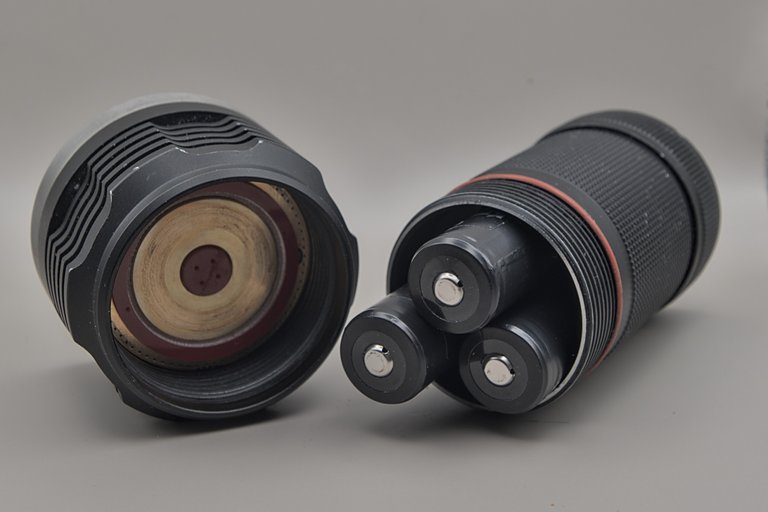
I use the Emisar D18 to illuminate larger areas. The 18 SST 20 LEDs installed provide an incredible 10,000 lumens at the brightest level. If the flashlight is fitted with other LEDs, the luminous flux is even higher, but with a less pleasant color temperature and lower color rendering index. The D18 is about the size of a 0.33 l beverage can and weighs 480 g including the three 18650 batteries required. The D18 is available directly from the manufacturer's online store at a current price of €88. The D18 is a flooder with a wide, very homogeneous light cone. With the "floody opitcs" option, the light becomes even softer and more homogeneous.
Die Emisar D18 verwende ich zur Ausleuchtung größerer Bereich. Die 18 verbauten SST 20 LEDs liefern in der hellsten Stufe sagenhafte 10000 Lumen. Wird die Taschenlampe mit anderen LEDs bestückt ist der Lichtstrom sogar noch höher, allerdings mit weniger angenehmer Farbtemperatur und geringerem Farbwiedergabeindex. Die D18 ist in etwa so groß wie eine 0,33l Getränkedose und wiegt inklusive der drei erforderlichen 18650 Akkus 480g. Erhältlich ist die D18 direkt im Onlineshop des Herstellers zum Preis von aktuell 88€. Die D18 ist ein Flooder mit breitem, sehr homgenem Lichtkegel. Mit der Option "floody opitcs" wird das Licht noch etwas weicher und homogener.
https://intl-outdoor.com/led-flashlights/emisar-d18.html
5 DIY LIGHT SCANNER
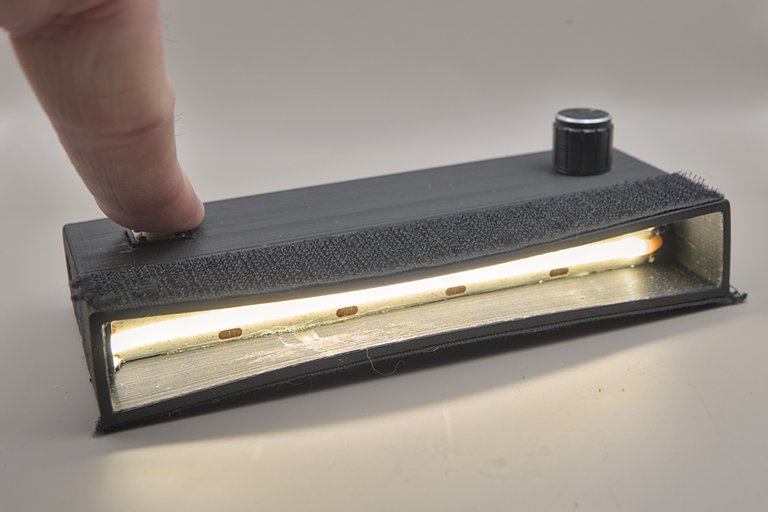
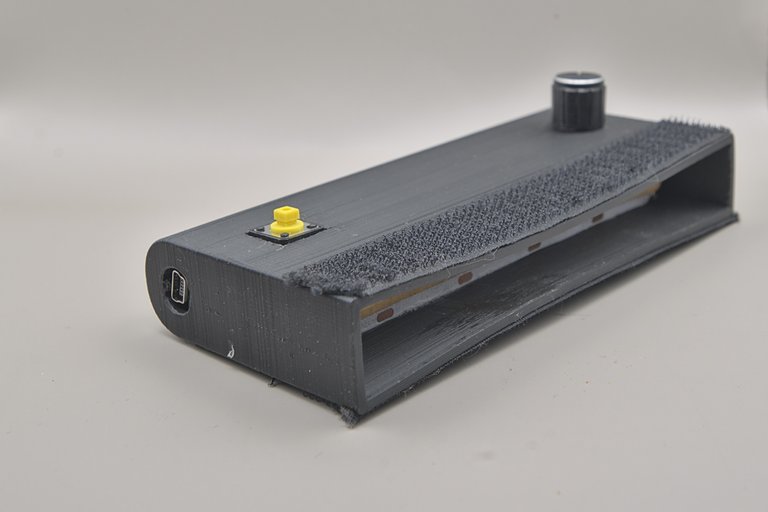
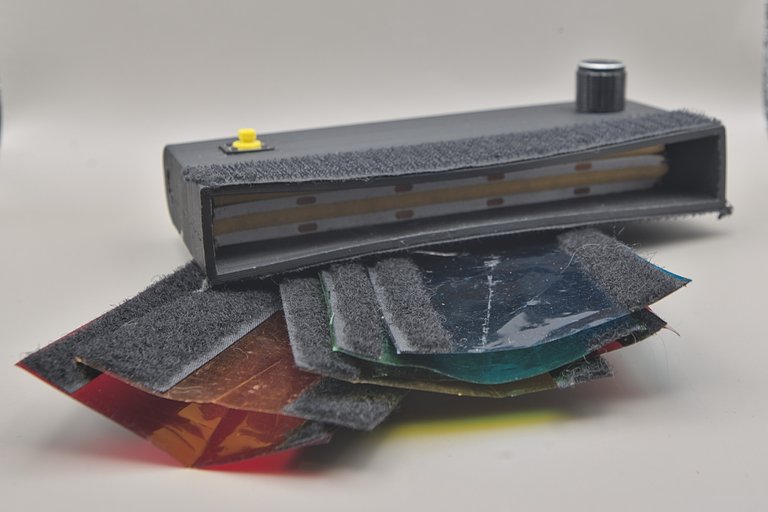
I mainly use the self-made scanner to illuminate people. As only a narrow strip is illuminated at a time, it is much easier for the model to keep still. Once the face has been scanned, it is no longer visible in the picture if the model then moves her head slightly. The scanner can also be used to illuminate objects. The housing comes from the 3D printer. I used two pieces of COB LED strip with 4000K and 95 CRI. The potentiometer is used to switch the scanner on and off and to adjust the brightness continuously. At full brightness, it emits over 1200 lumens, which is actually far too bright to shine in a model's face. The scanner only lights up for as long as the button is held down. I can easily attach color filters with the attached Velcro tape.
If you don't have the possibility to build your own, you can fall back on a work lamp. Here is a link to such a lamp on Amazon.
Den selbstgebauten Scanner verwende ich hauptsächlich zum Einleuchten von Personen. Da immer nur ein schmaler Streifen beleuchtet wird, ist es für das Model wesentlich einfacher still zu halten. Wenn das Gesicht eingescannt wurde ist es dann nicht mehr im Bild sichtbar wenn das Model danach leicht den Kopf bewegt. Auch für die Beleuchtung von Gegenständen kann man den Scanner gut verwenden. Das Gehäuse stammt aus dem 3D Drucker. Verbaut habe ich zwei Stücken COB LED Strip mit 4000K und 95 CRI. Über den Potentiometer wird der Scanner ein- und ausgeschaltet sowie stufenlos die Helligkeit geregelt. Bei voller Helligkeit werden über 1200 Lumen emittiert, eigentlich viel zu hell um einem Model ins Gesicht zu leuchten. Der Scanner leuchtet nur so lange wie man den Taster gedrückt hält. Farbfilter kann ich mit dem angeklebten Klettband auf einfache Weise befestigen.
Wer keine Möglichkeit zum Selbstbau hat kann auf eine Arbeitslampe zurückgreifen. Hier mal ein Link zu einer solchen Lampe bei Amazon.
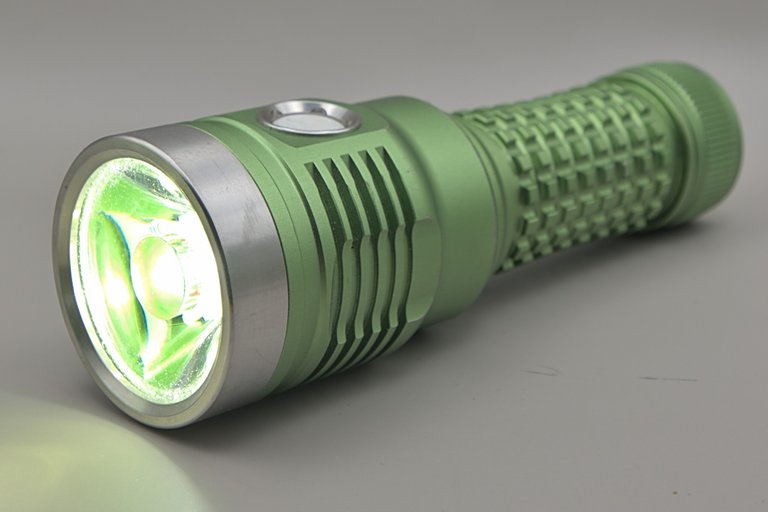
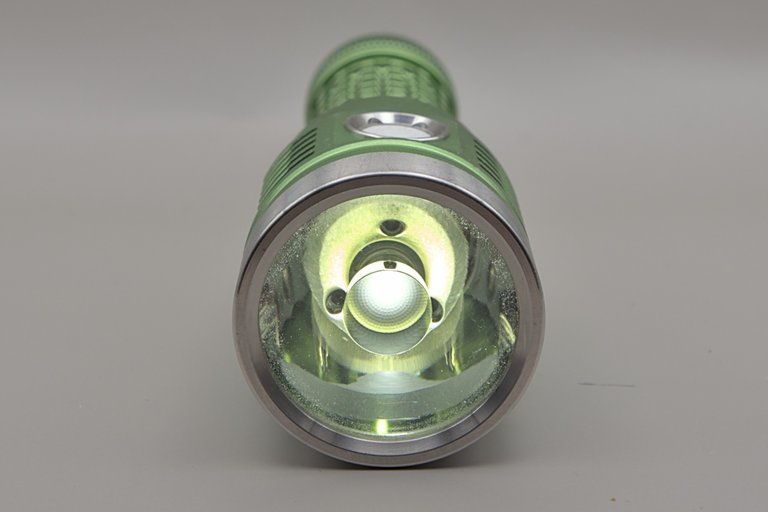
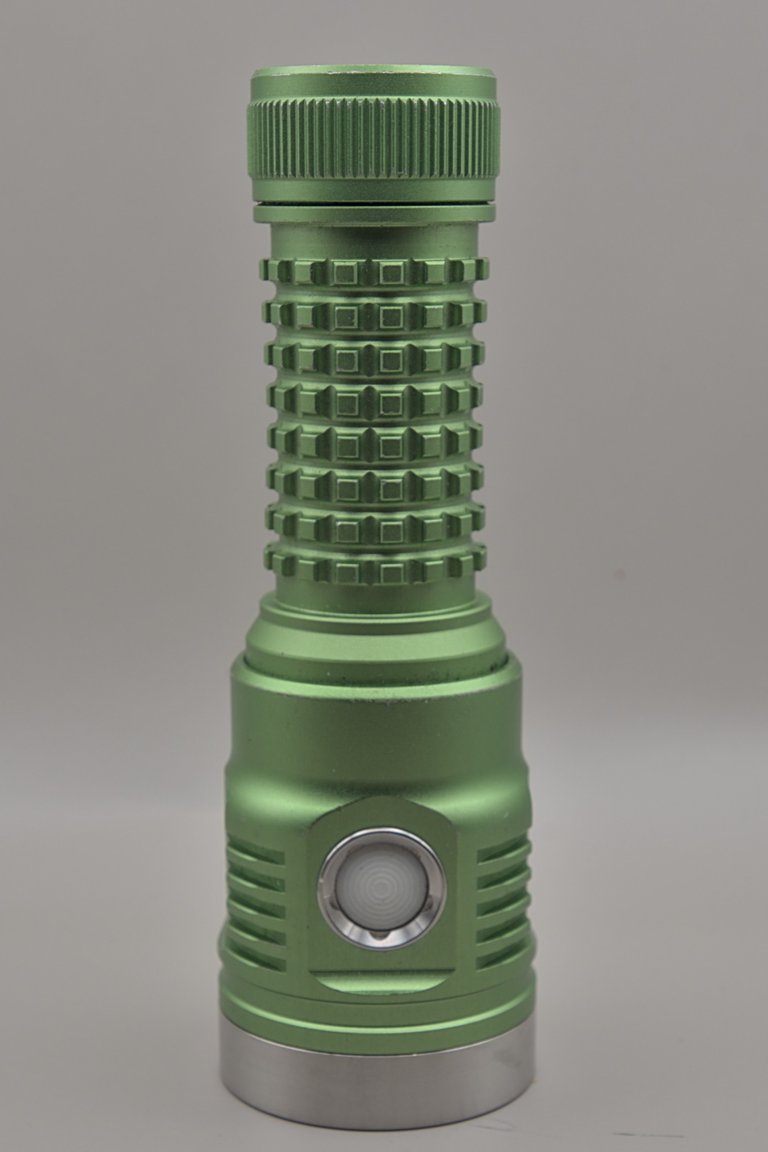
4 - CONVOY S2+ WITH COLOUR LED
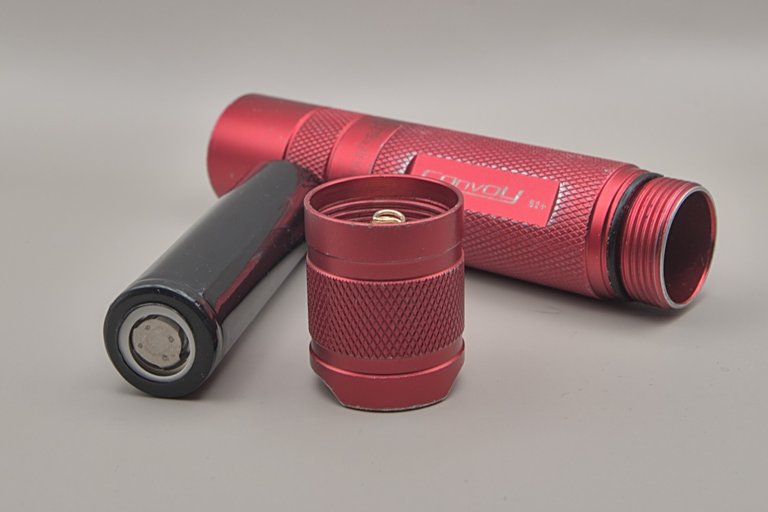
Admittedly, we're not talking about a single flashlight, but a number of different ones. The Convoy S2+ is a robust flashlight that is available in many variants for a fair price. I use S2+ with colored LEDs from Osram, Cree and Luxeon as well as an Osram UV flashlight. The Convoy are suitable for both light painting tools and illumination. The advantage is that the colors are then equally bright with the LEDs from the same manufacturer. This is not the case when working with color filters. The S2+ with colored LEDs are available in the Convoy store on AliExpress.
Zugegeben, wir reden jetzt nicht von einer einzelnen Taschenlampe sondern von etlichen verschiedenen. Die Convoy S2+ ist eine robuste Taschenlampe, die für einen fairen Preis in vielen Varianten erhältlich ist. Ich verwende S2+ mit farbigen LEDs von Osram, Cree und Luxeon sowie eine Osram UV Taschenlampe. Die Convoy sind sowohl an Light Painting Tools sowie zur Ausleuchtung geeignet. Der Vorteil ist, dass die Farben mit den LEDs des gleichen Herstellers dann gleich hell sind. Bei der Arbeit mit Farbfiltern ist dies nicht der Fall. Erhältlich sind die S2+ mit farbigen LEDs im Shop von Convoy bei AliExpress.
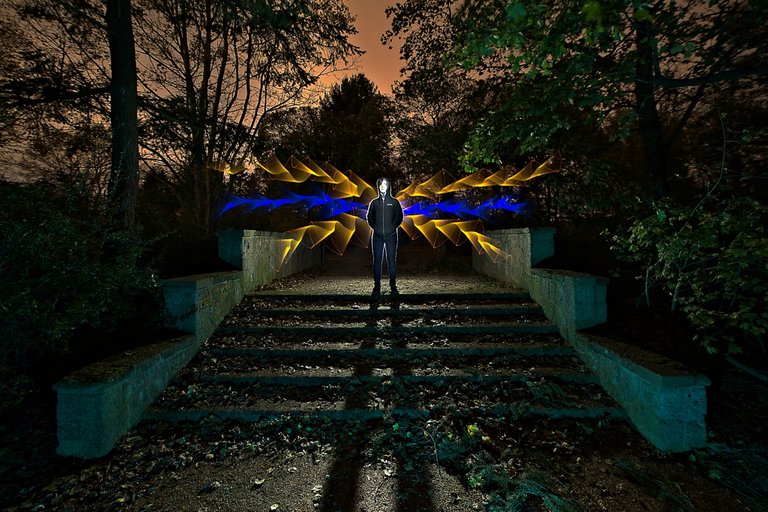
3 - LIGHTPAINTER RYUS LIGHTWORKS
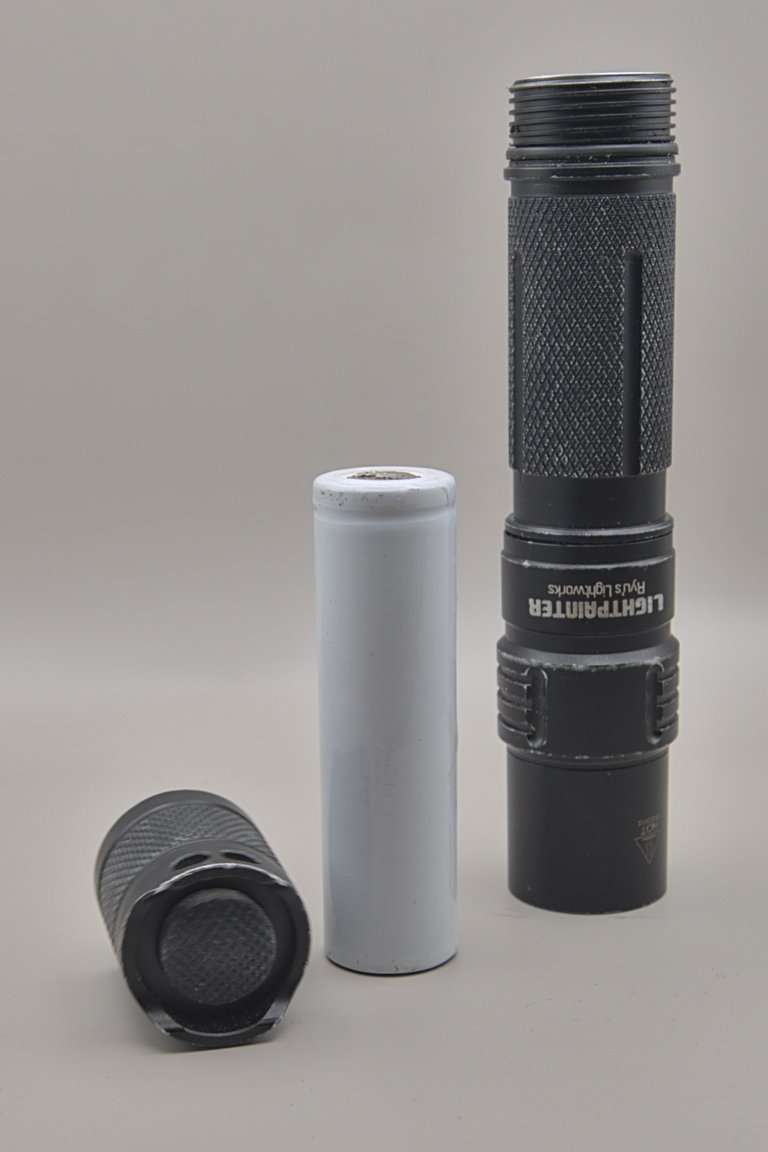
Unfortunately, this particular torch has not been available for some time. It is to be hoped that the torch will be produced again in the near future. The special thing about this torch are the modes suitable for the Lightpainter. The torch has 10 brightness levels. Once the brightness has been selected, you can choose from various strobe modes with this brightness. The frequency can be changed in each case. The programmed mode can be saved. The button on the lamp head can be used as a momentary switch. This makes the torch perfect for painting light trails. This torch is only suitable for illumination to a limited extent. It is powered by an 18650 rechargeable battery. The Light Painting Paradise shop offers suitable adapters for connecting the torch to a wide range of light painting tools, including colour filters.
Leider ist diese besondere Taschenlampe seit geraumer Zeit nicht mehr erhältlich. Es bleibt zu hoffen, dass die Taschenlampe in naher Zukunft wieder produziert wird. Das besondere an dieser Taschenlampe sind die für den Lightpainter geeigneten Modi. Die Taschenlampe verfügt über 10 Helligkeitsstufen. Nachdem die Helligkeit gewählt wurde kann man mit dieser Helligkeit aus verschiedenen Strobe Modi wählen. Die Frequenz lässt sich jeweils verändern. Der programmierte Modus kann gespeichert werden. Der Taster am Lampenkopf kann als Momentary verwendet werden. Somit ist die Taschenlampe perfekt zum Malen von Lichtspuren geeignet. Zur Ausleuchtung ist diese Taschenlampe nur bedingt geeignet. Betrieben wird sie mit einem 18650 Akku. Der Shop von Light Painting Paradise hat passende Adapter, um die Taschenlampe mit den verschiedensten Light Painting Tools inklusive Farbfiltern zu verbinden im Angebot.
2 - EMISAR D4K
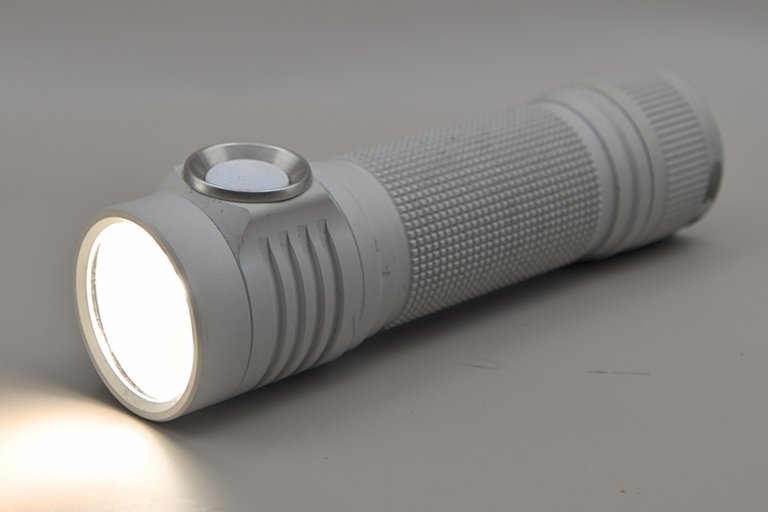
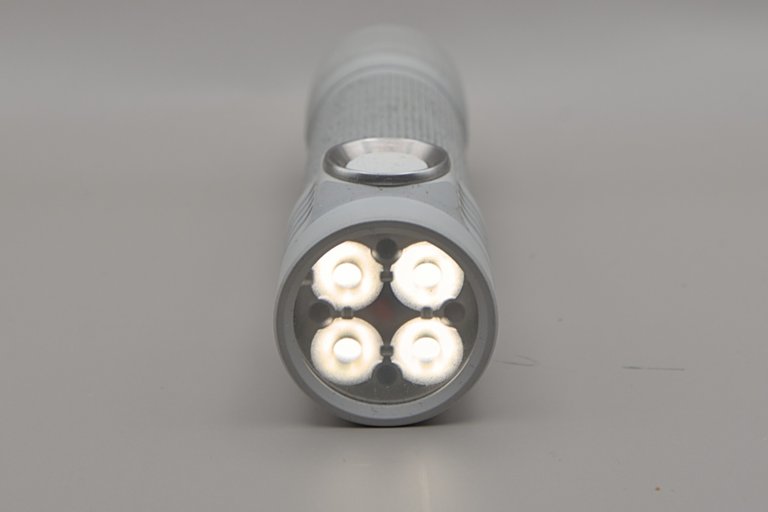
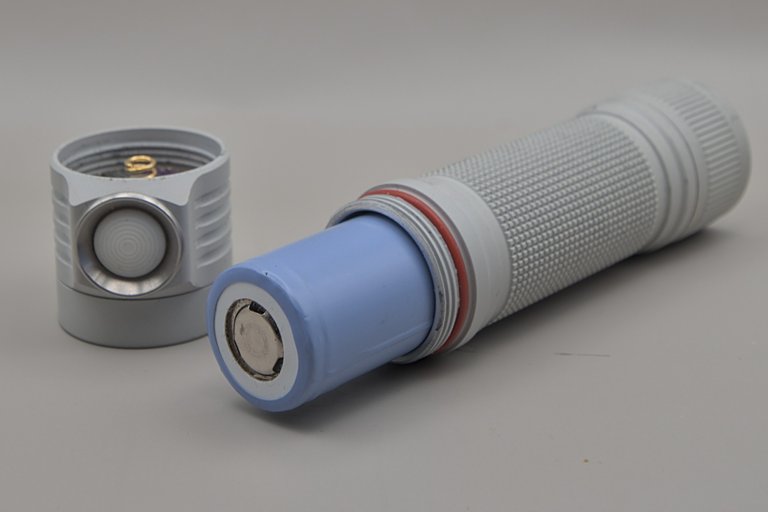
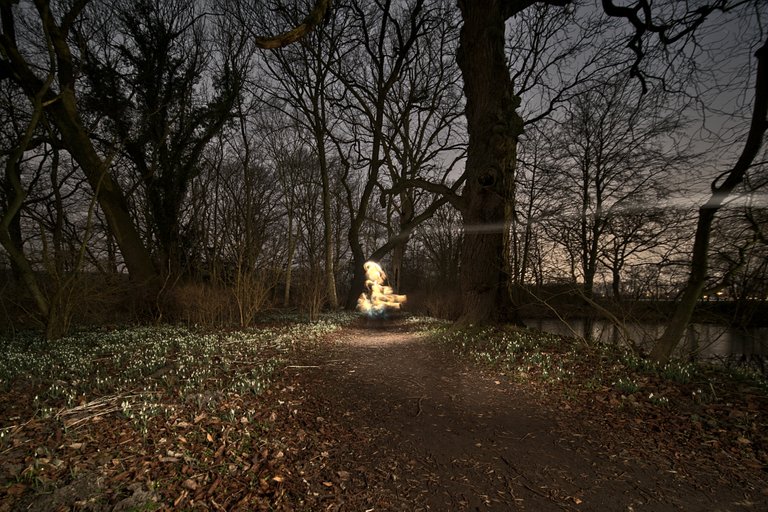
I have used the Emisar D4K and some Emisar D4V2s most frequently in recent years. The rather small torches with the four LEDs are very bright and have a very homogeneous light cone. With a small pack, the Emisar D4K or D4V2 can easily illuminate larger locations. The D4K is powered by a 21700 battery, the D4V2 by an 18650. The D4K and D4V2 are equipped with a wide range of LEDs, including coloured and UV. I use variants with Nichia 219C, SST 20 with 3000 or 4000K. All have a high colour rendering index. The torches can only be used to a limited extent with light painting tools. They do fit into the standard adapters from Light Painting Paradise and the Universal Connector, but then you can no longer access the switch. I have printed special adapters on the 3D printer where the switch is accessible.
When choosing the right rechargeable battery, it is essential to pay attention to high-current capability. The D4K and D4V2 are controlled with the Anduril UI mentioned above. The torches are available in the manufacturer's online shop.
Die Emisar D4K sowie einige Emisar D4V2 habe ich in den letzten Jahren am häufigsten eingesetzt. Die recht kleinen Taschenlampen mit den vier LEDs sind sehr hell und haben einen sehr homogenen Lichtkegel. Mit kleinem Gepäck ist mit den Emisar D4K oder D4V2 auch die Ausleuchtung größere Locations einfach möglich. Die D4K wird mit 21700 Akku betrieben, die D4V2 mit 18650. Bestückt werden die D4K und D4V2 mit den verschiedensten LEDs, unter anderem auch mit farbigen oder auch UV. Ich verwende Varianten mit Nichia 219C, SST 20 mit 3000 oder 4000K. Alle haben einen hohen Farbwiedergabeindex. An Light Painting Tools kann man die Taschenlampen nur eingeschränkt verwenden. Sie passen zwar in die gängigen Adapter von Light Painting Paradise und den Universal Connector, allerdings kommt man dann an den Schalter nicht mehr ran. Ich habe auf dem 3D Drucker spezielle Adapter gedruckt, bei denen der Schalter erreichbar ist.
Bei der Wahl des passenden Akkus ist unbedingt auf Hochstromfähigkeit zu achten. Gesteuert werden die D4K und D4V2 mit der bereits oben erwähnten Anduril UI. Erhältlich sind die Taschenlampen im Onlineshop des Herstellers.
https://intl-outdoor.com/led-flashlights/emisar-d4k-1-21700-high-power-quad-edc-led-flashlight.html

1 - HEADLAMP
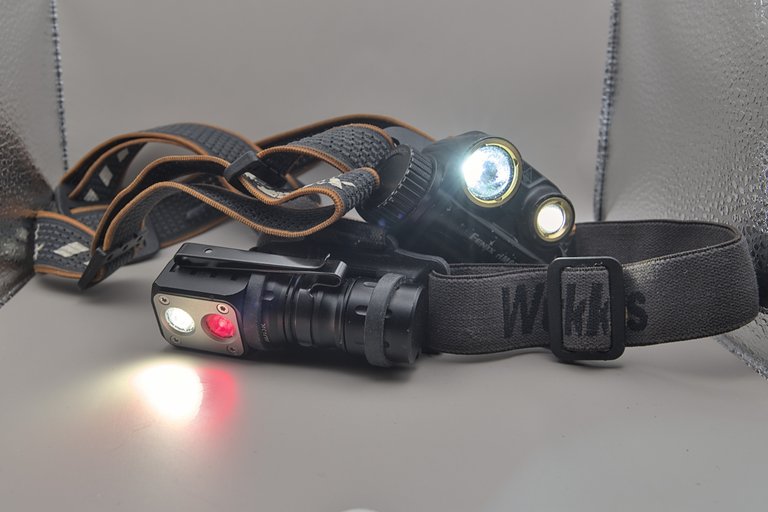
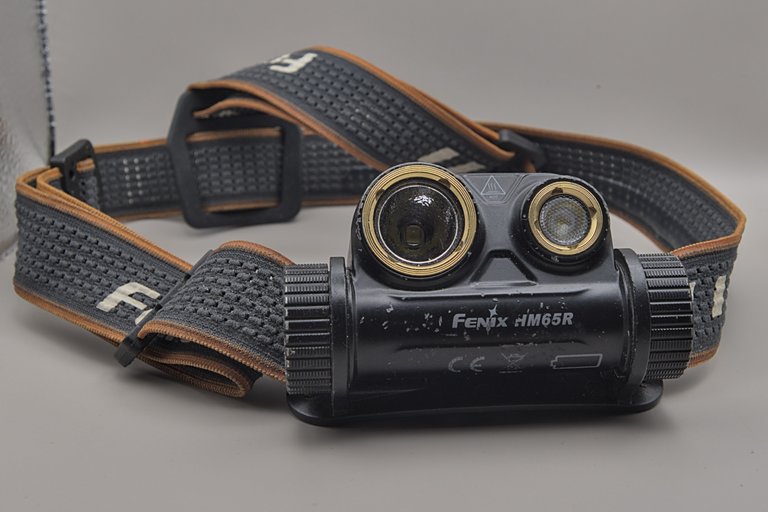
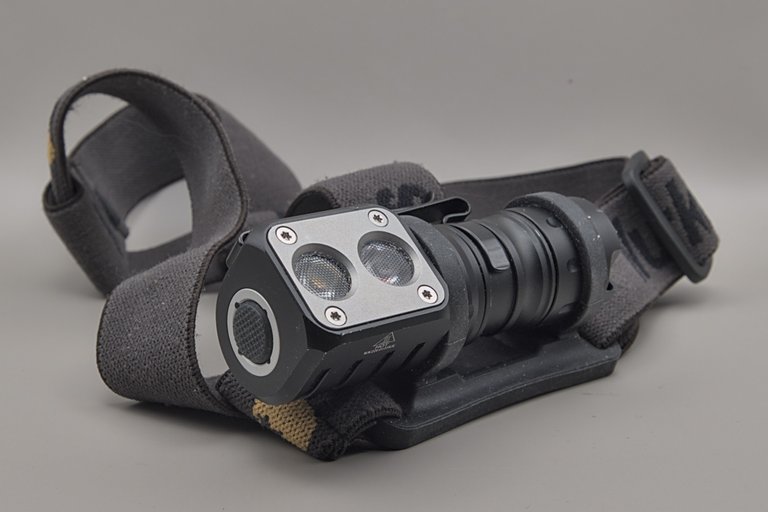
Well, none of the string lights can be seen in the light painting pictures, but without the light on my head I would hardly have got a picture on the sensor. The headlamp saved me from many falls and accidents. Adjusting and aligning the camera is almost impossible without a headlamp. You always have both hands free and can see what you are doing and where you are going. But you can also use the headlamp for illumination in an emergency. The two models in the pictures provide luminous fluxes of 1000 and over 2000 lumens respectively. The Fenix HM65R has two LEDs with different reflectors, one as a flooder to illuminate a larger area and one as a smaller spotlight. Both have their own switch. The Wurkos Strin lamp also has two LEDs, one white and one red. Switching is done by clicking the switch several times. The last mode is memorised. The red light is invisible to mosquitoes and other annoying insects. This is very useful in summer when painting with light at night.
Na ja, keine der Strinlampen ist in den Light Painting Bildern zu sehen, aber ohne das Licht an meinem Kopf hätte ich kaum ein Bild auf den Sensor bekommen. Die Stirnlampe hat mich vor vielen Stürzen und Unfällen bewahrt. Ohne Stirnlampe ist das Einstellen und Ausrichten der Kamera fast unmöglich. Man hat immer beide Hände frei und sieht was man tut und wohin man tritt. Aber auch zur Ausleuchtung kann man die Strinlampe zur Not verwenden. Die beiden Modelle in den Bildern liefern Lichtströme von 1000 bzw. über 2000 Lumen. Die Fenix HM65R hat zwei LEDs mit verschiedenen Reflektoren, einmal als Flooder um einen größeren Bereich zu beleuchten und einmal ein kleineres Spotlicht. Beide verfügen über einen eigenen Schalter. Die Wurkos Strinlampe hat ebenfalls zwei LEDs, eine weiße und eine rote. Umgeschaltet wird durch mehrfaches Klicken des Schalters. Der letzte Modus wird gespeichert. Das rote Licht ist für Mücken und andere lästige Insekten unsichtbar. Im Sommer ist das während der nächtlichen Lichtmalerei sehr hilfreich.
CONCLUSION
I have now accumulated a total of over 200 torches in my warehouse. Some I no longer use at all, others only very rarely. I almost always have the torches mentioned above with me. If I could only take three torches with me, they would be the Lightpainter torch, the Emisar D4k and one of the two headlamps. This combination makes it easy and convenient to draw light trails and illuminate larger areas.
I wish you good light at all times.
Insgesamt haben sich in meinem Lager mittlerweile über 200 Taschenlampen angesammelt. Einige verwende ich überhaupt nicht mehr, andere nur sehr selten. Die oben erwähnten Taschenlampen habe ich fast immer dabei. Wenn ich nur drei Taschenlampen mitnehmen könnte wären das die Lightpainter Taschenlampe, die Emisar D4k sowie eine der beiden Stirnlampen. Mit dieser Kombination ist das Zeichnen von Lichtspuren sowie die Ausleuchtung auch größerer Bereiche auf einfache, komfortable Weise möglich.
Ich wünsche euch allzeit gutes Licht.

WHAT IS LIGHT PAINTING?
LICHTKUNSTFOTO
If you like my art visit www.lichtkunstfoto.de for more Light Art Photography and informations about Light Painting. Join me on Flickr Twitter

For more great Light Art Photography, Light Painting and inspiration check these light painters: @marlasinger666 @fadetoblack @fastchrisuk @dawnoner @oddballgraphics @martbarras @stepko @rod.evans.visual @yo-hoho @maxpateau @gunnarheilmann @neilru75 @maximepateau @ryuslightworks @lightstabeu @candelart @lacelight

WE ARE LIGHT PAINTERS
To help and support the LightPainters community here on Hive I would appreciate your delegation of HivePower. Any amount is appreciated. It does not require much to get started, we are happy for any gesture. @lightpainters
How to delegate?
Delegate 50HivePower, [50HP]
Delegate 250HivePower, [250HP]
Delegate 500HivePower, [500HP]
Delegate 1000HivePower, [1000HP]
All the Hive Power will help to upvote the artist's contribution as part of the LightPainters community.
Ein sehr umfangreicher und informativer Beitrag über die wichtigsten Werkzeuge eines Lightpainters. Schade, dass es die Ryus Lightpainters Lampe nicht mehr gibt. Eine oder zwei von diesen Lampen könnte ich durchaus noch gebrauchen. aber vielleicht gibt es ja in der Zukunft irgendwann etwas vergleichbares.
Ja, das ist sehr bedauerlich. Die Emisar Funzeln haben meist einen Port zum Programmieren. Man müsste "nur" eine passende Firmware schreiben oder zumindest das Anduril entsprechend anpassen. Vielleicht nehme ich mich der Sache mal an. Im Moment hab ich allerdings überhaupt keine Nerven dafür.
Fände ich sehr gut, aber wenn du da momentan keinen Kopf für hast, dann lass es lieber vorerst, nicht dass da in Karlshorst wieder Lampen aus dem Fenster fliegen oder dem Hammer zum Opfer fallen. 😬
😂
Toller Post: sehr aufschlussreich und detailliert. 👍
Danke. 😊 Es freut mich, dass der Beitrag hilfreich ist.
You must be the founding member of "flashlight aholics anonymous" ;-)
A great detailed post with information I would never find on FB!
Me? Anonymous flashoholics? No, no. I have it under control. 😂😂😂
Where can I sign up? ;-)
😂🤣
F.A.A. 😆
Ich liebe die Convoylampen und den Scanner. Danke dafür!
Gerne 😊
200 torches WOW!!! I have only 4 😆
4 is the right number. Headlamp, scanner, flooder and one for light trails. 😁
No headlamp and no scanner for me : a small torch, a medium, a powerful one and and orange Convoy S2 that I never use.
Small, medium and powerful sounds like a good choice.
Sounds like a man who's travelling light 😉
Yes 😊
But I need to build my own scanner : lighting people with a flashlight isn't satisfying, neither using a flashgun.
Just wow .. thank you for sharing ...
I hope it is helpful for some of the crazy Lightpainters. 😁
I never knew you use torchlights for your paintings
This is fantastic
Those torches must be very expensive
I use torches in most of my light paintings. Some are expensive, some are only 15 or 20€. It is not necessary to spend hundreds of € for torches to get great results.
Congratulations @lichtkunstfoto! You have completed the following achievement on the Hive blockchain And have been rewarded with New badge(s)
Your next target is to reach 15000 upvotes.
You can view your badges on your board and compare yourself to others in the Ranking
If you no longer want to receive notifications, reply to this comment with the word
STOPCheck out our last posts: