Astrophotography on HIVE
Seid gegrüßt, Freunde des nächtlichen Sternenhimmels. Heute möchte ich euch meinen Arbeitsablauf bei der Bearbeitung von Fotos des nächtlichen Sternenhimmels beschreiben. Im Internet findet man einige Anleitungen zur Bildbearbeitung von Astrofotos mit Adobe Lightroom und Photoshop, aber sehr wenige gute Anleitungen für die Arbeit mit Open Source Software. Zuerst zeige ich euch das Ergebnis.
Greetings, friends of the starry night sky. Today I would like to describe my workflow for editing photos of the night sky. On the internet you can find some instructions for editing astrophotos with Adobe Lightroom and Photoshop, but very few good instructions for working with open source software. First I'll show you the result.
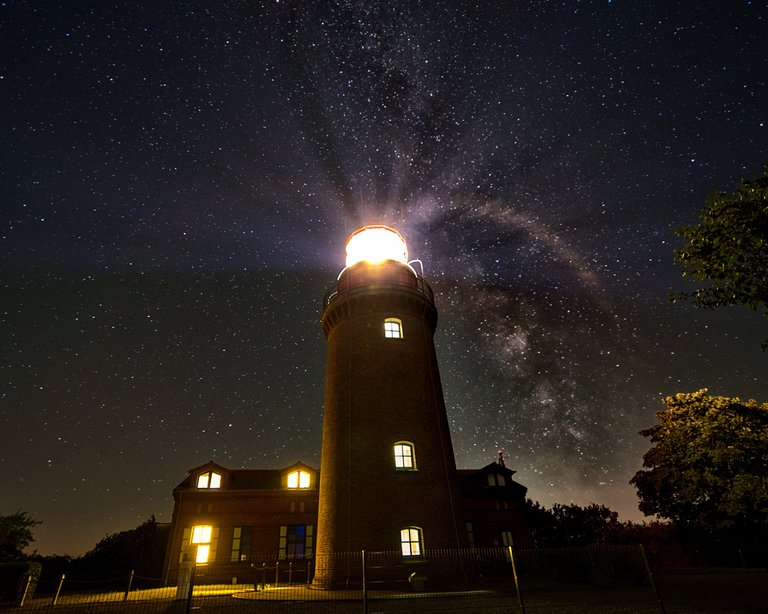
Das Foto habe ich mit der Nikon D750 und dem Laowa 12/2,8 aufgenommen. Der Blendenring stand auf 2,8, den ISO Wert hatte ich auf 800 und das Aufnahmeformat RAW eingestellt und 30 Sekunden lang belichtet. Das größte Problem bei diesem Motiv stellt das helle Licht des Leuchtturms da. Dieses überstrahlt das schwache Licht der Sterne. So sah das unbearbeitete Bild aus:
I took the photo with the Nikon D750 and the Laowa 12/2.8. I set the aperture ring to 2.8, the ISO value to 800 and the RAW format and exposed for 30 seconds. The biggest problem with this motif is the bright light from the lighthouse. It outshines the faint light of the stars. This is what the unprocessed image looked like:
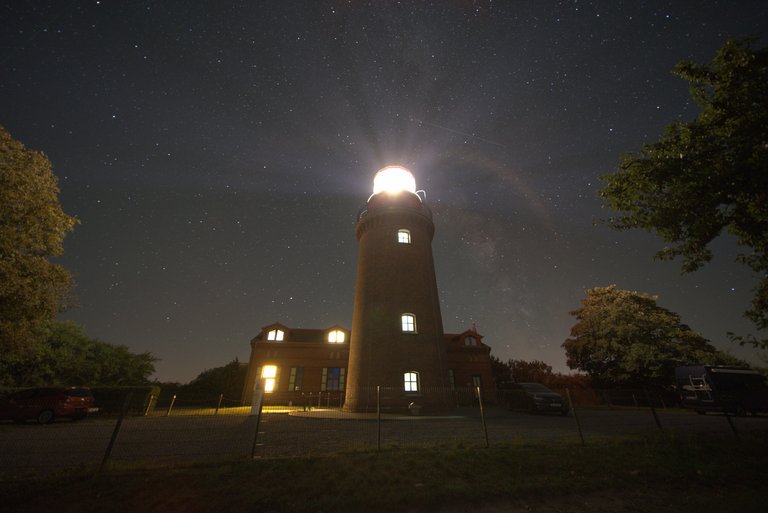
Von den Sternen ist nicht viel zu sehen. Darüber hinaus stören mich die Autos und der Zaun im Bild. Wie ihr im Ergebnis oben sehen könnt, ist es mir nicht gelungen, den Zaun zu entfernen. Mit keinem Auswahlwerkzeug konnte ich den Zaun maskieren weil es kaum Kontrast zwischen Zaun und Hintergrund gibt. Wäre der Zaun knallrot, wäre das sehr einfach. Man könnte zwar in stundenlanger Arbeit den Zaun mit der Hand wegretuschieren. Dazu hatte ich allerdings keine Lust. Die Lichtspur des Satelliten wirkt zwar im unbearbeiteten Bild nicht sehr störend, durch die Erhöhung des Kontrasts im Himmel wurde die Spur allerdings sehr präsent. Ich habe diese dann entfernt.
You can't see much of the stars. I'm also bothered by the cars and the fence in the picture. As you can see in the result above, I wasn't able to remove the fence. I couldn't mask the fence with any selection tool because there is hardly any contrast between the fence and the background. If the fence were bright red, it would be very easy. You could spend hours retouching the fence by hand. But I didn't feel like doing that. The light trail of the satellite doesn't look very disturbing in the unprocessed image, but by increasing the contrast in the sky, the trail became very present. I then removed it.

Software
Zur Bearbeitung setzte ich folgende Software ein. Den Raw Entwickler Darktable, das Bildbearbeitungsprogramm GIMP und das Bildverwaltungsprogramm digiKam. Ich arbeite aktuell mit Linux Mint 21.1. Die genannten Programme gibt es auch für Windows und MacOS. Die Programme sind quelloffen und kostenlos. Die Einarbeitung in Darktable und Gimp erfordert viel Zeit, auch der Umstieg von Lightroom und Photoshop dürfte mit einigen Schwierigkeiten verbunden sein. Belohnt wird man dann aber mit stabil laufender Software mit umfangreichen Funktionen und vor allem ohne Abo-Zwang oder sonstige Kosten.
I use the following software for editing. The raw developer Darktable, the image editing programme GIMP and the image management programme digiKam. I currently work with Linux Mint 21.1. The programmes mentioned are also available for Windows and MacOS. The programmes are open source and free of charge. Familiarising yourself with Darktable and Gimp requires a lot of time, and switching from Lightroom and Photoshop is also likely to be associated with some difficulties. However, you will then be rewarded with stable software with extensive functions and, above all, no subscription obligation or other costs.
https://www.darktable.org/install/
https://www.gimp.org/downloads/
https://www.digikam.org/download/
Step 1: Darktable
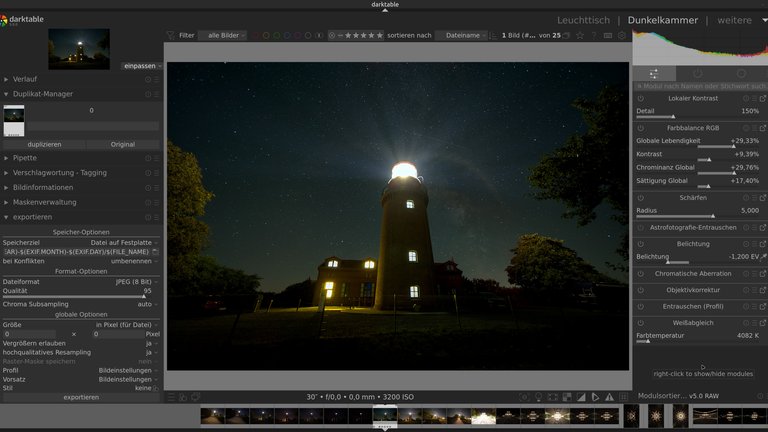
Ich öffnete das RAW Bild in der Dunkelkammer von Darktable. Zur besseren Übersicht habe ich mir ein Profil mit den passenden Werkzeugen für die Astrofotografie erstellt. Die Werkzeuge der Schnellzugriffgruppe seht ihr im Bild oben. Ich habe dann alle Module außer "Astrofotografie-Entrauschen" eingeschaltet und die Werte wie im Bild zu sehen verändert. Um die Milchstraße deutlicher sichtbar zu machen habe ich mehrere Instanzen des "Kontrast-Equalizers" auf den Bereich der Milchsstraße angewendet.
I opened the RAW image in the Darktable darkroom. For a better overview, I created a profile with the appropriate tools for astrophotography. You can see the tools in the quick access group in the image above. I then switched on all modules except "Astrophotography Denoise" and changed the values as shown in the image. To make the Milky Way more clearly visible, I applied several instances of the "Contrast Equaliser" to the area of the Milky Way.
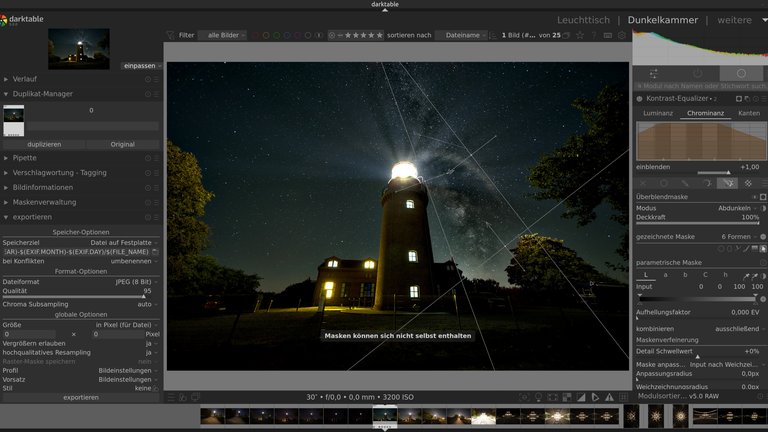
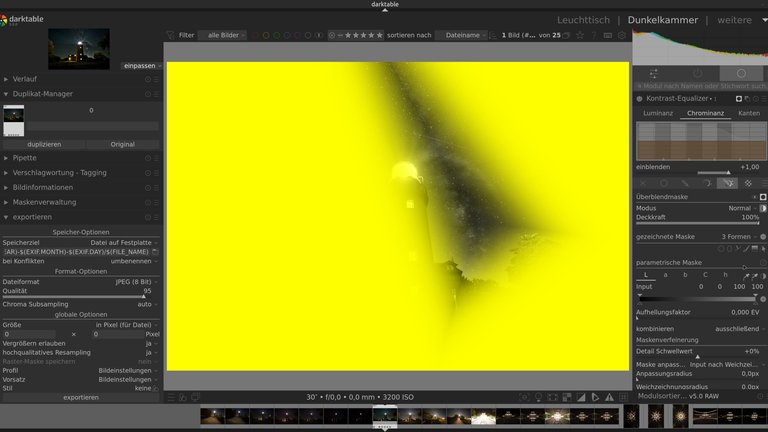
Ich habe zwei parametrische Masken als Verlauf neben der Milchstraße erstellt. Wichtig ist dabei, dass die Pfeile gegeneinander gerichtet sind. Zusätzlich habe ich eine dritte Maske erstellt um zu verhindern, dass die Verstärkung des Kontrasts auf den Bereich des Vordergrunds angewendet wird. Über das Symbol neben "Überblendmaske" kann man die Maskierung einblenden (gelb). Zusätzlich könnte man mit dem Pinsel oder einem der anderen Werkzeuge (Kreis, Ellipse, Pfad) weitere Bereich maskieren.
In der ersten Instanz des Kontrast-Equalizers habe ich die Luminanz verstärkt. Im Anschluss habe ich die Instanz dupliziert. Die Masken wurden somit in die neue Instanz übernommen. In dieser zweiten Instanz habe ich dann den Modus auf "abdunkeln" gestellt und die Luminanz-Kurve etwas nach unten geschoben. Ich duplizierte die erste Instanz ein weiteres Mal. Die Werte für die Luminanz hab ich mit einem Doppelklick auf die Kurve zurückgesetzt und anschließend die Werte für die Chrominanz angehoben. Anschließend aktivierte ich die Module "Velvia" und "Dunstenfernung". Im letzten Schritt exportierte ich das Bild.
I have created two parametric masks as a gradient next to the Milky Way. It is important that the arrows are directed towards each other. I have also created a third mask to prevent the contrast enhancement from being applied to the foreground area. You can use the symbol next to "Overlay mask" to show the mask (yellow). You could also use the brush or one of the other tools (circle, ellipse, path) to mask other areas.
In the first instance of the contrast equaliser, I increased the luminance. I then duplicated the instance. The masks were thus transferred to the new instance. In this second instance, I then set the mode to "darken" and moved the luminance curve down slightly. I duplicated the first instance a second time. I reset the values for luminance by double-clicking on the curve and then increased the values for chrominance. I then activated the "Velvia" and "Vapour removal" modules. In the last step, I exported the image.
Step 2: GIMP
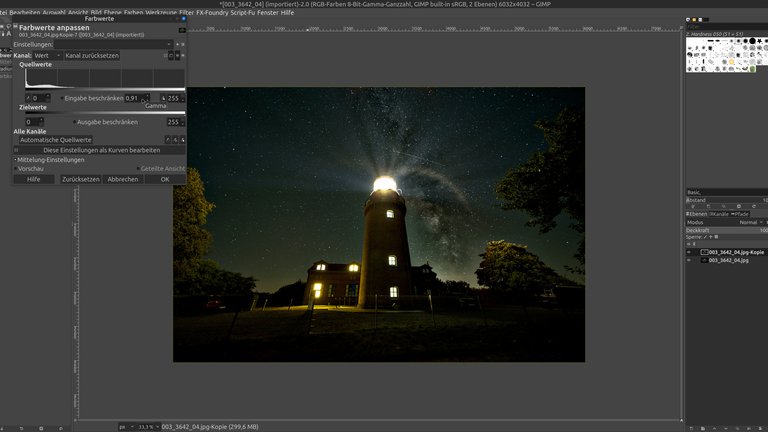
Das exportierte Bild öffnete ich dann in GIMP und duplizierte die Ebene. Im Modul "Farbwerte anpassen" beschränkte ich den Gamma Wert auf 0,91 um die Helligkeit etwas zu reduzieren und den Kontrast im Himmel noch etwas zu verstärken.
I then opened the exported image in GIMP and duplicated the layer. In the "Adjust colour values" module, I limited the gamma value to 0.91 to reduce the brightness a little and increase the contrast in the sky.
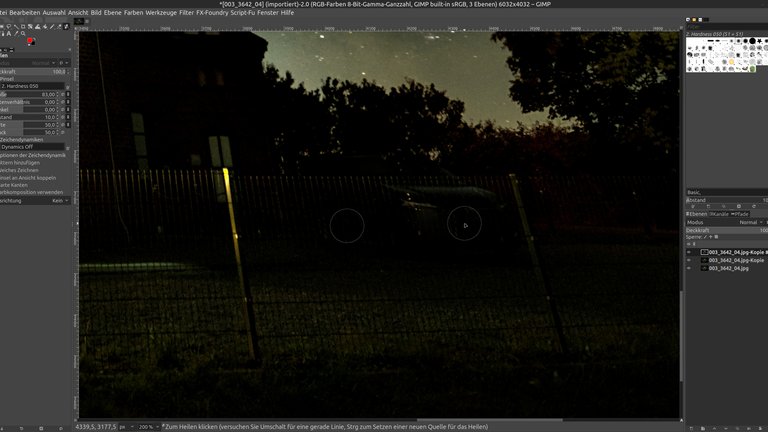
Anschließend duplizierte ich diese Ebene und entfernte mit dem Modul "Heilen" das Auto neben dem Leuchtturm. Ich setzte die Quelle auf den Zaun neben dem Auto und übermalte dann das Auto. Im zweiten Schritt setzte ich die Quelle über den Zaun und übermalte den Bereich des Autos über dem Zaun.
I then duplicated this layer and used the "Heal" module to remove the car next to the lighthouse. I placed the source on the fence next to the car and then painted over the car. In the second step, I placed the spring over the fence and painted over the area of the car above the fence.
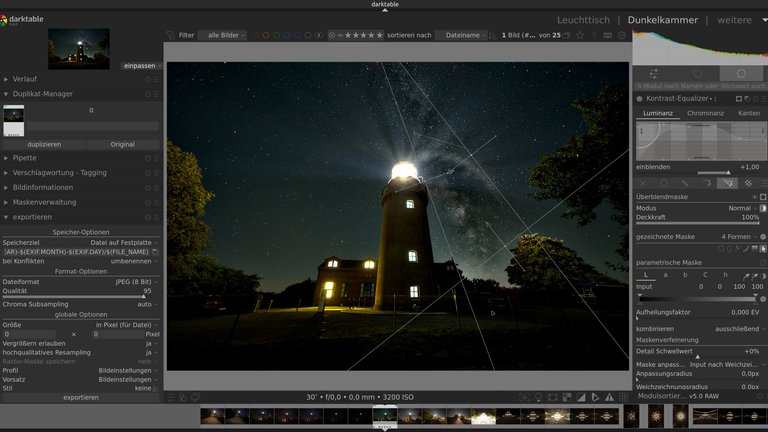
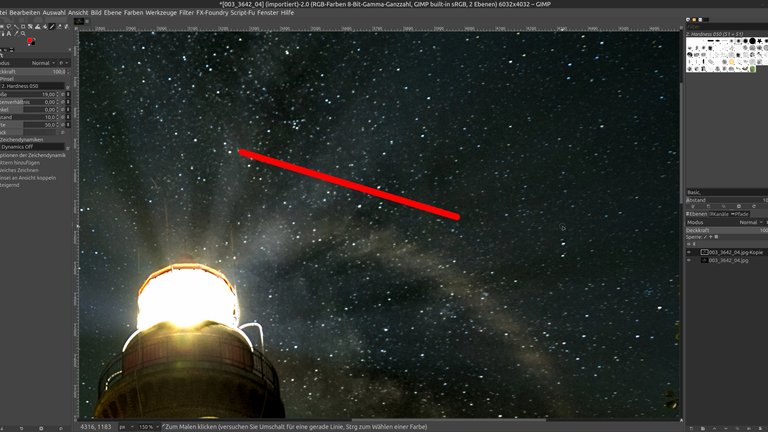
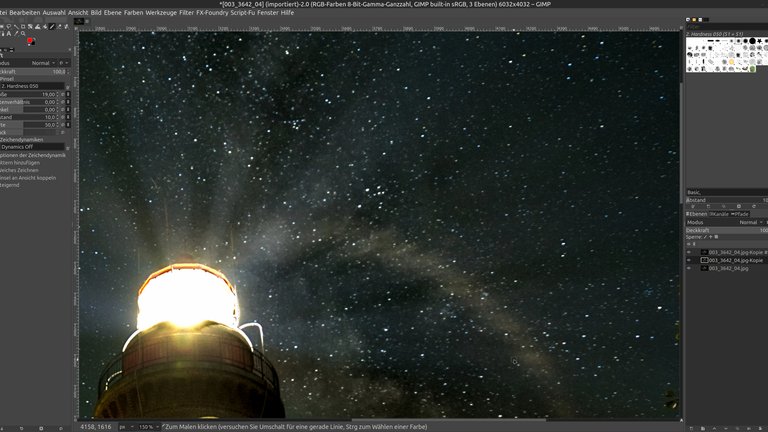
Ich vereinte dann die Ebenen nach unten und duplizierte diese Ebene erneut. Um die Spur des Satelliten zu entfernen maskierte ich die Spur mit dem Stift-Werkzeug in rot.
I then merged the layers down and duplicated this layer again. To remove the trace of the satellite, I masked the trace in red using the pen tool.
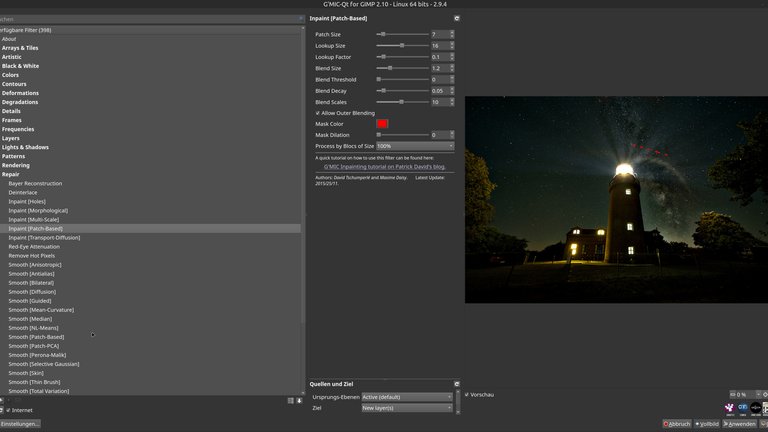
Mithilfe des GMIC Filters Inpaint [Patch-Based] konnte ich die Spur dann entfernen. Ich beließ alles auf den Standardwerten und klickte auf "Anwenden". Nach einigen Sekunden war die Spur verschwunden und wurde mit Pixel aus der Umgebung des Bereichs der Maske aufgefüllt. Unter Umständen kann es nötig sein die Werte für "Patch Size" und "Lookup Size" anzupassen, gerade wenn der maskierte Bereich größer ist.
I then used the GMIC filter Inpaint [Patch-Based] to remove the track. I left everything at the default values and clicked on "Apply". After a few seconds, the trace disappeared and was filled with pixels from the area surrounding the mask. It may be necessary to adjust the values for "Patch Size" and "Lookup Size", especially if the masked area is larger.
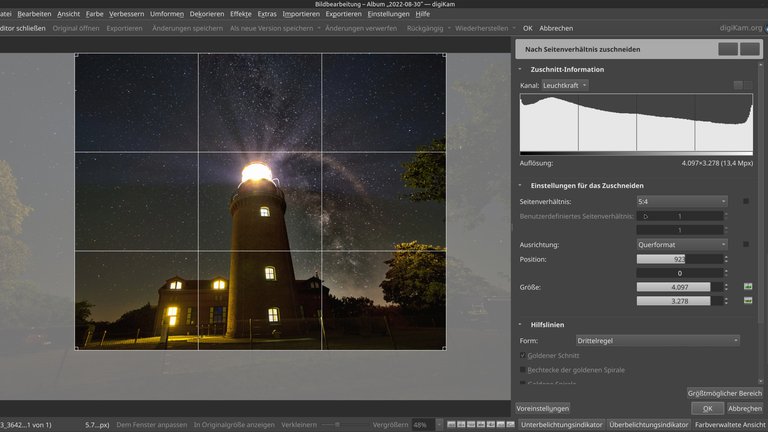
Step 3: digiKam
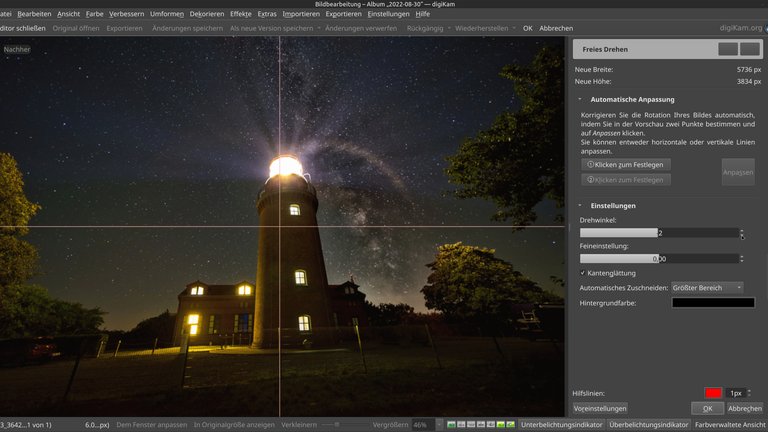
Die drei letzten Bearbeitungsschritte hätte ich auch mit GIMP erledigen können, allerdings geht das mit digiKam einfacher und schneller. Ich drehte das Bild um -2°, änderte den Schnitt und das Bildformat und exportierte das Bild als neue Version. Anschließend verkleinerte ich das Bild auf eine Breite von 2048 Pixeln und exportierte dieses dann wieder als neue Version.
I could have done the last three editing steps with GIMP, but it's easier and quicker with digiKam. I rotated the image by -2°, changed the crop and the image format and exported the image as a new version. I then reduced the image to a width of 2048 pixels and exported it again as a new version.
Ich habe nicht auf die Uhr gesehen, aber die Bearbeitung des Bildes hat wesentlich mehr Zeit in Anspruch genommen als die Aufnahme inklusive Hin- und Rückfahrt mit dem Auto. Aber ohne aufwändige Bildbearbeitung sind solche Bilder nicht möglich. Das Bild war auch noch recht einfach zu bearbeiten weil es eben nur ein einzelnes Foto war. So richtig lustig wird das dann erst wenn man eine Astro-Nachführng benutzt, mehrere Bild übereinander stapelt, den Vordergrund separat aufnimmt und diesen dann austauscht. Vielleicht schreibe ich dazu dann einen weiteren Beitrag, auch wenn es sicher nicht besonders viele Verrückte gibt, die mit derartigem Aufwand die Sterne fotografieren.
Bis dahin allzeit gutes Licht
I didn't look at the clock, but editing the picture took considerably longer than taking it, including the journey there and back by car. But such pictures are not possible without elaborate image processing. The image was also quite easy to edit because it was just a single photo. It only gets really funny when you use astro tracking, stack several images on top of each other, take the foreground separately and then replace it. Maybe I'll write another post about this, even though there certainly aren't that many crazy people who go to such lengths to photograph the stars.
Until then, good light at all times
WHAT IS LIGHT PAINTING?
LICHTKUNSTFOTO
If you like my art visit www.lichtkunstfoto.de for more Light Art Photography and informations about Light Painting. Join me on Flickr Twitter
For more great Light Art Photography, Light Painting and inspiration check these light painters: @marlasinger666 @fadetoblack @fastchrisuk @dawnoner @oddballgraphics @martbarras @stepko @rod.evans.visual @yo-hoho @maxpateau @gunnarheilmann @neilru75 @maximepateau @ryuslightworks @lightstabeu @candelart @lacelight

WE ARE LIGHT PAINTERS
To help and support the LightPainters community here on Hive I would appreciate your delegation of HivePower. Any amount is appreciated. It does not require much to get started, we are happy for any gesture. @lightpainters
How to delegate?
Delegate 50HivePower, [50HP]
Delegate 250HivePower, [250HP]
Delegate 500HivePower, [500HP]
Delegate 1000HivePower, [1000HP]
All the Hive Power will help to upvote the artist's contribution as part of the LightPainters community.
Sehr interessant! Auf Bildbearbeitung habe ich eigentlich keinen Bock. Ist halt bei Astrofotografie nötig, um solche tollen Ergebnisse wie oben gezeigt zu erzielen. Gratuliere! Bin auf die Bearbeitung mit den Bildern aus der Kameranachführung gespannt.
Wer hat schon Bock auf Bildbearbeitung? Ich hatte mich jetzt nur etwas intensiver damit beschäftigt, weil das Wetter seit Wochen nicht zum Fotografieren einlädt. Und unbearbeitete Astrofotos sind meist ziemlich belanglos.
Coole Fotos
!BBH
Danke
Excelent, i use Darktable too to edit all My photos!
!HUG