
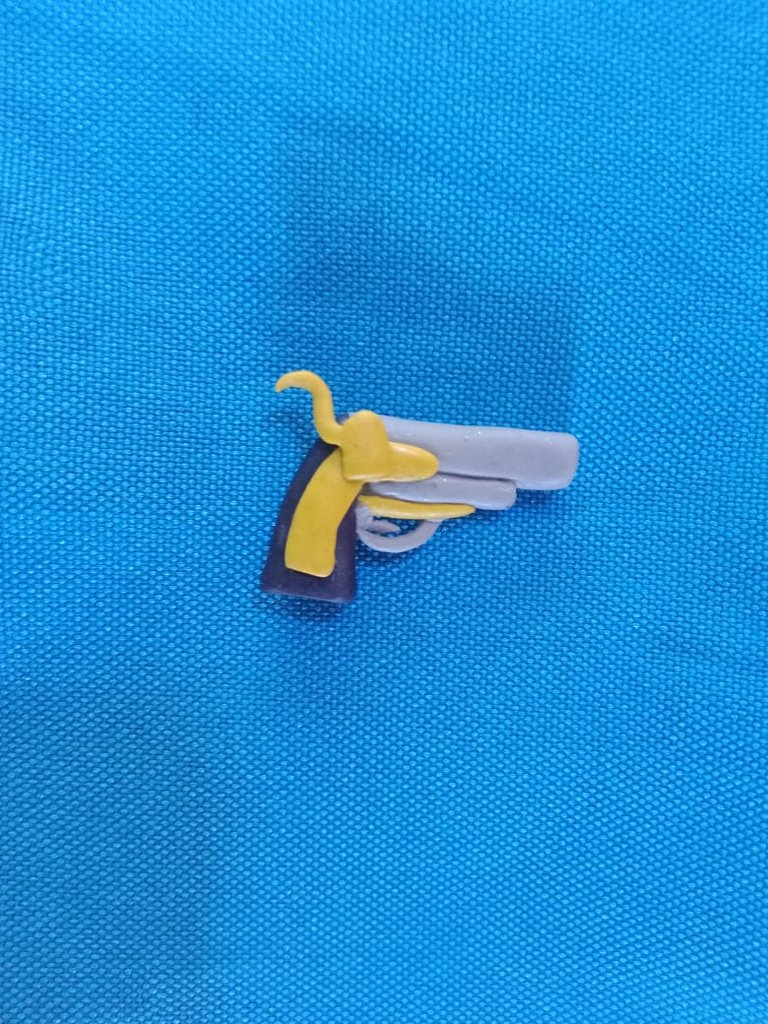
Saludos comunidad @diyhub, les deseo un feliz día en unión familiar, me siento feliz de compartir un nuevo proyecto creativo, tras una breve pausa, las actividades escolares me mantuvieron ocupado, pero ya estoy de vacaciones y pienso aprovechar el tiempo para moldear nuevos proyectos con masa flexible, mi material favorito, el cual consiste en un pistola, tomando como referencia el personaje de Splinterlands Two Gun Pete.
Los proyectos con masa flexible son mis favoritos porque es un material duraderos y sencillos de trabajar, lo importante es completar el proceso de secado y agregar pegamento suficiente al unir las piezas, cuando se trata de piezas gruesas el secado es fundamental y la cantidad de pegamento, para que queden fuertes y unidas, en este tipo de proyectos con piezas gruesas y pesadas, acostumbro a dejar secando por tres o siete días y regularmente reviso como va el proceso para añadir pegamento si es necesario, esta práctica me ha permitido obtener buenos resultados y durabilidad en los trabajos de moldeado, les muestro el proceso de elaboración.
Greetings @diyhub community, I wish you a happy day with your families. I'm happy to share a new creative project. After a short break, school activities kept me busy, but I'm now on vacation and plan to use the time to mold new projects with polymer clay, my favorite material. This project consists of a gun based on the character from Splinterlands Two Gun Pete.
My favorite projects are using polymer clay because it's a durable and easy-to-work material. The important thing is to complete the drying process and add enough glue when joining the pieces. When dealing with thick pieces, drying is crucial, as is the amount of glue, to ensure they are strong and securely joined. For these types of projects with thick and heavy pieces, I usually let them dry for three to seven days and regularly check the process, adding glue if necessary. This practice has allowed me to achieve good results and durability in my molding projects. I'll show you the process.


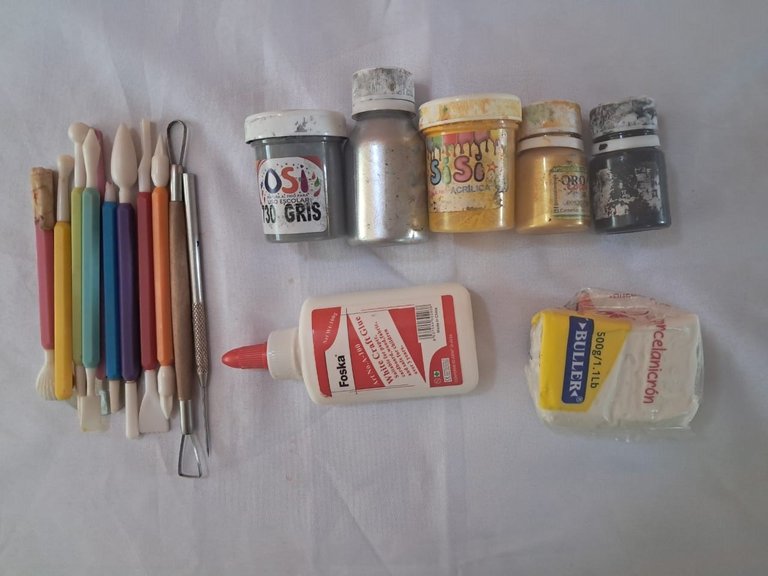
Pintura al frío
Estecas
Crema para moldear
Pegamento
Masa flexible
Cold paint
Modeling tools
Modeling cream
Glue
Flexible clay
Para moldear iniciamos dividiendo la masa en pequeñas porciones, luego agregamos pintura y mezclamos hasta obtener el color deseado, los colores a usar en este proyecto son dorado, gris y negro; luego de agregar pintura a las tres porciones de masa, mezclamos y para trabajar con mayor comodidad formamos bolas con las masas, una vez que ya tenga la pintura y el color que deseamos a partir de allí formaremos un triángulo que será la base o empuñadura, luego con la masa de color gris hacemos un cilindro y lo unimos al triángulo, es importante colocar suficiente pegamento y dejar secar durante varios minutos para que ambas piezas compacten y queden bien unidas.
To mold, we start by dividing the dough into small portions, then we add paint and mix until we obtain the desired color. The colors to use in this project are gold, gray, and black. After adding paint to the three portions of dough, we mix them, and to work more easily, we form balls with the dough. Once it has the paint and the desired color, we form a triangle that will be the base or handle. Then, with the gray dough, we make a cylinder and attach it to the triangle. It is important to apply enough glue and let it dry for several minutes so that both pieces compact and are well joined.


A continuación con masa de color gris, moldeamos un cilindro más pequeño y delgado que el anterior y lo colocamos en la parte de abajo agregamos pegamento y unimos a la base y a la parte inferior del cilindro anterior, con ayuda de las estecas hacemos orificios en ambos cilindros, luego de colocar el pegamento y dejamos secar.
Next, using gray clay, we mold a smaller and thinner cylinder than the previous one and place it at the bottom. We add glue and join it to the base and the bottom of the previous cylinder. With the help of the modeling tools, we make holes in both cylinders after applying the glue and let it dry.

Con la masa de color dorado, moldeamos un arco o herradura que irá en la parte delantera de la pistola, para ello se pueden usar las estecas, un molde o con las manos y ayuda de la superficie plana le vamos dando forma, iniciamos con una tira plana y a partir de allí formaremos el arco, agregamos pegamento y la unimos, también moldeamos una tira de color color dorado que pegaremos en la parte de abajo del cilindro pequeño, al igual que en el paso anterior dejamos secar.
Using the gold-colored clay, we shape an arch or horseshoe that will go on the front of the gun. You can use modeling tools, a mold, or your hands, shaping it on a flat surface. Start with a flat strip and shape it into an arch. Add glue and join the pieces. Also, shape a gold-colored strip that you will glue to the bottom of the small cylinder. As in the previous step, let it dry.


Usando nuevamente la masa de color dorado, moldeamos la pieza que va en la parte de arriba, primero formamos una especie de trapecio alargado, luego una semicurva delgada, estas piezas al ser pequeñas, requieren precisión y toma un poco más de tiempo ya que debemos trabajar con cuidado, para obtener el tamaño adecuado, moldearlas fue un poco difícil pero luego de un minucioso trabajo pude terminarlas, moldeadas ambas piezas, agregué pegamento en la parte de atrás del trapecio, lo uní a la otra pieza y dejé secar por varios minutos, aquí es importante que la pieza seque bien, ya que al ser pequeña se puede desprender, pasado el tiempo de secado verifiqué y agregué nuevamente pegamento para reforzar.
Luego pegué esta pieza, encima del arco anterior, la parte curva debe quedar hacia afuera y el trapecio entre el cilindro grande y la curva, coloqué pegamento dejé secar y así está listo un hermoso proyecto inspirado en Splinterlands.
Using the gold-colored clay again, we shaped the top piece. First, we formed a kind of elongated trapezoid, then a thin semi-curve. These pieces, being small, required precision and took a little more time since we had to work carefully to get the right size. Shaping them was a bit difficult, but after meticulous work, I was able to finish them. Once both pieces were shaped, I added glue to the back of the trapezoid, attached it to the other piece, and let it dry for several minutes. It's important that the piece dries well, as it's small and can come loose. After the drying time, I checked and added more glue to reinforce it.
Then I glued this piece on top of the previous arch, the curved part facing outwards and the trapezoid between the large cylinder and the curve. I applied glue, let it dry, and there it is: a beautiful Splinterlands-inspired project.


Les muestro el resultado.
I'll show you the result.
Gracias por Leer.
Thank you for reading.
See you later!
Translated with https://www.deepl.com/translator
    All images are of my authorship captured with an Alcatel phone.


      Todas las imágenes son de mi autoría capturadas con un teléfono Alcatel.
Thank you
It's a nice moulding 👍
Thanks for stopping by, I'm glad you liked it.
Cheers!
This is so clean and good. The details of your gun is everything. Awesome job!
selected by @ibbtammy
Greetings @diyhub, thank you for the support, I liked the result, it looks very good and neat.
Thanks for sharing! - @cieliss
