Saludos, amigos de DIYHUB! 🥰❤️
Primeramente quiero desearles a todos un maravilloso nuevo año 2026 que este año venga cargado de bendiciones para todos, deseo que estén disfrutando de unos días tranquilos y agradables, hoy me uno nuevamente al Concurso de este mes y me complace compartir con ustedes una linda confección de un conjunto para dama, este consta de pantalón y camisa, acompáñame y te comparto el paso a paso:
Greetings, DIYHUB friends! 🥰❤️
First, I want to wish everyone a wonderful New Year 2026. May this year be filled with blessings for all. I hope you are enjoying some peaceful and pleasant days. Today I'm joining this month's contest again, and I'm pleased to share with you a lovely women's outfit. It consists of pants and a shirt. Join me, and I'll share the step-by-step instructions:

MATERIALES
MATERIALS
Para este conjunto voy a utilizar una tela de una textura suave, delgada y de un color muy lindo, no recuerdo el nombre de la tela, pero me pareció perfecta para este tipo de conjuntos, para guiarme en el modelo, utilizaré el patrón Basico de pantalón y camisa, haciéndole algunas modificaciones y usaré un aproximado de 2 m y medio de tela, aquí les dejo la lista de materiales a utilizar:
- 2,5m de tela
- patrón guía de pantalón y camisa
- tijeras
- cremallera de 20cm
- entre-tela o perlon
- máquina de coser
For this outfit, I'm going to use a soft, thin fabric in a lovely color. I don't remember the name of the fabric, but it seemed perfect for this type of set. To guide me in the design, I'll use the basic pants and shirt pattern, making a few modifications. I'll need approximately 2.5 meters of fabric. Here's the list of materials you'll need:
- 2.5 meters of fabric
- Pants and shirt pattern template
- Scissors
- 20cm zipper
- inter-fabric or perlon
- Sewing machine

PASO A PASO
STEP BY STEP
Vamos a comenzar confeccionando el pantalón, para esto colocamos la tela doble sobre la mesa. Colocamos el patrón sobre la tela a una distancia de unos 5 cm de la orilla para dejar el espacio de las costuras, al tener el patrón principal podemos hacerle las modificaciones que deseemos, en este caso voy a reducirle algunos centímetros en la altura de la cintura para que quede un poco más bajo y en la bota del pantalón la voy a hacer un poco más ancha, el largo lo dejaré igual.
Para la parte de atrás igual le reduciré unos centímetros en la altura de la cintura y en el fundillo, ya que este es un poco largo y hace que el pantalón quede muy alto, la bota es igual al modificarla tanto adelante como atrás, luego de dibujar cortamos nuestra tela, este pantalón no lleva a bolsillo, así que la confección es mucho más sencilla, cortamos un retazo de tela de aproximadamente 10 cm de ancho por el largo que llevará la cremallera de este pantalón.
Let's begin by making the pants. To do this, place the fabric folded on the table. Position the pattern on the fabric about 5 cm from the edge to allow for seam allowances. Once you have the main pattern, you can make any desired modifications. In this case, I'm going to reduce the waistline by a few centimeters so it sits a little lower, and I'm going to make the leg openings a bit wider. I'll leave the length the same.
For the back, I'll also reduce the waistline and seat openings by a few centimeters, as they are a bit long and make the pants sit too high. The leg openings will be modified the same way, both front and back. After drawing the pattern, cut out your fabric. These pants don't have pockets, so the construction is much simpler. Cut a piece of fabric approximately 10 cm wide by the length of the zipper.
 |  |
|---|---|
 |  |
La confección de la camisa es bastante sencilla, para esto vamos a colocar el patrón sobre la tela, hacemos en la orilla el patrón delantero, dejamos una distancia de 5 cm para la botonera, marcamos el largo deseado, lo podemos hacer 10 cm debajo del nivel de la cintura y en los laterales es completamente recto, ya que esta camisa queda holgada, para esta también le haré bolsillos al frente en ambos lados, estos los podemos cortar de 15 cm de ancho por 20 cm de largo para que queden los centímetros para hacerle el ruedo, para la parte de atrás ponemos la tela doble, colocamos el patrón sobre ella y hacemos la modificaciones y luego cortamos, las mangas y el cuello se cortan luego de que ya tengamos armada la camisa
Making the shirt is quite simple. We'll place the pattern on the fabric, cut the front pattern along the edge, leaving a 5 cm seam allowance for the button placket. We'll mark the desired length, which can be 10 cm below the waistline. The sides are completely straight, as this shirt is meant to be loose-fitting. I'll also add pockets on both sides of the front. These can be cut 15 cm wide by 20 cm long to allow for hemming. For the back, we fold the fabric in half, place the pattern on top, make any necessary adjustments, and then cut it out. The sleeves and collar are cut after the shirt is assembled.
 |  |
|---|
En este paso comenzaremos con las costuras, para el pantalón, comenzaremos uniendo las dos piezas delanteras, luego le unimos la cremallera, de esta forma, la cremallera queda mucho más bonita haciéndolo de manera principal, luego unimos las dos piezas de atrás por el tiro, para luego unir a las delanteras por los lados y el fundillo, también le hacemos las pinzas en la parte de atrás del pantalón.
Para la cintura del pantalón vamos a cortar la tela de un aproximado de 15 cm de ancho, le colocamos entre tela para que esta quede un poco más firme, esta tela que estoy usando es bastante suave y se corre al momento de cocerla, así que debemos coser con mucha precaución, hacemos las trabillas y luego unimos todo a la cintura de nuestro pantalón, hacemos el ruedo en las botas de un aproximado de 1 cm .
In this step, we'll begin the sewing. For the pants, we'll start by joining the two front pieces, then attach the zipper. This way, the zipper looks much neater when sewn prominently. Next, we'll join the two back pieces at the crotch seam, and then join them to the front pieces at the sides and seat. We'll also add darts to the back of the pants.
For the waistband, we'll cut a piece of fabric approximately 15 cm wide. We'll add interfacing to make it a bit firmer. The fabric I'm using is quite soft and tends to shift when sewing, so we need to sew very carefully. We'll make the belt loops and then attach everything to the waistband. Finally, we'll hem the legs by approximately 1 cm.
 |  |
|---|---|
 |  |
En este paso vamos a hacer las costuras de nuestra camisa unimos por los hombros. Luego le unimos los bolsillos cuidando que nos queden en el mismo sitio de cada lado que no tengan desnivel, luego le pegamos el entretela para la botonera y doblamos, hacemos ruedo en la parte inferior.
In this step, we'll sew our shirt, joining the shoulders. Then we'll attach the pockets, making sure they're in the same place on each side and level. Next, we'll glue the interfacing for the button placket and fold it over, hemming the bottom edge.


|---|---|
Luego vamos a cortar la figura del cuello, guiándonos por la medida que nos dé en nuestra camisa, en este caso voy a hacer el cuello bastante sencillo, sólo con la forma en las esquinas y embonare junto a la botonera, luego de cortar el cuello, le plancho el perlón para pegárselo, luego guiándome con la medida del contorno de manga confecciono la manga, en mis imágenes les muestro un aproximado de las medidas.
Next, we'll cut out the collar shape, using the measurements from our shirt as a guide. In this case, I'm going to make the collar quite simple, just shaping the corners and fitting it with the button placket. After cutting the collar, I'll iron the perlon to attach it. Then, using the sleeve circumference measurement as a guide, I'll make the sleeve. In my images, I show you an approximation of the measurements.
 |  |
|---|---|
 |  |
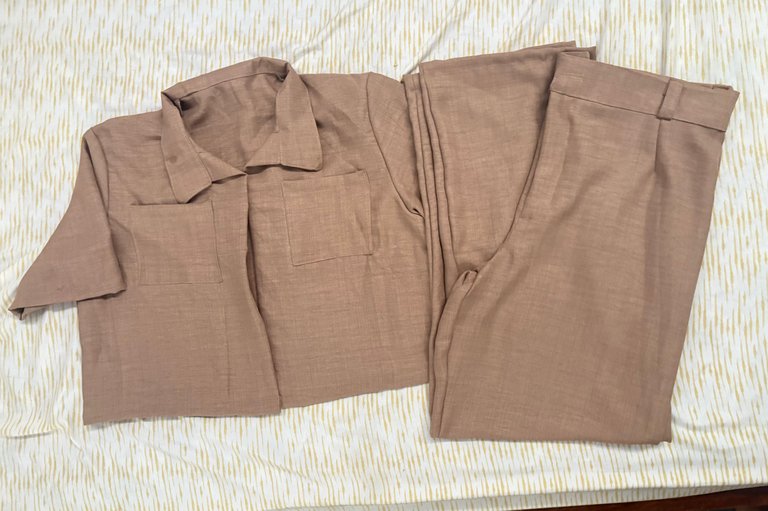
Ya para finalizar uno con costura el cuello a la camisa, luego en las esquinas embono con la botonera, creo que nunca había hecho este modelo de cuello, y me gustó bastante, aparte de qué es más fácil de hacer y luego de todo el proceso ya está listo este hermoso conjunto de dama, me ha encantado el resultado y me parece un conjunto muy bonito, espero les guste, eso es todo por hoy amigos, me despido deseándoles muchas bendiciones, hasta otra oportunidad
Finally, I sewed the collar to the shirt, then attached the button placket at the corners. I don't think I'd ever made this collar style before, and I really liked it. Besides being easier to make, after all that, this beautiful women's outfit is ready. I love the result and think it's a very pretty set. I hope you like it. That's all for today, friends. I'm signing off wishing you many blessings. Until next time!


las fotos aquí compartidas son de mi propiedad tomadas con mi teléfono iPhone 11, la edición fue hecha en Canva, para la traducción del inglés utilice el traductor de Google
The result is awesome and the seams are clean and precise.
Great job friend, keep it up.
selected by @ibbtammy
Thank you very much friend ☺️
I love this authors: [Literature] Charles Dickens: Bleak House 2/501
que hermoso conjunto, está super el color y diseño, buen trabajo
What a beautiful set, the color and design is great, good job
Gracias 🥰