(ESP)
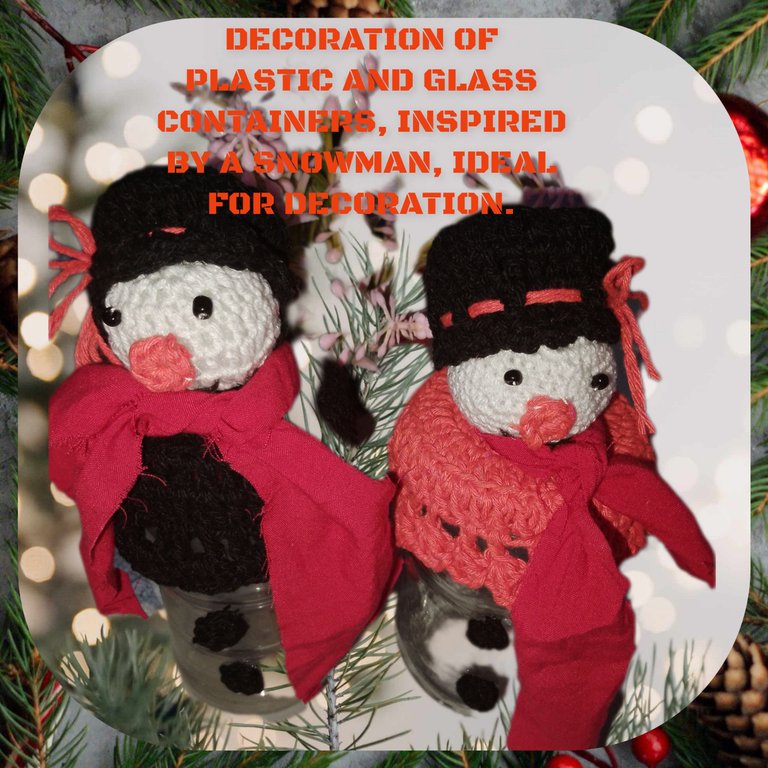
Hello beautiful people from @diyhub, DIY lovers, I am pleased to accompany you on this day, wishing it to be of many benefits, full of many good and productive things. I am going to show you a very simple and beautiful, manual project, where I use the recycling technique, and crochet, to create beautiful containers, which you could use, decorate, as well as, to give a present during these Christmas festivities.
Without further ado, I invite you to follow me until the end and I will show you how easy it is to make.
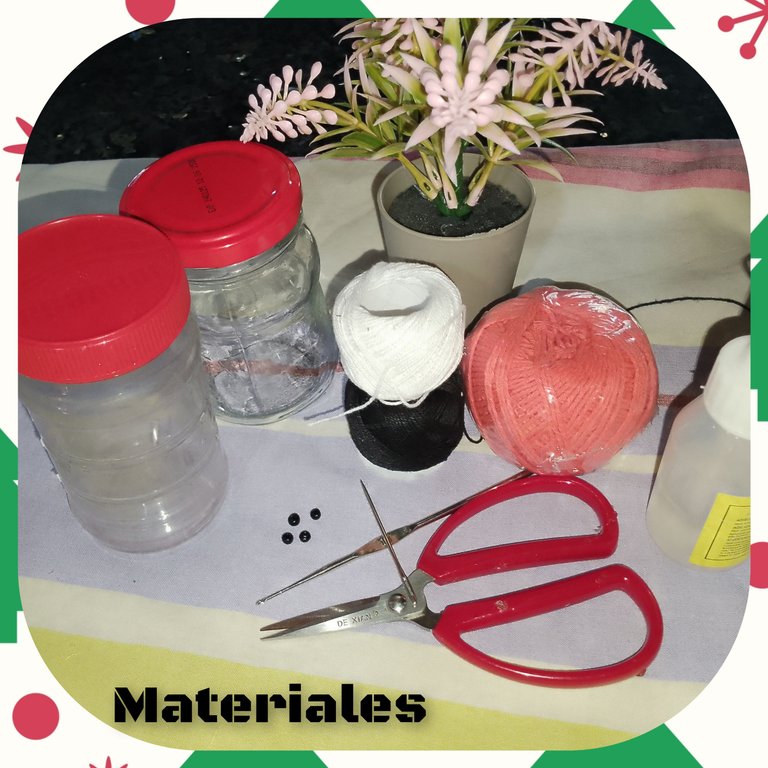
Materials:
. Colored knitting thread, white, black.
. Orange wick thread.
. Strips of red fabric.
. Knitting needle.
. Daughter to sew.
. Stuffed.
. Black chaquirs.
. Glue.
. Small plastic container with lid.
. Small glass container with lid.
. Scissors.
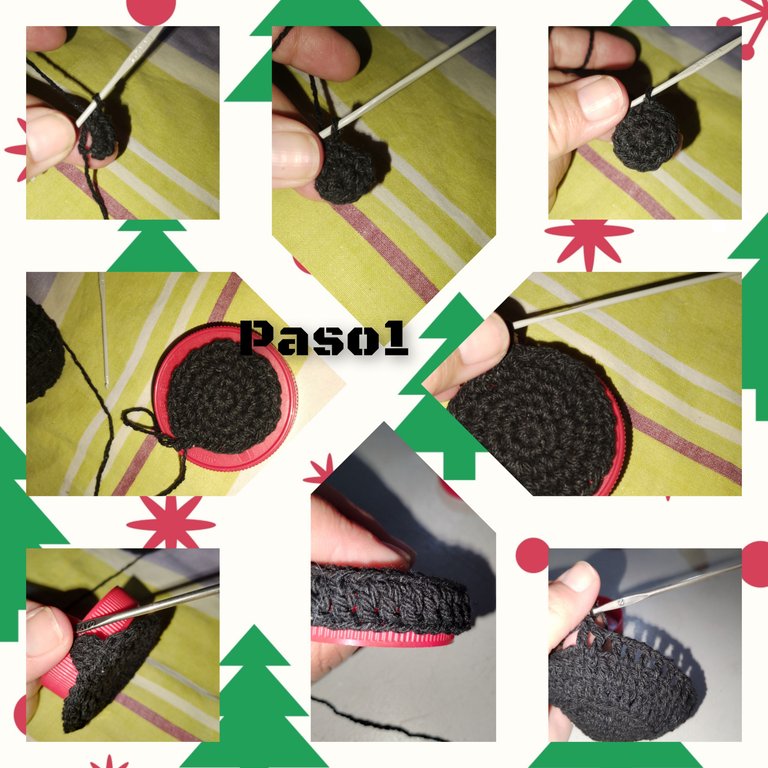
Steps:
1.) In a magic ring, I knit eight half stitches, I close the ring and on the next row I knit eight increases, for a total of, (16 stitches), I knit a next round, and after a single crochet I knit an increase , I place the knitted circle on the lid. Once it is confirmed that this circle covers the upper part of the cover, I knit one more row. But this time, with double crochets followed by a chain stitch, leaving a half stitch from the previous pass, I continue with the knitting, and we will knit at home chain space, two double crochets, a chain and I place myself in the next space with slipped stitch.
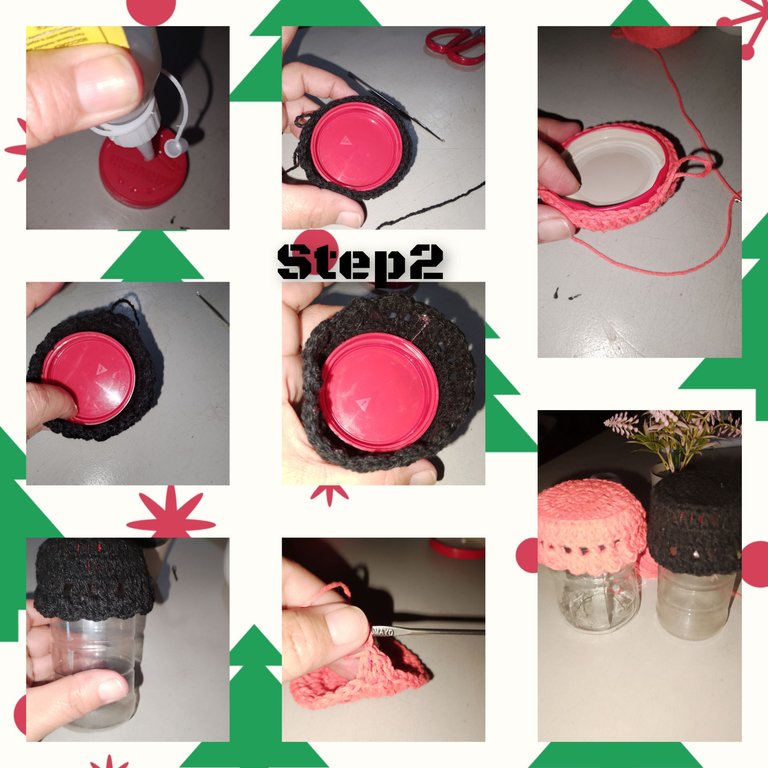
2.) ready the previous step, I repeat, but this time, I will cover the lid, with the crochet fabric, using the orange thread. He then applied glue to both covers and glued the fabric. Thus covering the lid of both containers.
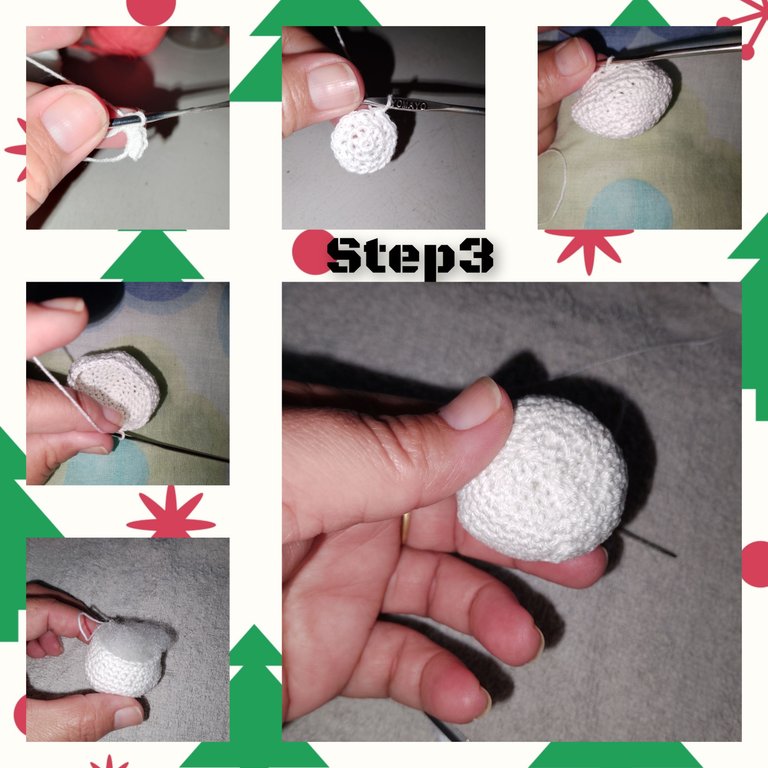
3.) Using the white thread, I knit six half stitches, in a magic ring, after closing continuously, making six increases, for twelve stitches, a next round, where, an increase will be knitted after a half stitch . For 18 points. In the next one, I will knit the increase after two half stitches for 24 stitches. I continue knitting three rows of 24 stitches, and I will continue, making the decreases, before closing the sphere, I will place a little filling and finally I close. In the same way, I will knit a next sphere.
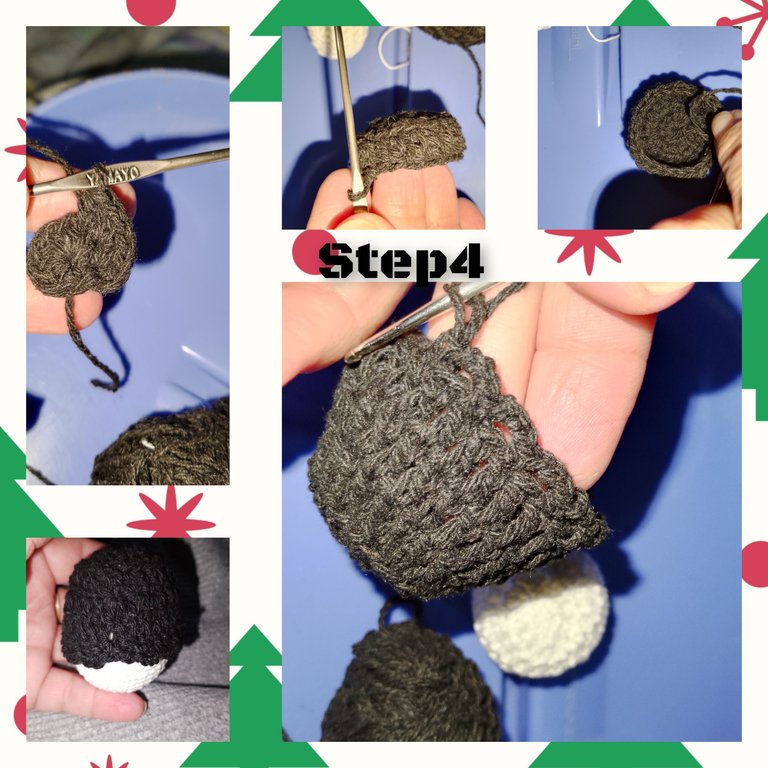
4.) in a magic ring, I will knit six half stitches, then say half stitches, knitting increases and one more round making increases after a half stitch, for 18 half stitches. For the next one, I will knit a few trebles, but taking the back strand of the half stitch from the previous pass. Thus making a break and knitting the snowman's hat.
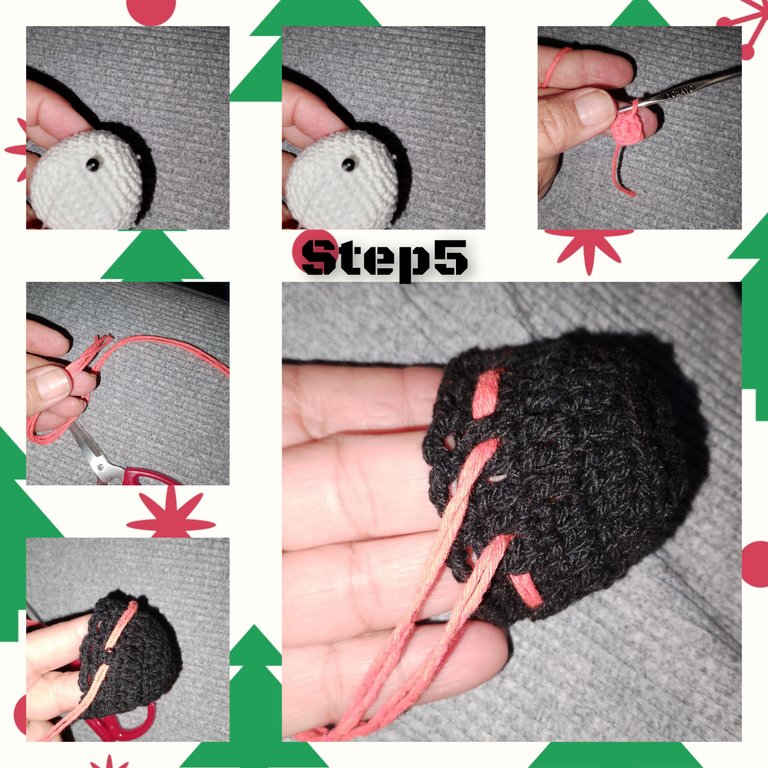
5.) I start by gluing the black beads with a needle and thread and begin to shape the face. Likewise, I cut two long strands of orange thread, and place on the back of the hat, where I knit, double crochets and chain, I will do the entire route and place on the upper part of the sphere, I applied a little silicone, to that thecap. To finish I knit a small orange circle, to symbolize the snowman's nose.
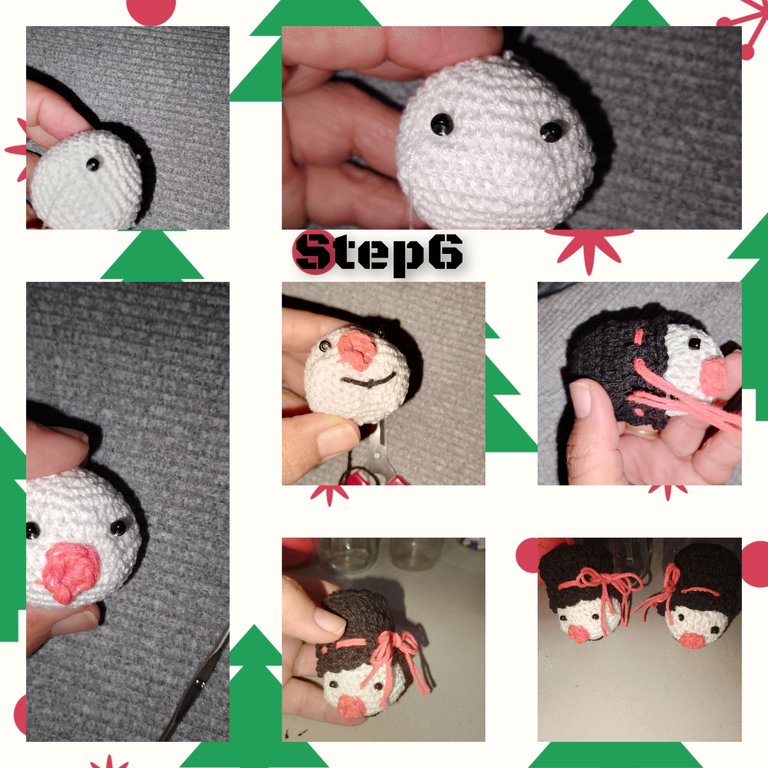
6.) I continue, I glue the snowman's nose with a needle and thread and mute the smile. Likewise, he formed a loop with the strands of thread that run through the hat. Likewise, I knit small buttons with black thread.
7.) To finish, I applied glue to the spheres, on the upper part of the lid and placed them on the containers, I put some silicone stitches and placed the red ribbon, and tied them to symbolize the scarf, also on the body of the container, I glue two black buttons, crocheted.
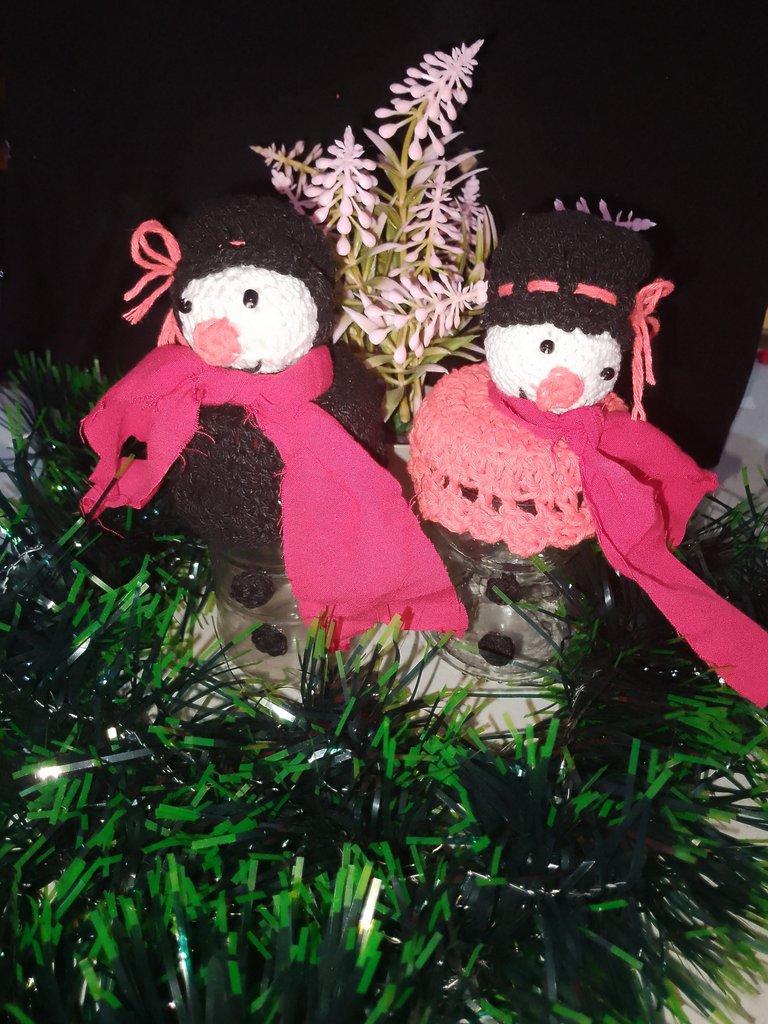
. All photos are my property.
. Use incollage to show the steps.
. Use language translator.
Thank you for visiting my blog, you are always welcome. It will be until a next opportunity.
Hola gente linda de @diyhub, amantes de el bricolaje, me complace acompañarles, en este día, deseando, sea de muchos provecho, lleno de muchas cosas buenas y productivas. Paso a mostrarles, un muy sencillo y hermoso, proyecto manual, dónde emplee la técnica de reciclaje, y crochet, para crear unos hermosos envases, que bien podrías usar, decorar, como además, para dar algún presente en estás festividades Navideñas.
Sin más les invito a seguirme hasta el final y les mostraré, lo fácil de su elaboración.

Materiales:
. Hilo para tejer de colores, blanco, negro.
. Hilo pabilo de color naranja.
. Tiras de tela de color rojo.
. Aguja para tejer.
. Hija para coser.
. Relleno.
. Chaquirs de color negra.
. Pegamento.
. Envase pequeño de plástico con tapa.
. Envase pequeño de vidrio con tapa.
. Tijeras.

Pasos:
1.) En un anillo mágico, tejo, ocho medios puntos, cierro el anillo y par ala siguiente pasada tejo ocho aumentos, para un total de, (16 puntos), tejo una siguiente vuelta, y luego de un punto bajo tejo un aumento, coloco el círculo tejido, sobre la tapa. Comprobado, que este círculo cubre, la parte superior de la tapa, tejo una, vuelta más, Pero en esta oportunidad, de puntos altos seguido de un punto cadena, dejando un medio puntos de la pasada anterior, sigo con el tejido, y tejeremos en casa espacio de cadenas, dos puntos altos,una cadena y me ubico en el siguiente espacio con punto deslizado.

2.) listo el paso anterior, repito, Pero en esta oportunidad, cubrire la tapa, con el tejido a crochet, usando el hilo de color anaranjado. Seguidamente aplicó pegamento sobre ambas tapas y pego el tejido. Quedando así cubriera, la tapa de ambos envases.

3.) Usando, el hilo de color blanco, tejo, seis medios puntos, en un anillo mágico, luego de cerrar continuo, haciendo seis aumentos, para doce puntos, una siguiente vuelta, dónde, se Tejera un aumento luego de un medio punto. Para 18 puntos. En la siguiente, tejere el aumento luego de dos medios puntos para 24, puntos. Continuo tejiendo tres vueltas de 24 puntos, y continuaré, haciendo las disminuciones, antes de cerrar la esfera, colocaré un poco de relleno y finalmente cierro. De igual manera, tejere una siguiente esfera.

4.) en un anillo mágico, tejere seis medios puntos, luego dice medios puntos, tejiendo aumentos y una vuelta más haciendo aumento luego de un medio punto, para 18 medios puntos. Para la siguiente, tejere, unos altos, pero tomando la hebra tracera de el medio punto de la pasada anterior. Haciendo así un quiebre y tejer el gorro de el muñeco de nieve.

5.) comienzo pegando con aguja e hilo, las chaquiras, de color negro y comenzar a dar forma a el rostro. Así mismo corto dos hebras largas de hilo de color anaranjado, y coloco en la vuelta de el gorro, dónde tejo, puntos altos y cadena, haré todo el recorrido y colocaré en la para superior de la esfera, aplicó un poco de silicón, para que quede bien fijado el gorro. Para terminar tejo un pequeño circulo de color naranja, para simbolizar la nariz de el muñeco de nieve.

6.) Continuo, pego con aguja e hilo la nariz y sordo la sonrisa a el muñeco de nieve. Así mismo formó un lazo con las hebras de hilo que recorren el gorro. Así mismo,tejo pequeños botones, con hilo de color negro.

7.) Para finalizar aplicó pegamento a las esferas, en la parte superior de la tapa y las coloco a los envases, pongo algunas puntadas de silicón y coloco el liston rojo,y ato para simbolizar la bufanda, así mismo en el cuerpo de el envase, pego dos botones de color negro, tejidos a crochet.

. Todas las fotos, son de mí propiedad.
. Use incollage para mostrar los pasos.
. Use traductor lenguaje.
Agradecida hayas visitado mí blog, siempre eres bienvenido. Será hasta una próxima oportunidad.
Katiuska, congratulations on this work. It turned out beautifully and is an example to follow in our community. You are a person who inspires others to create with a passion for details, thank you for choosing DIYHub to share it. I wish you a great day!...
Guao que alargador su comentario amigo... gracias por su apoyo.
Hola amiga, te quedó bonita y muy navideña la decoración de los frascos. Me gustó. Gracias por compartir 😃
Gracias mu hermosa amiga... abrazos
You can check out this post and your own profile on the map. Be part of the Worldmappin Community and join our Discord Channel to get in touch with other travelers, ask questions or just be updated on our latest features.
This is a great job, one of those that takes a lot of time, dedication and talent to complete and make them look so beautiful. Congratulations, because it is very good, as is your way of sharing it in the community with this excellent post.
that's great, you are very creative👍
Muy agradecida 😘
un trabajo esplendido, está hermoso!
splendid work, it is beautiful!
Que bueno le haya gustado amiga, gracias por apoyarme
This is incredible,nice position of the colors
Gracia amigo, que gusto saber si opinión
Hola Katiuska, que lindo proyecto, está perfecto para guardar galletas y golosinas, gracias por compartir una excelente idea para reutilizar los envases que tenemos en casa.
Saludos!
!DIY
Si mi amiga, yo los idee, para regalar, el tradicional, dulce de lechosa...
You can query your personal balance by
!DIYSTATSQue alegría,.muchas gracias por su apoyo... abrazos ☺️