( ENG)
Hello everyone, what a pleasure to share this beautiful idea with all of you on @ diyhub, dedicated to all of you, before DIY.
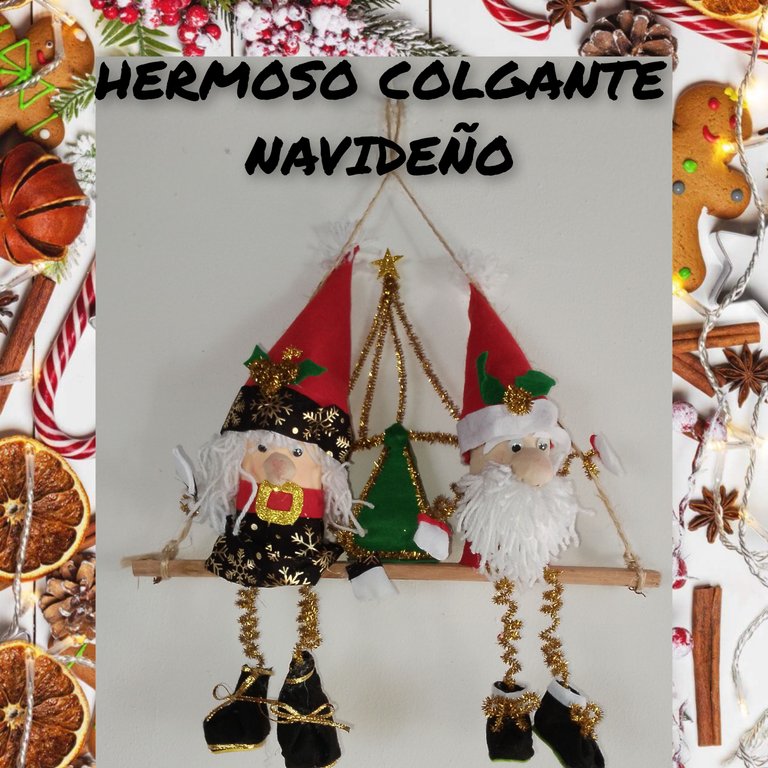
This time it is a cute and decorative pendant, ideal for decorating this Christmas. To do this, use various recyclable and useful materials.
Follow me and I'll tell you how to do them, I hope you like it and find the journey fun.
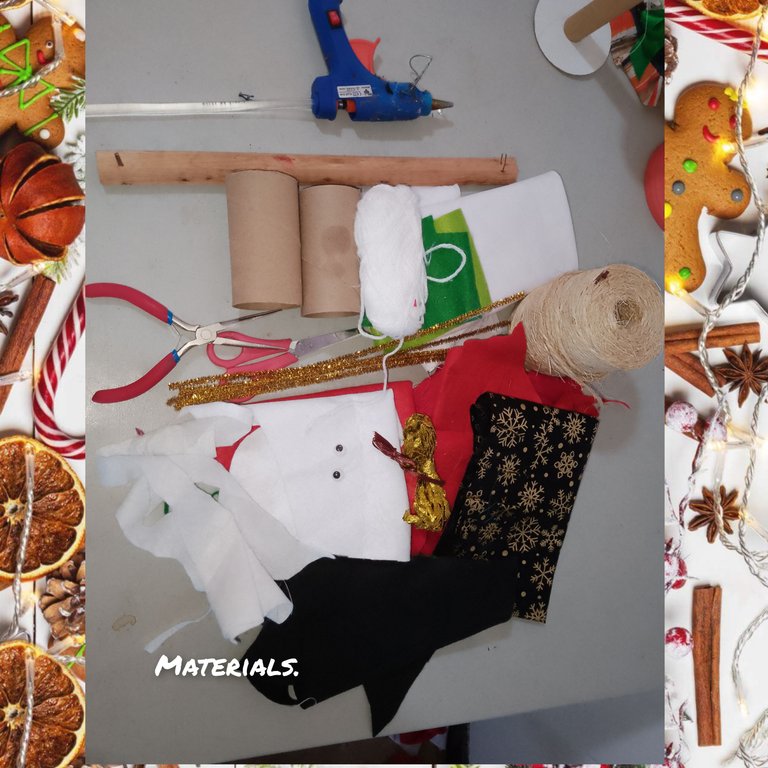
Materials:
. Gold Chanel.
. Piece of wooden strip of 60cs.
. Mecatillo.
. White stamen.
. Foami cutouts, (meat, Dorado).
. Felt cutouts (red, white, green).
. Glue.
. Toilet paper rust.
. Black fabric with Christmas prints.
. Mecatillo.
. Googly eyes.
. Tweezers
.scissors.
Pencil.
. Needle and thread.
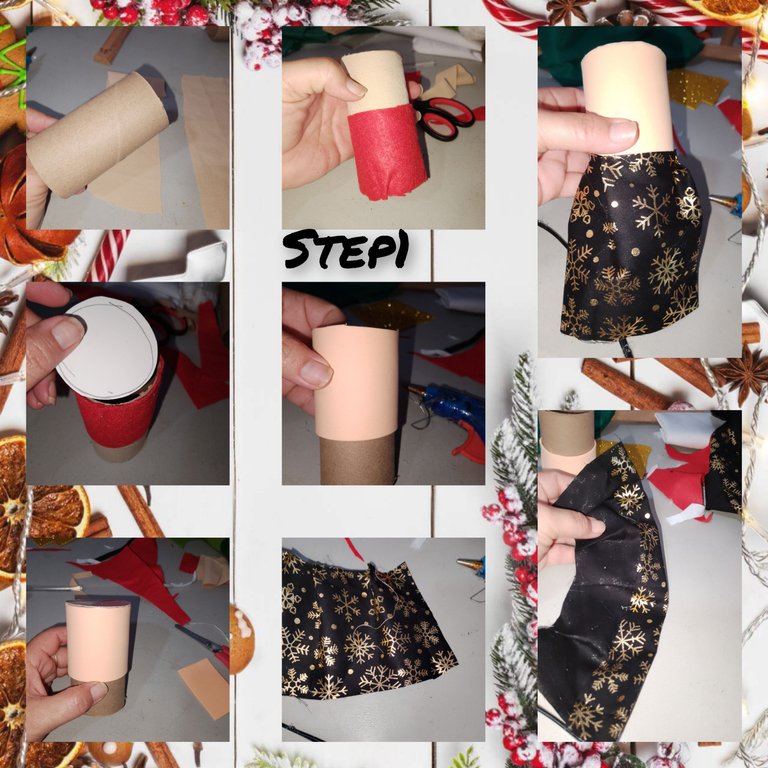
Steps:
1.) I start by covering the toilet paper tubes. For Santa, I place part of the tube in flesh color and for the rest, red felt. While for the holy bride, one part, in flesh color and the next with black fabric, where else, I made some planks to give it a better shape. To both tubes, I place a lid on top, right on the side where I covered with flesh-colored foam.
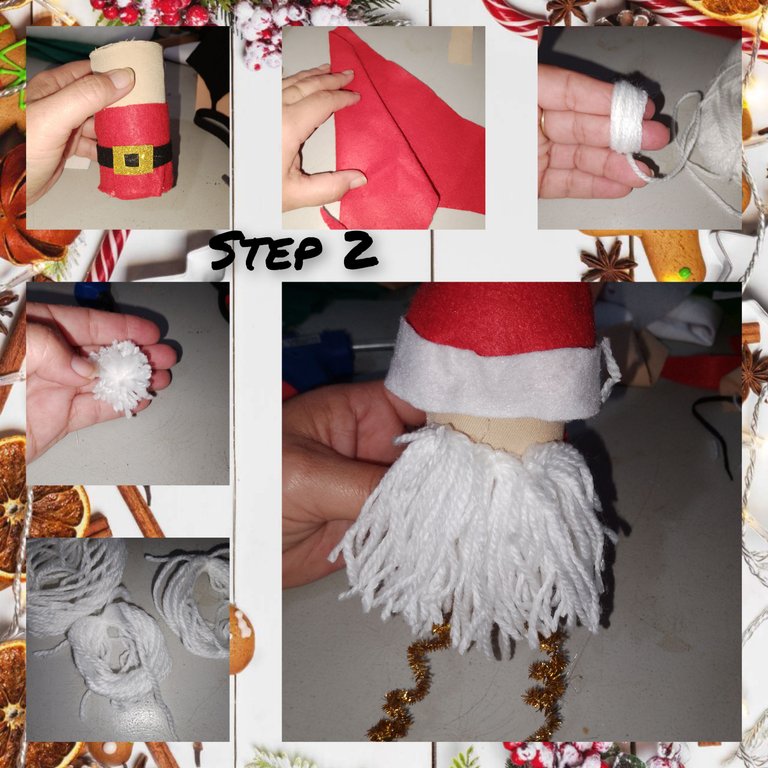
2.) I place the first doll to hang a belt, then, with red felt, I put together the hat, on the edge, I glue a white felt ribbon, then, I join the index and middle fingers, I make 15 turns and I make a pompom to glue the top of the hat. I put a little filling on the hat, and glue, continue, and make 20 turns with the worsted thread, cut and tie, I make two more but smaller in size and glue on the face after cutting the strands, I formed the beard and I shape.
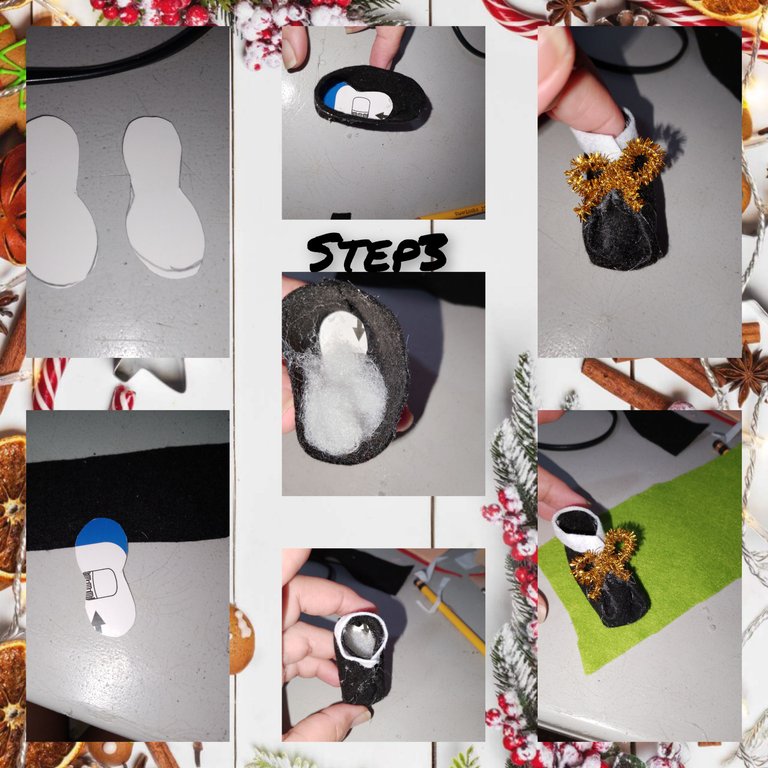
3.) I draw and cut out some small shoes on the cardboard, then I cover them with black felt, I place a little filling on the front, and I start to apply glue and form the shoes, I place them on the bottom, I put a green lid on it. And with a piece of pipe cleaner, I make a bow and glue it to the front.
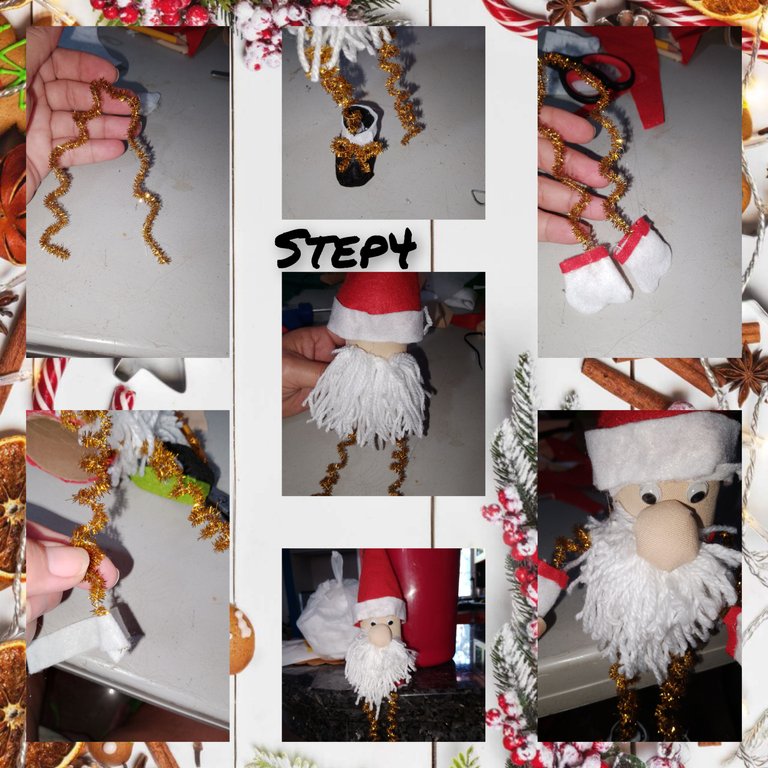
4.) I fold a pipe cleaner into equal parts and with the help of the pencil, I make several turns on both sides, and at the ends, I glue a ribbon, to stick inside the shoe. I continue, marking and cutting out two small gloves, in white felt, I put a little filling in a new pipe cleaning stick, I glue to form the hands, gluing from the back of the doll, likewise, I assembled and glued the eyes and nose, whom I previously sewed on a piece of cream-like fabric giving a rounded shape, stuffed and gathered, to form the nose.
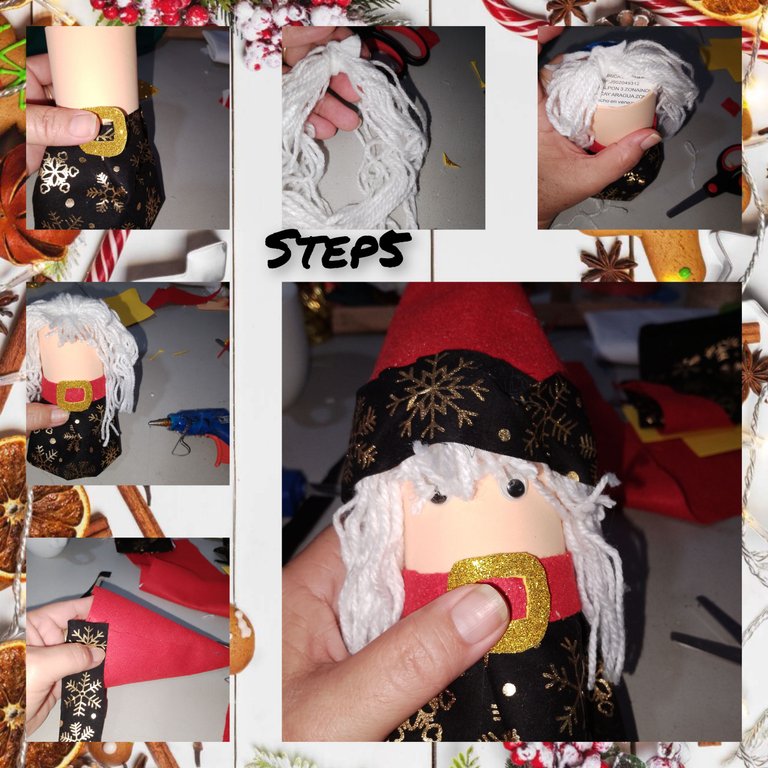
5.) For the next doll, I place a strip of black felt on the belt, and in the center, a pronounced gold foam buckle. I place strands of white yarn, and I put an elegant head of hair. He made the hat, following the same process as the previous one, but on the edge, he placed black fabric, with a Christmas print. He applied and glued the hat and theeyes.
6.) Just as I made the arms, feet and shoes for the previous doll, I repeat for this one.
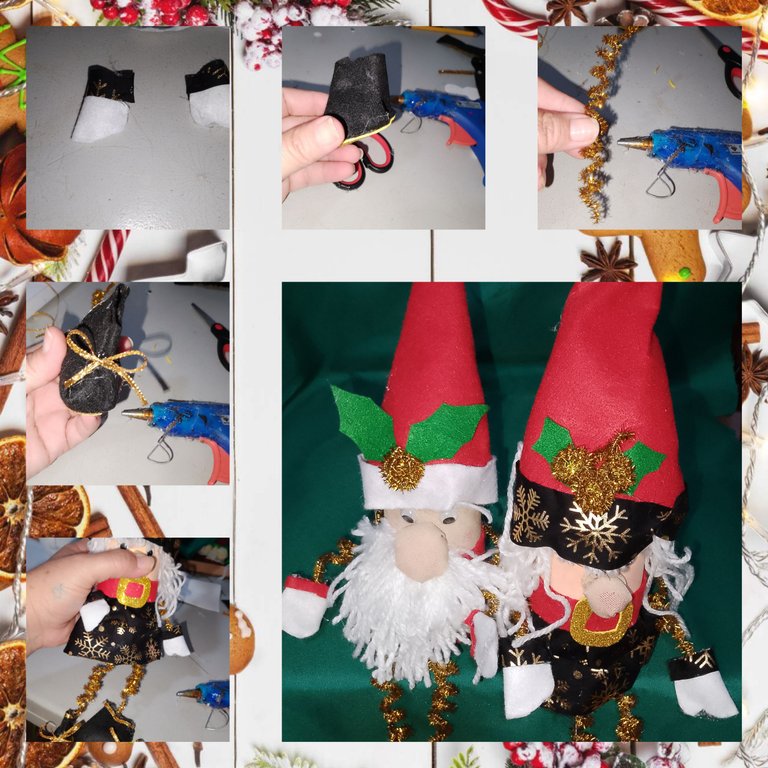
7.) With a pipe cleaner, I shape it into a triangle, and give it a few turns to fix it. I make a smaller triangle and glue felt on the back part. He cut out the residue and glued both figures to form a striking Christmas tree. To assemble the swing, I tie a ribbon of rope to both ends of the wood.
I start to decorate, I glue the tree in the center and at both ends, one of the dolls, circling the rope with one of the arms.
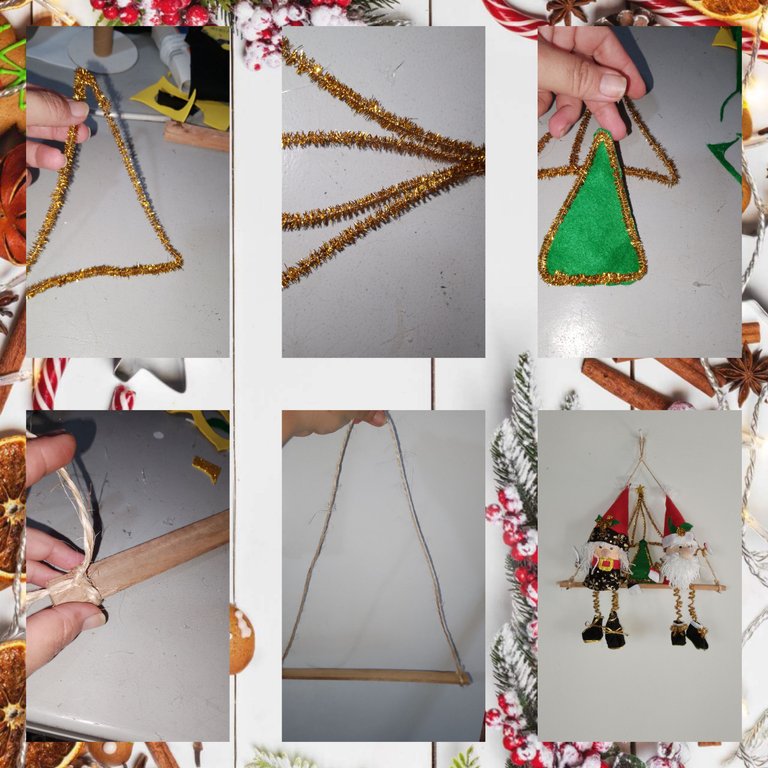
. All photos are my property.
. Use incollage.
. Use language translator.
Grateful for your visit to my blog, it is always a pleasure to show you my most recent project. It will be until an approximate opportunity.
( ESP)
Hola a todos, que gusto compartir esta linda idea con todos ustedes en @ diyhub, dedicada para todo ustedes, antes de el bricolaje.
Se trata en esta oportunidad de un lindo y decorativo colgante, ideal para ambientar en esta navidad. Para ello utilice, diversos materiales reciclable y de provecho.
Síganme y les cuento como realizarlos, deseo les guste y le sea divertido el recorrido.

Materiales:
. Chanel dorado.
. Trozo de liston de madera de 60cs.
. Mecatillo.
. Estambre color blanco.
. Recortes de foami, ( carne, Dorado).
. Recortes de fieltro( rojo, blanco,verde).
. Pegamento.
. Royos de papel higiénico.
. Tela color negra estampados de navidad.
. Mecatillo.
. Ojitos saltones.
. Pinzas
.tijeras.
Lápiz.
. Aguja e hilo.

Pasos:
1.) Comienzo cubriendo los tubos de papel higiénico, Para santa, coloco una parte de el tubo en color carne y para el resto, fieltro de color rojo. Mientras que para novia santa, una parte, en color carne y la siguiente con tela de color negra, dónde demás, hice unos tablones par dar mejor forma. A ambos tubos, coloco una tapa en la parte superior, justo en el lado donde cubrí con foami color carne.

2.) Coloco a el primer muñeco par colgar, un cinturón, seguidamente, con fieltro color rojo, armó el gorro, en la orilla, pego un listón de fieltro color blanco,luego, uno los dedos índice y medio, doy 15 vueltas y armo un pompo, para pegar el la parte superior de el gorro. Coloco un poco de relleno a el gorro, y pego, continuo, y doy con el hilo estambre 20 vueltas, corto y ato, hago dos más Pero de menor tamaño y pego en el rostro luego de cortar las hebras, formó la barba y doy forma.

3.) Dibujo y recortó sobre el cartón, unos pequeños zapaticos, luego, cubro con fieltro de color negro, coloco un poco de rellenos en la parte de adelante, y comienzo a aplicar pegamento y formar los zapaticos, coloco en la parte inferior, coloco una tapa, de color verde. Y con un trozo de limpia pipas, hago un lazo y pego en la parte de el frente.

4.) doblo en partes iguales, un limpia pipas y y con ayuda de el lápiz, doy varias vueltas a ambos lados, y en los extremos, pego un listón, para pegar dentro de el zapatito. Sigo, marcando y recortando dos pequeños guantes, en fieltro color blanco, pongo un poco de relleno en una nueva barrita de limpieza pipas, pego par formar las manos, pegando desde la parte tracera de el muñeco, así mismo, armó y pego los ojos y nariz, a quien anteriormente en un recorte de tela como crema cosi dando forma redondeada, relleno y he recogido, para formar la nariz.

5.) Para, la siguiente muñeco, coloco en cinturón, coloco una tir de fieltro color Negro, y en el centro, una pronuncia hebilla de foami dorado. Coloco hebras de estambre color blanco, y pongo una elegante cabellera. Elaboró el gorro, siguiendo el mismo proceso de el anterior, Pero en la orilla, coloco tela de color negro, estampado de navidad. Aplicó y pego el gorro y los ojos.

6.) Tal como elabore los brazos, pies y zapatos a el muñeco anterior, repito para este.

7.) con un limpia pipas, doy forma de triángulo, y doy algunas vueltas para fijar. Hago un triángulo de menor tamaño y por la parte tracera, pego fieltro. Recortó el residuo y pego ambas figuras, para formar un llamativo árbol de navidad. Para armar, el columpio, ato un listón de mecatillo, en ambos extremos de la madera.
Comienzo a decorar, pego en el centro el árbol y en ambos extremos, uno de los muñecos, dando vueltas con uno de los brazos a la cuerda.

. Todas las fotos son de mí propiedad.
. Use incollage.
. Use traductor lenguaje.
Agradecida por su visita a mí blog, siempre es un gusto, mostrarles mi más reciente proyecto. Será hasta un aproxima oportunidad.
Hermoso lo que has realizado la verdad sería genial colocar estos adornos en el árbol de navidad, hechos en casa, no es necesario gastar en compras si lo puedes hacer tu mismo
Prepared creative art of extraordinary experience on the occasion of Christmas. Made this wonderful Christmas decoration by using cotton with glitter paper and white yarn. Thanks for sharing
Gracias por visitarme 😘
You are most welcome my pleasure
Hola.
Se ve super lindos tus colgantes navideños. Me encantan esos colores de tela y los limpiapipas dorados.
Bello 🤩
Que gusto saber te haya gustado amiga... gracias
This is a lovely piece of craftsmanship. It looks great as a Christmas decoration piece. Buen trabajo
Gracias,.muy lindo...
Wow simplemente hermoso. Excelente trabajo
Encantada amiga de ver hermosos colgantes navideños ideal para decorar nuestros árboles o paredes gracias por compartir genial, tu post es maravilloso saludos y bendiciones para ti🍀
Gracias ☺️🫂
Ho Ho Ho! @katiuskamata, one of your Hive friends wishes you a Merry Christmas and asked us to give you a new badge!
The HiveBuzz team wish you a Merry Christmas!
May you have good health, abundance and everlasting joy in your life.
To find out who wanted you to receive this special gift, click here!
You can view your badges on your board and compare yourself to others in the Ranking
Check out our last posts: