
¡Hola DIYHUB!
✔️Spanish
Llegaron las fiestas decembrinas, con ellas una gran cantidad de opciones para decorar nuestros hogares, espacios con todo tipo de artesanías navideñas y lo más especial es que podemos ser creativos y otorgar un toque personal a nuestros diseños navideños. Mi esposo me dice que siempre hago manualidades por temporadas. Tiene toda la razón, por la que me gusta hacer manualidades cuando me siento inspirada. La Navidad es una fuente de inspiración que me gusta aprovechar. En esta fecha siempre me gusta ayudar a mi madre a decorar su casa con detalles navideños. Esta vez me animé a diseñar un lindo conejo Navideño para ella. Aprovechando este momento creativo, me animé a participar en la iniciativa de la Comunidad DIYHub Christmas con Ecency (concurso final de 2024) con mi diseño de Conejo Navideño.
✔️English
The holidays are here, and with them a lot of options to decorate our homes, spaces with all kinds of Christmas crafts and the most special thing is that we can be creative and give a personal touch to our Christmas designs. My husband tells me that I always do seasonal crafts. He's absolutely right, which is why I like to craft when I feel inspired. Christmas is a source of inspiration that I like to take advantage of. On this date I always like to help my mother to decorate her house with Christmas details. This time I decided to design a cute Christmas bunny for her. Taking advantage of this creative moment, I was encouraged to participate in the DIYHub Christmas with Ecency Community initiative (final contest),with my Christmas Bunny design.

✔️Materiales
💎Tijeras
💎Silicone
💎Pistola para Silicone.
💎Retazos de telas ( preferiblemente verde,rojo, dorado,blanco, negro)
💎Retazos de tela de algodón
💎Cartulina
💎Agujas
💎Hilos (Colores acordes a los retasos de tela)
💎Rellenos para almohadas
💎Lápiz
✔️Materials
💎Scissors
💎Silicone
💎Gun for silicone.
💎Fabric scraps (preferably green, red, gold, gold, white, black)
💎Cotton fabric scraps
💎Cardboard
💎Needles
💎Yarns (colors according to the fabric scraps)
💎Pillow fillings
💎Pencil


✔️PASO 1🌼 👉
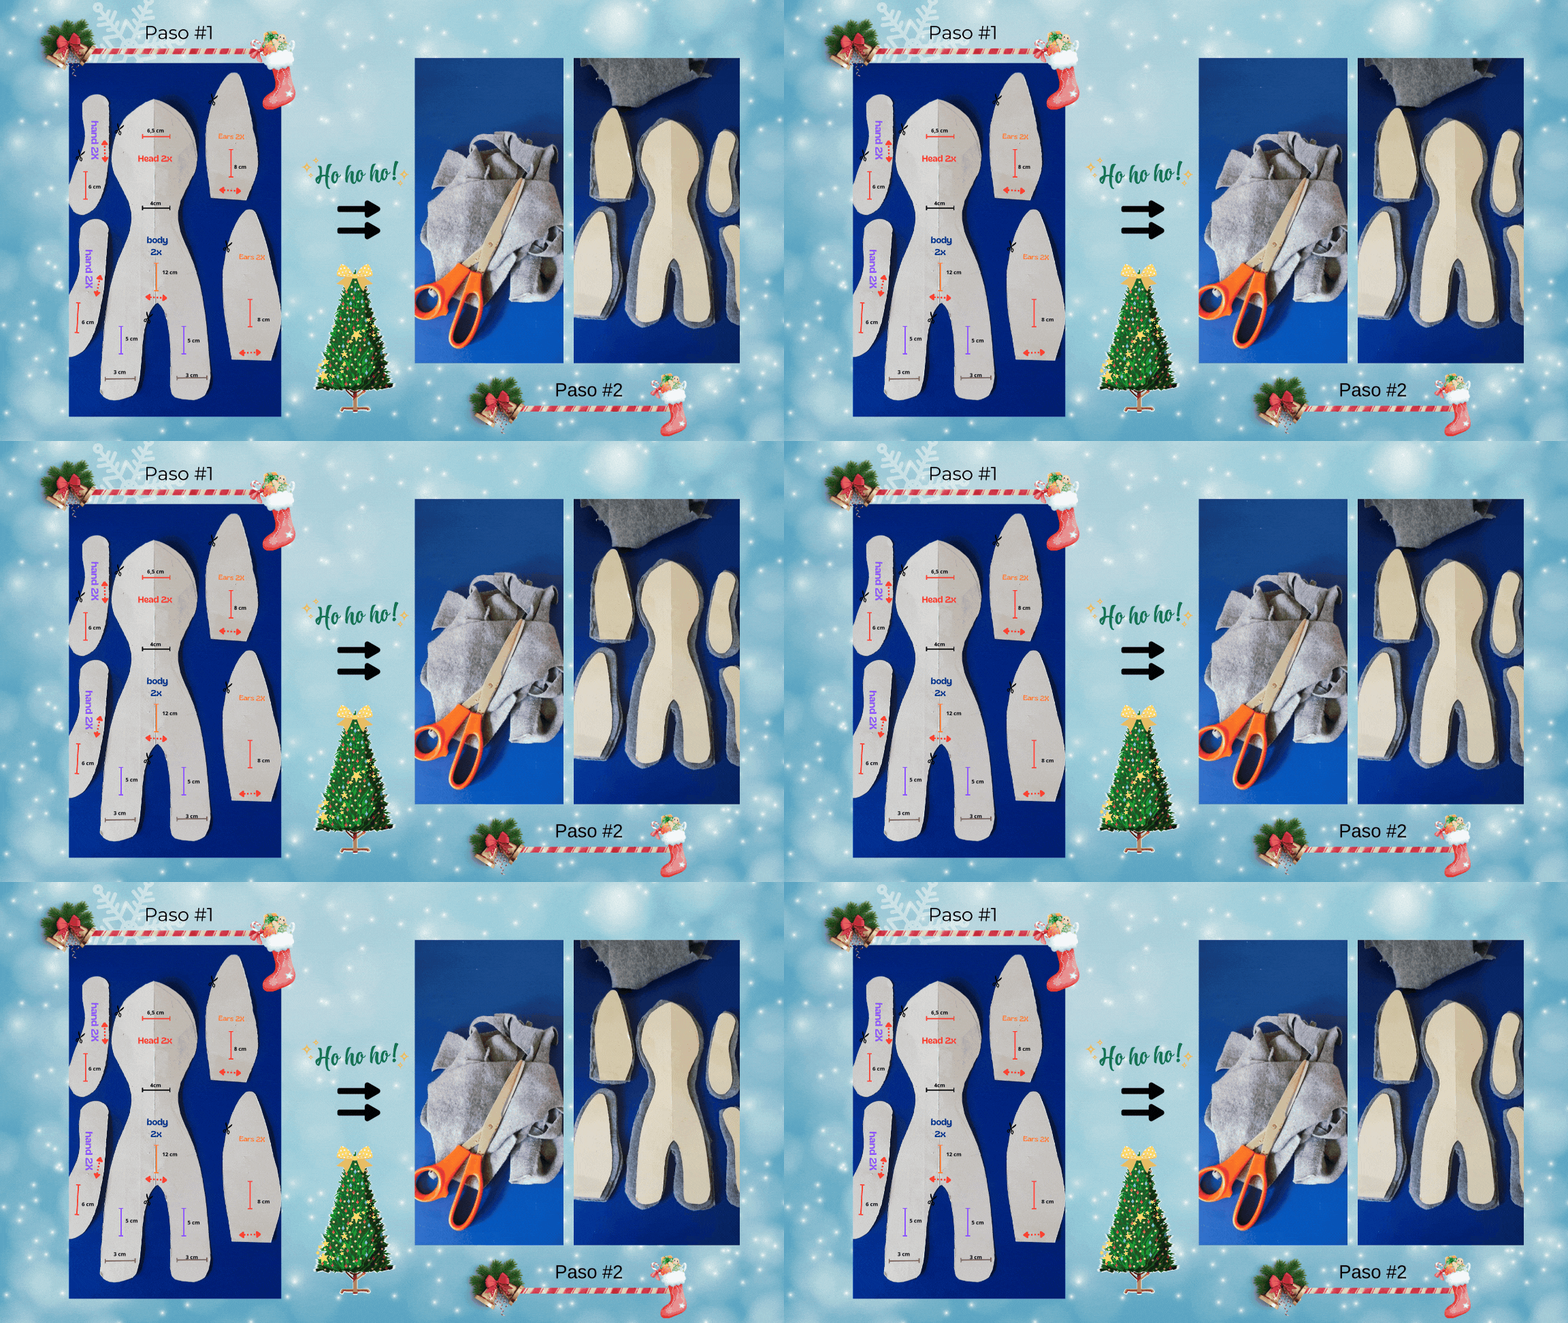
En una cartulina diseña cada pieza del cuerpo del conejo siguiendo las medidas presentes en la imagen a continuación. La cabeza del conejo y su cuerpo irán en una sola pieza de cartulina.
✔️PASO 2🌼 👉
Una vez recortada cada pieza de cartulina con la forma del cuerpo del conejo utiliza este patrón en el retazo de tela de algodón para obtener dos piezas de cada figura.
✔️STEP 1🌼 👉
On a piece of cardboard design each piece of the rabbit's body following the measurements in the image below. The rabbit's head and body will be on one piece of cardboard.
✔️STEP 2🌼 👉
Once you have cut out each piece of cardboard in the shape of the bunny's body, use this pattern on the piece of cotton fabric to obtain two pieces of each figure.


✔️PASO 3🌼 👉
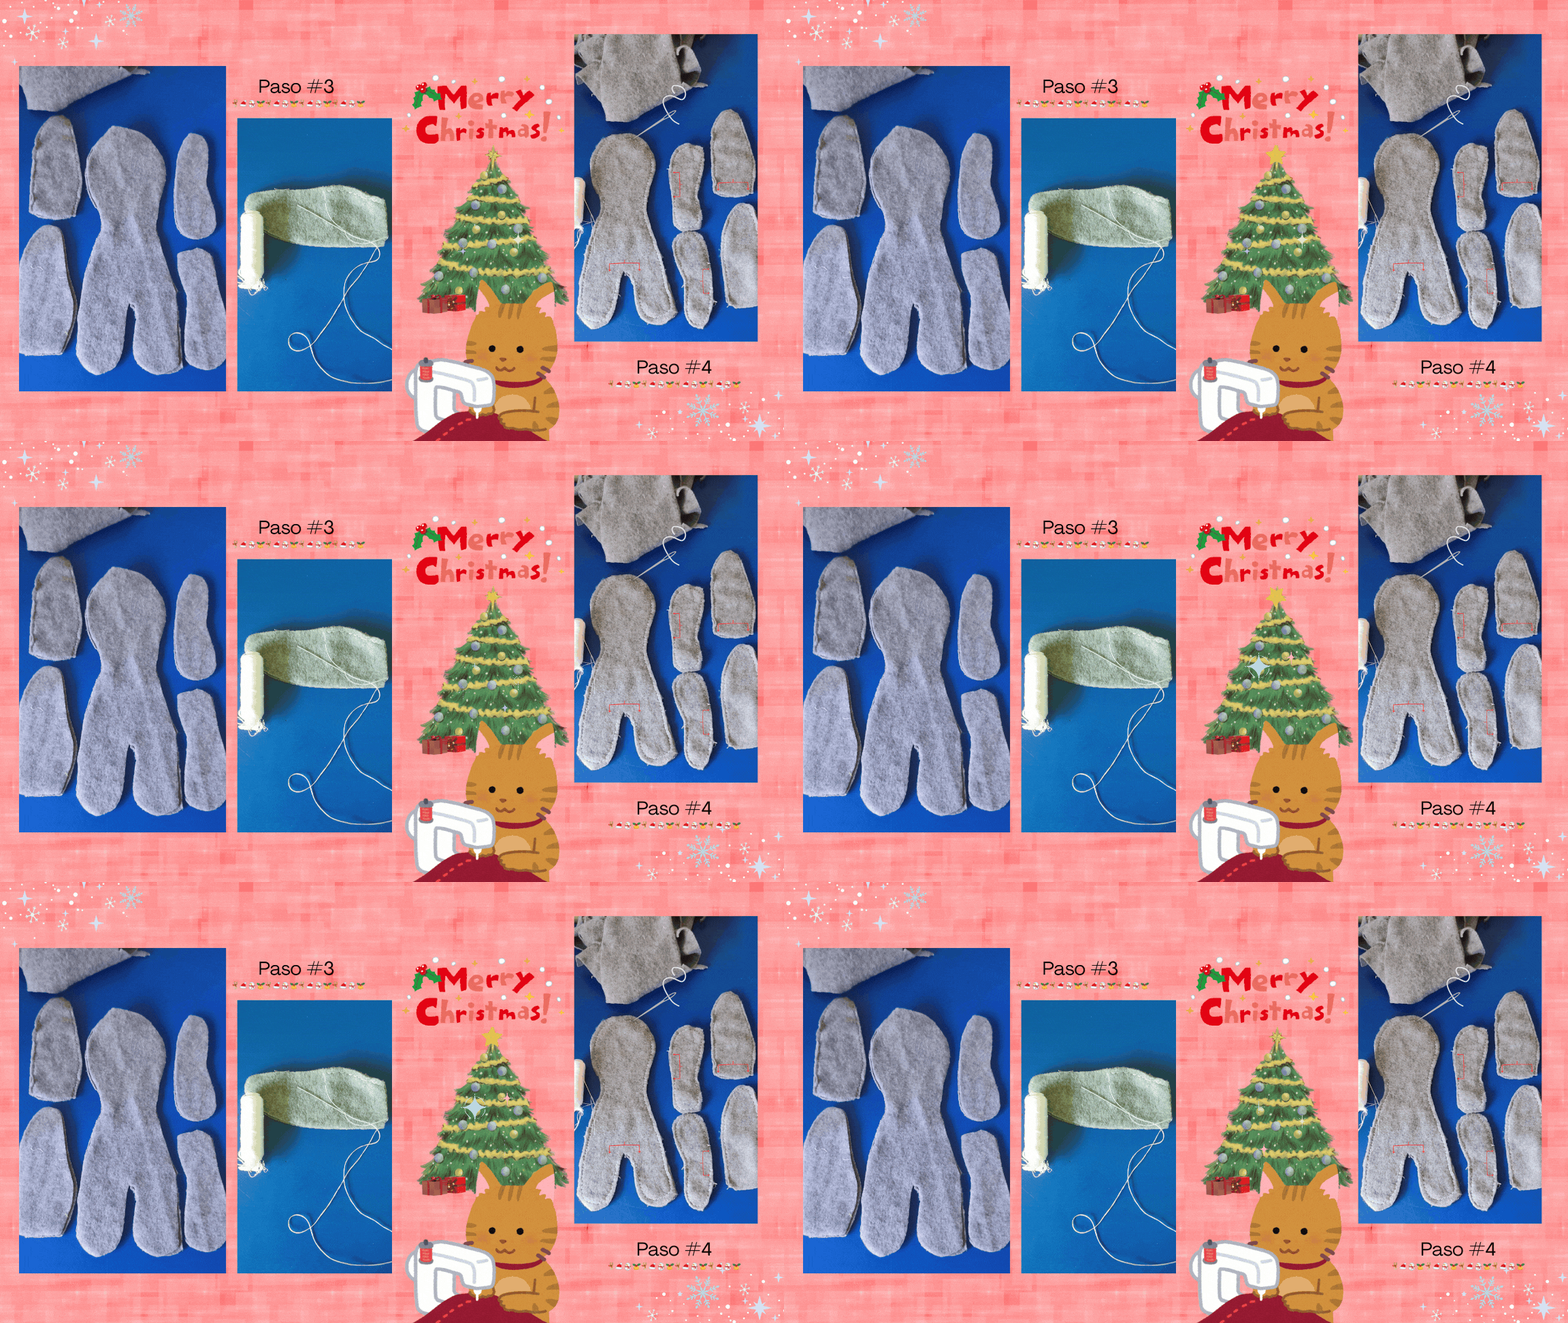
Cada pieza de tela con la figura del cuerpo del conejo necesita pasar por la costura. Esta parte puedes hacerla con ayuda de una máquina. En mi caso, como no dispongo de una máquina de coser, realicé la costura a mano con mucho cuidado y paciencia, igual cada pieza que necesitaba la ayuda de la máquina de coser. Todas las costuras fueron a mano.
✔️PASO 4🌼 👉
A la hora de realizar la costura de cada pieza, se deben dejar unos centímetros sin coser que servirán para dar vuelta a cada pieza de tela.
✔️STEP 3🌼 👉
Each piece of fabric with the figure of the rabbit's body need to go through the seam. This part can be done with the help of a sewing machine. In my case, as I don't have a sewing machine, I made the sewing by hand with great care and patience, the same for each piece that needed the help of the sewing machine. All the sewing was done by hand.
✔️STEP 4🌼 👉
When sewing each piece, a few centimeters should be left unsewn, which will be used to turn each piece of fabric.


✔️PASO 5🌼 👉
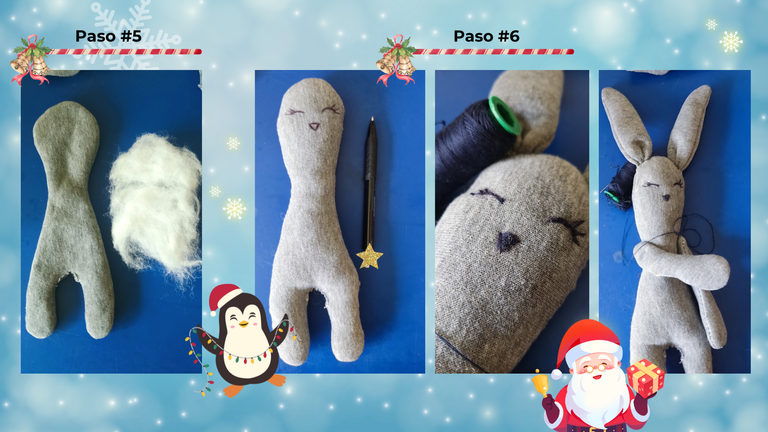
Una vez realizadas las costuras a cada pieza de tela del cuerpo del conejo, es el momento de dar vuelta a la tela. De este modo, llegamos al momento de colocar el relleno para dar volumen a cada pieza. En esta secuencia solo llevará relleno la pieza del cuerpo y cada brazo; ambas orejas del conejo se dejan sin relleno. Una vez rellenada cada pieza, cerramos las aberturas que sirvieron de entrada al relleno. Siempre tratando de realizar una buena costura para evitar que más adelante el relleno brote de la pieza.
✔️PASO 6🌼 👉
Antes de unir las partes del cuerpo del conejo con ayuda de un lápiz o lapicero, dibuja las líneas que servirán de guía para bordar con hilo los ojos y nariz del conejo. Dibujar las líneas de estos detalles en la cara del conejo facilitan el bordado, una vez bordado cada detalle de la cara seguimos a la parte donde cada pieza del cuerpo es unido con ayuda de hilo y aguja, así empezamos a armar el cuerpo de nuestro conejo colocando cada pieza en su lugar, de esta forma, nuestro diseño ya comienza a tener la imagen de conejo.
✔️STEP 5🌼 👉
Once the seams have been sewn on each piece of fabric of the rabbit's body, it is time to turn the fabric over. In this way, we come to the moment of placing the stuffing to give volume to each piece. In this sequence only the body piece and each arm will be stuffed; both ears of the rabbit are left without stuffing. Once each piece is stuffed, we close the openings that served as the entrance to the stuffing. Always trying to make a good seam to prevent the stuffing from sprouting out of the piece later on.
✔️STEP 6🌼 👉
Before joining the parts of the rabbit's body with the help of a pencil or pen, draw the lines that will serve as a guide to embroider with thread the eyes and nose of the rabbit. Drawing the lines of these details on the bunny's face facilitates the embroidery, once each detail of the face is embroidered we continue to the part where each piece of the body is joined with the help of thread and needle, so we begin to assemble the body of our bunny placing each piece in its place, in this way, our design already begins to have the image of the bunny.


✔️PASO 7🌼 👉
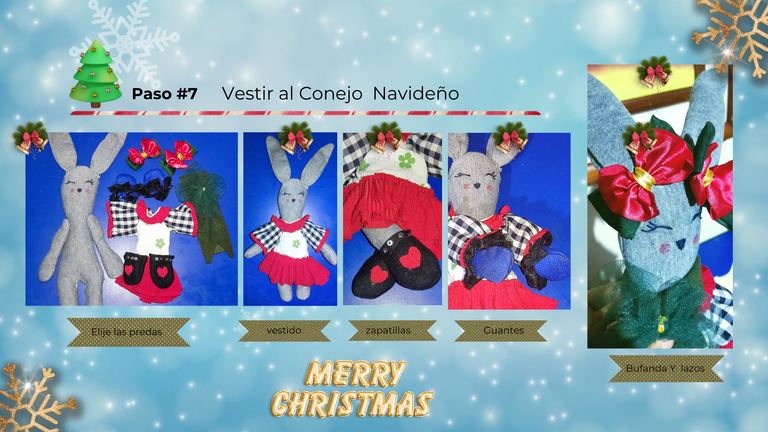
Este será nuestro último paso donde debemos colocar prendas de ropa a nuestro conejo. Para este paso, puedes hacer uso de retazos de tela para elaborar la pieza de ropa que deseas. En mi caso, usé retazos de tela para realizar un vestido combinando cada pieza del vestido acorde a mi diseño navideño. Mi diseño de vestuario para el conejo consiste en un vestido a la medida, con zapatillas negras decoradas con lentejuelas y corazones, guantes azules con encaje negro en las muñecas. Telas con los colores típicos de la Navidad. Además de eso, este diseño femenino lleva una bufanda de tela de algodón verde y un hermoso lazo hecho con tela Tul verde, una bonita combinación. Al tratarse de una coneja, los lazos en ambas orejas con diseño navideño hacen que este diseño sea hermoso.
✔️STEP 7🌼 👉
This will be our last step where we have to put clothes on our bunny. For this step, you can use fabric scraps to make the piece of clothing you want. In my case, I used fabric scraps to make a dress combining each piece of the dress according to my Christmas design. My costume design for the bunny consists of a tailored dress, with black slippers decorated with sequins and hearts, blue gloves with black lace at the wrists. Fabrics with typical Christmas colors. Besides that, this feminine design has a green cotton fabric scarf and a beautiful bow made with green Tulle fabric, a nice combination. Being a doe, the bows on both ears with Christmas design make this design beautiful.


Espero que esta guía sea de ayuda para la creación de hermosas piezas navideñas dedicadas a los conejos. Gracias por leer esta, guía y disfrutar mi primera entrada al concurso DIYHub Christmas con Ecency
I hope this guide will be helpful in creating beautiful Christmas pieces dedicated to rabbits. Thank you for reading this guide and enjoy my first entry to the DIYHub Christmas with Ecency.

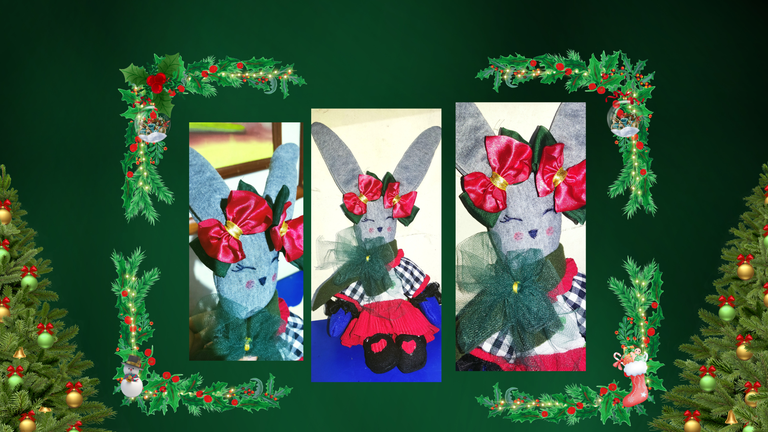
Resultado final de mi diseño

Este contenido es original, traducido al idioma English a través de Deepl.
Portada y presentaciones editadas con Recursos de Canva.
Ecencia Artes de Invierno y Navidad 2025)Las fotografias de está Artesania navideña es mi propiedad @elisaday7 .
Separadores de textos diseño Navidad elaborado a través de Canva en su versión Gratis por @elisaday7 .
Gif ecency diseñado por @irisworld (
This content is original, translated into English through Deepl.
Cover and presentations edited with Canva Resources.
Ecencia Winter Arts and Christmas 2025)The pictures of this Christmas Craft is my property @elisaday7 .
Text dividers Christmas design elaborated through Canva in its Free version by @elisaday7 .
Gif ecency designed by @irisworld (
Ay qué bonita manualidad, el conejito te quedó de lo más tierno, qué ganas entran de abrazarlo. Me gustó muchísimo tu publicación, le añadiste detalles hasta en las imágenes de las medidas, jeje. Lo he disfrutado mucho. ¡Suerte para el concurso!
I have picked this post on behalf of the @OurPick project! Check out our Reading Suggestions posts!
Please consider voting for our Liotes HIVE Witness. Thank you!
thank you very much @palomap3 for the support .
You are super talented! The bunny looks cute!
!PIZZA
thank you very much @irisworld😇
$PIZZA slices delivered:
(1/5) @irisworld tipped @elisaday7
Wow, the results are really amazing.
thanks @reachdreams for appreciating this post
You are welcome, friend.
que belleza, muy creativo!
what a beauty, very creative!
Inspired by Christmas, thanks for supporting this post @yasmarit
Prepared a wonderful Christmas bunny by using fabric art with great feel. Truly it is a great art in unique skill. Thank you so much for sharing this wonderful Christmas art.
thanks to you @mdakash62 for appreciating this art. happy day
You are most welcome my pleasure my friend 🥰❤️
Estupendo!
greetings @roswelborges🌸thanks for rating this Christmas bunny.
gracias a ti