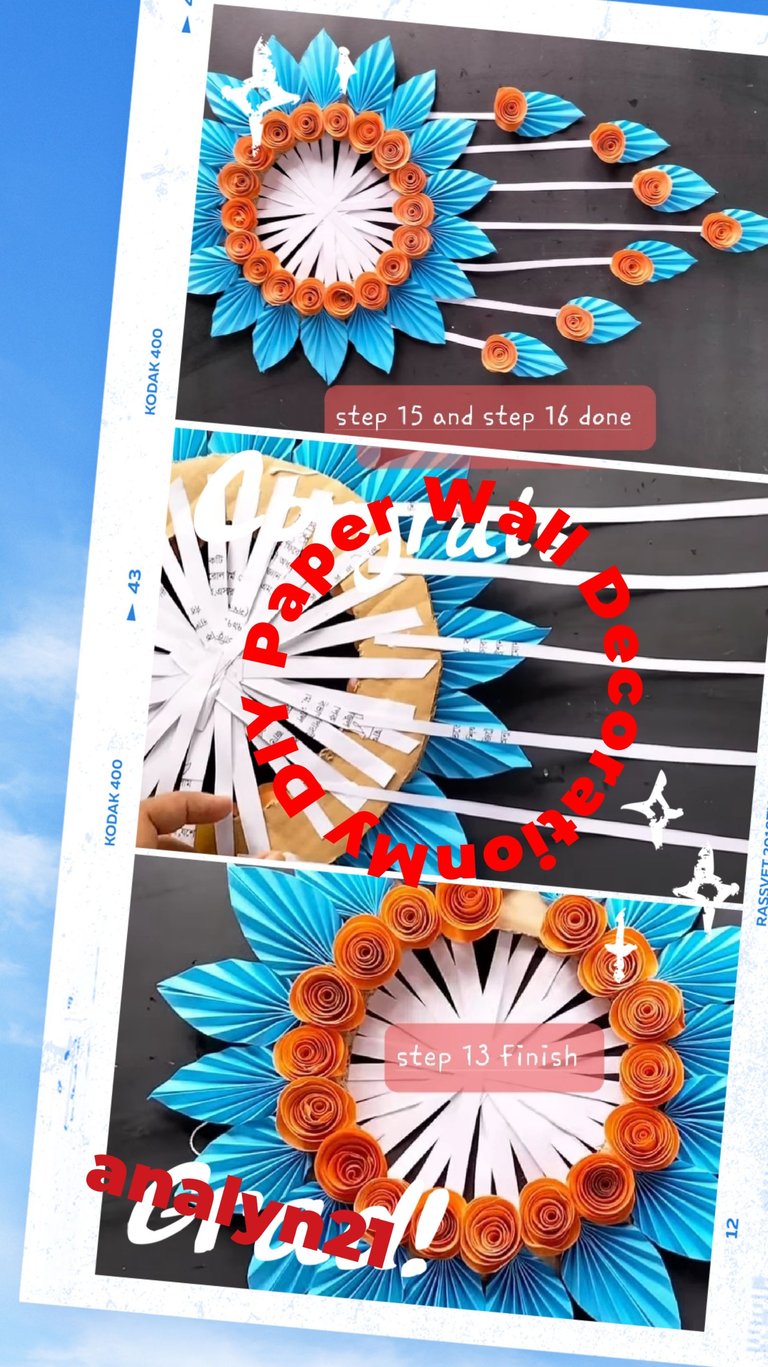
(Photos edited with Photo Grid)
Hello Hive friends! I'm thrilled to share my latest DIY project: a stunning paper wall decoration! This project is not only visually appealing but also a fantastic way to repurpose old papers, making it a sustainable and eco-friendly craft.
I hope you'll love it as much as I do. I'll guide you through the process step-by-step, so you can create your own masterpiece.
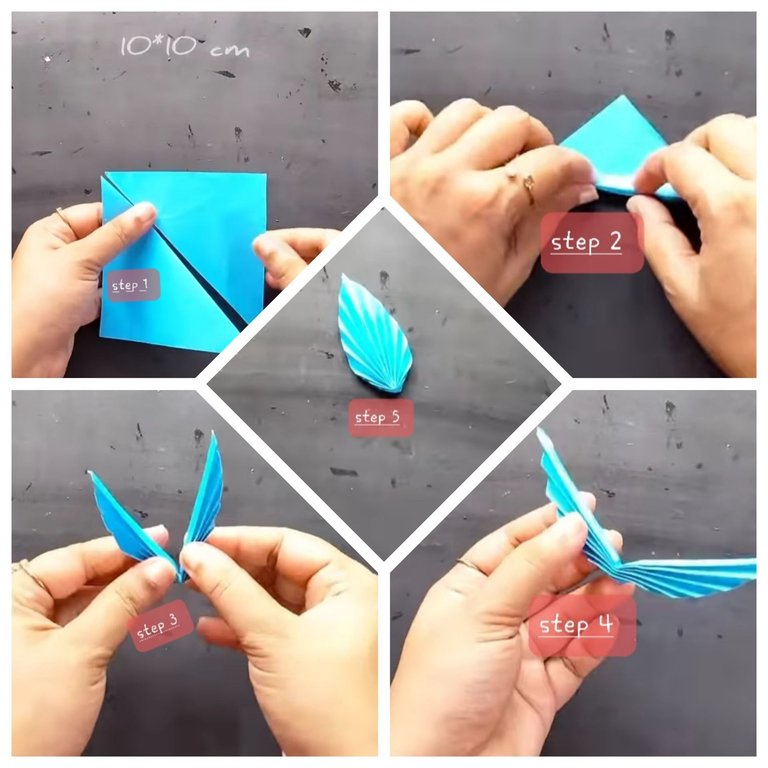
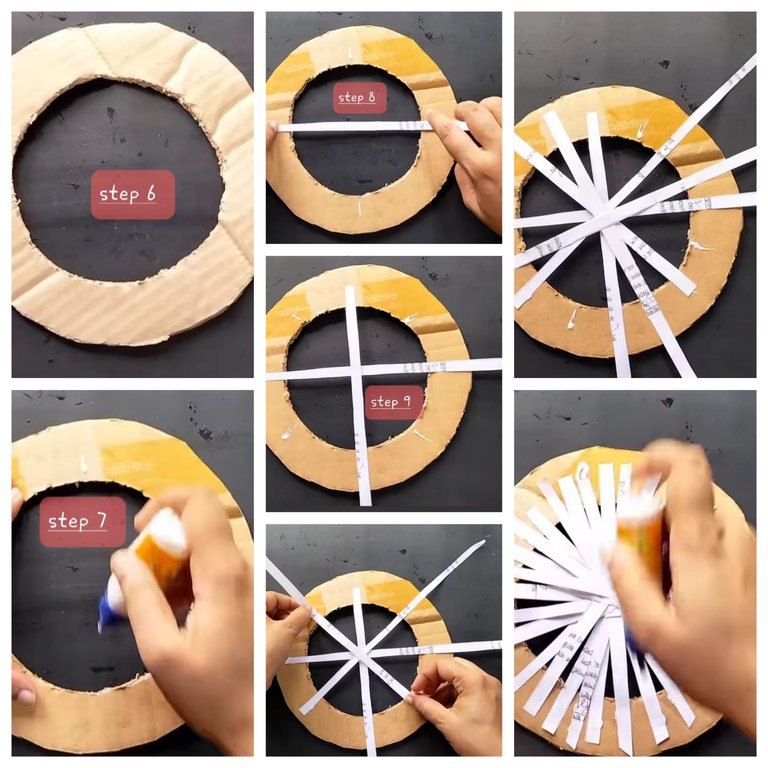
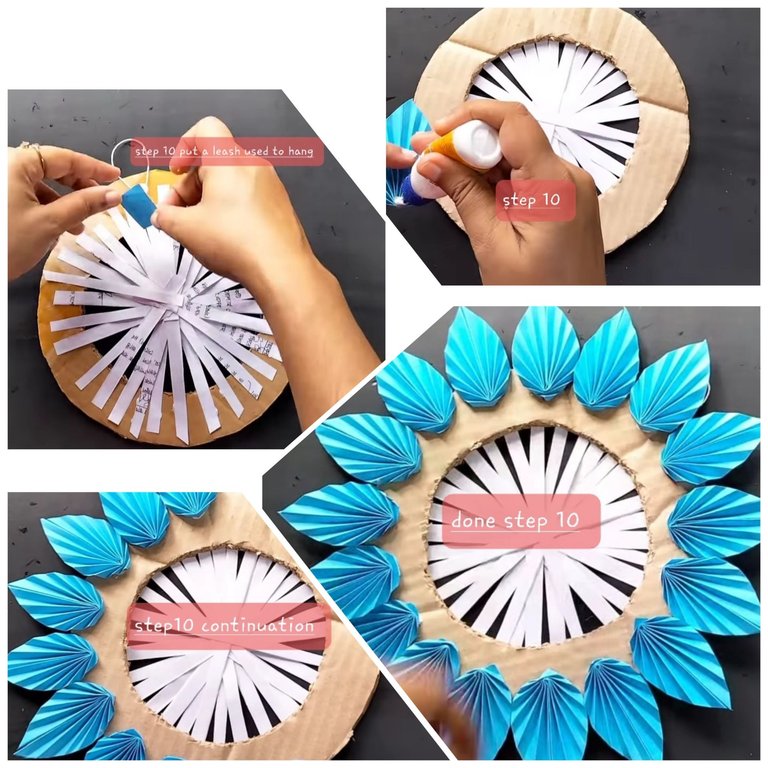
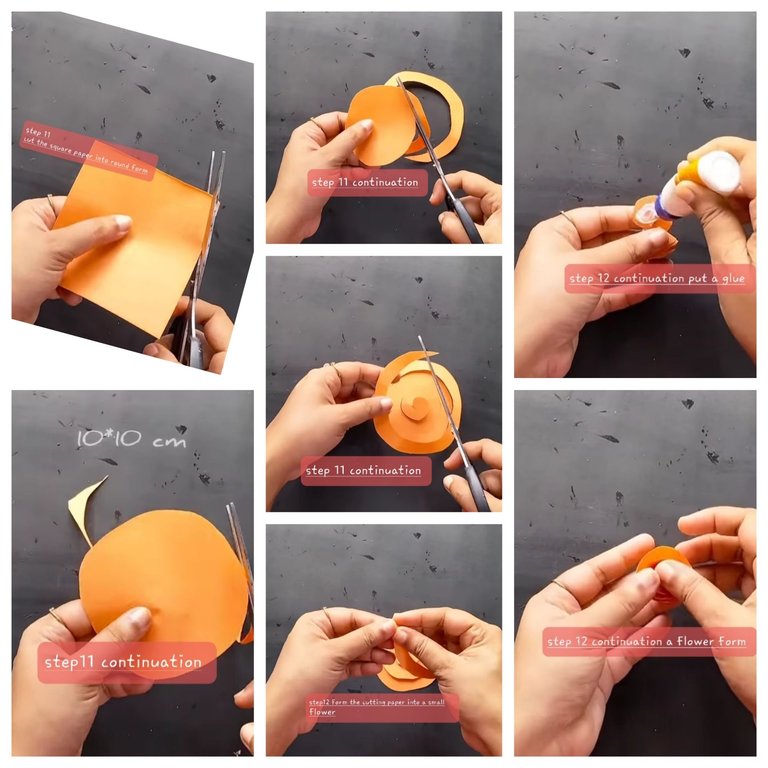
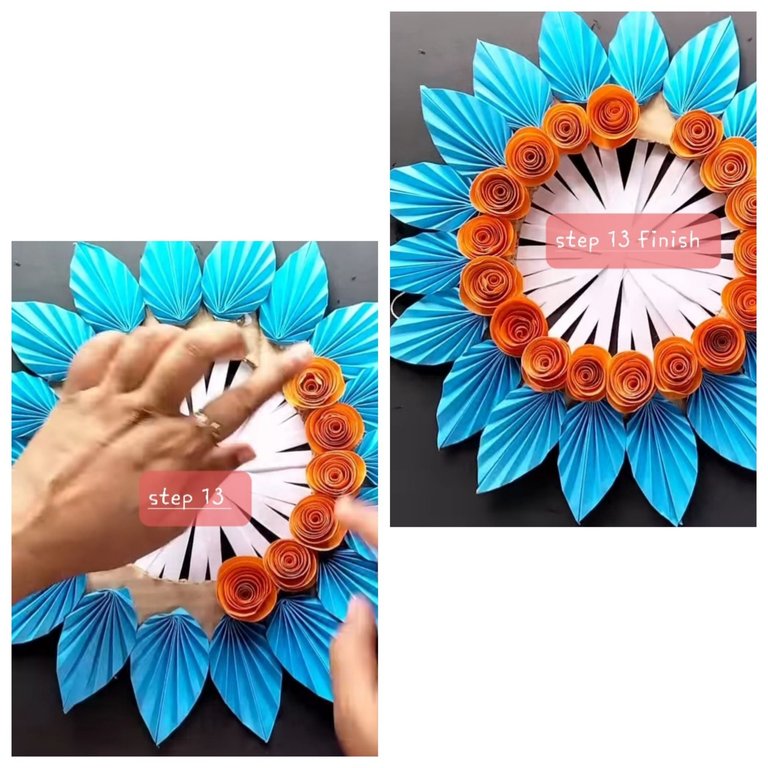
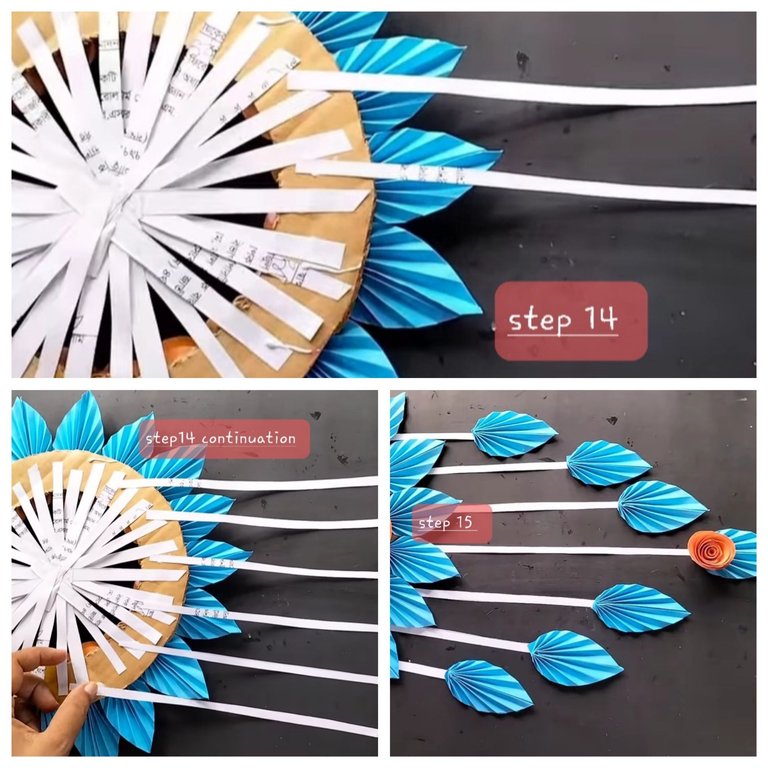
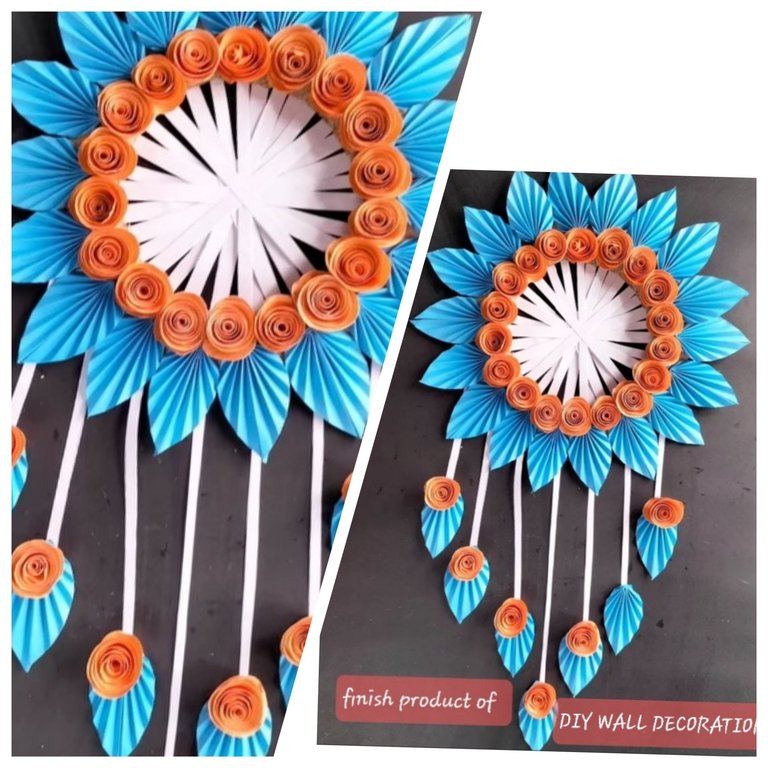
Inspiration and Materials:
My creativity blossomed during my education years, fueled by the constant creation of portfolios for school demonstrations. This project is a testament to that early passion for crafting. The idea for this wall decoration came from a desire to add a unique and personalized touch to my space using readily available materials.
To create this beautiful wall decoration, you'll need:
Old newspapers, magazines, or scrap paper (the more varied the better!)
Cardboard (for the base)
Scissors
Glue
Ruler or measuring tape
Pencil
Optional: Colored paper, paint, or other embellishments for added flair.
Step-by-Step Instructions:
Prepare the Base: Cut a circular piece of cardboard to your desired size. This will be the foundation of your wall decoration.
Create Paper Strips: Cut your scrap paper into long, thin strips. The width of the strips will determine the look of your final piece – experiment to find your preferred width.
The Base Layer: Arrange the paper strips radially around the cardboard circle, gluing them securely to create a sunburst effect. Try to use a variety of paper types and colors for a more interesting look.
Adding the Floral Accents: This is where you can get creative! You can create small paper roses using the same technique as the strips, or you can use pre-cut shapes. Arrange these around the outer edge of the cardboard circle, creating a beautiful floral border.
Finishing Touches: Once the glue is completely dry, you can add additional embellishments. You could use colored markers to add details to the paper roses, or you could add small beads or sequins for extra sparkle.
Hanging Your Masterpiece: Once you're happy with your creation, carefully attach a hanger or ribbon to the back of the cardboard circle. Now you're ready to hang your DIY paper wall decoration and enjoy your handiwork!
Tips and Variations:
Experiment with different paper types and colors to create unique designs.
Use different sizes of paper strips to create texture and depth.
Add other embellishments like glitter, beads, or ribbons to personalize your creation.
Consider using different shapes for the base, such as a square or heart.
This DIY project is a fantastic way to unleash your creativity while also being mindful of the environment. It's a perfect activity for a rainy afternoon or a fun weekend project. I encourage you to try it and share your creations! I'd love to see what you come up with! Happy crafting!
Whoa, this is so pretty, the process is just kinda ah, you know, but I think making it is worth it especially if you have a lot of used paper at home. Instead if throwing it why not just make this no 🤔🤩
yeah you are right, instead of throwing or burned all your used papers youd better used it as recycling things like this. I have a lots of ideas abut recycling some unused things, I can share here it too. thank you for appreciating my work.
WOW, this is so beautiful and it's colours are lovely and outstanding too. Am impressed by your creativity, indeed you really took your time to craft something unique and beautiful, well done.
thank you very much. I love making crafts made of recycling items.
You can check out this post and your own profile on the map. Be part of the Worldmappin Community and join our Discord Channel to get in touch with other travelers, ask questions or just be updated on our latest features.
thank you worldmappin.
Hey @analyn21 you are welcome.
Thanks for using @worldmappin 😘
Congratulations @analyn21! You have completed the following achievement on the Hive blockchain And have been rewarded with New badge(s)
Your next target is to reach 900 upvotes.
Your next target is to reach 1500 upvotes.
You can view your badges on your board and compare yourself to others in the Ranking
If you no longer want to receive notifications, reply to this comment with the word
STOPCheck out our last posts:
thank you hivebuzz
All good @analyn21! You're a true Hive champion! Onward to that new goal!
thank you so much hivebuzz. glory to god.
Very creative, the colors are also nice
thank you very much, you appreciate my work.
yeah, thank you for inviting me in your community. It is my great honor to join on your community..
está muy lindo, excelente para decorar!
it is very nice, excellent for decorating!
thank you so much for appreciating my work, yes and we can used our unused materials instead of throwing it away.
This is impressive, creativity and quality is what you can appreciate. Thanks for sharing it on DIYHub Community.
Thank you so much DIY HUB, because of this community I can now share my talent of making an handicraft using any recycling materials. LET ME share some more ideas here on my work by recycling unused materials at home. thank you very much. god bless
Greetings! I am very excited reading your post and seeing the step by step pictures you share in our community. I congratulate you for the quality of your work, you are new to the platform and you are already an example to follow, bravo!...
thank you so much jesuslnrs. it is my honor you appreciated my work. god bless