Saluditos mis Artistas Creativos de las Manualidades y la Joyería, mis mejores deseos para todos, espero que esté fin de semana sea de mucho jubilo y alegría en los hogares. Que todos ya tengan listos los arbolitos y nacimientos para empezar a escribir las cartas dónde pediremos nuestros regalos al niño Chuchú 🤭, para mí estás fechas son de mucho ajetreo más que todo en el trabajo pues el fin de año es demasiado movido pero todos contentos y felices.
Hoy les voy a compartir una tarea de mi sobrino; pues le tocó en el colegio hablar de los reptiles, el escogió una Tortuga 🐢 como debía llevar una imagen para hacer su exposición en vez de hacer lo que se estila en estos casos que es una lámina, un cartel, un pendón etc., me pidió que le hiciera un llavero porque era más fácil de cargar, nos reímos porque me comentó que iba hablar de la tortuga terrestre y no la marina, pues el tiene un morrocoy y sabe como lo alimenta porque es vegetariana en cambio que a la marina tendria qué pescar para darle de comer🤣.
De tal manera que mis sobrinos cualquier cosa que me pidan estoy para complacerlos, use la técnica del alambrismo mostacillones y cuentas de madera, y sigan leyendo para que vean como la hice
Greetings my Creative Artists of Crafts and Jewelry, my best wishes to everyone, I hope this weekend is full of joy and happiness in your homes. I hope everyone has their Christmas trees and nativity scenes ready to start writing the letters where we will ask for our gifts to baby Chuchú 🤭, for me these dates are very busy, especially at work because the end of the year is too busy but everyone is happy and content.
Today I am going to share with you a task from my nephew; Well, at school he had to talk about reptiles, he chose a Turtle 🐢 as he had to carry an image to make his presentation instead of doing what is usually done in these cases, which is a sheet, a poster, a banner, etc., he asked me to make him a keychain because it was easier to carry, we laughed because he told me that he was going to talk about the land turtle and not the sea turtle, since he has a turtle and knows how to feed it because it is vegetarian, whereas he would have to fish for the sea turtle to feed it🤣.
So that my nephews, whatever they ask me for, I am here to please them, I used the wire-wrapping technique with beads and wooden beads, and keep reading to see how I made it:
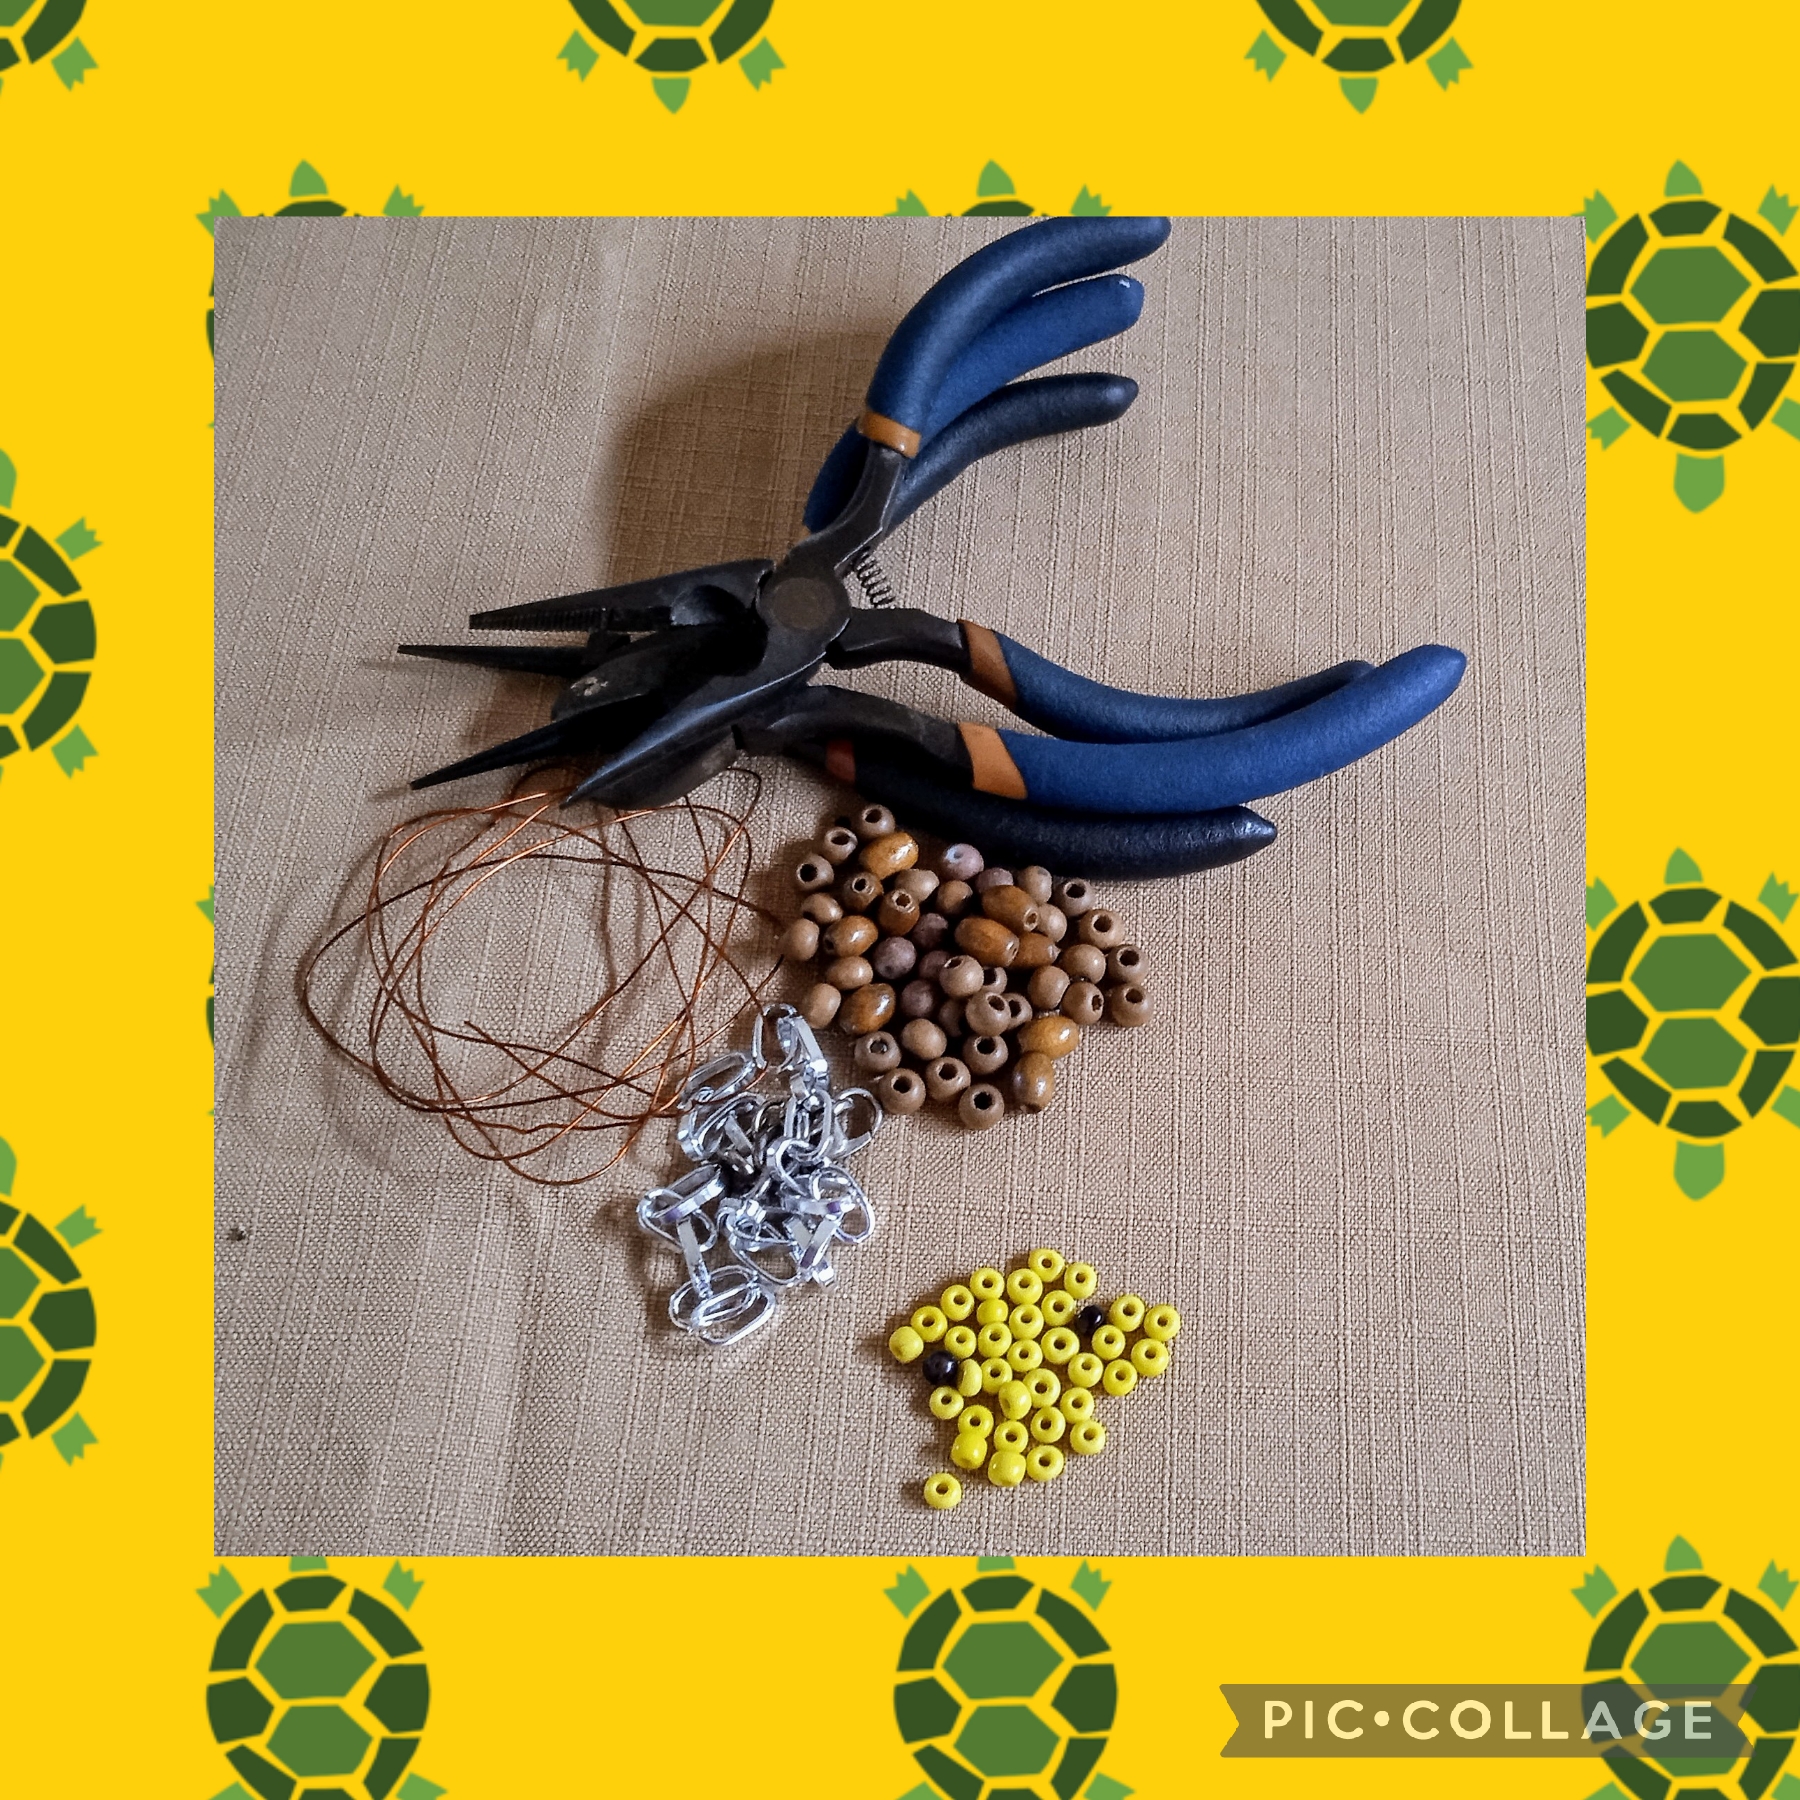
MATERIALES USADOS EN LA ELABORACIÓN DE ESTE PROYECTO:
✓ Alambre de cobre calibre 26 pulgadas.
✓ Cuentas de madera color marrón.
✓ Mostacillones amarillos.
✓ Dos mostacillones negros.
✓ Cadena de seis eslabones.
✓ Un anillo para llaveros.
✓ Pinza plana.
✓ Pinza de corte.
✓ Pinza punta redonda..
MATERIALS USED IN THE PREPARATION OF THIS PROJECT:
✓ 26-inch gauge copper wire.
✓ Brown wooden beads.
✓ Yellow seed beads.
✓ Two black seed beads.
✓ Six-link chain.
✓ A ring for key chains.
✓ Flat pliers.
✓ Cutting pliers.
✓ Round-tipped pliers.
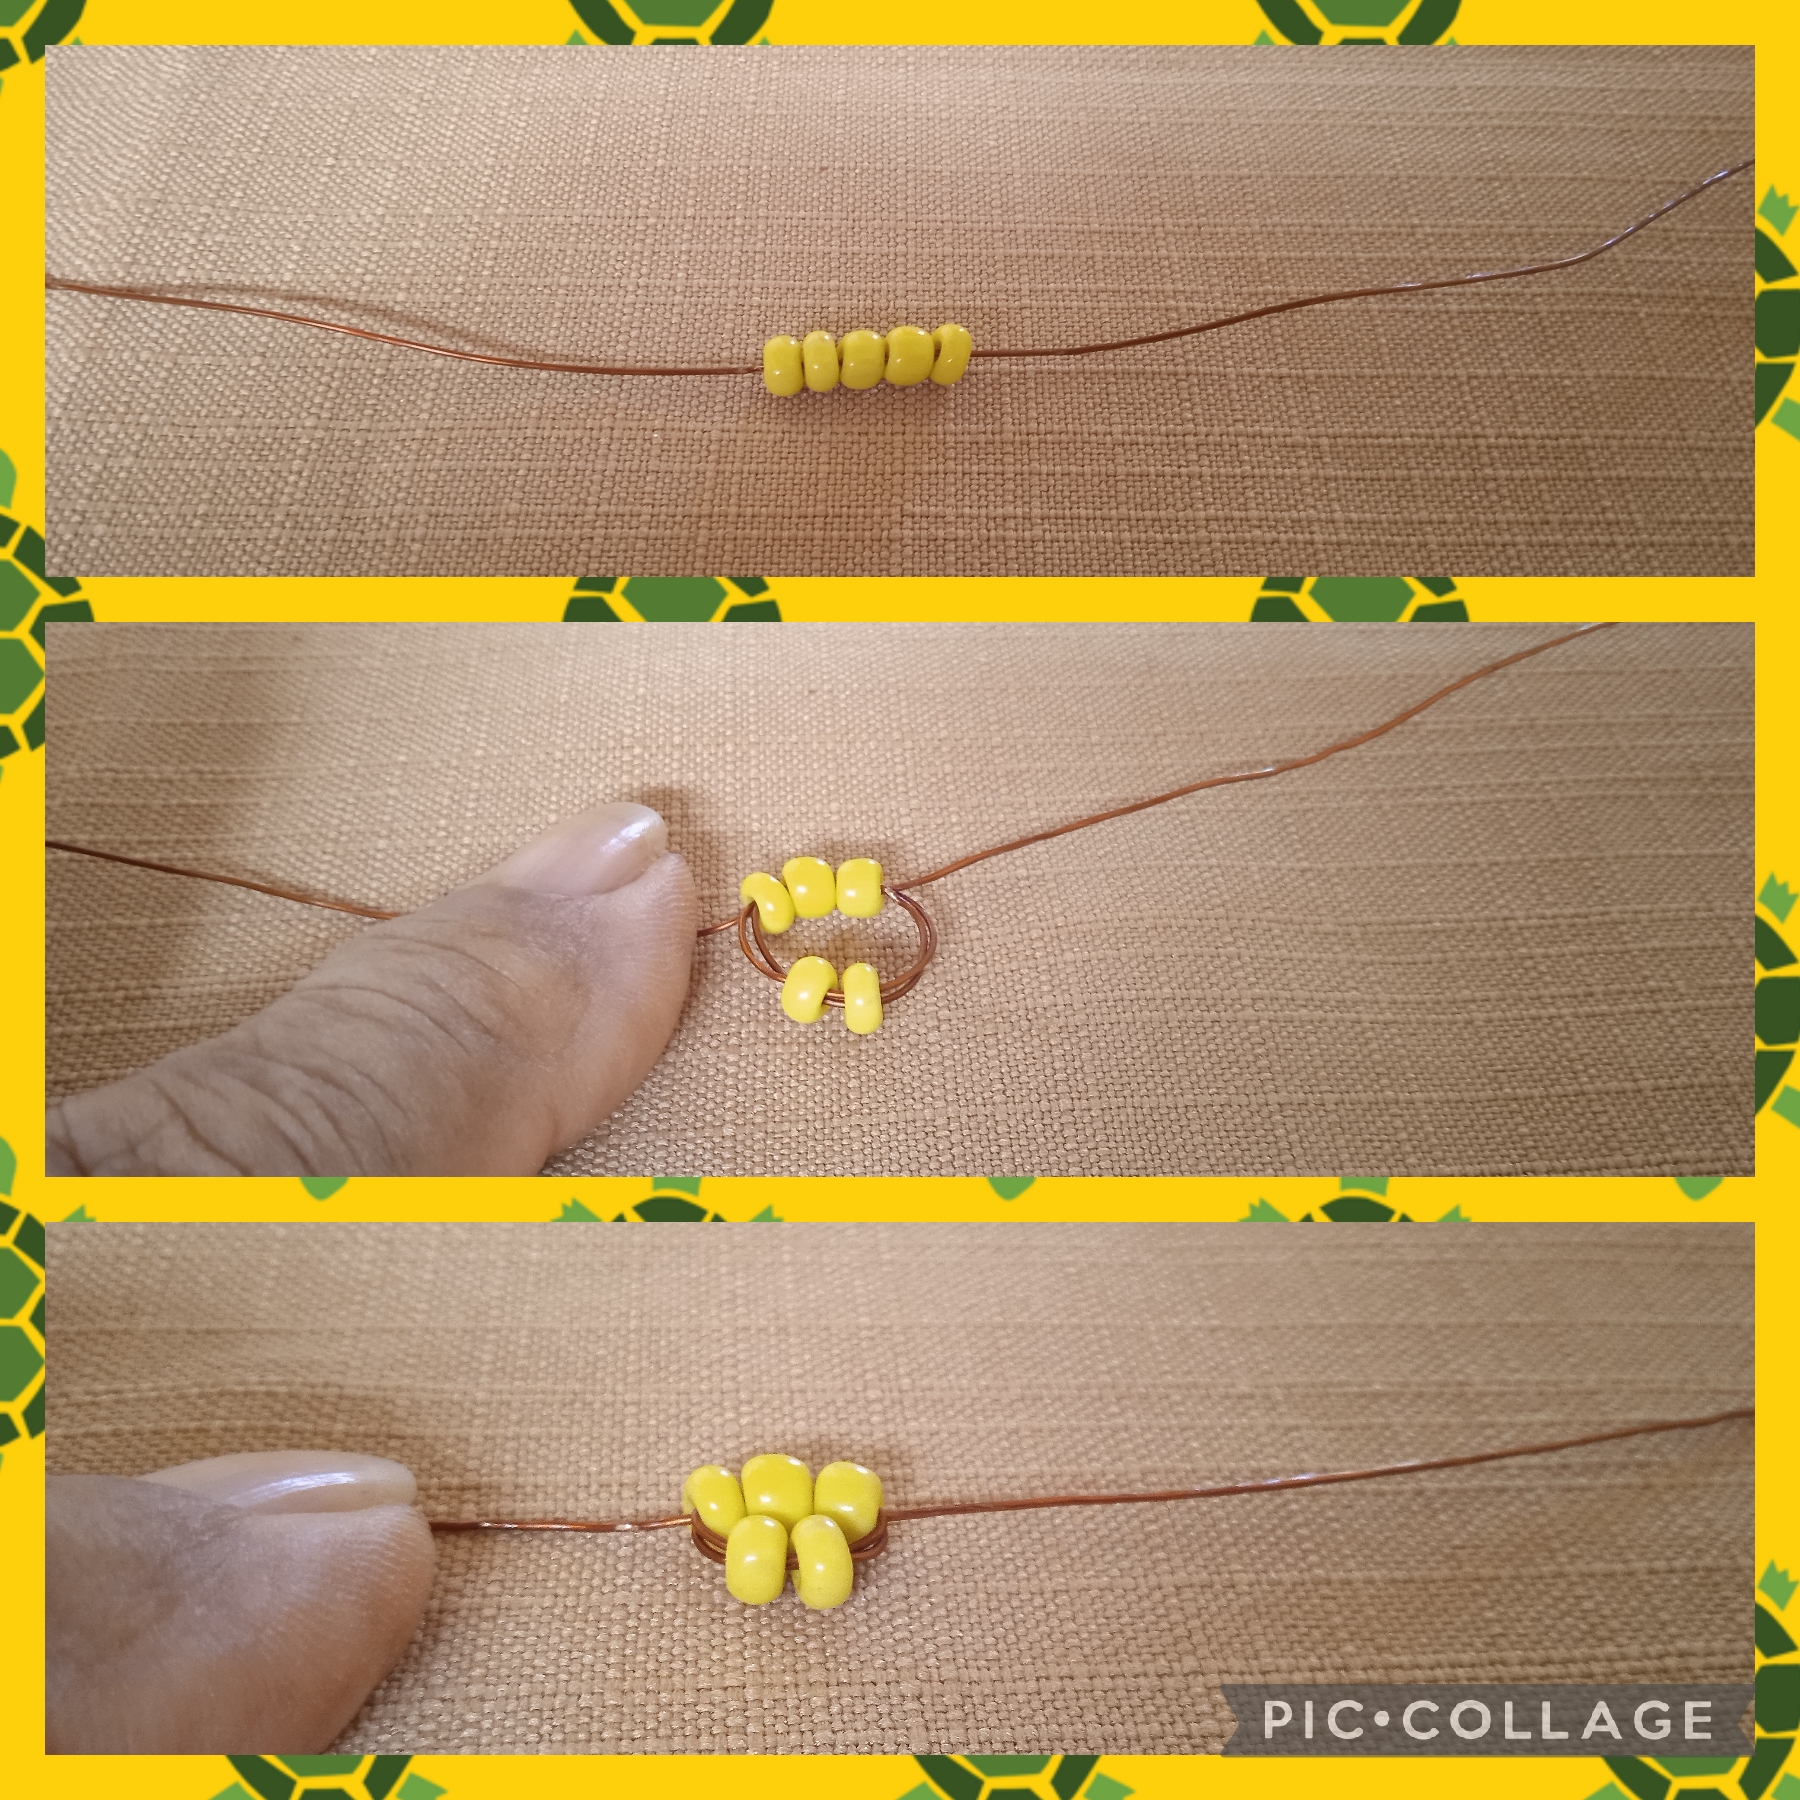
CON ESTOS SENCILLOS Y POCOS PASOS REALICÉ MI PROYECTO.
PRIMER PASO:
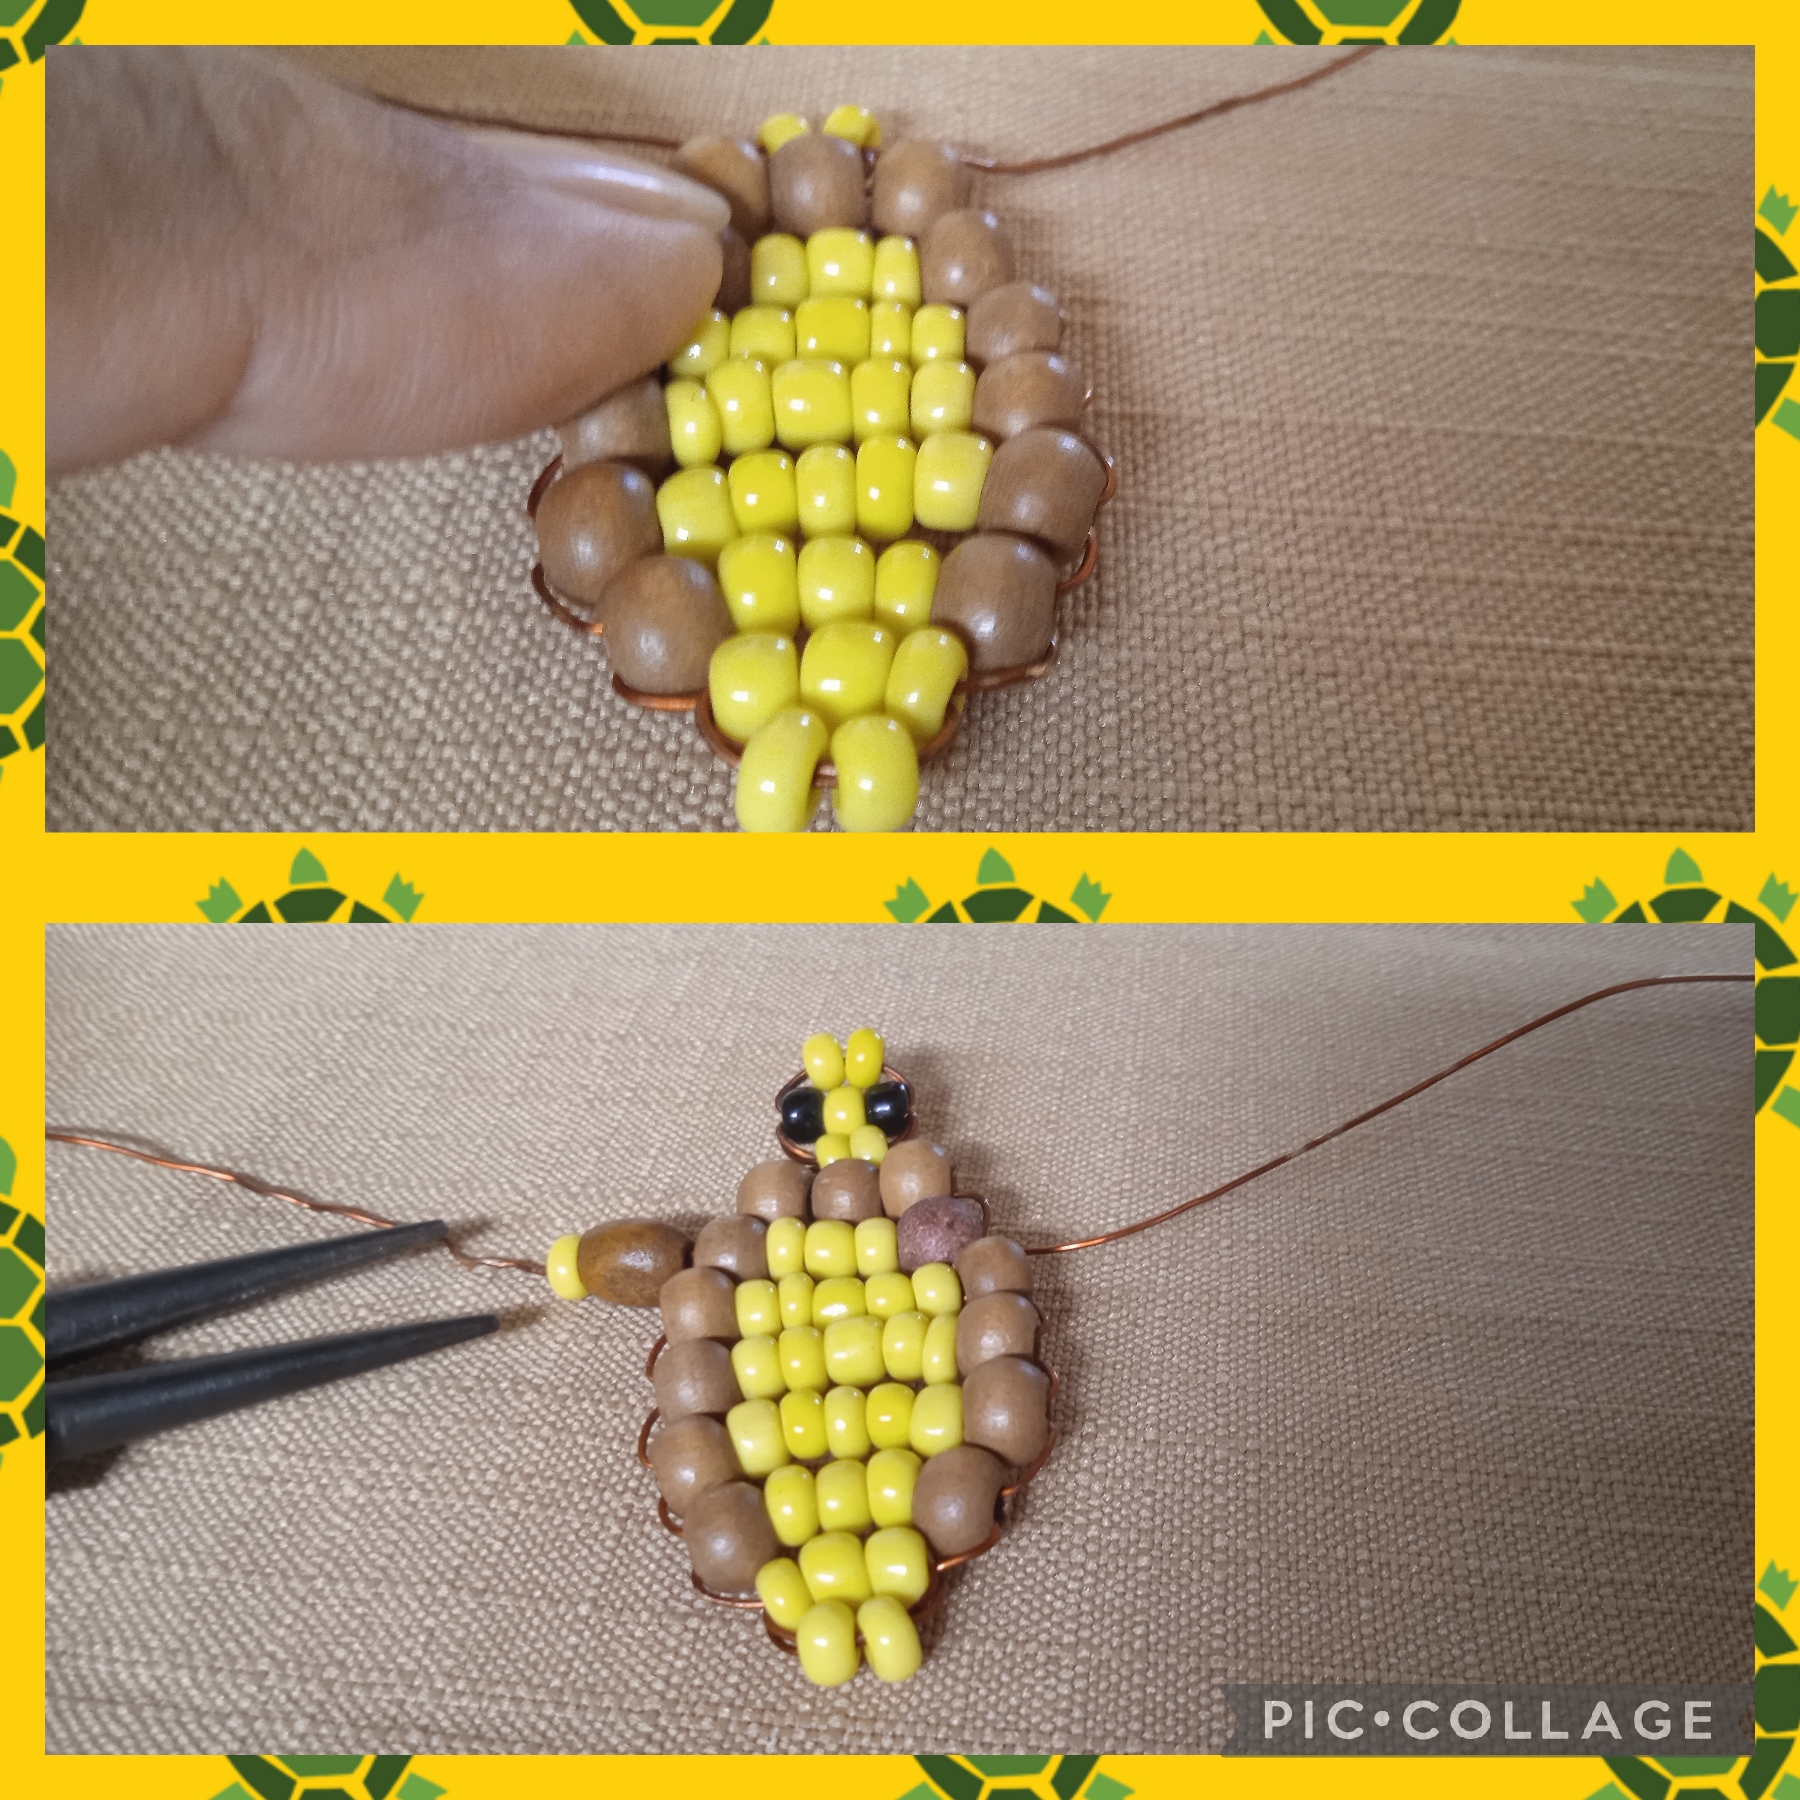
Comencé la elaboración de mi tortuga 🐢 ocupando sesenta centímetros del alambre de cobre calibre 26 pulgadas en el cual inserto cinco mostacillones amarillos por una punta, con la otra punta cruzo por los tres últimos, halo las dos puntas y ajusto bien para formar una vuelta de dos mostacillones y otra de tres, como se ve en la imagen.
WITH THESE SIMPLE AND FEW STEPS I COMPLETED MY PROJECT.
FIRST STEP:
I began making my turtle 🐢 by using sixty centimeters of 26-inch gauge copper wire in which I insert five yellow beads at one end, with the other end I cross the last three, I pull the two ends and adjust well to form a loop of two beads and another of three, as seen in the image.
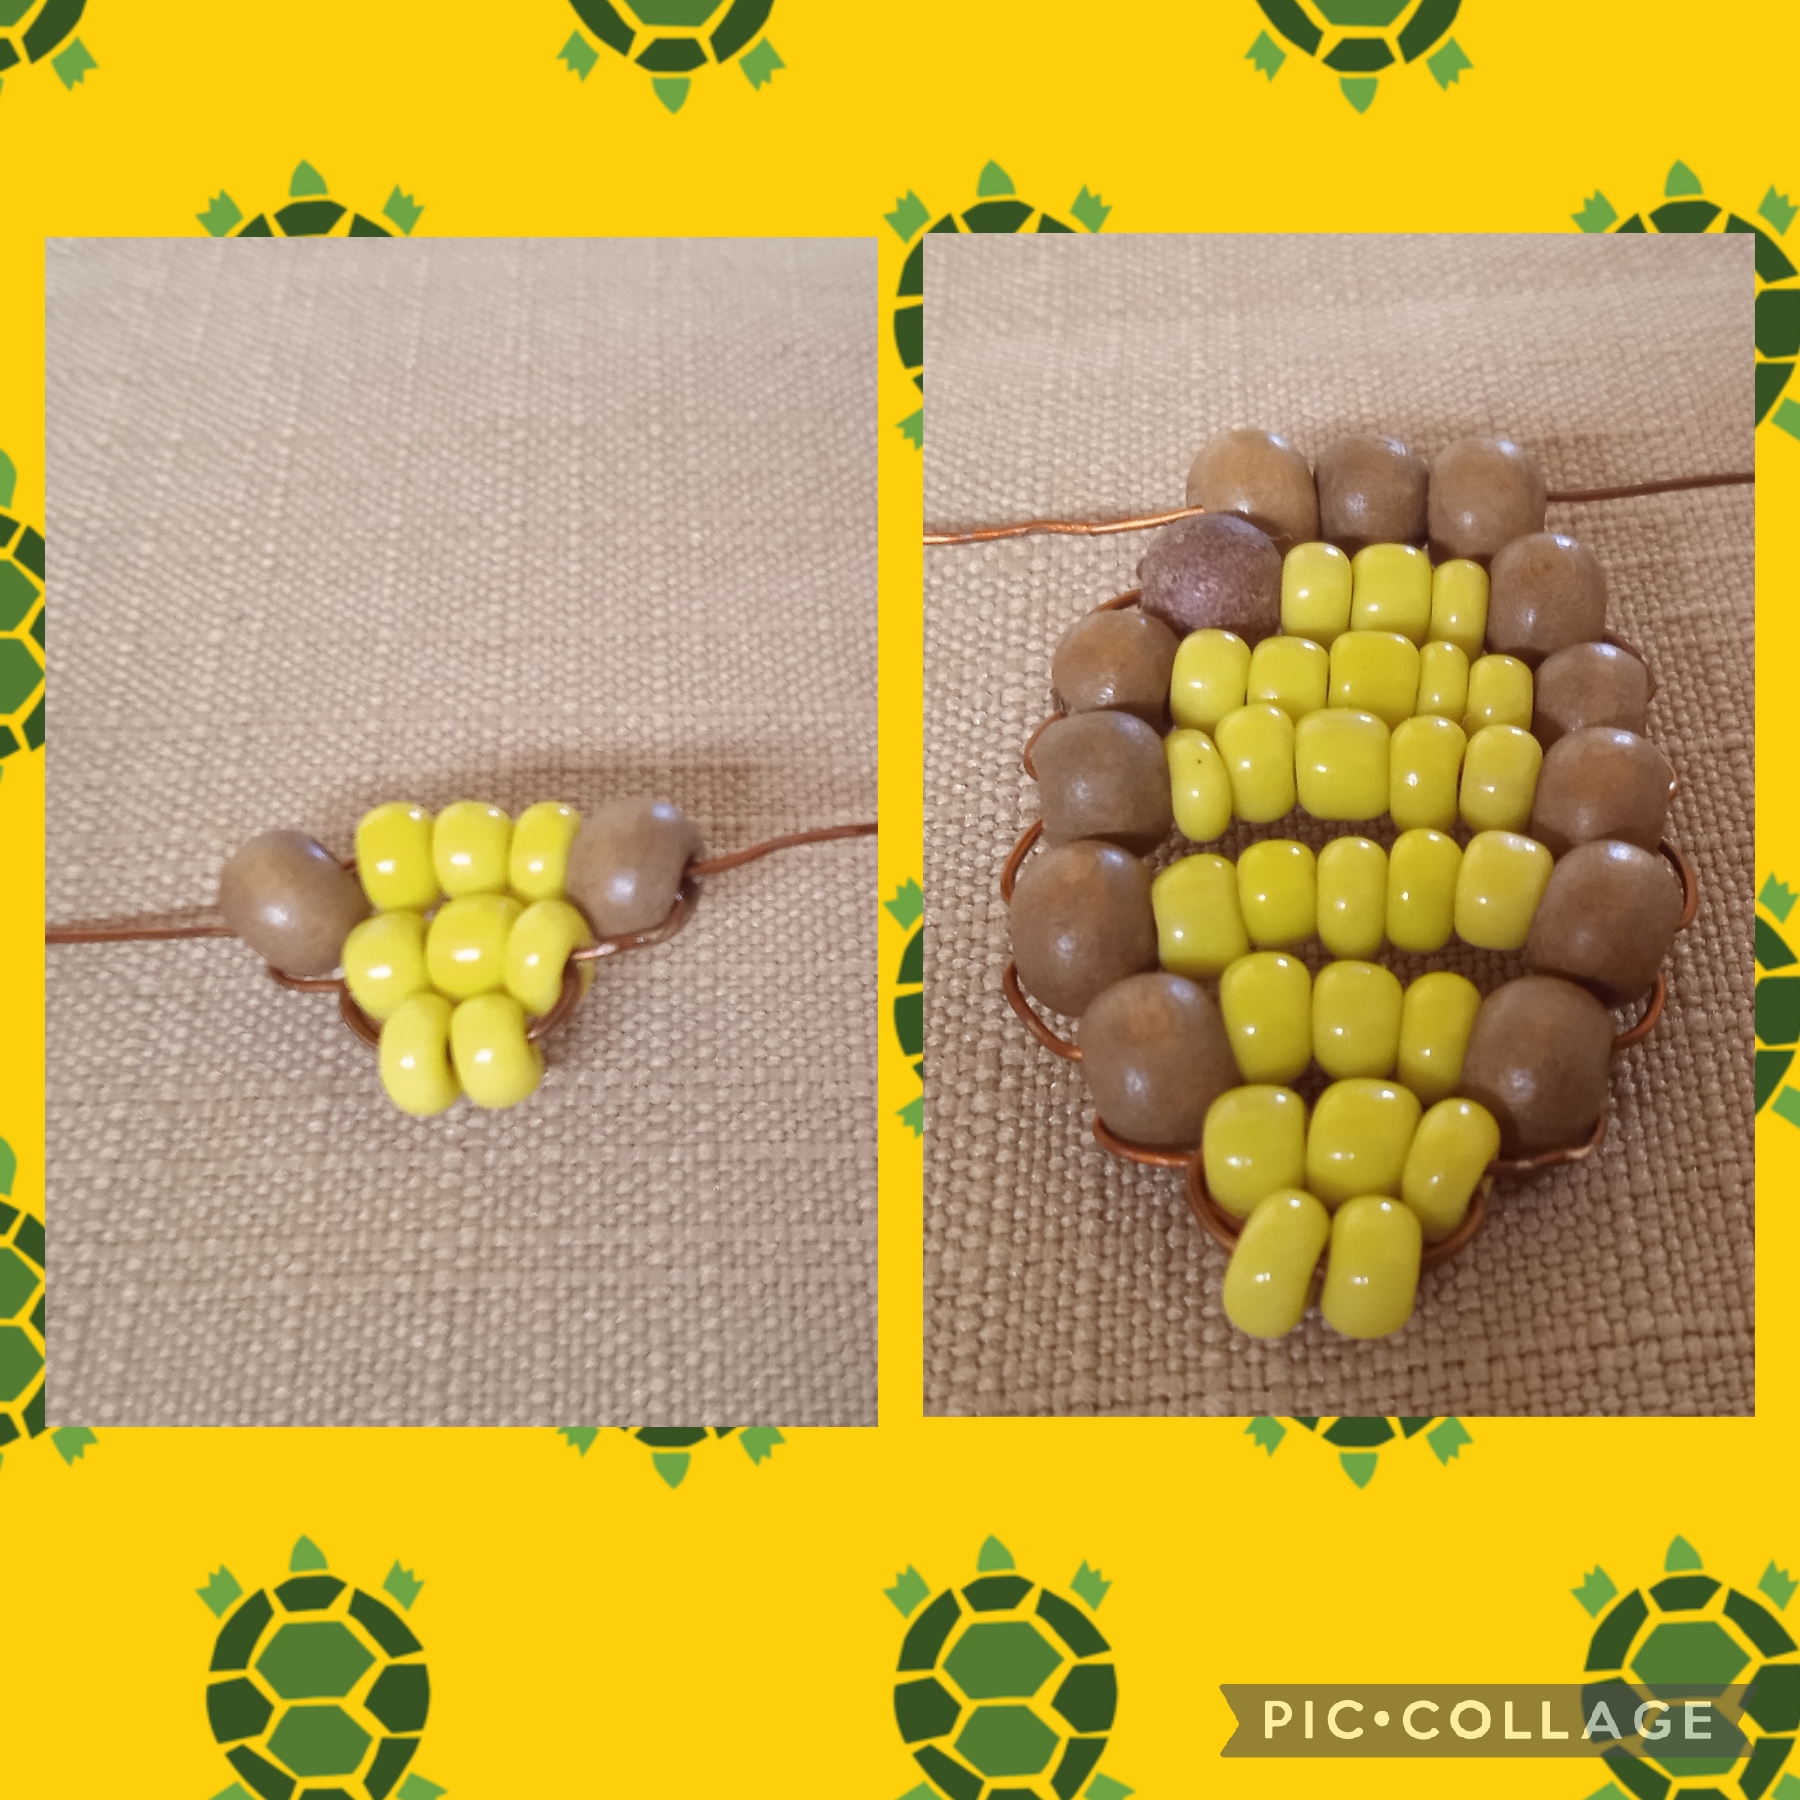
PASO DOS:
Continúo con la elaboración de mi tortuga y ahora voy a insertar por una punta una cuenta de madera, cuatro mostacillones amarillos y otra cuenta de madera, cruzo con el alambre de la otra punta y halo las dos para que ajuste bien, en la cuarta vuelta inserto una cuenta de madera, cinco mostacillones amarillos y una cuenta de madera, en la quinta, sexta y vuelta realizó el mismo procedimiento, continúo y en esta vuelta coloco una cuenta de madera tres mostacillones amarillos y una cuenta de madera, en esta vuelta para terminar el cuerpo inserto tres cuentas de madera por una punta y las cruzo con la otra punta como se ve en la imagen.
STEP TWO:
I continue with the elaboration of my turtle and now I am going to insert a wooden bead, four yellow beads and another wooden bead through one end, I cross it with the wire from the other end and pull both together so that it fits well, on the fourth turn I insert a wooden bead, five yellow beads and one wooden bead, on the fifth, sixth and turn I do the same procedure, I continue and on this turn I place a wooden bead, three yellow beads and one wooden bead, on this turn to finish the body I insert three wooden beads through one end and I cross them with the other end as seen in the image.
TERCER PASO:
En este paso elaboro la cabeza: inserto por una punta dos mostacillones amarillos, luego en la otra vuelta un mostacillón negro en cada extremo para simular los ojos separados por un mostacillón amarillo, finalizo la cabeza insertando dos mostacillones amarillos.
Paso de nuevo el alambre por las tres vueltas para ajustar bien halando las puntas, usando las pinzas corto los excedentes y aplanó.
Ahora paso paso un alambre de cobre calibre 26 pulgadas de díez centímetros por la séptima vuelta y trabajo con un solo alambre, para formar las patas de manera individual coloco una cuenta de madera ovalada y cuatro mostacillones amarillos paso de nuevo el alambre por la cuenta ovalada y lo paso hasta el otro lado, ahora en el alambre del otro lado hago un procedimiento igual halo las dos puntas paso las puntas de los alambres por la vuelta de abajo ajusto bien y corto los excedentes. Este paso lo realizó igual en la vuelta número cuatro y así tengo las cuatro patas, paso las puntas de los alambres hasta la primera vuelta donde coloco un mostacillón color marrón que cruzo y hago un entorchado suave que corto el excedente y aplanó para terminar.
THIRD STEP:
In this step I make the head: I insert two yellow beads through one end, then in the other turn a black bead at each end to simulate the eyes separated by a yellow bead, I finish the head by inserting two yellow beads.
I pass the wire through the three turns again to adjust it well by pulling the ends, using the pliers I cut the excess and flatten it.
Now I pass a 26-inch gauge copper wire of ten centimeters through the seventh turn and work with a single wire, to form the legs individually I place an oval wooden bead and four yellow beads I pass the wire through the oval bead again and pass it to the other side, now on the wire on the other side I do the same procedure I pull the two ends I pass the ends of the wires through the bottom turn I adjust well and cut the excess. I did this step the same way on round number four and so I have the four legs. I pass the tips of the wires to the first round where I place a brown seed bead that I cross and make a soft twist, cutting off the excess and flattening it to finish.

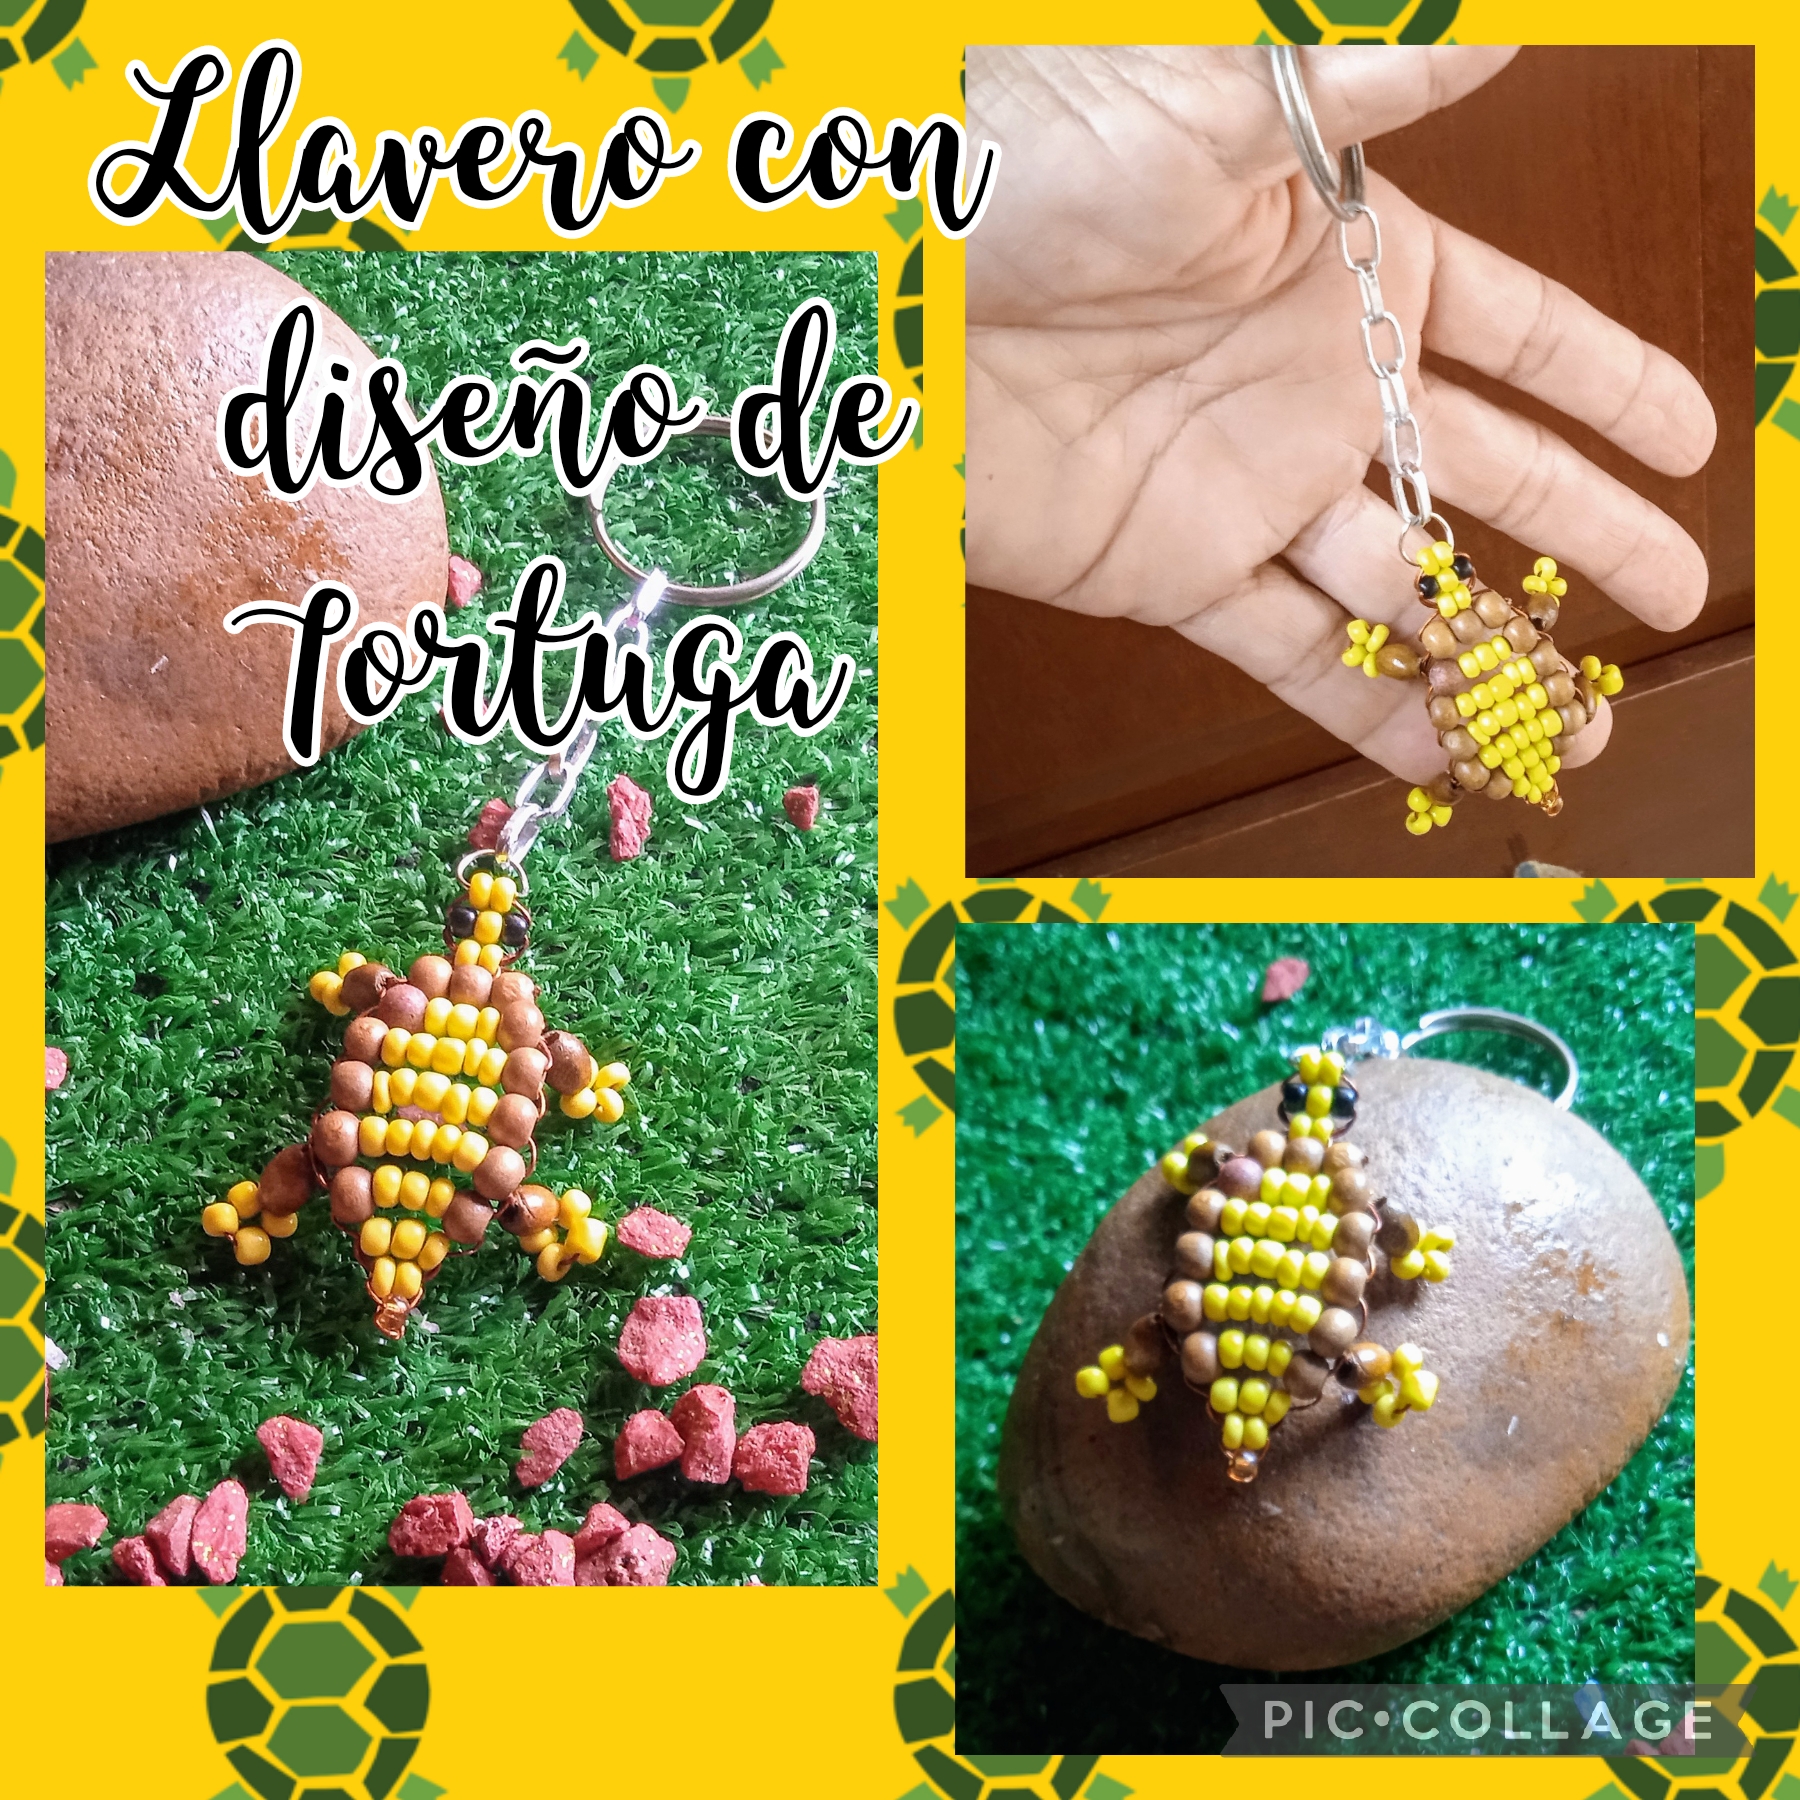
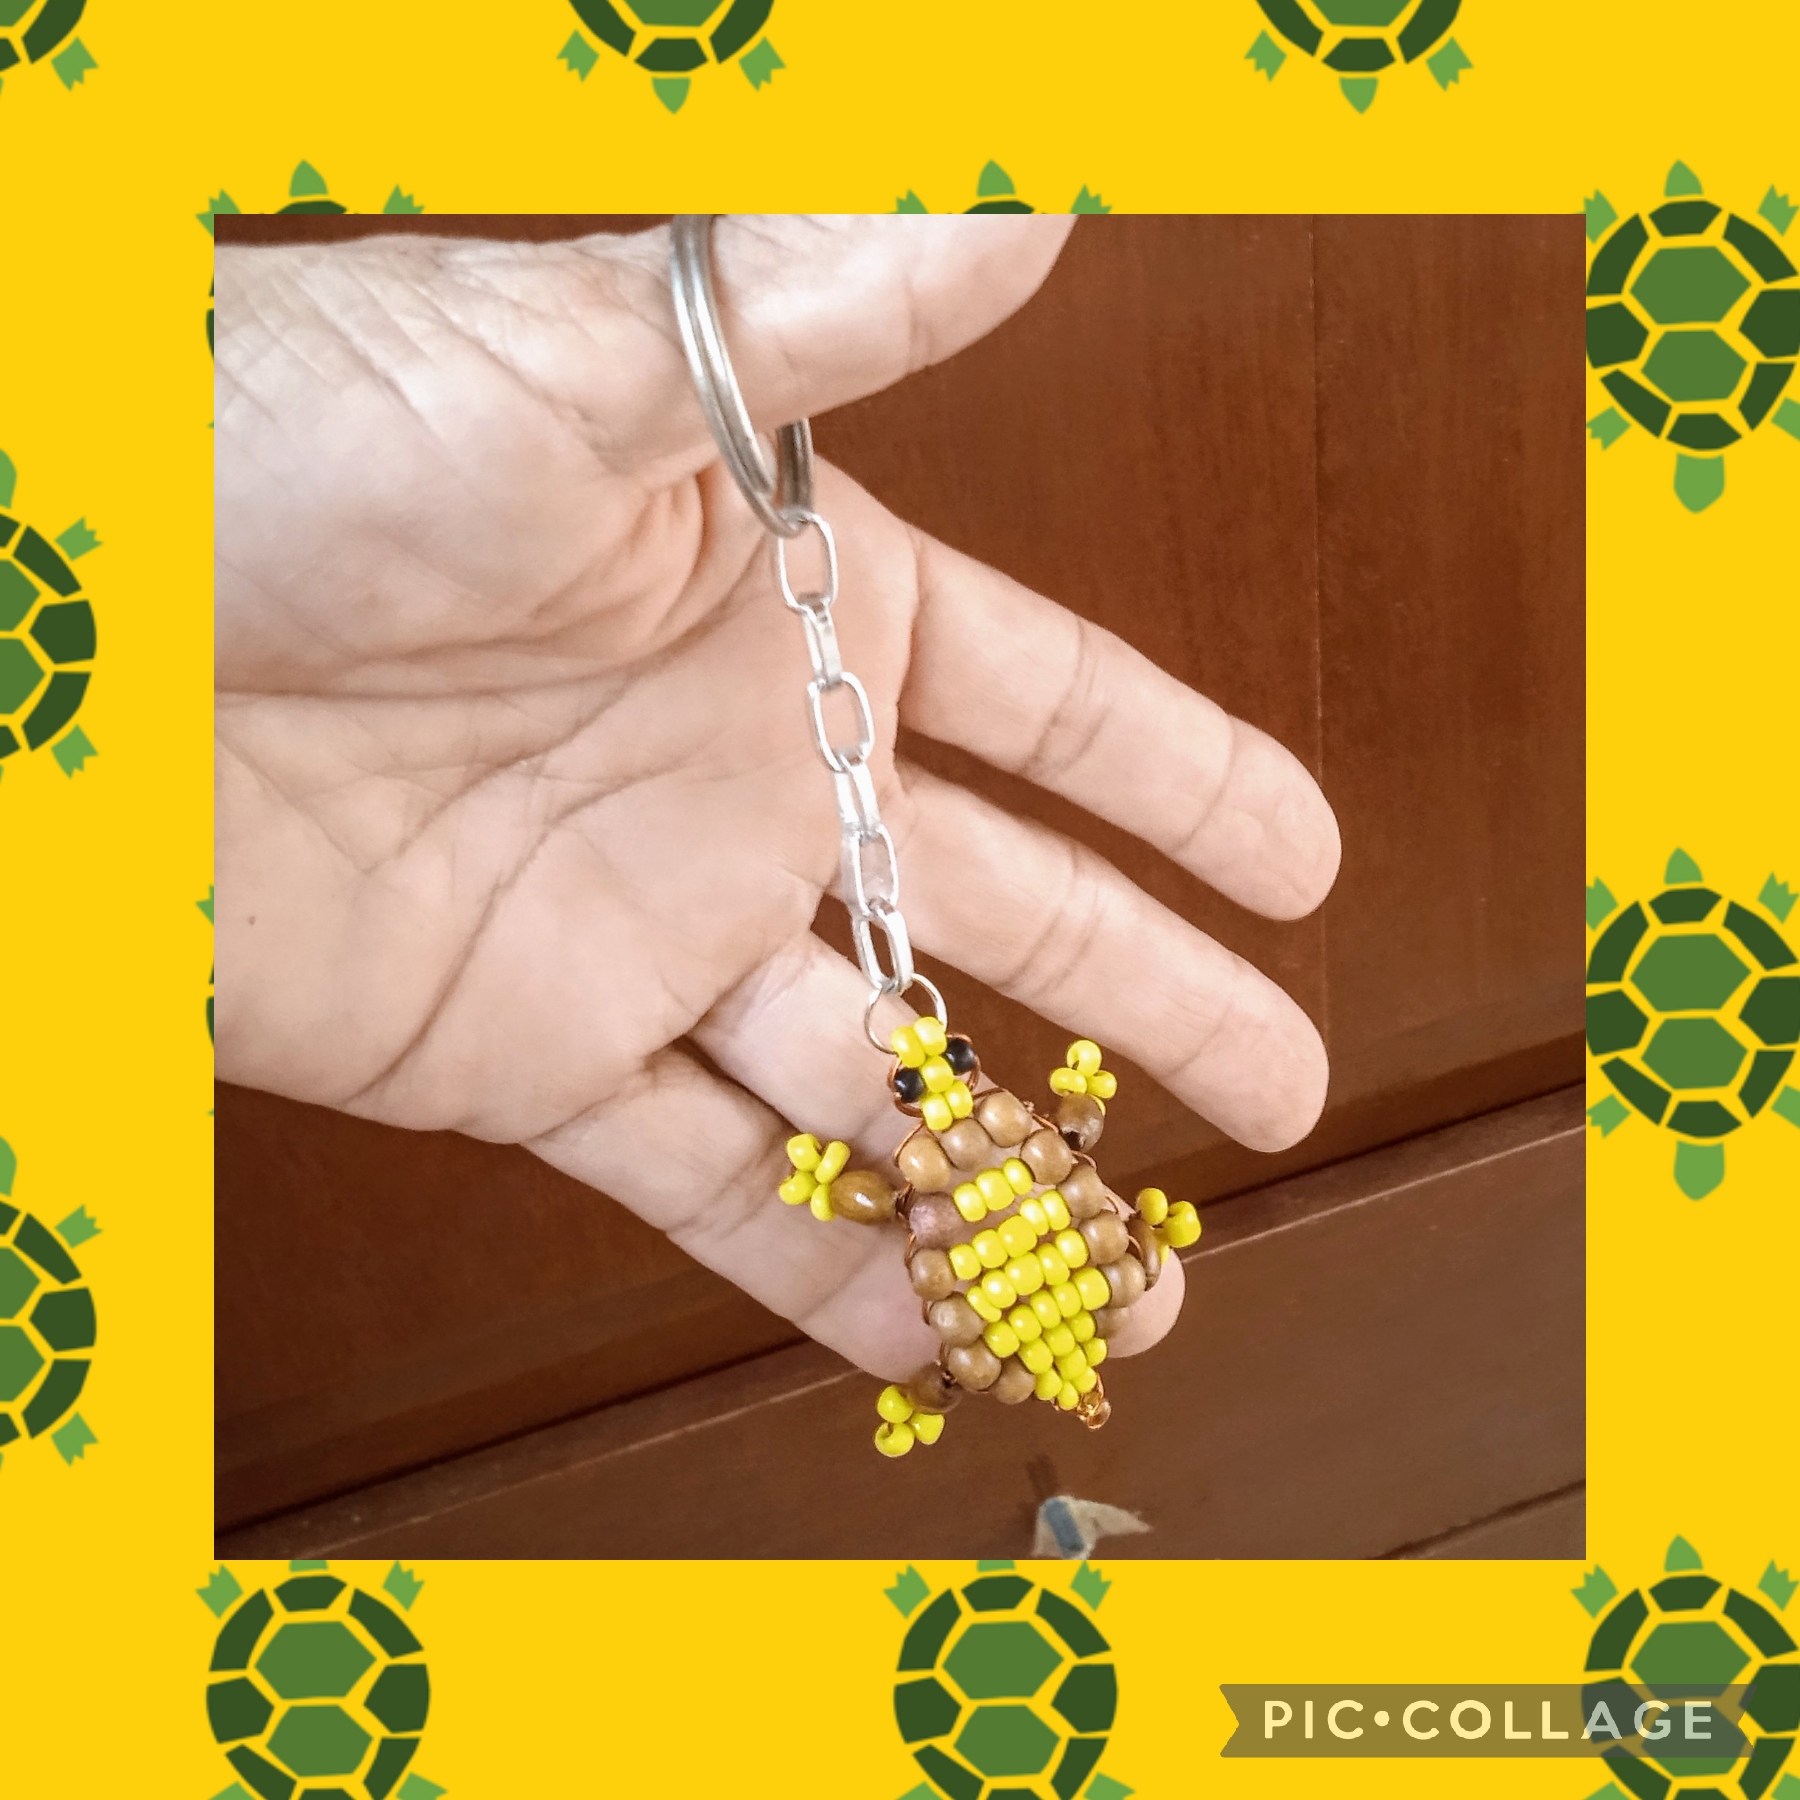
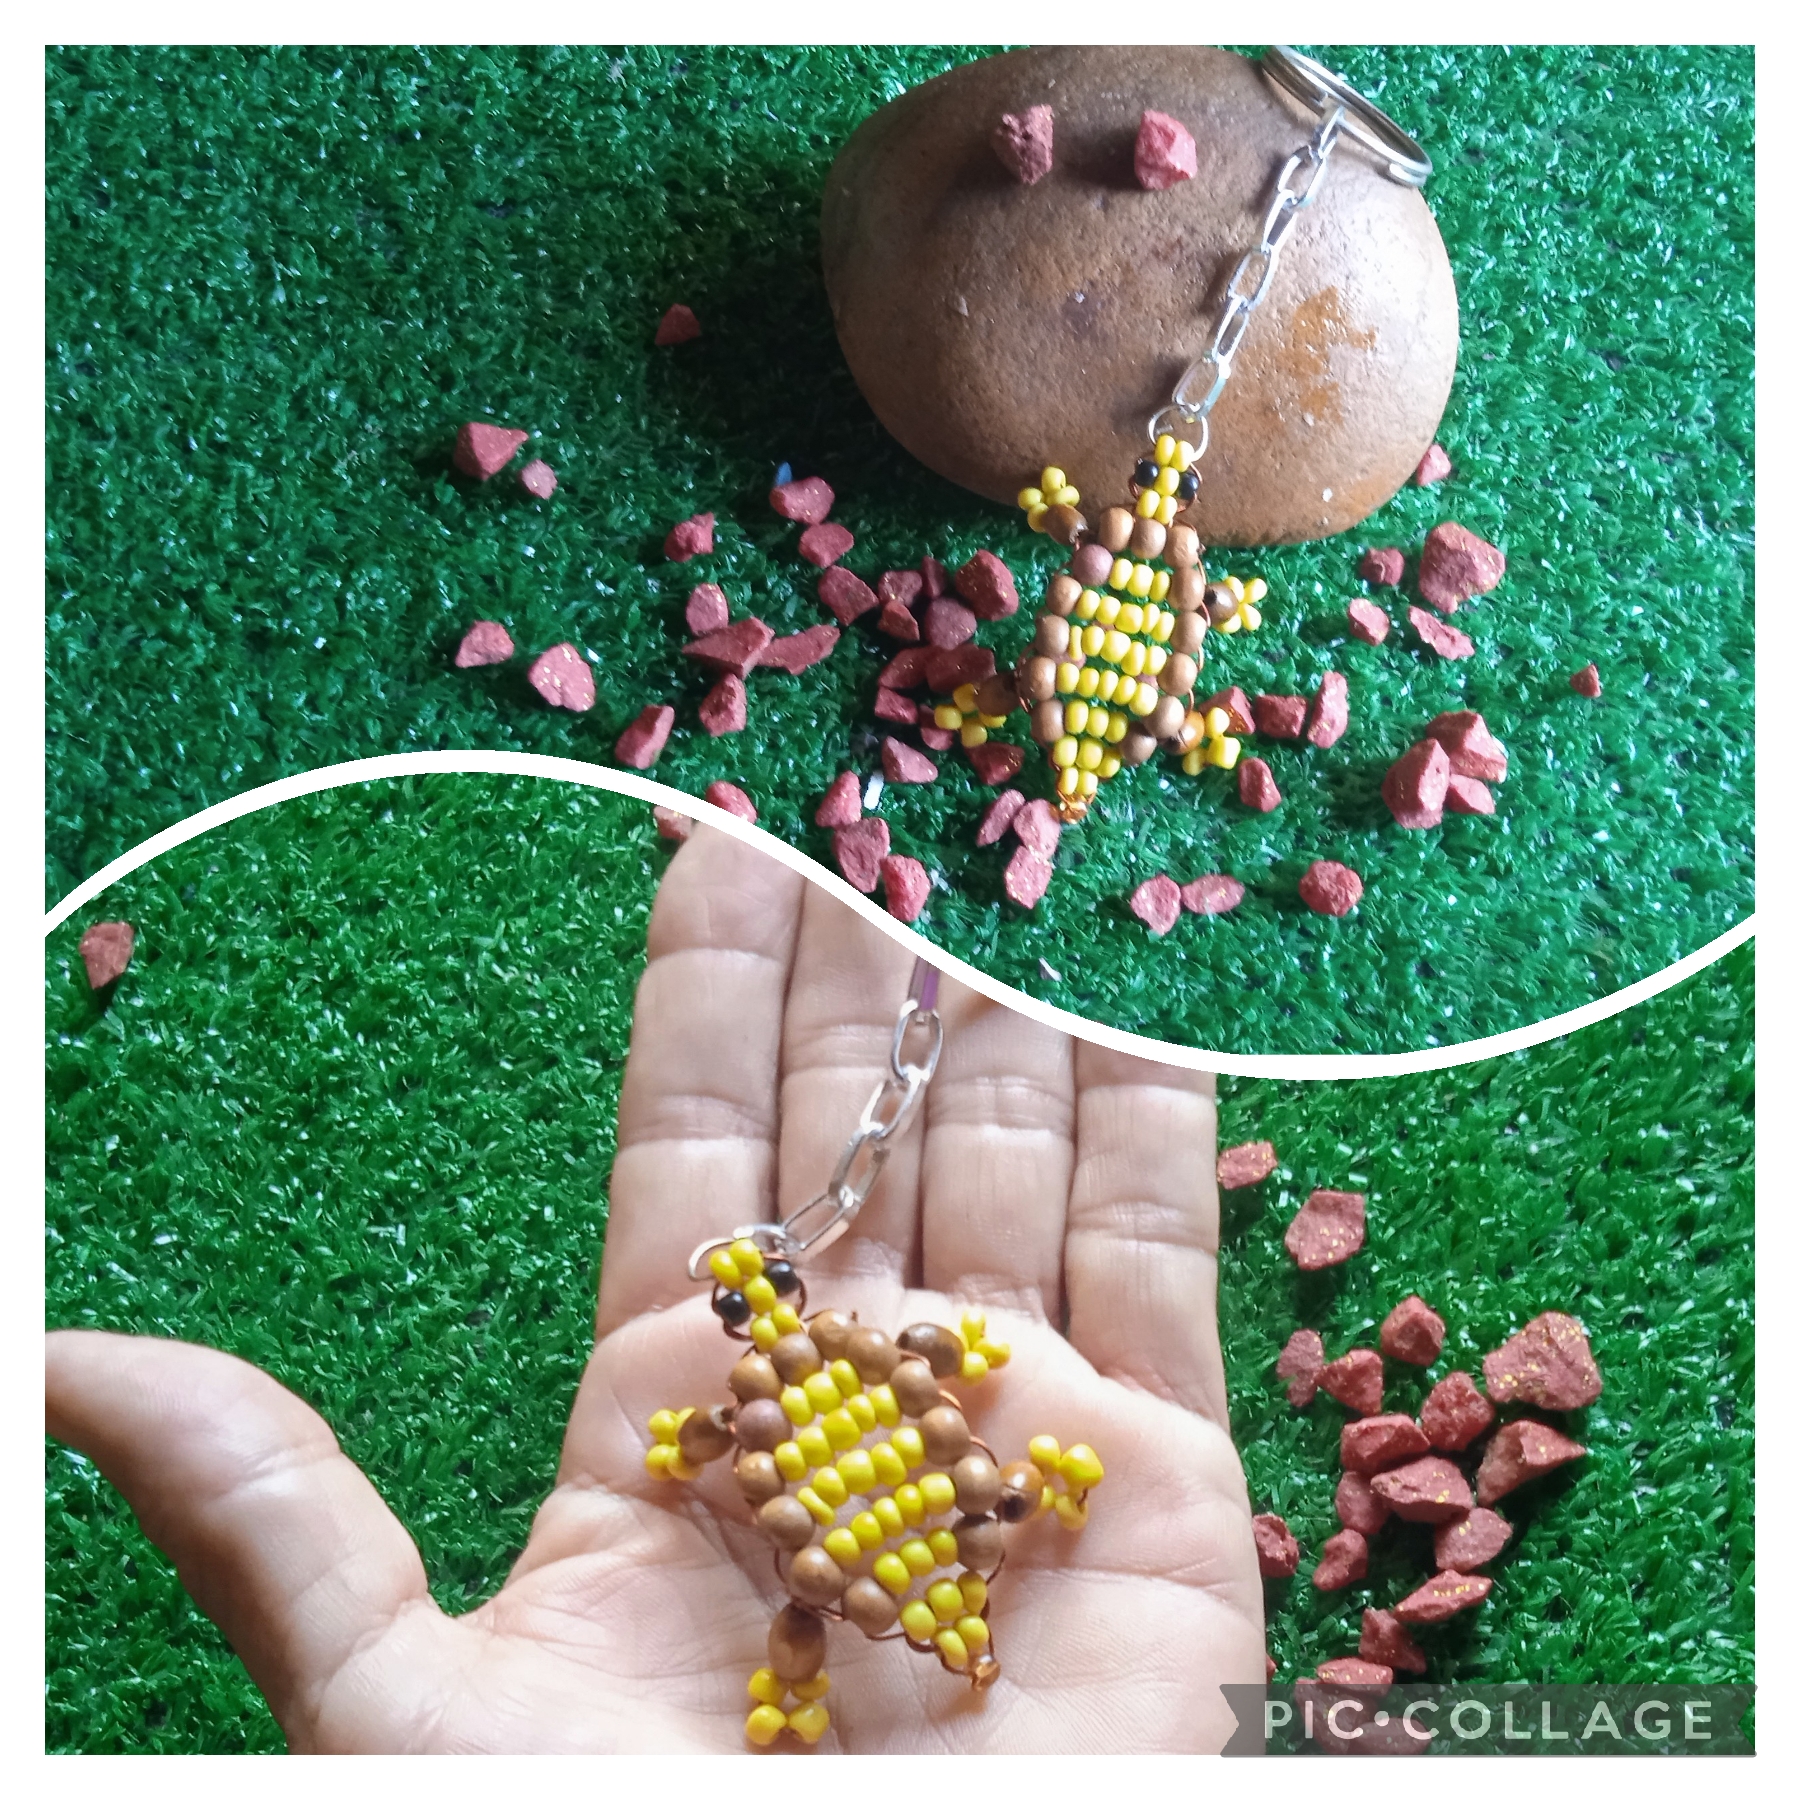
Artistas Creativos de las Manualidades y la Joyería, este es el resultado final de la tortuga terrestre
, para formar el llavero coloqué el aro porta llaves en una cadena de eslabones con una argolla que puse en la cabeza de la tortuga como se ve en la imagen.
Demás está decirles que mi sobrino estaba encantadisimo con su llavero y me prometió que su nota sería A+ en esa exposición, a mí siempre me emociona el cariño de mis niños por eso no podía dejar de compartir con ustedes mi manualidad, espero que les guste, y gracias por leer y ver mis publicaciones , que pasen un feliz fin de semana y nos vemos en la próxima manualidad, bye bye.
Creative Artists of Crafts and Jewelry, this is the final result of the land turtle
, to make the keychain I placed the key ring on a chain of links with a ring that I put on the head of the turtle as seen in the image.
Needless to say, my nephew was delighted with his keychain and promised me that his grade would be A + in that exhibition, I am always moved by the love of my children so I could not stop sharing my craft with you, I hope you like it, and thank you for reading and seeing my posts, have a happy weekend and see you in the next craft, bye bye.
Las imágenes y redacción de éste tutorial son de mi exclusiva propiedad, las fotos fueron tomadas con mi teléfono celular redmi 9 y las edite con una aplicación gratis del mismo.
Para traducir texto use Google traductor.
The images and writing of this tutorial are my exclusive property, the photos were taken with my redmi 9 cell phone and I edited them with a free application of the same.
To translate text use Google translator.

This post was shared and voted inside the discord by the curators team of discovery-it
Join our Community and follow our Curation Trail
Discovery-it is also a Witness, vote for us here
Delegate to us for passive income. Check our 80% fee-back Program
@nhaydu Me encantó este diseño, muy bien pensado como llavero , Saludos 🤗
Gracias @anamariag, espero que mi sobrino haga su trabajo con ese llavero 🤗
Excelente la imaginación de los sobrinos gracias a Dios cuentan con una tía dispuesta siempre a ayudar. Buen trabajo querida @nhaydu, la verdad no soy amante del color amarillo pero así como los Morrocoy se ve linda la combinación. Besitos 🤗
Gracias @lorennys todo se confabuló para lograr ese resultado con mi modelo la incondicional 🐢 Perlita me resultó de maravilla, saluditos 🥰
Beautiful this keychain that you made. Thank you for giving us such a spectacular job, it looks very tender and delicate turtle.
Thank you hive for giving me such a meaningful comment and supporting my publications.
Hermosa, tierna y delicada. Encantador llavero.
Gracias por regalarnos tu excelente trabajo..
!discovery 35
Gracias mi querida @dayadam, tu siempre tan linda apoyando mis publicaciones, un abrazo 💐
As you said unique, I take that because it looks so unique, I love the color, you did a very nice work, thanks for sharing your steps
Thank you, you are very kind. I really enjoyed your visit to my blog. Best regards. @uduakingyang
Ayy que tierno,gracias por tu tutorial ya se que hacer con mis canutillos 😊😍linda tortuguita 🐢
Que bueno! Me encanta que el tutorial te haya dado ideas para hacer tus llaveros de tortugas @anne002 😂 gracias por tu comentario, saluditos