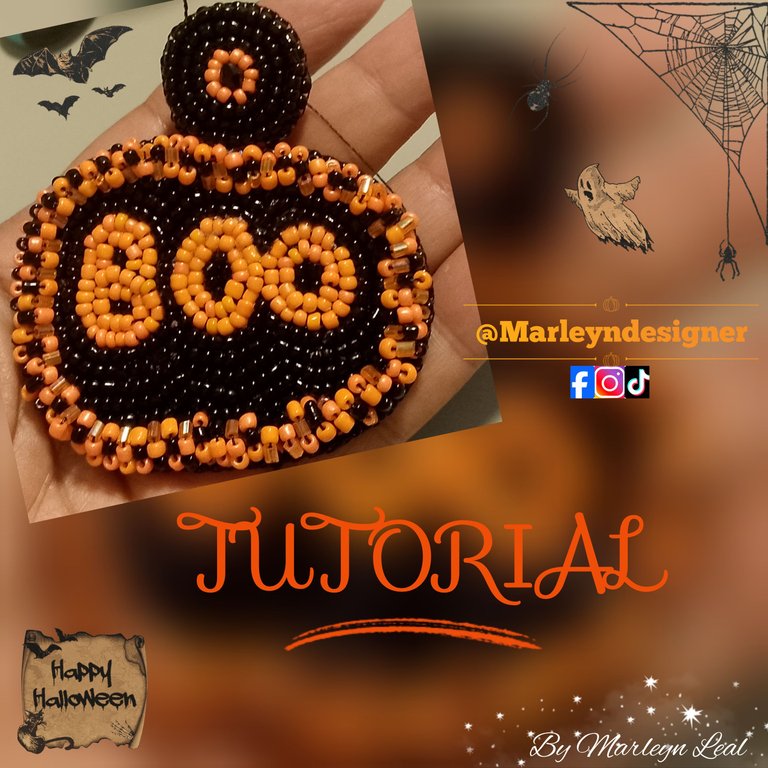
Feliz y Bendecido día, Como saben una de las cosas que mas amo es crear! y digamos que me especializo en zarcillos, por ende no podía dejar pasar la oportunidad de crear accesorios temáticos de Halloween es una forma divertida de expresar creatividad y celebrar la temporada. Con amor y entusiasmo, logre transformar materiales simples en piezas únicas que capturan la esencia de Halloween. ¡Anímate tu también a hacer tus propios zarcillos y disfruta del proceso creativo!
Happy and blessed day, as you know, one of the things I love most is creating! And let's say I specialize in earrings, so I couldn't pass up the opportunity to create Halloween themed accessories. It's a fun way to express creativity and celebrate the season. With love and enthusiasm, I managed to transform simple materials into unique pieces that capture the essence of Halloween. Dare to make your own tendrils and enjoy the creative process!

Halloween es una oportunidad perfecta para dejar volar la creatividad y crear accesorios únicos que reflejen el espíritu festivo. Con gran emoción, he diseñado unos zarcillos utilizando mostacillas y una base de cuero. A continuación, comparto el proceso creativo y algunos consejos para que puedas hacer tus propios zarcillos de Halloween.
Halloween is a perfect opportunity to let your creativity run wild and create unique accessories that reflect the holiday spirit. With great excitement, I designed some earrings using beads and a leather base. Below I share the creative process and some tips so you can make your own Halloween tendrils.

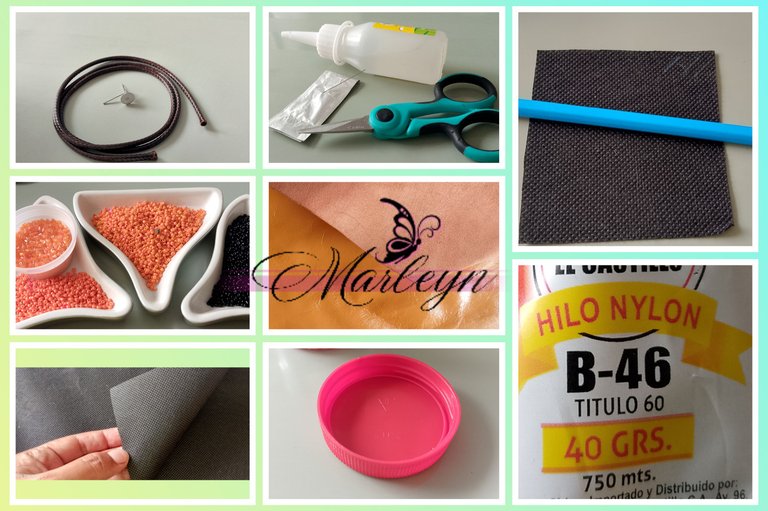
Todos los materiales son sencillos y el proceso es realmente repetitivo, toma tiempo realizarlo debes ser paciente y no apresures el proceso solo debes disfrutarlo, y paso a paso veras que el proceso creativo va fluyendo maravillosamente. Lo que vamos a utilizar es, Mostacillas yo utilice 3 tonos naranja, silicon liquido, tijeras, aguja para mostacilla, hilo 2 milímetros yo Utilice hilo piel de Serpiente de 2 milímetros, Tela POP, Hilo nylon, Cuero o Tela Gruesa, Base de Zarcillo.
All the materials are simple and the process is really repetitive, it takes time to do it, you must be patient and do not rush the process, you just have to enjoy it, and step by step you will see that the creative process is flowing wonderfully. What we are going to use is, Beads I used 3 shades of orange, liquid silicone, scissors, bead needle, 2 millimeter thread I used 2 millimeter Snakeskin thread, POP Fabric, Nylon Thread, Leather or Thick Fabric, Tendril Base .
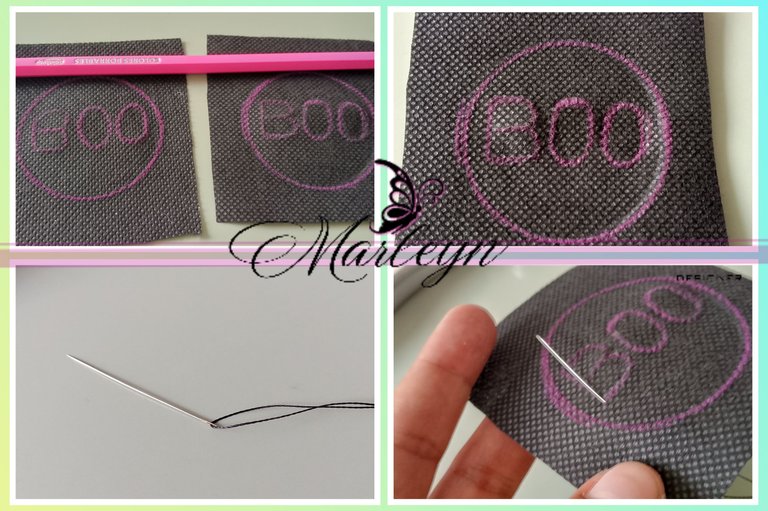
Para empezar vamos a crear nuestra base, yo utilice un color rosado para que se vea mejor en la tela color negro; y como es la temática de Halloween pensé en un zarcillo que asuste, jajaja el zarcillo dirá Boo... Empezaremos ensartando la aguja, luego vamos a crear desde cero esta será nuestra mayor retribución, empieza por las letras para que sea nuestro centro.
To begin we are going to create our base, I used a pink color so that it looks better on the black fabric; and since it is the Halloween theme I thought of a scary tendril, hahaha the tendril will say Boo... We will start by threading the needle, then we will create from scratch this will be our greatest reward, start with the letters so that it is our center.
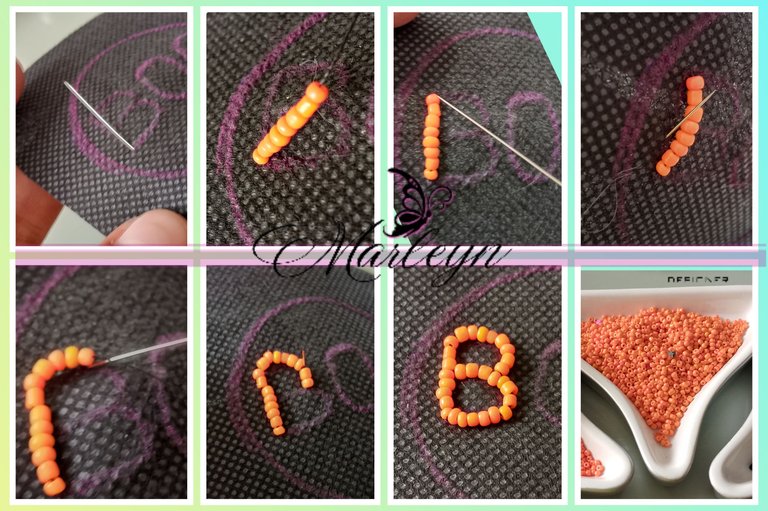
Vamos a comenzar por la letra B, introduce la aguja de abajo hacia arriba de manera que el nudo del hilo quede abajo, introduce tantas mostacillas como necesites para cubrir la linea recta de la letra B, y donde termina las mostacillas regresa la aguja hacia abajo, ahora sube la aguja por la tercera mostacilla como te muestro en las imágenes, pasa la aguja por el resto de las mostacillas ahora continua así dando forma con calma a el resto de la letra. En la parte de las curvas solo agrega 3 mostacillas para es decir de 3 en 3 para que des la forma de una manera mas facil.
We are going to start with the letter B, insert the needle from the bottom up so that the knot of the thread is at the bottom, insert as many beads as you need to cover the straight line of the letter B, and where the beads end, return the needle back down. , now raise the needle through the third bead as I show you in the images, pass the needle through the rest of the beads, now continue like this, calmly shaping the rest of the letter. In the curves part, just add 3 beads, that is, 3 at a time so that you can give the shape in an easier way.
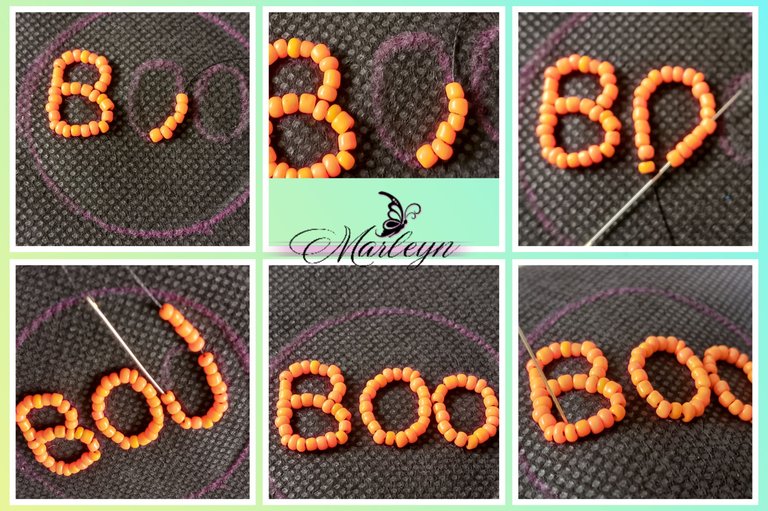
Continua el proceso creativo paso a paso, al terminar cada letra devuelve la aguja por toda la pieza para que se vea mas uniforme, y siempre al terminar cada una pasa la aguja atrás y realiza un amarre de manera que si se te revienta el hilo o se acaba no se te dañe todo lo que se a avanzado en el zarcillo.
Continue the creative process step by step, when you finish each letter, return the needle throughout the piece so that it looks more uniform, and always when you finish each one, pass the needle back and make a tie so that if the thread breaks or It is over, do not damage everything that has been advanced in the tendril.
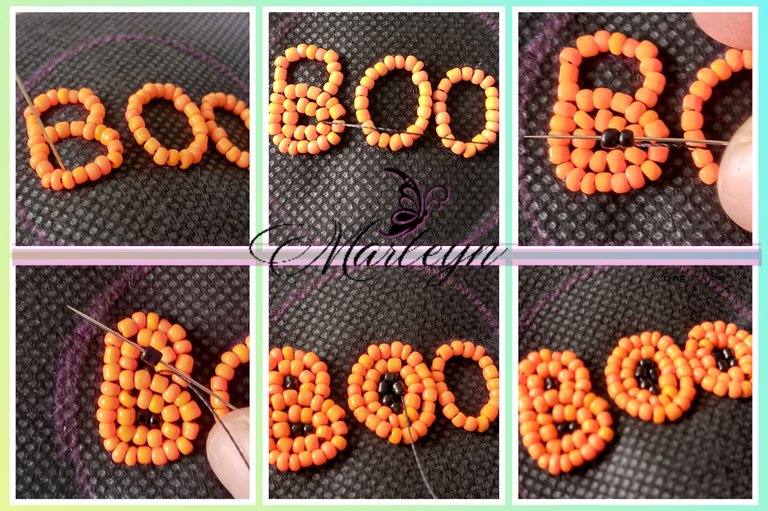
Cuando termines la primera linea, vamos a realizar el mismo proceso pero ahora adentro de cada letra, y en el centro colocamos unas mostacillas negras para que se resalte la profundidad de cada letra eso te quedara genial.
When you finish the first line, we are going to carry out the same process but now inside each letter, and in the center we place some black beads so that the depth of each letter stands out, that will look great on you.
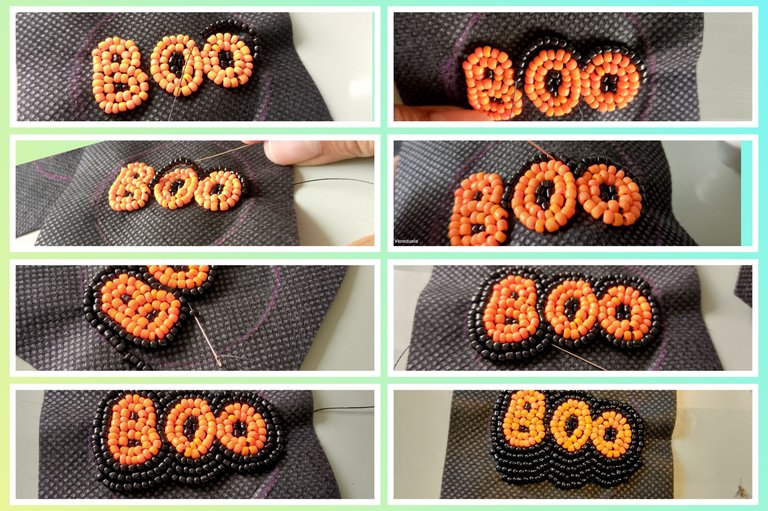
Vamos a empezar a rellenar con mostacillas negras, mi intención desde el principio era que fuese redondo, pero a medida que lo iba realizando me di cuenta que podía hacerlo algo distinto y no el zarcillo redondo básico que siempre encontraremos en las tiendas, así que empecé a rellenar como con montañas siempre dentro del circulo como te muestro en las imágenes, ahora bien el proceso es igual colocamos 6 mostacillas, subimos la aguja por la mostacilla 3 y de allí sacamos la aguja desde la tercera hasta la ultima, así consecutivamente por todo el alrededor de las letras hasta llegar a la orilla del circulo.
We are going to start filling with black beads, my intention from the beginning was for it to be round, but as I was doing it I realized that I could do something different and not the basic round tendril that we will always find in stores, so I started to fill as with mountains always inside the circle as I show you in the images, now the process is the same, we place 6 beads, we raise the needle through the 3rd bead and from there we take out the needle from the third to the last, like this consecutively for everything around the letters until you reach the edge of the circle.
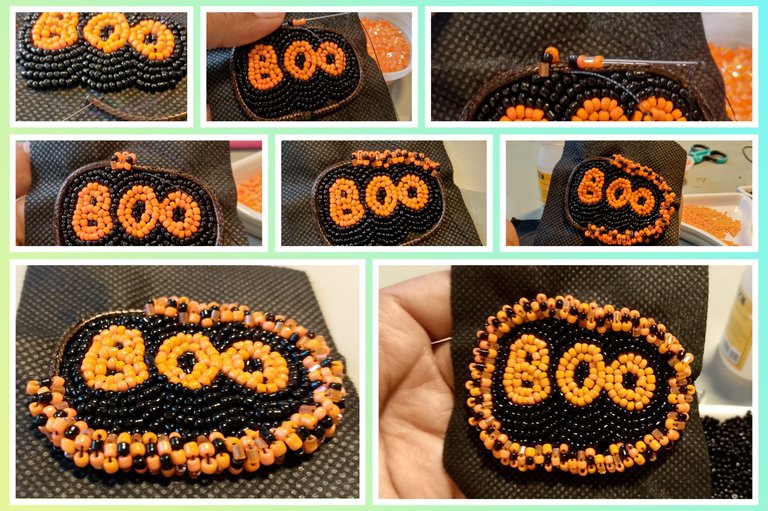
Por la Orilla vamos a cocer el hilo, si lo deseas puedes colocarle un poco de pega, yo prefiero cocerlo, y las puntas quemarlas un poquito para que no se deshilache, al terminar de cocerlo vamos a empezar a bordar la orilla, introduce la aguja de abajo hacia arriba y crea un patrón el q mas te guste yo lo que hago es colocar el patrón en 3 agujas para así siempre hacerlo igual ya que en el otro zarcillo debe ser lo mas parecido posible para crear el par perfecto, mi patrón fue primera aguja, naranja claro, negro, naranja medio, naranja oscuro! Segunda aguja, naranja medio, naranja claro, naranja oscuro, negro, y tercera aguja naranja medio, negro, naranja claro y naranja oscuro Entonces cada 3 puntadas empezaba de nuevo, así parecía diferente o que lo tome al azar pero ambos pares siempre quedarían igual o al menos lo mas parecido posible, yo debo decir que ame el resultado final de esta parte es una pieza que se ve super original y llamativa, definitivamente empezare a utilizar mucho mas esta técnica con el hilo por abajo.
On the edge we are going to sew the thread, if you wish you can put a little glue on it, I prefer to sew it, and burn the ends a little so that they do not fray, when we finish cooking we are going to start embroidering the edge, insert the needle from bottom to top and create a pattern that you like the most. What I do is place the pattern on 3 needles so that it is always the same since in the other tendril it must be as similar as possible to create the perfect pair, my pattern was first needle, light orange, black, medium orange, dark orange! Second needle, medium orange, light orange, dark orange, black, and third needle medium orange, black, light orange and dark orange Then every 3 stitches I started again, whether it seemed different or whether I took it at random but both pairs would always be the same or at least as close as possible, I must say that I love the final result of this part, it is a piece that looks super original and striking, I will definitely start using this technique a lot more with the thread at the bottom.
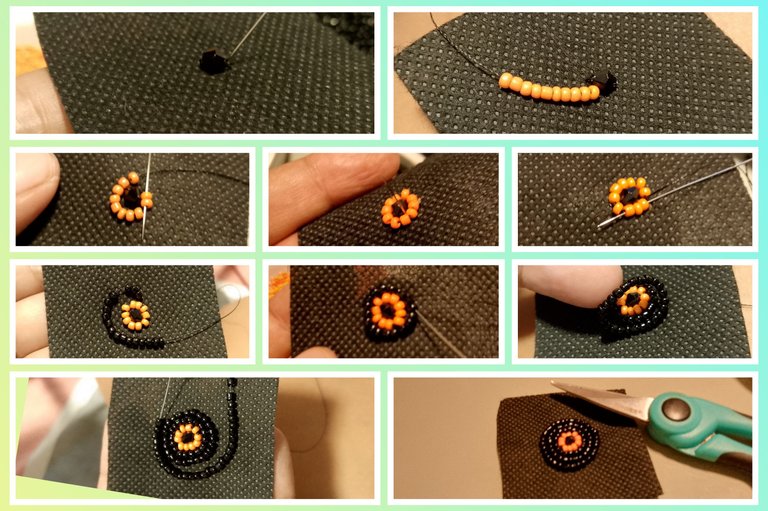
Vamos a crear la parte de arriba del zarcillo, la que va en la oreja; Yo coloque un cristal de Swarovski, lo recubrí con una linea de mostacillas anaranjadas para darle vida y resaltar color, luego continúe con 3 líneas mas de mostacillas negras, al terminarlo corte la tela sobrante para continuar.
We are going to create the upper part of the earring, the one that goes on the ear; I placed a Swarovski crystal, covered it with a line of orange beads to give it life and highlight color, then continued with 3 more lines of black beads, when finished cut the excess fabric to continue.
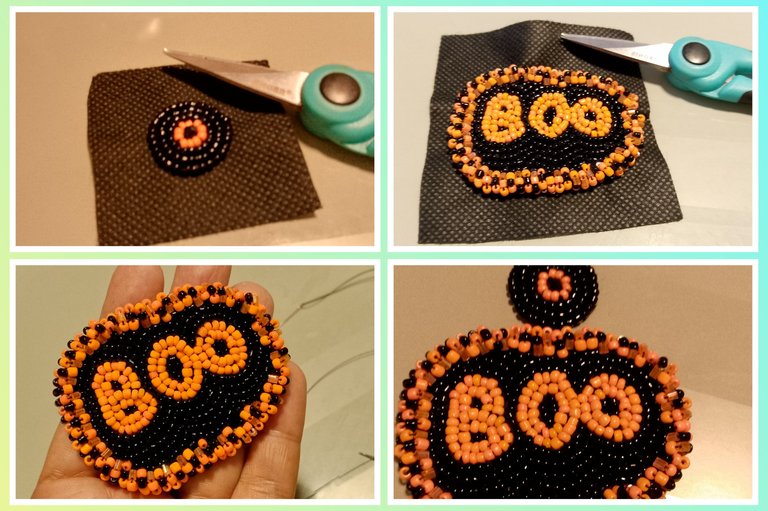
Vamos a cortar la tela sobrante de ambas piezas, debes tener mucho cuidado si cortas uno de los hilos tendrás que volver a empezar, así que se cuidadoso ahora en esta etapa estuve en un gran dilema...
We are going to cut the excess fabric from both pieces, you must be very careful if you cut one of the threads you will have to start over, so be careful now at this stage I was in a big dilemma...
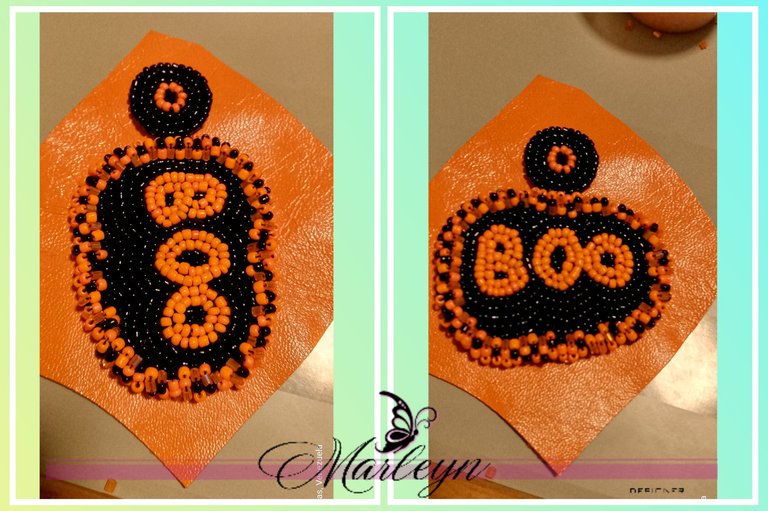
Mira mi dilema, no se de que lado quedaba mejor me gustaba mas de la primera manera pero se lee mejor de la segunda forma así que bueno, me quede con la segunda opción. Cual te gusta mas a ti?
Look at my dilemma, I don't know which side looked better, I liked it better the first way but it reads better the second way so well, I went with the second option. Which one do you like more?
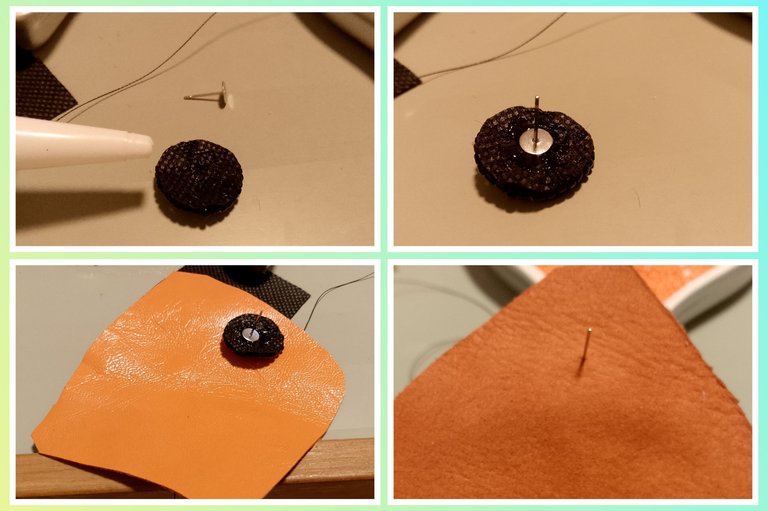
En la parte superior del zarcillo pegaremos la base del zarcillo por la parte de atrás, solo debes colocar una gota de silicon liquido o pega E6000 colocar la base de zarcillos y deja secar un rato si es posible, al estar seco insértalo en el cuero previamente cortado con el tamaño aproximado del zarcillo, coloca silicon liquido en la pieza para pegarlo al cuero.
At the top of the tendril we will glue the base of the tendril on the back, you just have to place a drop of liquid silicone or E6000 glue, place the base of the tendrils and let it dry for a while if possible, when it is dry, insert it into the leather previously Cut to the approximate size of the earring, place liquid silicone on the piece to stick it to the leather.
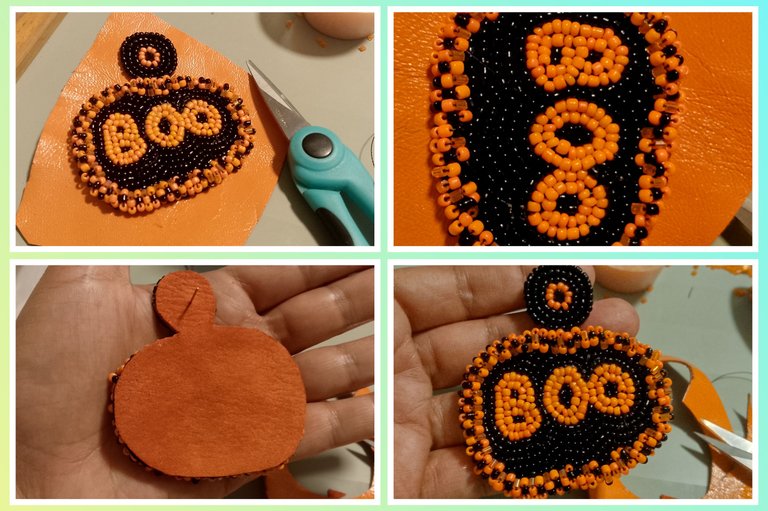
Coloca silicon liquido en la parte de atrás de las piezas, déjalas secar un poco y recorta el cuero sobrante, el cuero que yo tenia era brillante por la parte delantera pero a mi me gusto mas la parte de atrás que era como cuero mas original, no se me gusto mas y por eso lo pegue así, Una recomendación no le coloques silicon por las orillas para que al momento de cocerlo sea mas facil, si le colocas silicon en las orillas cada vez que pasas la aguja saldrá con pega y será un poco engorroso el trabajo, y si le colocas pega y lo dejas secar se pondrá duro y será mas difícil cocerlo.
Place liquid silicone on the back of the pieces, let them dry a little and trim the excess leather, the leather I had was shiny on the front but I liked the back better, which was like more original leather, I didn't like it any better and that's why I glued it like that. One recommendation is not to put silicone on the edges so that when cooking it it will be easier, if you put silicone on the edges every time you pass the needle it will come out sticky and it will be a The work is not very cumbersome, and if you put glue on it and let it dry it will become hard and it will be more difficult to cook it.
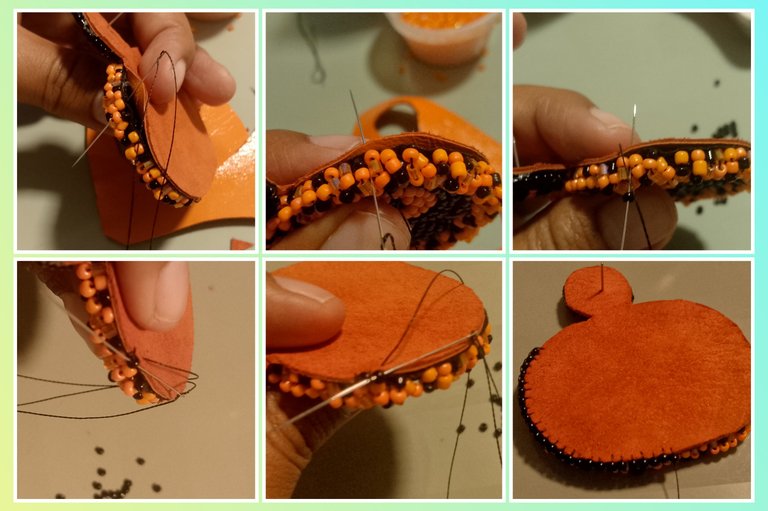
Esta parte es la parte final, ensarta el hilo en la aguja, ahora levanta un poco la pieza del cuero y mete la aguja por abajo de atrás hacia adelante tomando parte de la tela negra, esto es para que quede escondido el nudo del hilo, ahora pasa de regreso la aguja, que salga por el cuero como ves en la segunda imagen de izquierda a derecha, ahora inserta una mostacilla trata de que sea una la mas plana posible y regresa la aguja nuevamente por el cuero como te muestro en la tercera imagen, ahora continua nuevamente por toda la orilla hasta llegar nuevamente a donde empezaste! Ahora repite el proceso completo para el segundo arete... Se que te quedara Hermoso, no dudes en darle tu toque personal, Tu puedes transformar materiales simples en piezas únicas que capturan la esencia de Halloween. ¡Anímate a hacer tus propios zarcillos y disfruta del proceso creativo!
This part is the final part, thread the thread on the needle, now lift the piece of leather a little and insert the needle underneath from back to front taking part of the black fabric, this is so that the knot of the thread is hidden, Now pass the needle back, let it come out through the leather as you see in the second image from left to right, now insert a bead, try to make it as flat as possible and return the needle again through the leather as I show you in the third image, now continue again along the entire shore until you reach where you started again! Now repeat the entire process for the second earring... I know it will look beautiful on you, don't hesitate to give it your personal touch. You can transform simple materials into unique pieces that capture the essence of Halloween. Dare to make your own tendrils and enjoy the creative process!
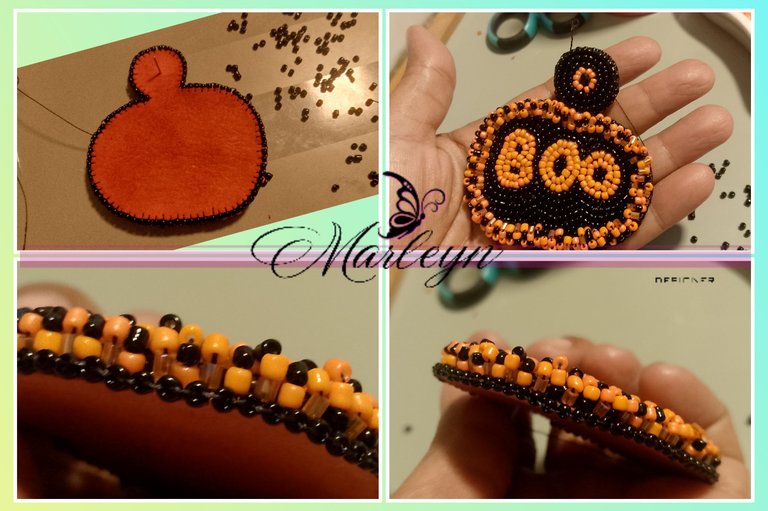
Este es la pieza final, espero que te gustara todo el proceso lo mas importe es que lo disfrutes, recuerda que puedes tomar la técnica y crear lo que tu quieras, el limite es tu mente! Si deseas puedes adquirir este y muchos mas modelos en mi tienda virtual, Estamos a la orden no dudes en escribirme. Atrevete a participar en esta increible iniciativa @maria-2905, @vane21000, @jess-ica
This is the final piece, I hope you like the whole process, the most important thing is that you enjoy it, remember that you can take the technique and create what you want, the limit is your mind! If you want, you can purchase this and many more models in my virtual store. We are at your disposal, do not hesitate to write to me. Dare to participate in this incredible initiative @maria-2905, @vane21000, @jess-ica


IMAGENES CREADAS EN CANVA
IMAGES CREATED IN CANVA

!discovery 35
This post was shared and voted inside the discord by the curators team of discovery-it
Join our Community and follow our Curation Trail
Discovery-it is also a Witness, vote for us here
Delegate to us for passive income. Check our 80% fee-back Program
Congratulations @marleyn! You have completed the following achievement on the Hive blockchain And have been rewarded with New badge(s)
Your next target is to reach 55000 upvotes.
You can view your badges on your board and compare yourself to others in the Ranking
If you no longer want to receive notifications, reply to this comment with the word
STOPCheck out our last posts:
Beautiful decoration!
Wow qué gran habilidad para crear esa pieza 😍 me encantó y también que los colores fuesen así de vibrantes. Tiene una energía muy spooky 👻 👻 👻
Beautiful job! That came out really nicely! It looks like it was time consuming but a great idea turned into reality.
!BBH
!INDEED
!PIZZA
@marleyn! @thebighigg likes your content! so I just sent 1 BBH to your account on behalf of @thebighigg. (5/50)
(html comment removed: )
)
(2/10)
@marleyn! @thebighigg Totally agrees with your content! so I just sent 1 IDD to your account on behalf of @thebighigg.
$PIZZA slices delivered:
@thebighigg(3/5) tipped @marleyn
This looks very unique and beautiful; I simply love it and would be happy to wear something like this. Reading your creative process is enjoyable as well. !DIY
Well done and good luck in the contest.
You can query your personal balance by
!DIYSTATS