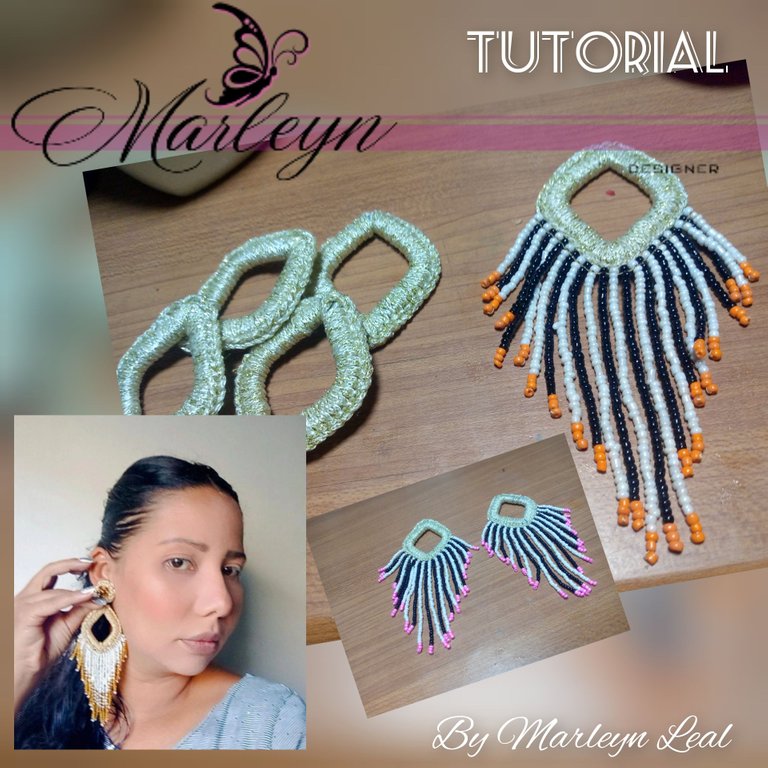
Feliz y Bendecido nuevo dia, Ante todo espero te encuentres bien, feliz, sano, creciendo, brillando y siendo cada dia tu mejor versión. Yo eh estado Gracias a Dios con mucho trabajo, aunque como ya sabes mi trabajo me encanta así que lo que realizo mas que trabajo es mi pasión y lo hago Feliz! Bueno como les habia comentado en mi publicación anterior hace varios dias atras tengo un pedido bastante grande de zarcillos y como son con flecos de mostacillas me lleva horas realizar cada pieza, en mi tutorial del dia de hoy les mostrare lo que estoy fabricando de esa manera aprendes y ves mi trabajo, espero que les guste y si tienen alguna duda estaré atenta de responderles. Ante todo Gracias por leerme.
Happy and Blessed new day, First of all I hope you are well, happy, healthy, growing, shining and being your best version every day. I have been thank God with a lot of work, although as you know I love my job so what I do more than work is my passion and I do it happily! Well as I had told you in my previous publication several days ago I have a large order of tendrils and as they are with bangs of beads it takes me hours to make each piece, in my tutorial today I will show you what I'm making that way you learn and see my work, I hope you like it and if you have any questions I will be happy to answer them. Thank you for reading my tutorial.
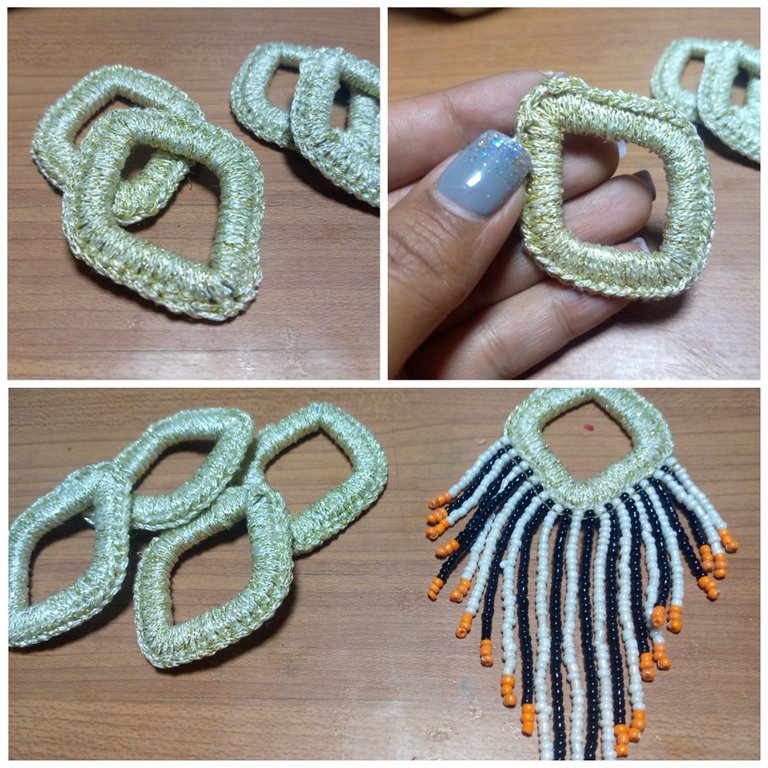
Para este pedido mi cliente me facilito estas piezas ya tejidas en crochet, yo no se tejer y eso que mírame lo eh intentado y no me sale ni la cadena principal, espero aprender en algún momento! Bueno estas piezas ya están tejidas y me las a enviado en diferentes colores para realizarle los flecos con las mostacillas.
For this order my client gave me these pieces already crocheted, I do not know how to crochet and look at me I have tried and I do not even get the main chain, I hope to learn at some point! Well these pieces are already knitted and he sent them to me in different colors to make the bangs with the beads.
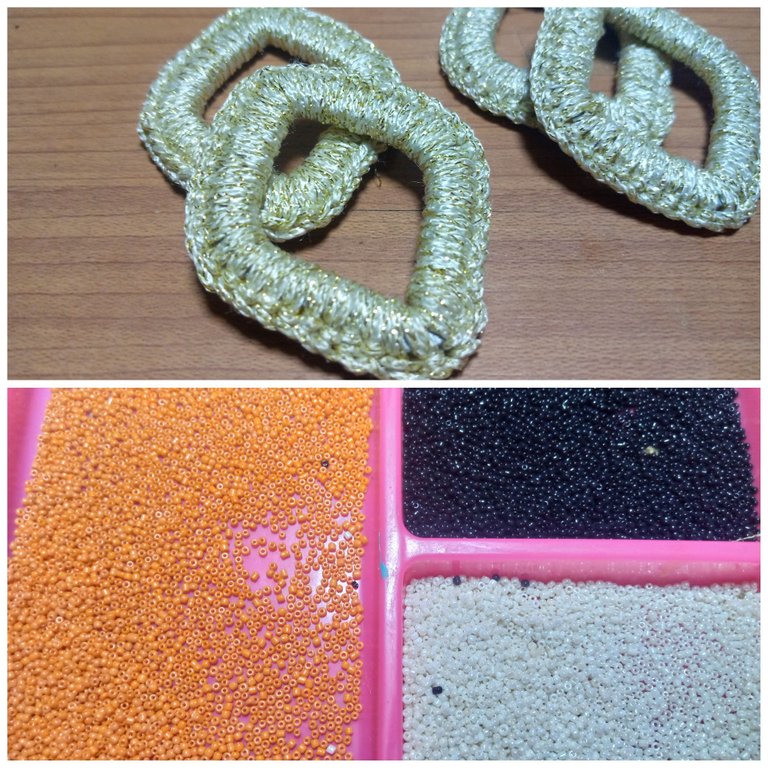
Lo Principal antes de realizar las piezas es seleccionar los colores de los flecos en este caso mi cliente, quería unos flecos largos que se salieran de lo habitual, tuvimos una lluvia de ideas hasta que se selecciono este modelo, es distinto, llamativo y original. Coloque mis mostacillas en una bandeja amplia para mayor facilidad al momento de agarrarlas con la aguja.
The main thing before making the pieces is to select the colors of the bangs, in this case my client wanted long bangs that were out of the ordinary, we had a brainstorming until this model was selected, it is different, striking and original. I placed my beads in a wide tray to make it easier to grab them with the needle.
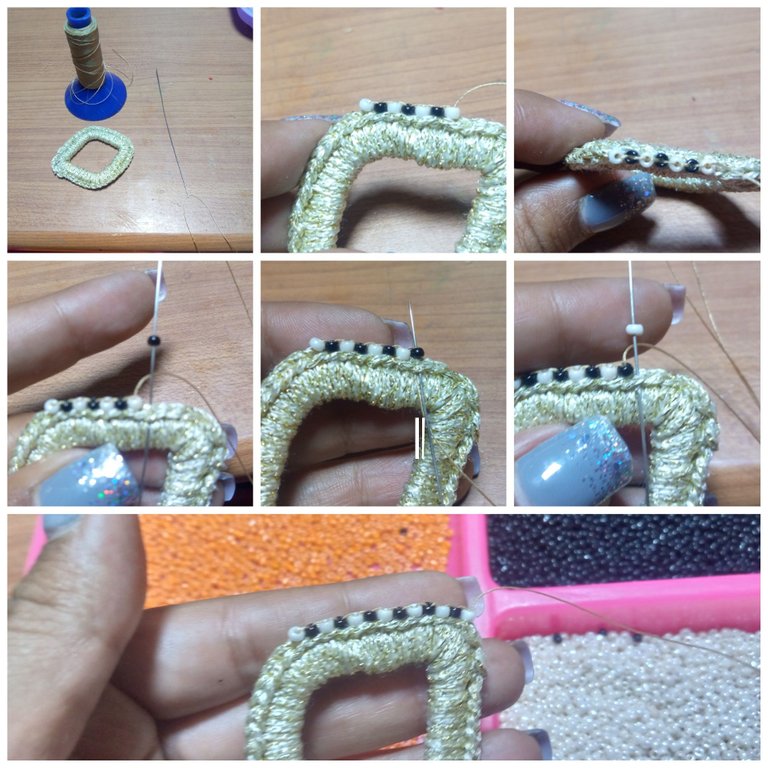
Estaremos utilizando hilo de talabarteria, es delgado como el hilo normal de coser pero es muchisimo mas fuerte y no se rompe con facilidad, hemos elegido un color como dorado para que me combine con todos los rombos que estaré trabajando, una aguja para mostacillas larga, y mi Rombo ya tejido para comenzar, lo primordial es ensartar la aguja con el hilo, si no eres muy diestra coloca solo un metro de hilo, si ya lo manejas bien vamos a ensartar tres metros y medio de hilo aproximadamente, introduce la aguja en el rombo halaremos el hilo hasta el final dejando una punta sobresaliente lo suficientemente larga para que puedas amarrar, regresa el hilo lo mas cerca posible, agarra ambos hilos y los amarraras primero un nudo, seguido de otro nudo doble, regresa la aguja hacia el otro lad y halar para esconder el nudo.. Sacaremos la aguja por el lado central del tejido, y vamos a realizar una linea de mostacillas con la tecnica de ladrillo en mostacillas, para la primera colocamos 2 mostacillas en la aguja, introduce la aguja hacia abajo, ahora regresa la aguja hacia arriba, saliendo por la segunda mostacilla, de aquí en adelante vamos a repetir el proceso la diferencia sera que se realizara con una sola mostacilla, es decir, coloca una mostacilla en la aguja, introduce la aguja hacia abajo, ahora regresa la aguja pasando por la mostacilla y repetir el proceso puedes guiarte con las imágenes que te dejo aca arriba.
We will be using saddlery thread, it is thin like normal sewing thread but it is much stronger and does not break easily, we have chosen a color like gold to match all the rhombuses that I will be working with, a long beading needle, and my Rombo already woven to start, the main thing is to thread the needle with the thread, if you are not very skillful place only one meter of thread, if you already have a good command, we are going to string approximately three and a half meters of thread, introduce the needle into the rhombus, pull the thread to the end leaving a protruding end long enough for you to tie, return the thread as close as possible, grab both threads and tie them in a knot first, followed by another double knot, return the needle to the other side and pull to hide the knot. . We will pull the needle through the center side of the fabric, and we will make a line of beads with the brick bead technique, for the first one we place 2 beads on the needle, introduce the needle downwards, now return the needle upwards, exiting through the second bead, from here on we will repeat the process the difference will be that it will be done with only one bead, that is to say, place a bead on the needle, introduce the needle down, now return the needle passing through the bead and repeat the process you can be guided with the images that I leave you above.
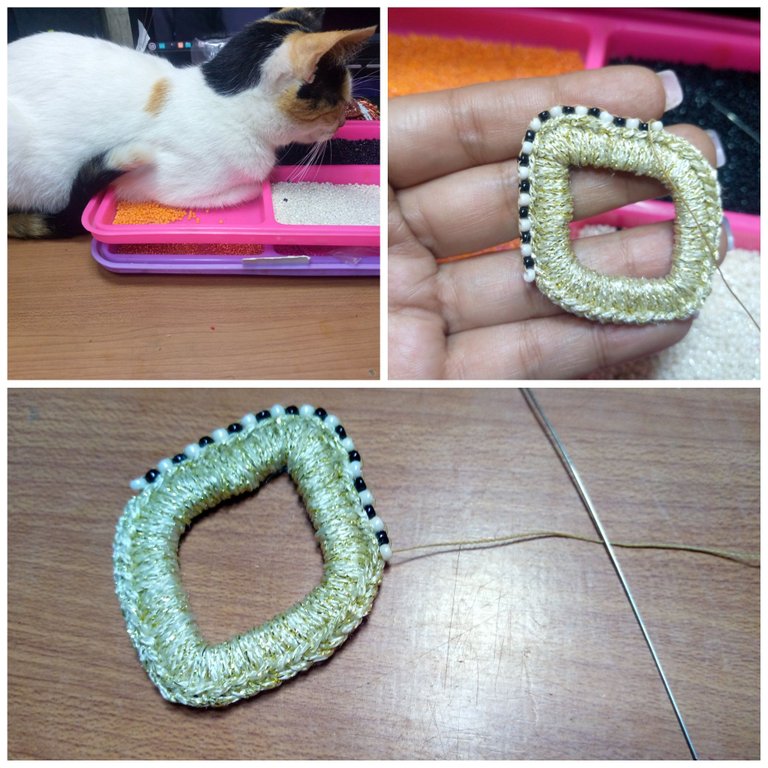
Mi Gata hermosa, mi Luna me a acompañado en todo este proceso llevo 2 semanas trabajando casi que 14 horas al dia, a mi Luna le encanta meterse ne mis mostacillas y las aplasta con sus patitas! Bueno continuamos la secuencia en ladrillo hasta llegar a la mitad de nuestra pieza yo lo realizo de 25 flecos tu puedes hacerlo de la cantidad que desees bien sea mas o menos! al llegar al final dejaremos el hilo hacia afuera pasándolo por adentro de la mostacilla como ves en la imagen de arriba para comenzar a realizar los flecos.
My beautiful cat, my Luna has accompanied me throughout this process I have been working for 2 weeks almost 14 hours a day, my Luna loves to get into my beads and crushes them with her little paws! Well we continue the sequence in brick until we reach the middle of our piece, I do it with 25 bangs, you can do it with the amount you want, either more or less! when we reach the end we will leave the thread to the outside passing it inside the beads as you see in the image above to begin to make the bangs.
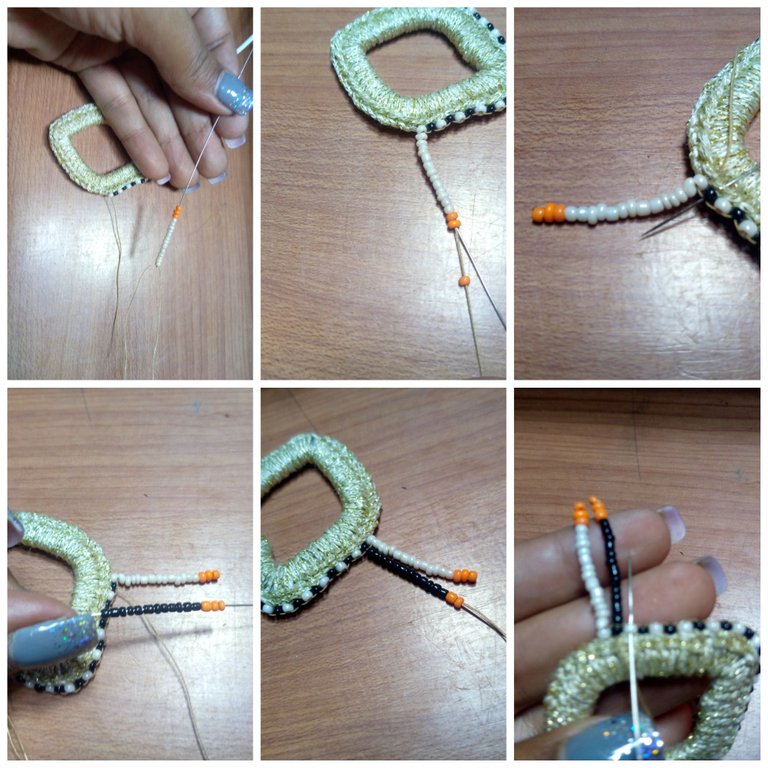
Vamos a comenzar con los flecos, esta es la parte mas facil pero mas lenta de todo el proceso, el primer dia tarde 6 horas para realizar solo 1 pieza, por que debía medir contar y verificar los largos para que este fuese el modelo a seguir para continuar mi proceso de fabricación. en el primer fleco coloque 11 mostacillas blancas y 3 mostacillas anaranjadas, como te muestro en la segunda imagen la ultima mostacilla quedara por fuera, y regresaremos la aguja por todas las otras mostacillas, sacaremos la aguja por encima de la primera mostacilla sin entrar en la pieza tejida, ahora lo sacamos por la próxima mostacilla como veras en la imagen 3, y vamos aumentando los flecos los primeros 3 flecos aumenta 1 mostacilla mas por fleco siempre conservando las 3 anaranjadas abajo, a partir del fleco 4 vamos a ir aumentando 3 mostacillas mas en cada fleco.
Let's start with the bangs, this is the easiest but slowest part of the whole process, the first day it took me 6 hours to make only 1 piece, because I had to measure and verify the lengths so that this was the model to follow to continue my manufacturing process. in the first fringe I placed 11 white beads and 3 orange beads, as I show you in the second image the last bead will be on the outside, and we will return the needle through all the other beads, we will take the needle out over the first bead without entering the woven piece, now we take it out through the next bead as you will see in the image 3, and we will increase the bangs the first 3 bangs increase 1 more bead per fringe always keeping the 3 orange ones below, from fringe 4 we will increase 3 more beads in each fringe.
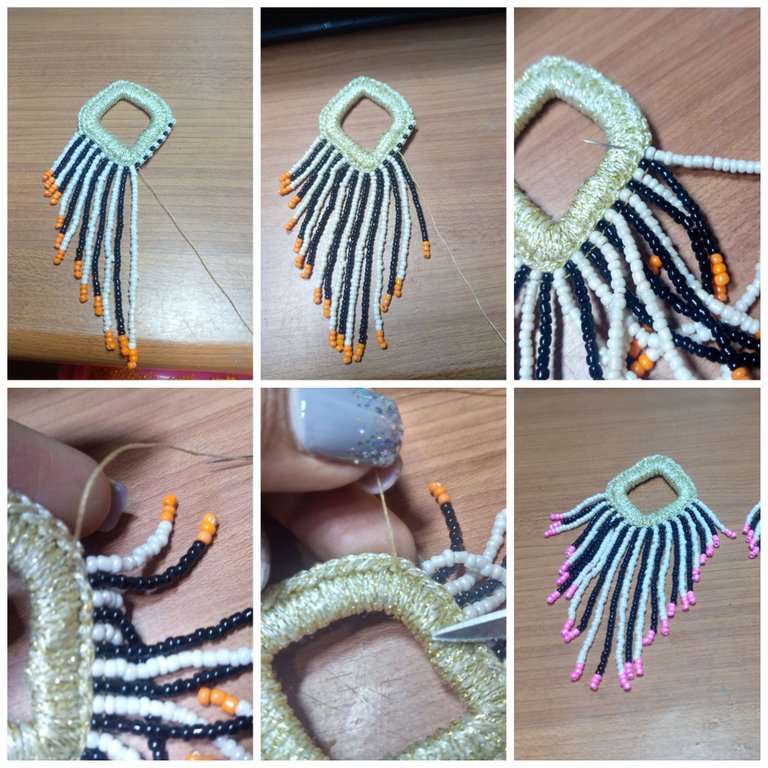
Cuando llegamos al fleco central, comenzamos a la inversa disminuyendo 3 mostacillas, aunque en esta etapa yo deje de contar las mostacillas porque las que tengo son las normales y estas los tamaños varían demasiado. yo lo que hice aquí fue medir para que los flecos tuvieran el mismo tamaño sin importar la cantidad de mostacillas respetando las ultimas 3 anaranjadas de abajo, así hasta llegar nuevamente arriba.
When we reach the central fringe, we start in reverse by decreasing 3 beads, although at this stage I stopped counting the beads because the ones I have are the normal ones and these sizes vary too much. What I did here was to measure so that the bangs had the same size regardless of the number of beads, respecting the last 3 orange beads at the bottom, and so on until we reach the top again.
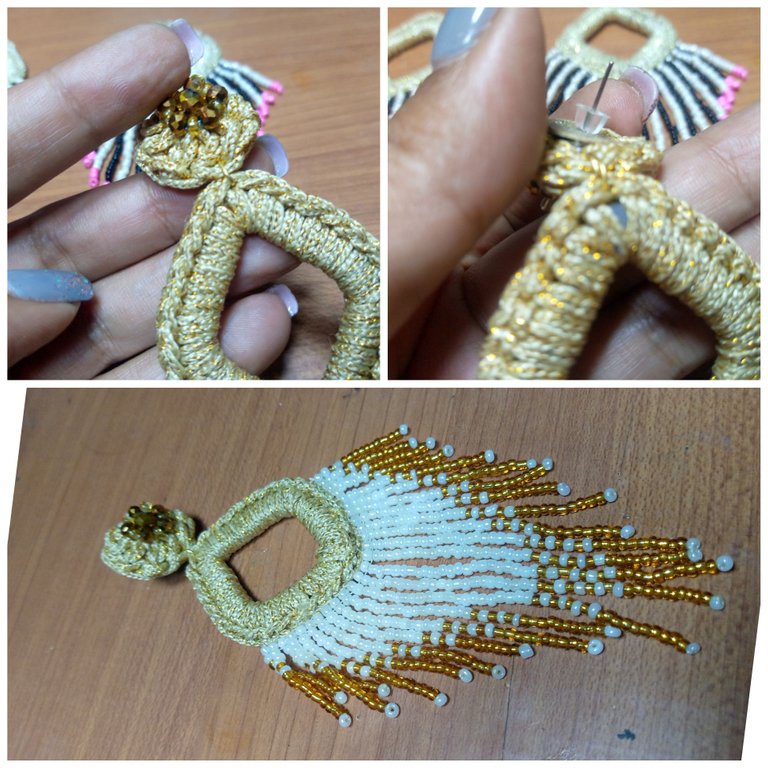
La parte de arriba para completar el zarcillo les coloque la pieza tejida que les mostre en la publicacion anterior, la sujete con un pequeño aro de bisuteria, y lo adorne con algunos cristales checos, por ello realice mucho enfasis en que le prestes atencion, ya que esta pieza la utilizaremos para gran cantidad de piezas diferentes.
The top part to complete the tendril I placed the knitted piece I showed you in the previous post, fasten it with a small costume jewelry ring, and embellish it with some Czech crystals, so I emphasized that you should pay attention to it, since this piece will be used for a lot of different pieces.
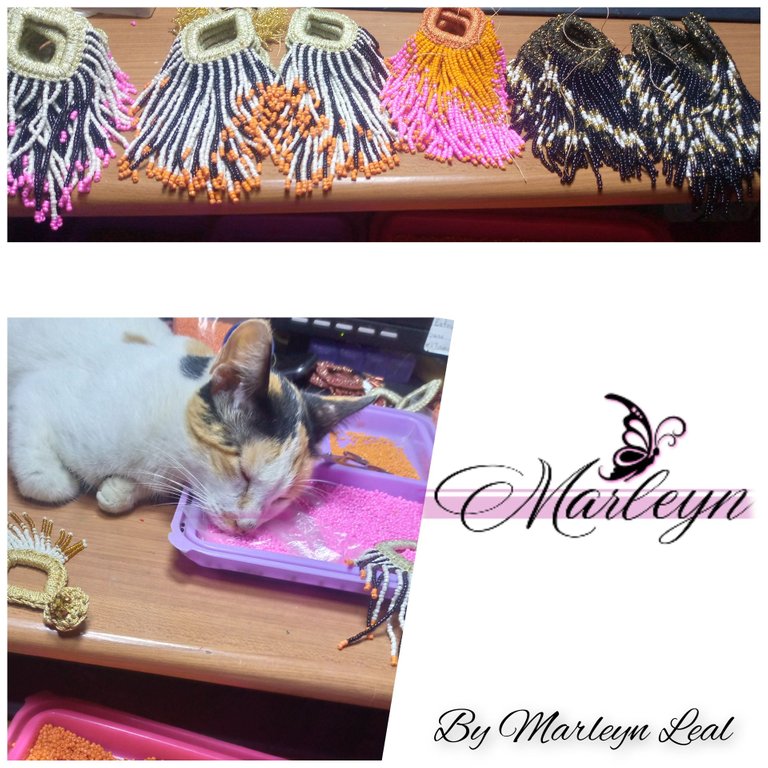
Hasta el dia de hoy llevo 24 pares listos, Luna siempre me acompaña, es mi compañera fiel! Gracias por leerme, por estar aquí! espero este trabajo me deje muchos frutos y materiales para seguir creando... Nos leemos pronto, Recuerda sigue creciendo, aprendiendo, creando e innovando! Tu puedes con todo.
To date I have 24 pairs ready, Luna always accompanies me, she is my faithful companion! Thank you for reading me, for being here! I hope this work leaves me many fruits and materials to continue creating... See you soon, remember to keep growing, learning, creating and innovating! You can do it all.


IMAGENES CREADAS EN CANVA
IMAGES CREATED IN CANVA
Recordé que tengo algunos rombos aquí, son algo más grueso, pero podría hacer un intento a ver cómo se ven.
Están quedando muy lindos. Trabajar con este tipo de flecos te mantendrá unas cuantas horas ocupada.
Feliz fin de semana 🙋🤗🌷
Gracias @creacioneslelys , me alegro que te gusten! Me Muestras como te queda si lo intentas! Por favor,que de seguro será hermoso.
Siii 😂 estaré ocupada muchas horas en realidad, lo más importante es que me gusta hacerlo.
Hija esto esta hermoso! Soy feliz de saberte feliz y mas que un trabajo es tu pasión... sigue asi @marleyn
Ahh.... 🥰🤩 Gracias @migda
The rewards earned on this comment will go directly to the people sharing the post on Twitter as long as they are registered with @poshtoken. Sign up at https://hiveposh.com.
@marleyn eres una artista de verdad, se.nota la pasión con la que haces tus accesorios, son de ensueño, los vi y pensé dignos de una miss Venezuela, de verdad te felicito porque tienes.un don de creación maravilloso.
@hive-189504 Muchas gracias por tus palabras, me motivas cada día 🥰🙏
Congratulations @marleyn! You have completed the following achievement on the Hive blockchain and have been rewarded with new badge(s):
Your next target is to reach 2250 replies.
You can view your badges on your board and compare yourself to others in the Ranking
If you no longer want to receive notifications, reply to this comment with the word
STOPCheck out the last post from @hivebuzz:
Support the HiveBuzz project. Vote for our proposal!
@tipu curate 2
Upvoted 👌 (Mana: 35/55) Liquid rewards.
Gracias @sharminmim
This may look simple to the eye but dear, it will be very difficult as it will be taken much time and energy to make. They look great.
@apunawu Thank you very much for your words
Me gustaron mucho los zarcillos!! Esto es un magnífico y gran trabajo!! <3
Gracias @mariamglow me alegro que te gusten! Este pedido me a llegado mucho tiempo más del esperado, aunque al ver que gusta tanto, es satisfactorio realizarlo.
Thank you for sharing this amazing post on HIVE!
Your content got selected by our fellow curator @rezoanulvibes & you just received a little thank you via an upvote from our non-profit curation initiative!
You will be featured in one of our recurring curation compilations and on our pinterest boards! Both are aiming to offer you a stage to widen your audience within and outside of the DIY scene of hive.
Join the official DIYHub community on HIVE and show us more of your amazing work and feel free to connect with us and other DIYers via our discord server: https://discord.gg/mY5uCfQ !
If you want to support our goal to motivate other DIY/art/music/homesteading/... creators just delegate to us and earn 100% of your curation rewards!
Stay creative & hive on!
Thank you 🤩
Que trabajo tan hermoso, me encantó 💗
Congratulations @marleyn! You received a personal badge!
You can view your badges on your board and compare yourself to others in the Ranking
Check out the last post from @hivebuzz:
Support the HiveBuzz project. Vote for our proposal!