ESP-ING 📿Tutorial: Cómo hacer un lindo y extravagante collar con canutillos y mostacillas.📿//ENG-ING 📿Tutorial: How to make a cute and extravagant necklace with beads and beads.📿
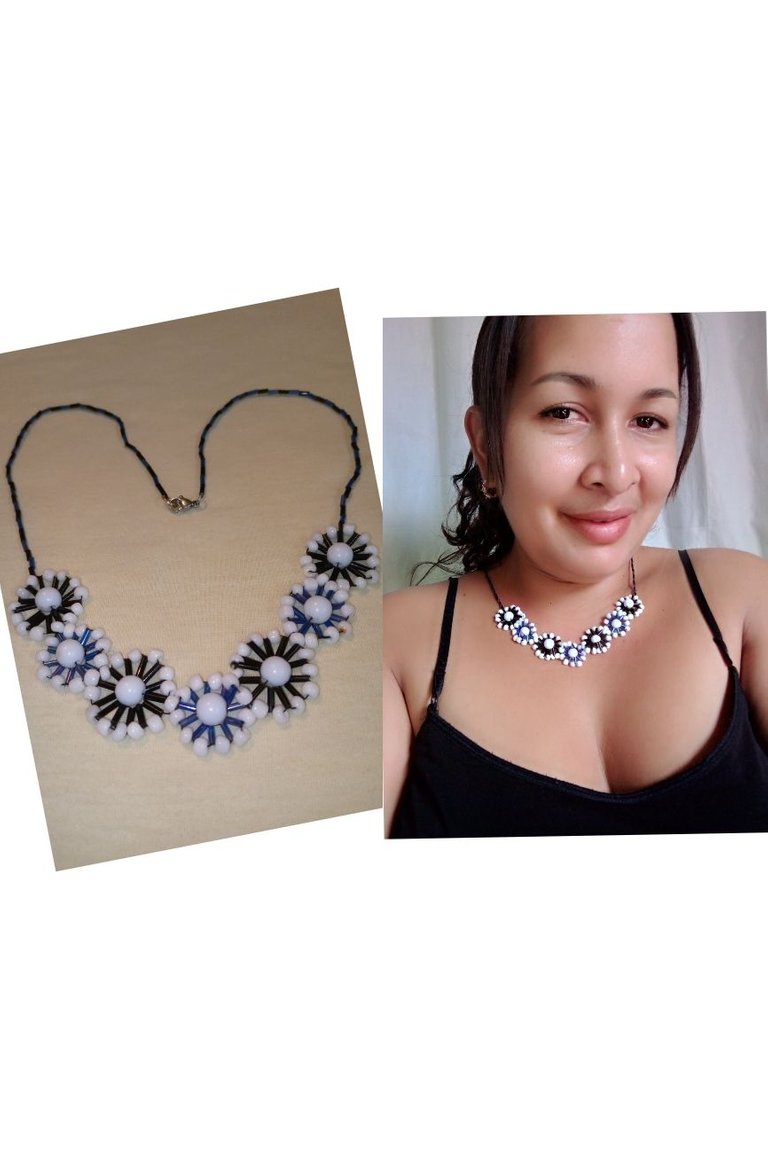
Hola mi querida comunidad de #jewelry, feliz tarde para todos y y feliz jueves, espero que todos la estén pasando bien en este día acompañado de sus seres más queridos y disfrutando del primer día del último mes del año, un mes donde todos nos llenamos de nostalgia, alegría, amor y unión, yo me siento muy agradecida por estar aquí una vez más compartiendo esta vez un tutorial donde les mostraré como diseñe y cree un hermoso collar cómo estás sillas y canutillos en color blanco, negro y azul, les cuento qué me llevo casi todo un día Por hacerlo debido a su tejido que aunque se vea difícil es muy fácil lo que tenemos es que tener paciencia y dedicación para lograr el resultado deseado y a la final a mí me encantó y espero que a ustedes les guste también por eso sin darle más largas a esto les diré los materiales qué utilizado para crear este extravagante collar.
Hello my dear #jewelry community, happy afternoon to all and happy Thursday, I hope everyone is having a good time on this day accompanied by their loved ones and enjoying the first day of the last month of the year, a month where we are all filled with nostalgia, joy, love and togetherness, I feel very grateful for being here once again, this time sharing a tutorial where I will show you how to design and create a beautiful necklace, how are you, chairs and beads in white, black and blue, I will tell you what It took me almost a whole day to do it because of its fabric that although it looks difficult is very easy what we have is to have patience and dedication to achieve the desired result and in the end I loved it and I hope you like it too for That without giving any longer to this I will tell you the materials used to create this extravagant necklace.
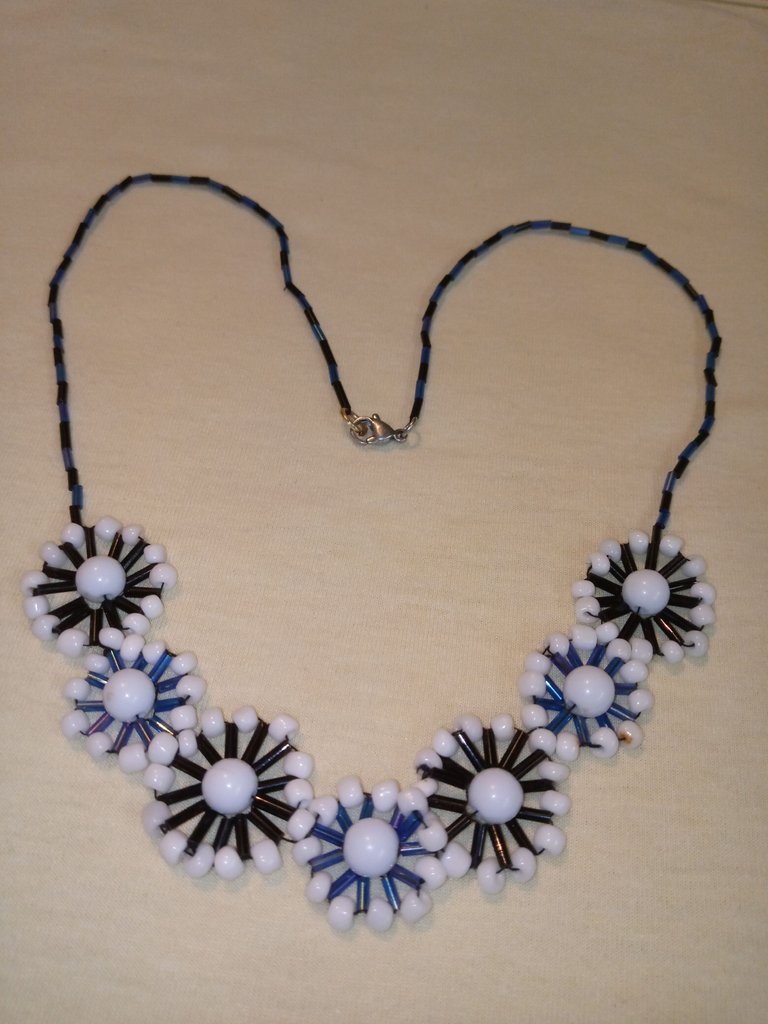
MATERIALES
📿 CANUTILLOS NEGROS
📿 CANUTILLOS AZUL
📿 MOSTACILLAS BLANCAS
📿 AGUJA
📿 HILO NYLON 0.25
📿 PASADOR
📿 PERLAS BLANCAS.
MATERIALS
📿 BLACK BEADS
📿 BLUE BEADS
📿 WHITE MUSTERS
📿 NEEDLE
📿 NYLON THREAD 0.25
📿 PIN
📿 WHITE PEARLS.
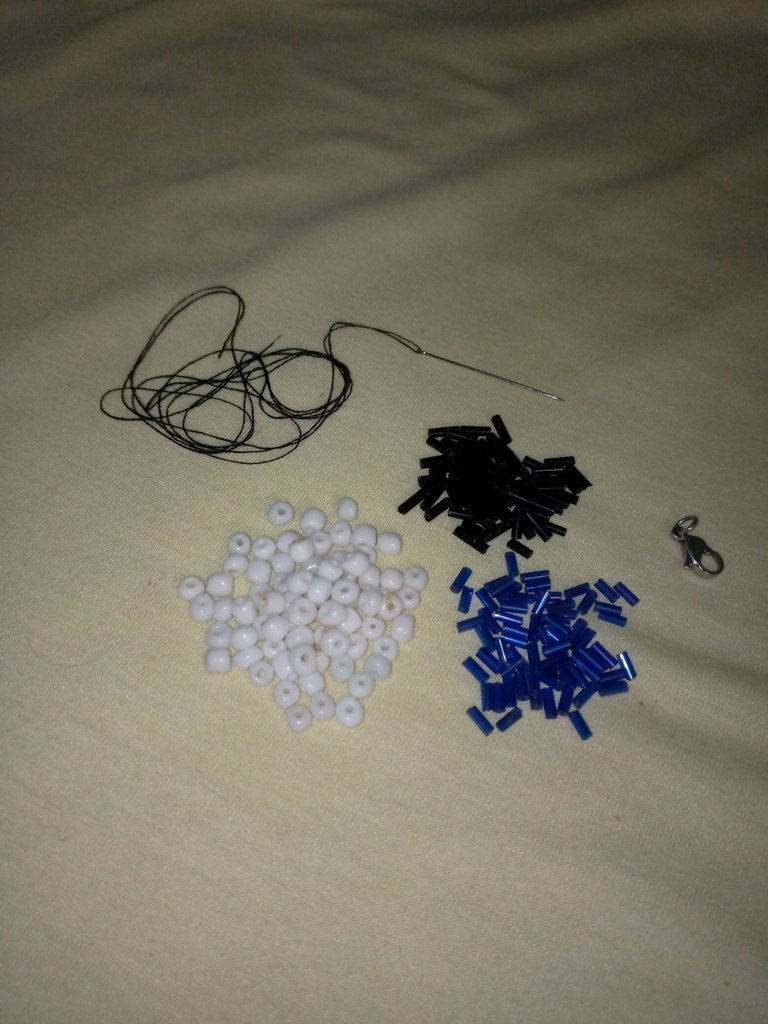
PASO A PASO
DISEÑA Y CREA
Amigos antes de empezar con la creación de este collar quiero decirle que él hilo ideal para realizar este trabajo es el hilo nylon 0.25, yo no lo pude realizar con ese porque no contaba con la cantidad suficiente pero no quería perder la oportunidad para mostrarle lo lindo que queda este collar hecho con canutillos mostacilla y perlas, un trabajo un poco largo pero con un resultado satisfactorio, así que comencemos.
STEP BY STEP
DESIGN AND CREATE
Friends, before starting with the creation of this necklace, I want to tell you that the ideal thread to carry out this work is the 0.25 nylon thread, I could not do it with that one because I did not have enough but I did not want to miss the opportunity to show you how beautiful What remains is this necklace made with beads and pearls, a bit long work but with a satisfactory result, so let's begin.
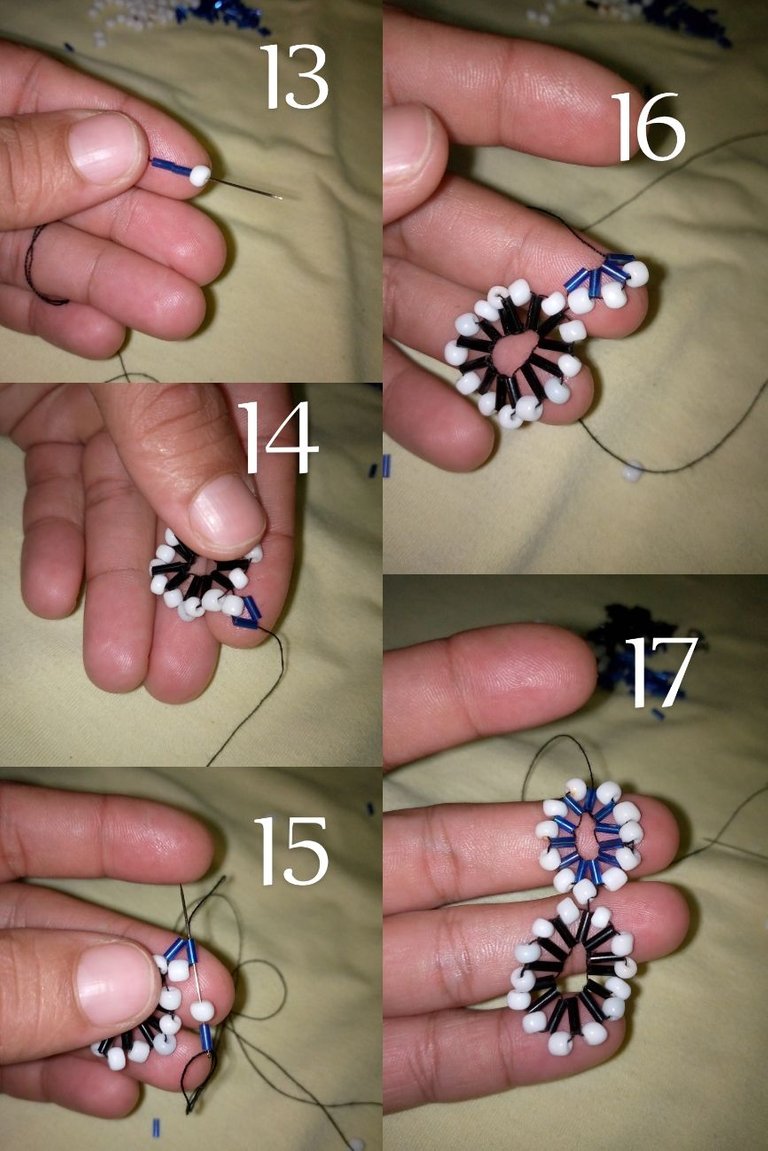
Lo primero que hice fue colocar a mi aguja 2 metros aproximadamente de hilo y empiezo a colocar un canutillo negro, una mostacilla blanca y un canutillos negro esto lo colocó al final del hilo y amarrado con nudos y corto el pedacito de hilo restante que queda.
The first thing I did was place approximately 2 meters of thread on my needle and I begin to place a black tube, a white bead and a black tube, this was placed at the end of the thread and tied with knots and I cut the remaining bit of thread that remains.
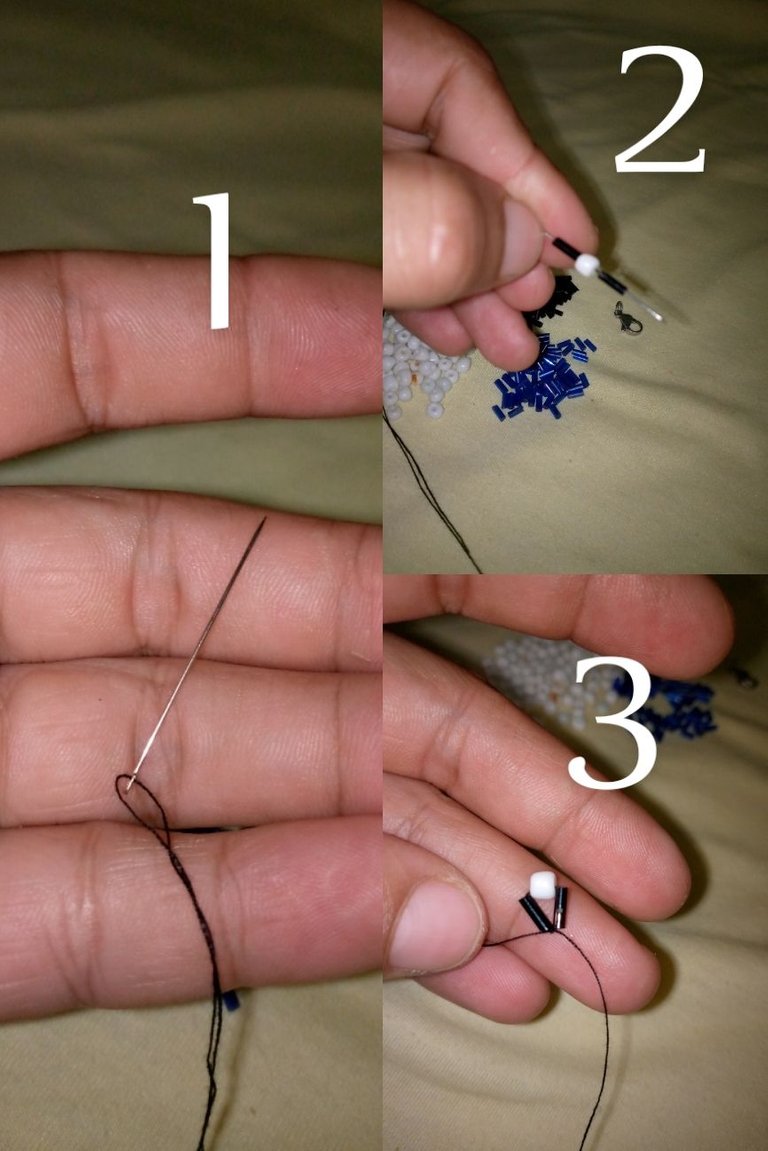
Luego coloque al aguja una mostacilla blanca y un canutillo negro y pase la aguja por el lado contrario de donde sale el hilo y me va quedando de esta manera.
Then put a white bead and a black tube on the needle and pass the needle on the opposite side from where the thread comes out and it ends up like this.
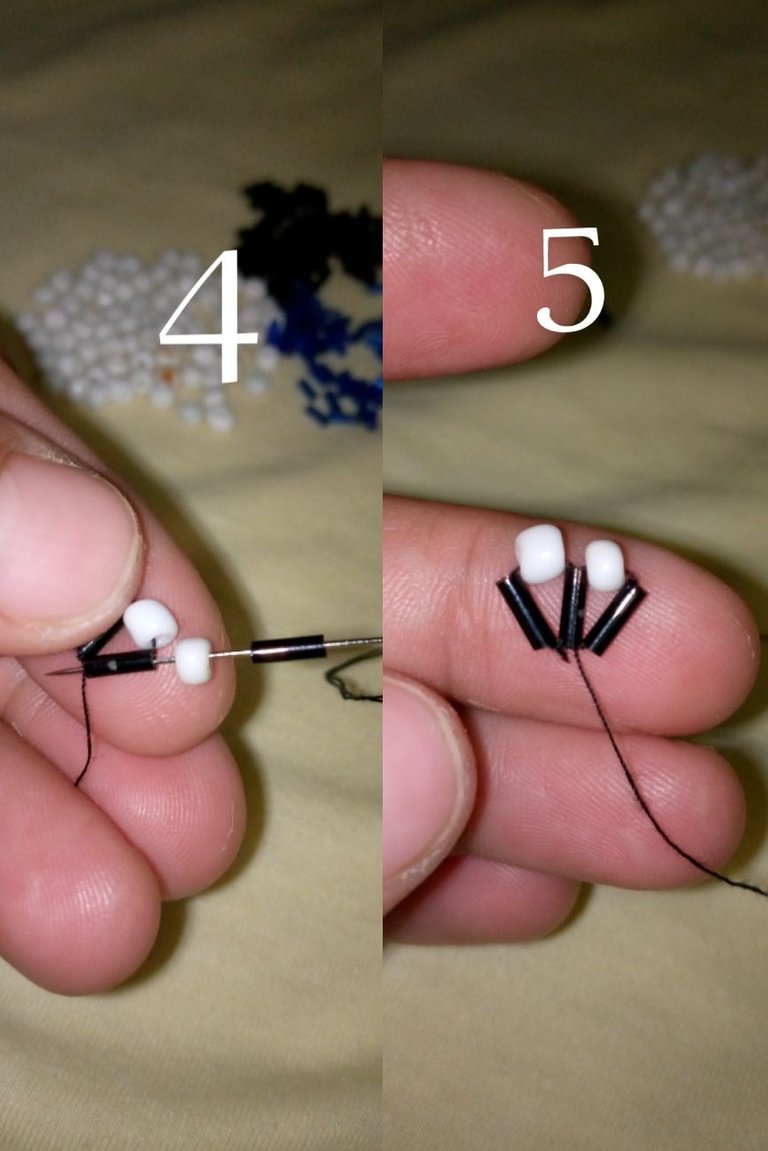
Continúa colocando al aguja ahora de manera contraria primero el canutillo y luego la mostacilla y paso de nuevo la aguja de lado contrario de dónde sale el hilo, este paso viene siendo de aquí en adelante el mismo lo único que lo diferencia es cuando vas a pasar el hilo de abajo hacia arriba tienes que colocar primero el canutillo antes que la mostacilla y si es de arriba hacia abajo tendrías que colocar primero la mostacilla y luego el canutillo y así repetimos hasta lograr hacer el círculo de canutillos.
Continue placing the needle now in the opposite way, first the comb and then the bead and pass the needle again on the opposite side where the thread comes from, this step has been the same from now on, the only difference is when you are going to pass the thread from the bottom up you have to place the bead first before the bead and if it is from the top to the bottom you would have to place the bead first and then the bead and we repeat like this until we achieve the circle of beading.
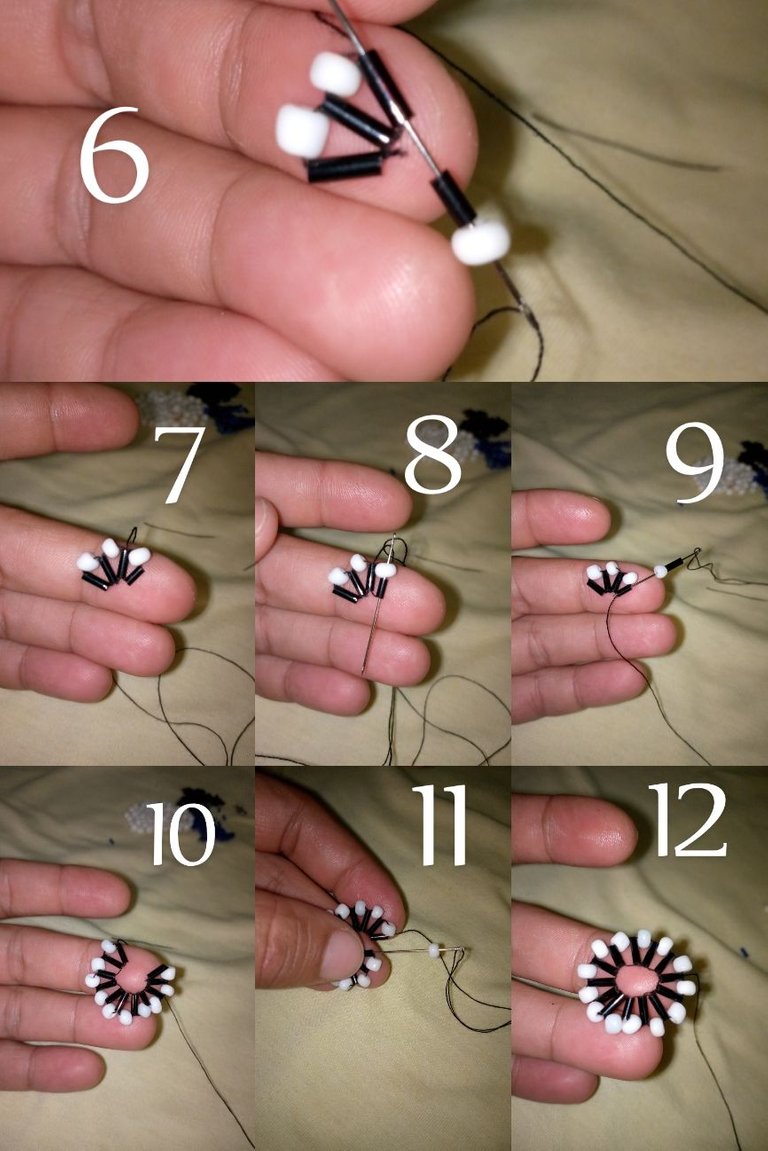
Ya con el primer aro formado sacamos el hilo por un canutillo y empezamos a colocar una mostacilla y ahora dos canutillos azules y pasamos la aguja por la mostacilla de regreso y empezamos a repetir los mismos pasos anteriores dependiendo de dónde sale el hilo colocamos la mostacilla y el canutillo sí el hilo está saliendo por la parte de abajo y si sale por la parte de arriba colocamos primero
La mostacilla y luego el canutillo y este pasó lo volvemos a repetir hasta terminar el segundo aro ahora en color azul.
With the first ring formed, we take the thread out through a bead and begin to place a bead and now two blue beads and we pass the needle through the bead back and begin to repeat the same previous steps depending on where the thread comes out, we place the bead and the tube, yes the thread is coming out from the bottom and if it comes out from the top we place it first
The bead and then the bead and this happened we repeat it again until finishing the second ring now in blue.
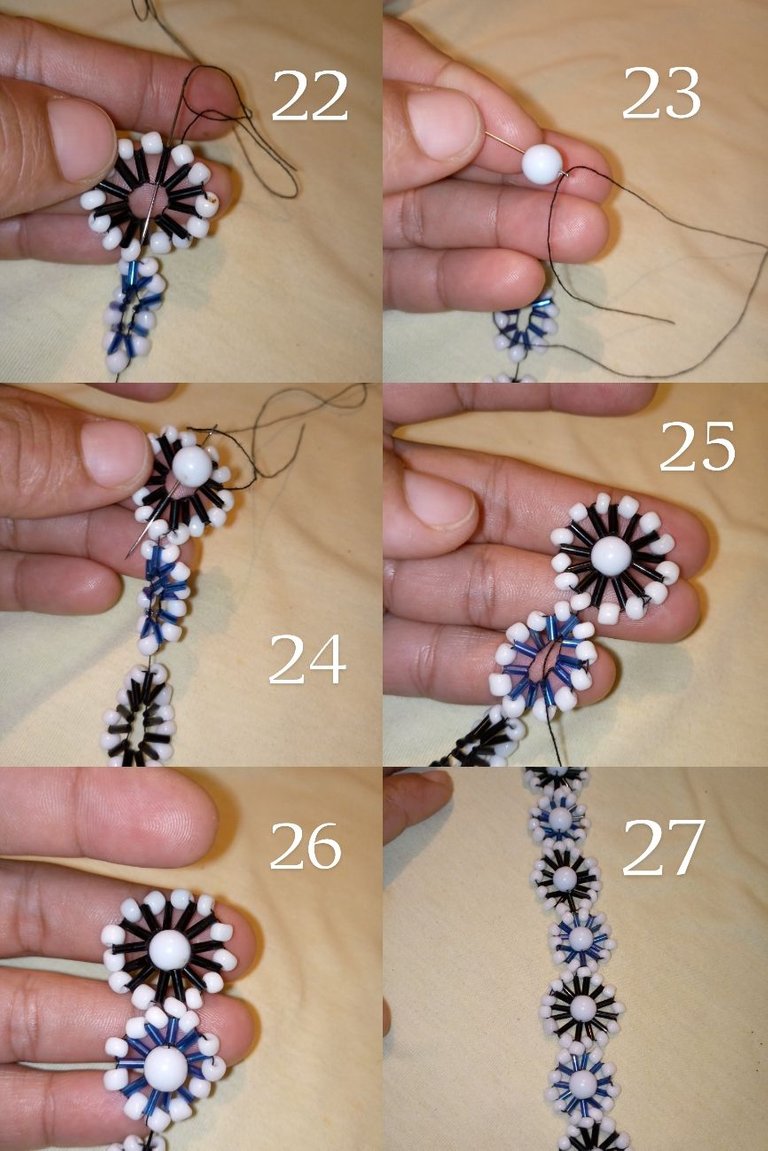
Y así vamos repitiendo todos los pasos hasta lograr colocar los aros que deseamos.
And so we repeat all the steps until we can place the rings we want.
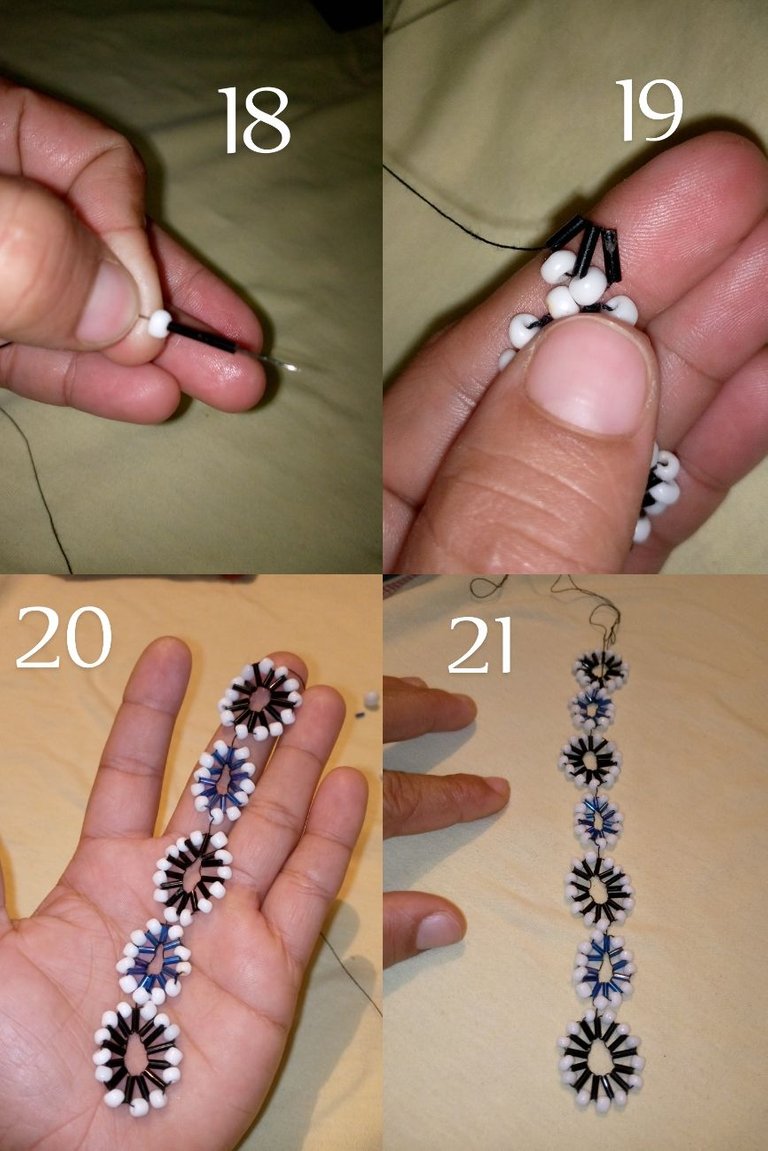
Después de tener los aros listo regresamos el hilo por un canutillo que quede justo en el medio y aquí empezamos a colocarle las perlas blancas vamos a pasar el hilo por todos los canutillos que estar en el centro hasta lograr colocar todas las perlas en el centro de cada círculo.
After having the earrings ready, we return the thread through a tube that is right in the middle and here we begin to place the white pearls, we are going to pass the thread through all the tubes that are in the center until we are able to place all the pearls in the center of each circle.
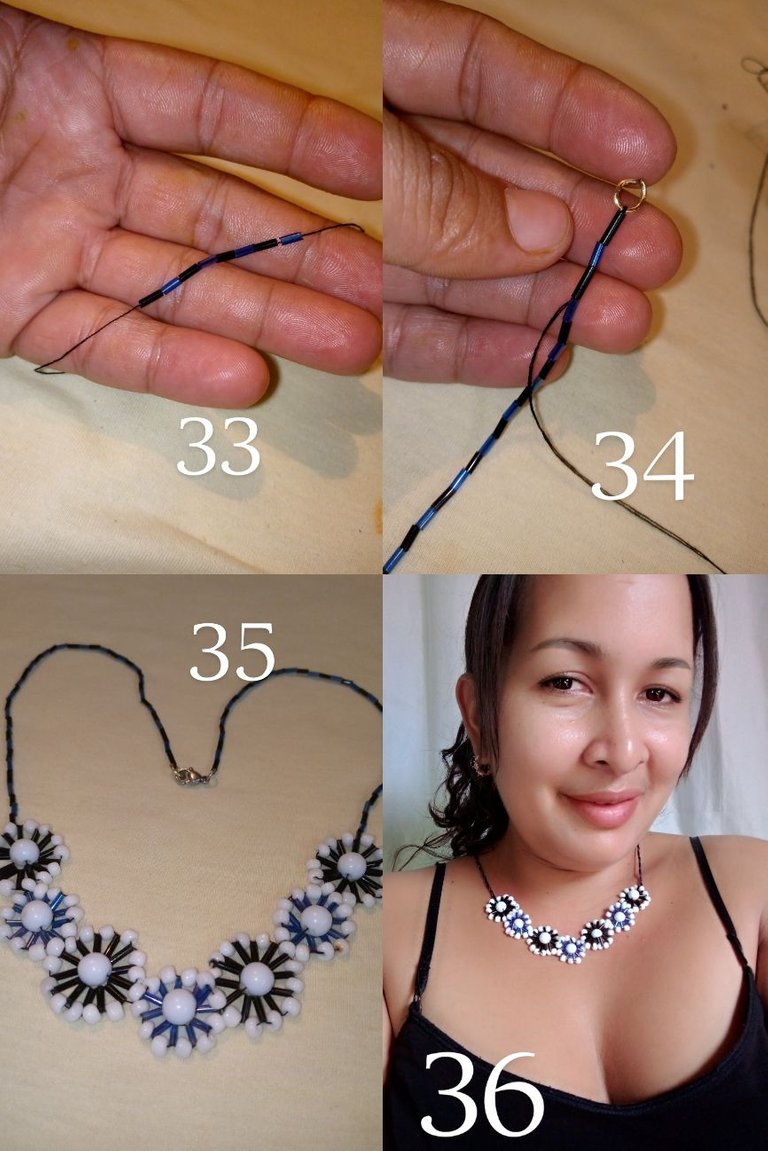
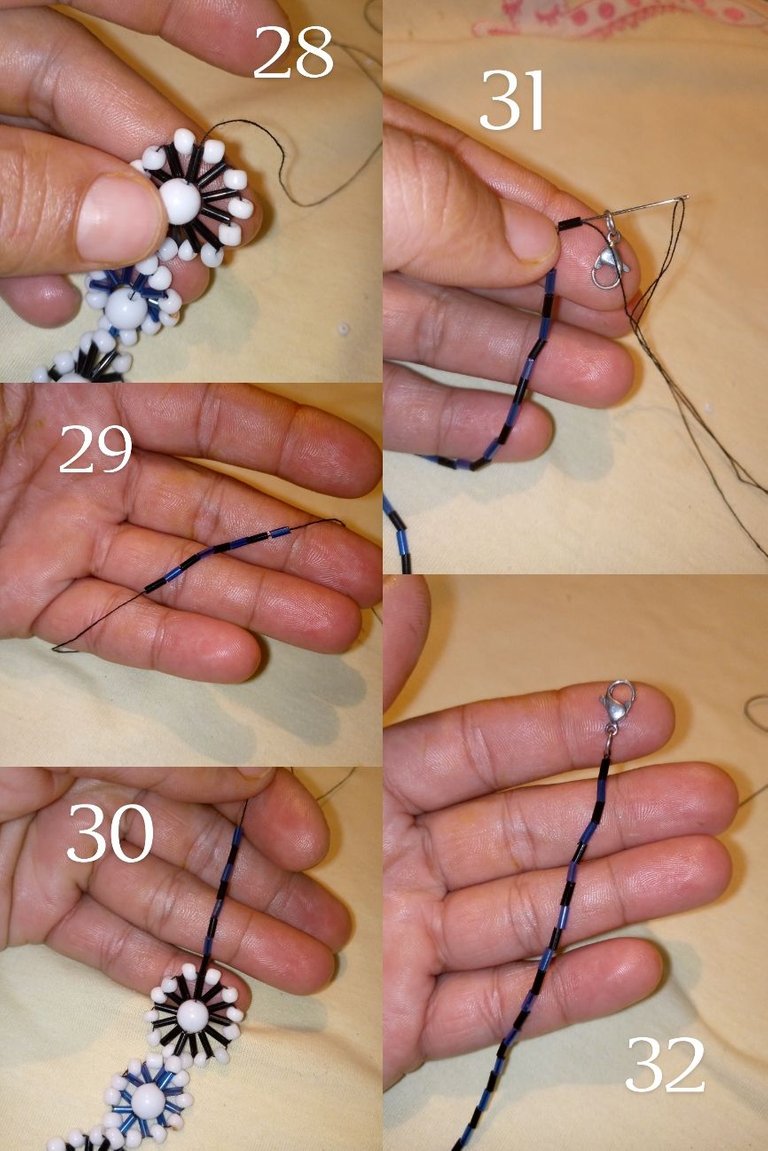
Ya colocada todas las perlas sacamos el hilo nuevamente por un canutillo que queda al medio ahora para colocar canutillos en los dos tonos qué creamos los círculos y formar una cadenita de un lado y aprovecho para colocarle el pasador.
Once all the pearls have been placed, we take the thread out again through a string that is in the middle now to place strings in the two tones that we create the circles and form a chain on one side and I take the opportunity to place the pin.
Repito lo mismo del otro lado formó la cadena colocando canutillos de los dos colores y aprovecha y colocó el árbol de metal y listo ya terminamos este lindo y extravagante collar de canutillos, espero que de verdad le guste este trabajo me despido de ustedes será hasta una próxima ocasión y gracias por visitar mi blog. Saludos
I repeat the same thing on the other side, he formed the chain by placing beads of the two colors and took advantage of it and placed the metal tree and that's it we finished this beautiful and extravagant necklace of beads, I hope you really like this work I say goodbye to you it will be until one next time and thanks for visiting my blog. Cheers
Todas las fotos son mías.
All the photos are mine.
@mariaj151305
Que hermoso trabajo amiga @mariaj151305 , se ve muy bonito, felicitaciones
Thank you for sharing this post on HIVE!
Your content got selected by our fellow curator rezoanulvibes & you just received a little thank you upvote from us for your great work! Your post will be featured in one of our recurring compilations which are aiming to offer you a stage to widen your audience within the DIY scene of Hive. Next time make sure to post / cross-post your creation within the DIYHub community on HIVE and you will receive a higher upvote ;) Stay creative & HIVE ON!
Please vote for our hive witness <3
De veras te quedó estupendo @mariaj151305, insertar canutillos y Mostacillas para realizar ese hermoso collar es EXTRAVAGANTE , feliz inicio de navidad, saluditos.
Lindo collar las flores te quedaron muy bonita y con esos colores combina perfecto
Gracias amiga @leidys01 me alegra que te haya gustado gracias por visitar mi blog.
The rewards earned on this comment will go directly to the people sharing the post on Twitter as long as they are registered with @poshtoken. Sign up at https://hiveposh.com.
Use #diy tag to earn BUIDL tokens