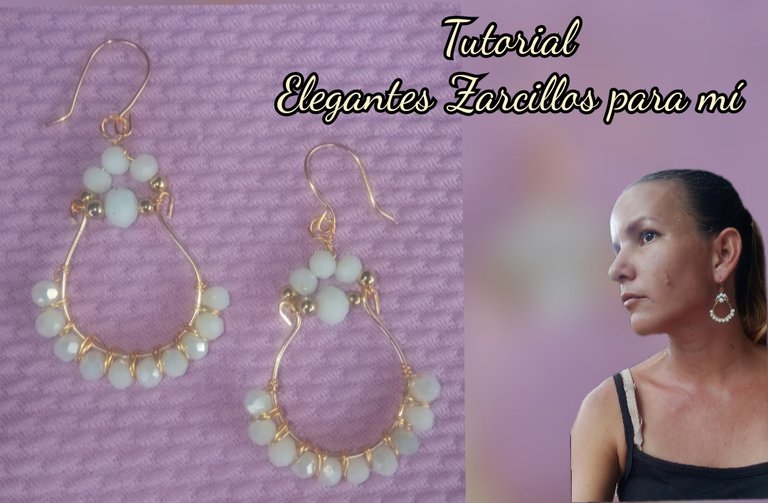
Feliz y bendecido día tengan todos ustedes, espero hayan tenido una semana muy productiva y puedan disfrutar este fin de semana en compañía familiar en esta oportunidad tengo gran placer de poder compartir nuevamente con todos ustedes uno de mis sencillas creaciones y en esta oportunidad se trata de unos muy hermosos zarcillos que elaboré para mi uso personal. Pues les confieso que desde siempre he sido amante de los zarcillos largos sin embargo debido en el problema que tengo en una de las perforaciones en mi oreja he tenido que dejar de usarlos pues el peso me ha causado daño por lo que el día de hoy decidí elaborar unos zarcillos que a pesar de ser un poco largos son súper cómodos y muy livianos e intentaré usarlo.
Have a happy and blessed day all of you, I hope you have had a very productive week and can enjoy this weekend in family company. On this occasion I have great pleasure to be able to share with you all again one of my simple creations and this time it is about some very beautiful tendrils that I made for my personal use.
Well, I confess that I have always been a lover of long earrings, however, due to the problem I have with one of the piercings in my ear, I have had to stop using them because the weight has caused me damage, so today I decided I made some earrings that, despite being a little long, are super comfortable and very light and I will try to use them.
This is a very easy design to make, I want to invite you on this occasion to join me so that you can then make your own accessories from home.
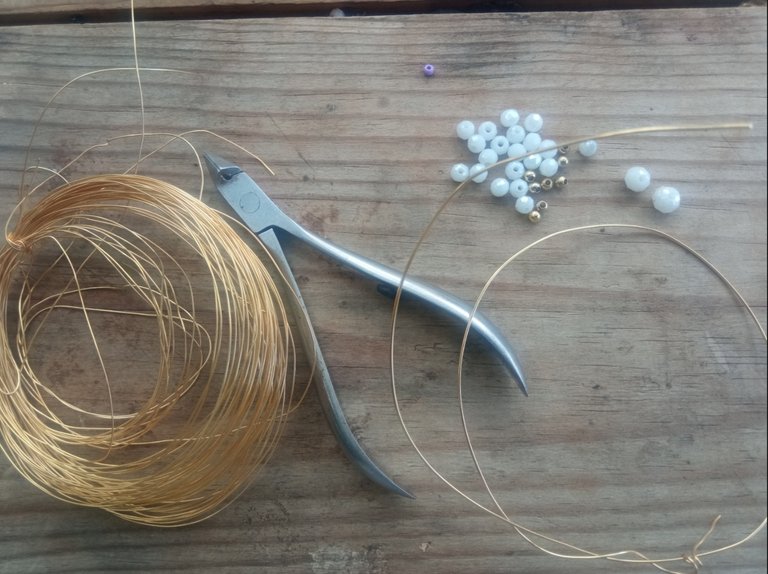
- alambre de bisutería calibre 20.
- alambre de bisutería calibre 26.
- cristales blancos pequeños.
- cristales blancos medianos.
- balines dorados pequeños.
- Pinza de bisutería.
- 20 gauge jewelry wire.
- 26 gauge jewelry wire.
- small white crystals.
- medium white crystals.
- small golden pellets.
- Jewelry clamp.
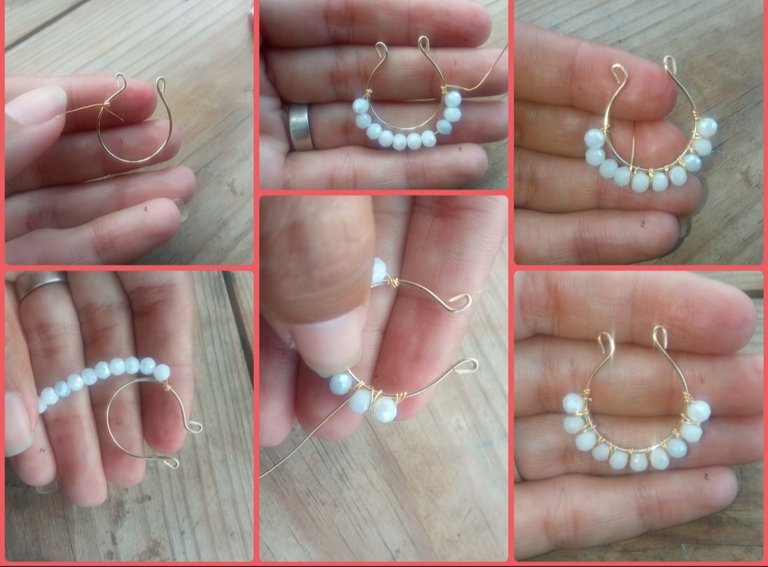
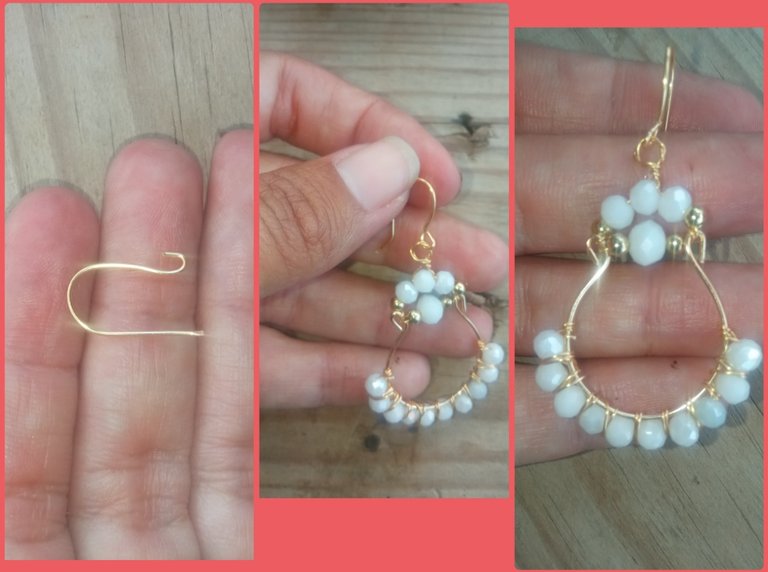
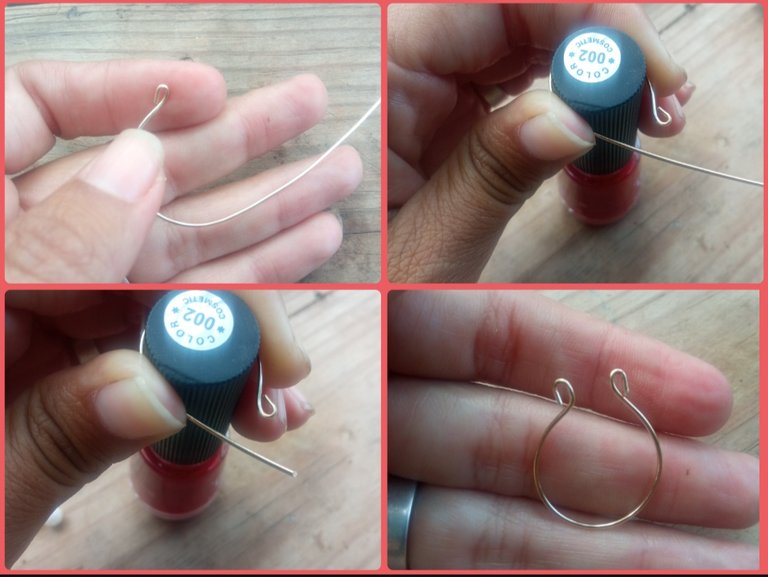
⭐ Paso 1: para iniciar la elaboración de este lindo diseño tomaremos el alambre de bisutería calibre 20 y en su punta con ayuda de la pinza de bisutería elaboraremos un pequeño doblez como pueden observar en las siguientes imágenes y luego apoyándonos en un objeto cilíndrico y cómo pueden observar yo utilicé la tapa de una pintura de uñas elaboraremos una forma semicircular llevándolo hasta unirlo con la otra punta y cortaremos el exceso de alambre calibre 20 y en esta punta también elaboraremos una forma de igual manera que laboramos en la punta anterior. Esta será la base de nuestro zarcillo y dependiendo del tamaño en que deseen realizarlo pueden usar una base un cilindro más grande o más pequeño según sean sus gustos.
⭐ Step 1: to begin the elaboration of this beautiful design we will take the 20 gauge jewelry wire and at its tip with the help of the jewelry tweezers we will make a small bend as you can see in the following images and then leaning on an object cylindrical and as you can see, I used the cap of a nail paint. We will make a semicircular shape by bringing it together with the other end and we will cut the excess 20 gauge wire and at this end we will also make a shape in the same way as we worked on the previous tip.
This will be the base of our tendril and depending on the size you want to make it, you can use a larger or smaller cylinder base depending on your tastes.
⭐ Paso 2: seguidamente tomaremos un pedazo de alambre de bisutería calibre 26 y lo uniremos a la base enrollándolo en uno de sus lados y por este alambre y creemos 10 cristales blancos pequeños y moldearemos la forma de la base y sujetaremos este alambre en el otro extremo de la base como pueden observar en las imágenes. Sin cortar el exceso de alambre comenzaremos nuevamente con este a intercalarlos entre las piedras para sujetarlas a la base y así también realizar una hermosa decoración que le daría un poco más de belleza y brillo a nuestro diseño, iremos intercalando realizando dos vueltas entre cada cristales hasta llegar al último cristal.
⭐ Step 2: next we will take a piece of 26 gauge jewelry wire and attach it to the base by rolling it on one of its sides and along this wire and create 10 small white crystals and we will mold the shape of the base and hold this wire at the other end of the base as you can see in the images.
Without cutting the excess wire we will begin again with this to intersperse them between the stones to attach them to the base and thus also make a beautiful decoration that would give a little more beauty and shine to our design, we will intersperse them making two turns between each crystals until reach the last crystal.
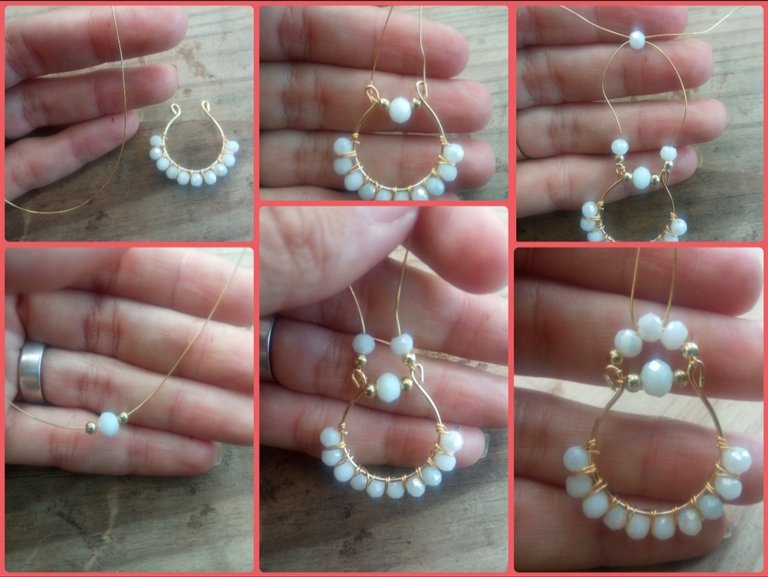
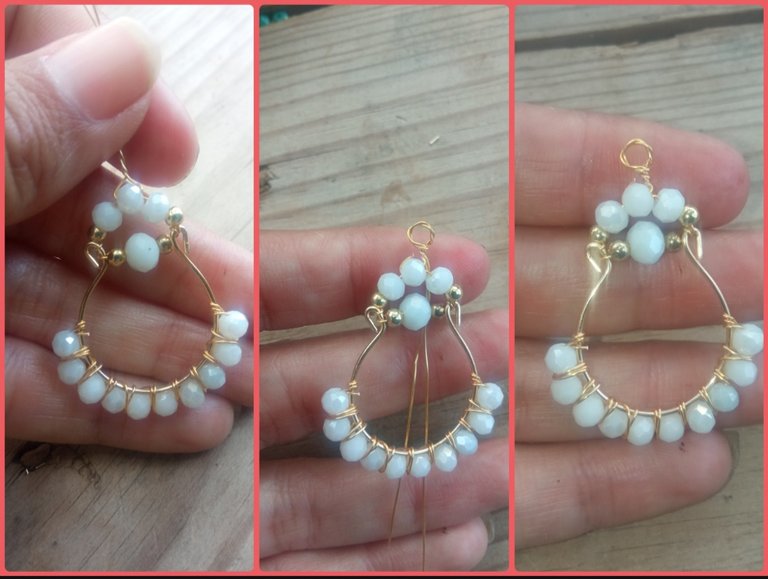
⭐ Paso 3: para continuar tomaremos 15 cm de alambre sería calibre 26 e introduciremos un balín dorado un cristal mediano y otro balín dorado los cuales colocaremos a mitad de esta hebra de este alambre, es que lo llevaremos hasta nuestra base y colocando esta pedrería en el medio de la parte superior donde están los dobleces de las puntas el alambre enrollaremos cada extremo en uno de los dobles de la base y el exceso de estas dos hebras de alambre la dejaremos colocadas hacia arriba e introduciremos por cada una de ellas un balín dorado y un cristal pequeño luego por una de ellas introduciremos otro cristal pequeño y tomaremos la otra hebra y la introduciremos intercalándola de un lado hacia el otro por la misma piedra o cristal para halar luego las dos hebras de cada lado y nos quede la siguiente forma que observarán en las imágenes. Nuevamente llevaremos los excesos del alambre hacia la parte superior de este último cristal y los uniremos en una sola hebra para luego con ayuda de un pequeño palillo elaborar una forma de argolla circular encima del cristal.
⭐ Step 3: to continue we will take 15 cm of wire, it would be 26 gauge and we will introduce a golden ball, a medium crystal and another gold ball which we will place in the middle of this strand of this wire, we will take it to our base and place We will wind this rhinestone in the middle of the upper part where the bends of the tips are. We will wind each end of the wire in one of the doubles of the base and we will leave the excess of these two strands of wire placed upwards and we will introduce it through each of them. a golden ball and a small crystal, then through one of them we will introduce another small crystal and we will take the other strand and we will insert it, alternating it from one side to the other through the same stone or crystal to then pull the two strands on each side and we are left with the following way that you will see in the images.
Again we will take the excess wire towards the top of this last crystal and join them into a single strand and then with the help of a small toothpick create a circular ring shape on top of the crystal.
⭐ Paso 4: por último tomaremos un pedazo de alambre 20 y moldearemos dando forma al anzuelo para nuestros arcillos el cual uniremos a nuestra elaboración enganchándola en la pequeña argolla que realizamos en la parte superior de nuestro pendiente y así culminaremos este hermoso diseño.
⭐ Step 4: finally we will take a piece of 20 wire and we will shape the hook for our clays which we will join to our creation by hooking it in the small ring that we made in the upper part of our earring and thus we will complete this beautiful design .
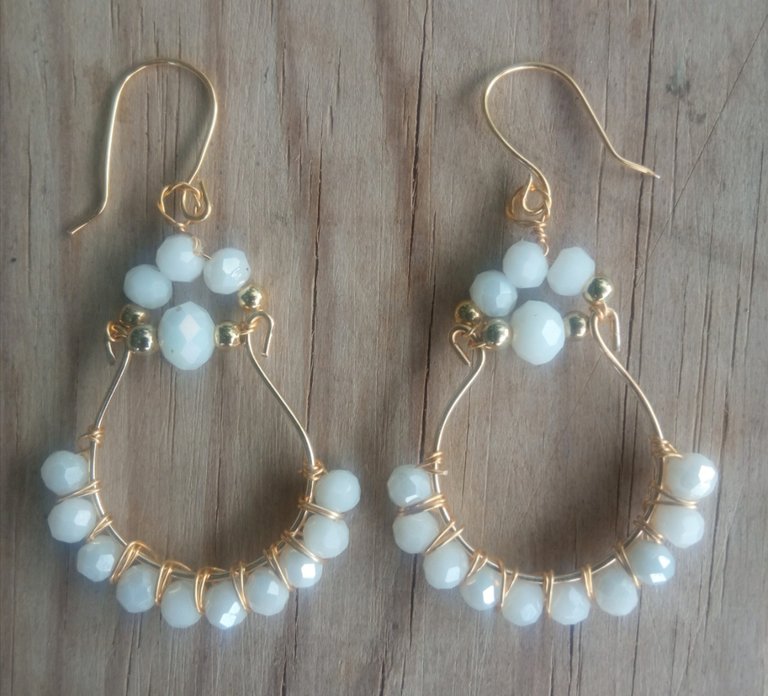
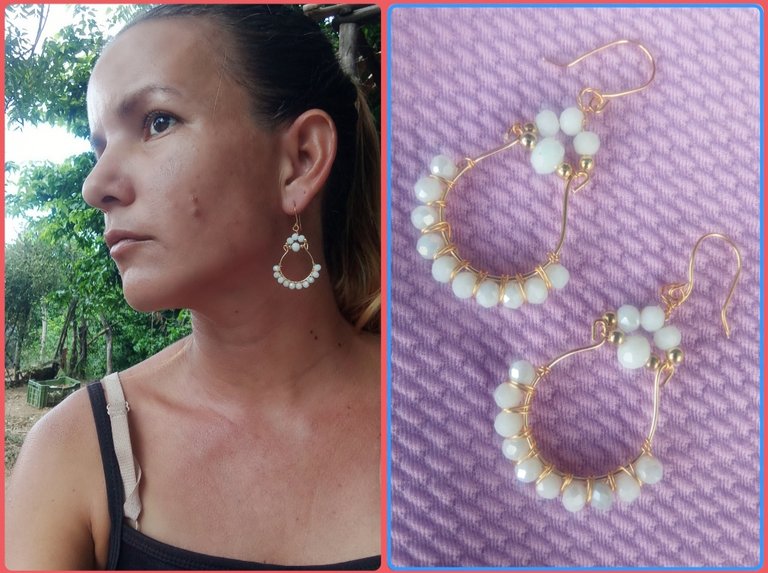
Mis queridos y apreciados amigos esta ha sido mi elaboración de hoy para todos ustedes la cual Espero te haya sido de su gusto y agrado, me despido agradeciéndoles por su visita y Esperando poder compartir con ustedes en una nueva oportunidad. Feliz fin de semana para todos.And in this super simple way we will achieve a very beautiful creation, says the employee, ideal to wear on special occasions. I can also assure you that they are super comfortable and very light.
Today I wanted to make this piece in white because that way I can combine it with any outfit, but I am totally sure that this piece can look beautiful in any color or act by combining it in multicolors.
Todas las Fotos son de mi autoría y fueron tomadas con mi Celular Redmi 9.My dear and appreciated friends, this has been my preparation today for all of you, which I hope has been to your liking. I say goodbye, thanking you for your visit and hoping to be able to share with you on a new opportunity.
Happy weekend everyone.
All Photos are my authorship and were taken with my Redmi 9 Cellphone
Posted Using InLeo Alpha
Lovely earrings
Un bellísimo trabajo muy prolijo y elegante, como el que siempre nos traes. Gracias por regalarnos tu proceso creativo...
!discovery 40
Muchas gracias, me alegra que te hayan gustado.
Saludos.
Very beautiful and elegant earrings, well crafted and well made. Thank you for giving us such excellent work, success
This post was shared and voted inside the discord by the curators team of discovery-it
Join our Community and follow our Curation Trail
Discovery-it is also a Witness, vote for us here
Delegate to us for passive income. Check our 80% fee-back Program
Un trabajo hermoso, unos zarcillos largos muy lindos y elegantes, te quedan hermosos, muchas veces hacemos bisutería y la mayor parte la vendemos, que bueno que estos son para ti es bueno darnos regalos de vez en cuando, felicidades, lindo trabajo.
Wow just the way I love it.
Wow you really tried oooo