It's time to make the girls fall in love, beautiful dangling earrings (DAISY ISLAND).
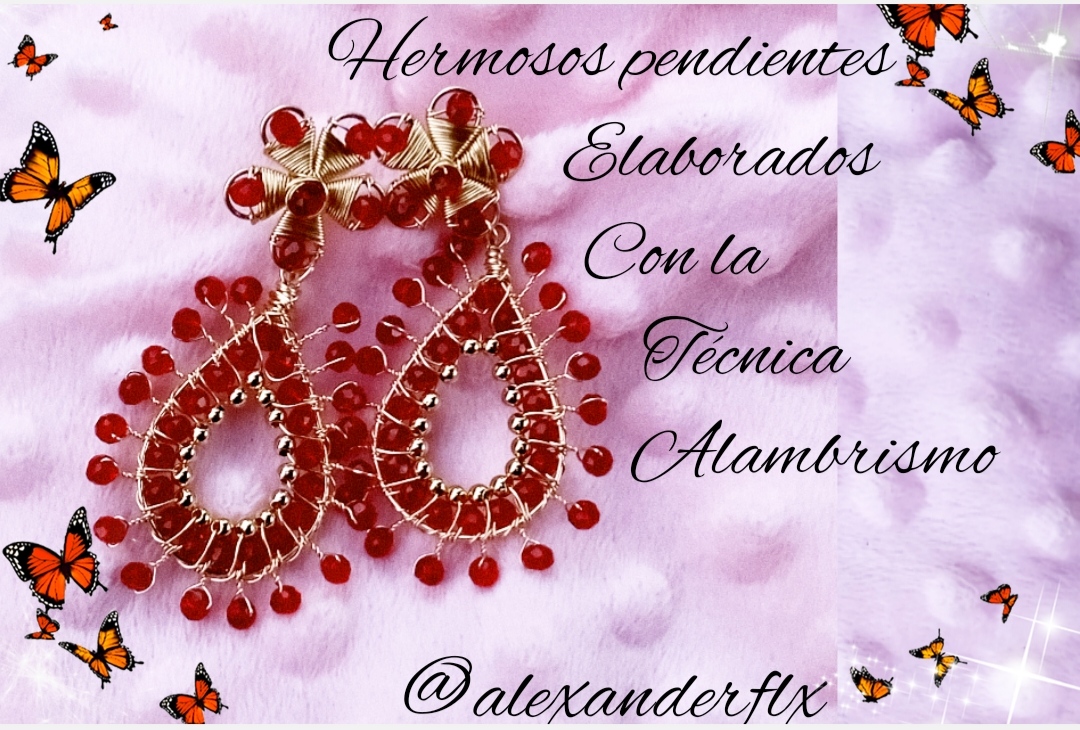
Hola buenas noches espero se cuentes bien feliz inicio de semana espero Allan pasado un excelente fin de semana la noche de hoy quiero invitarlo a mi blog el motivo es que quiero compartir con usted unos nuevos zarcillos muy lindos estos pendientes son de color rojo y también son colgantes están echo con la intención de usarlo en una ocasión especial o para una noche romántica espero a las chicas le guste están echo con mucho cariño y la verdad me dieron un poquito de trabajo como pueden ver llevan un poquito de piedras y mucho alambre pero no hay nada imposible, les invito a mi blog si les gusta alguna prenda todas están en venta soy de la isla de margarita 😀👌☺️😁🤗🥰🌹🍓👍😀
Hello good evening I hope you have a good start to the week I hope Allan had an excellent weekend tonight I want to invite you to my blog the reason is that I want to share with you some very cute new earrings these earrings are red and they are also pendants they are made with the intention of using it on a special occasion or for a romantic night I hope the girls like it they are made with a lot of love and the truth is they gave me a little work as you can see they have a little bit of stones and a lot wire but nothing is impossible, I invite you to my blog if you like any item they are all for sale I am from the island of Margarita 😀👌☺️😁🤗 🌹🍓👍😀
What do we need.
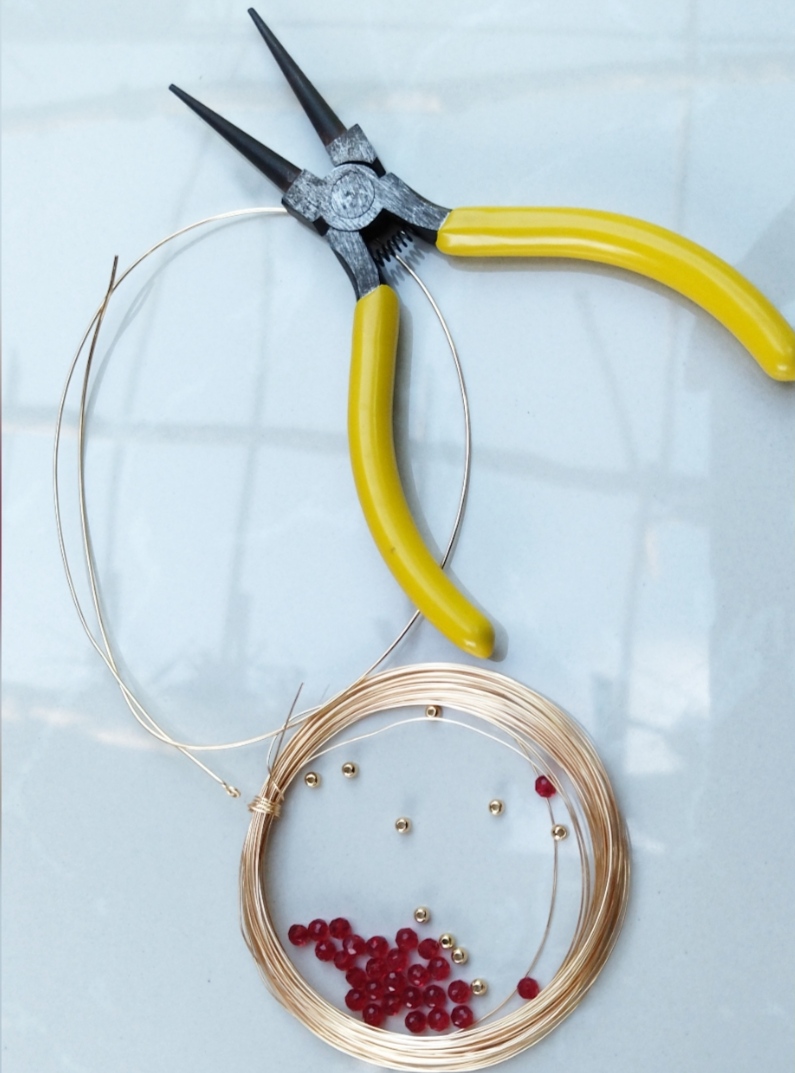
- cristales rojos
- alambre para visuteria calibre 20 . 26
- pinzas
red crystals
20 . ,26 gauge costume wire
tweezers
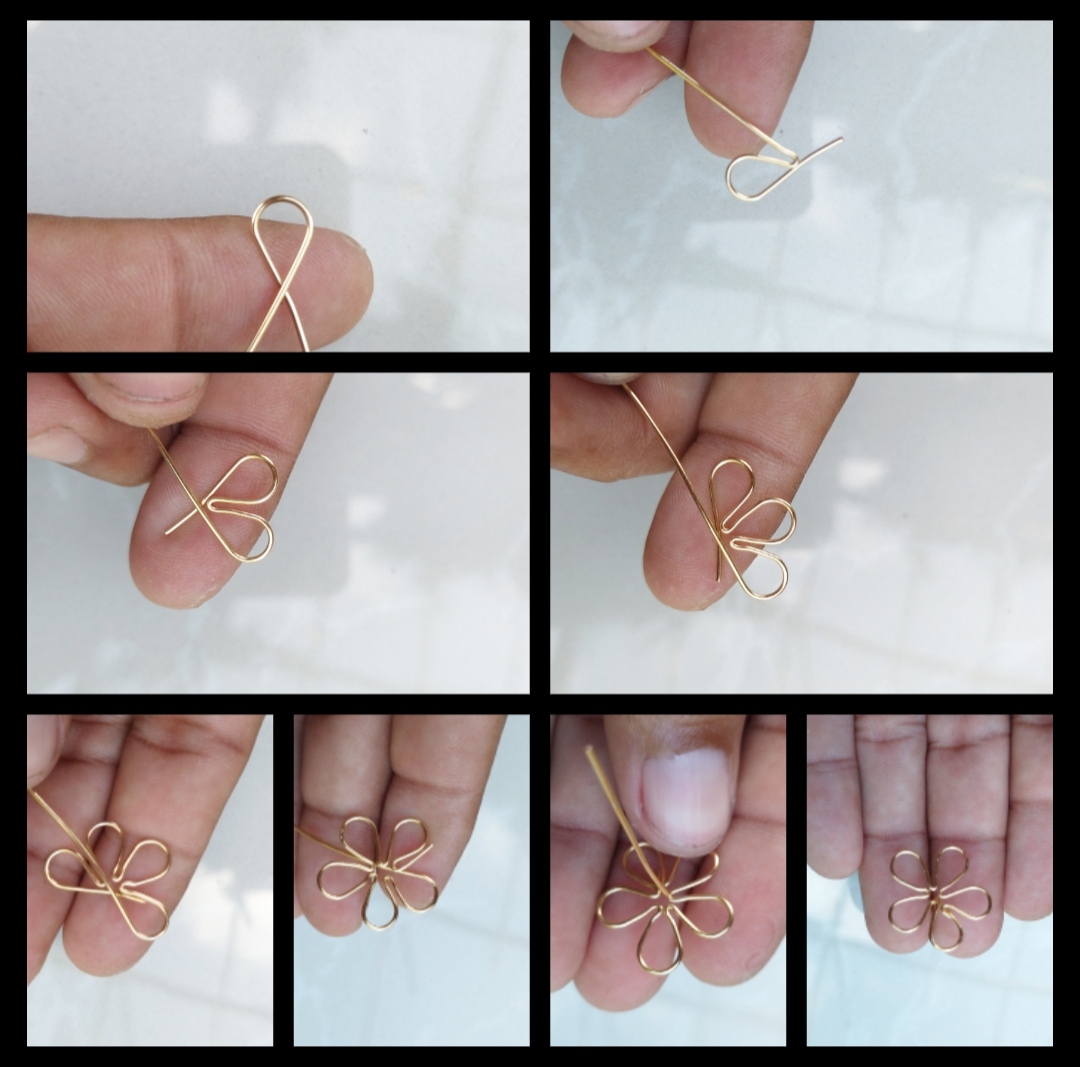
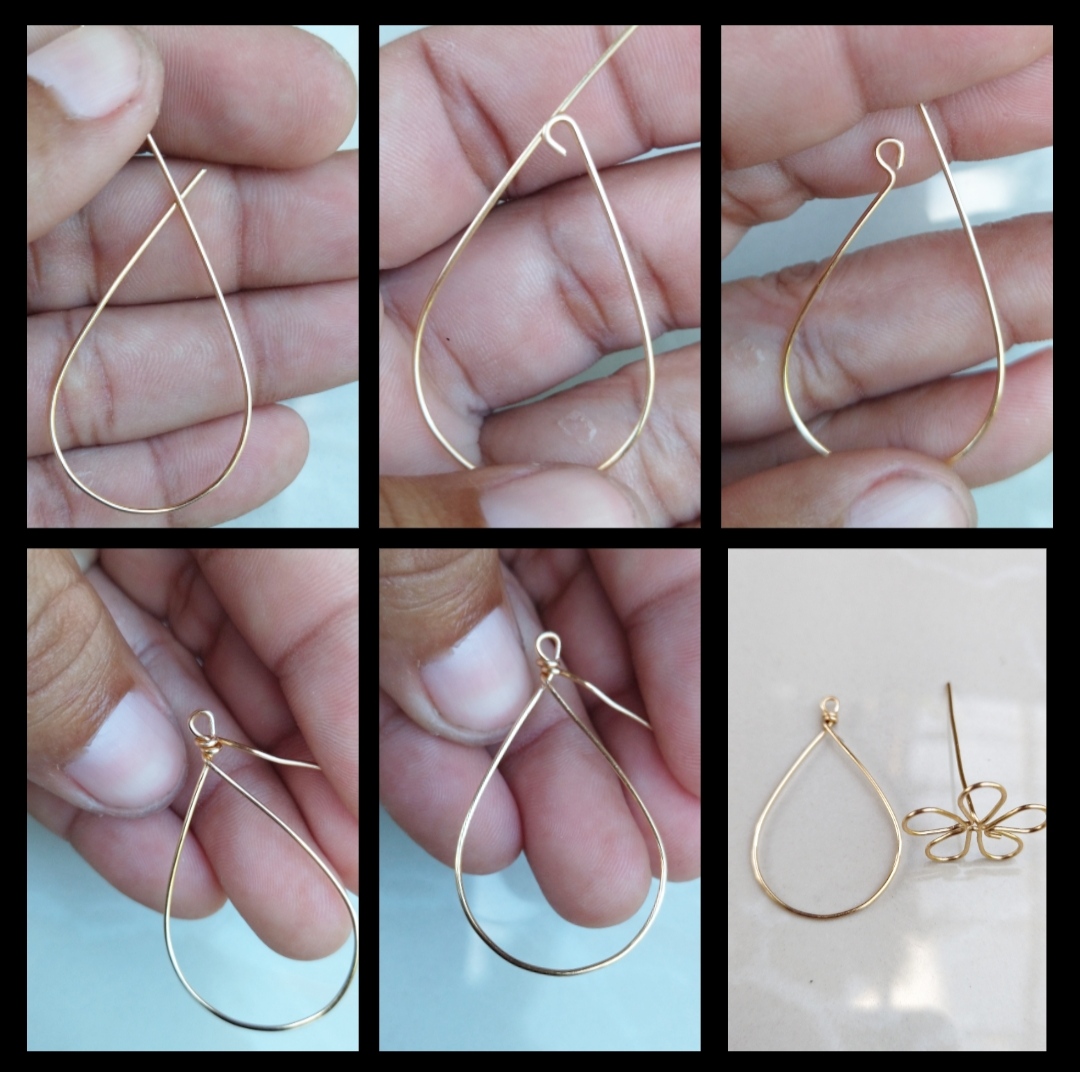
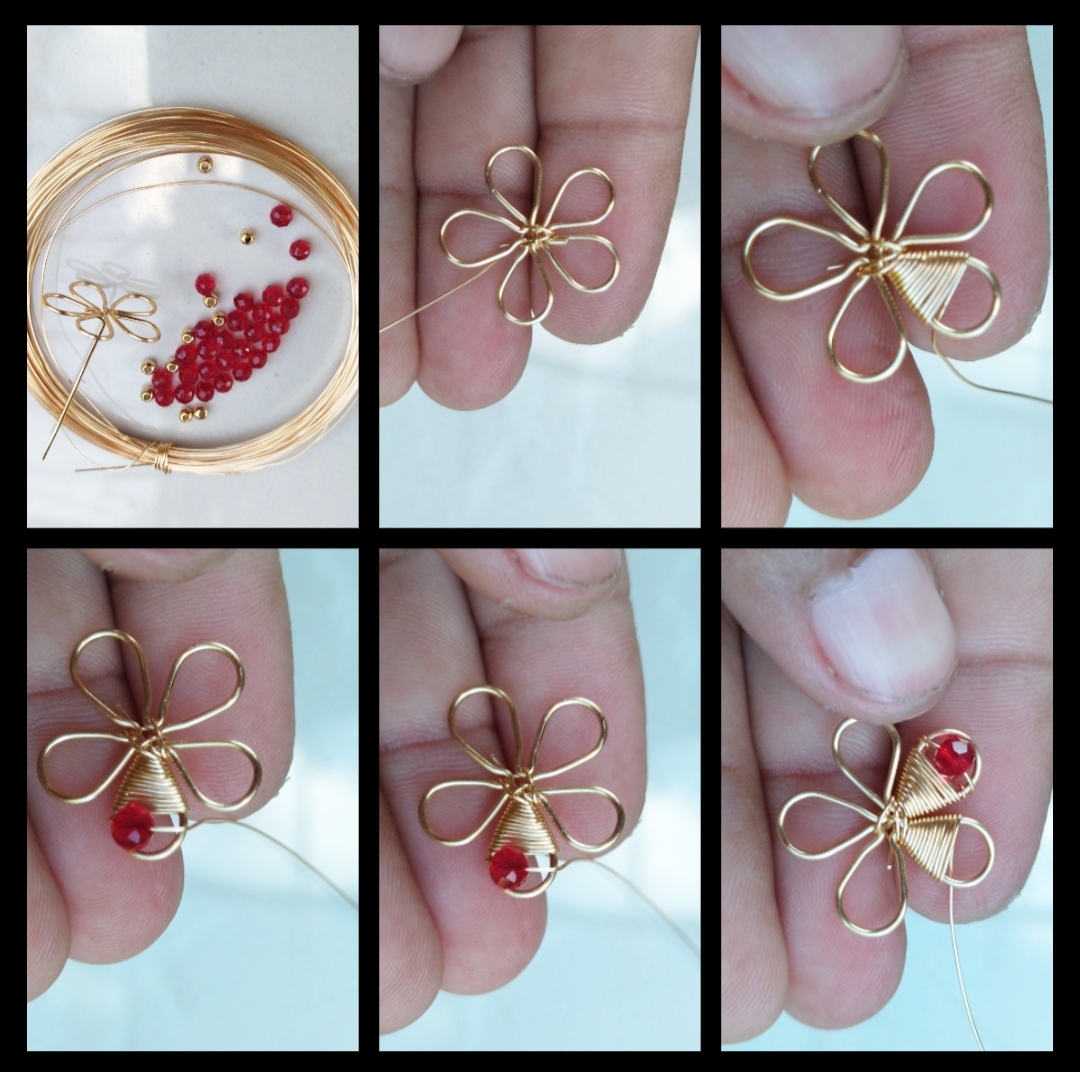
Paso 1: Para empezar tomaremos alambre calibre 20 y las pinzas luego con la ayuda de nuestra pinzas aremos un medio redondo como lo vemos en la foto luego el trozo de sobre más largo y lo doblaremos hacia arriba y volvemos hacer otro medio redondo y así seguiremos haciendo asta tener sinco medios redondo y estos serán los pétalos luego el trozo de alambre más largo lo doblaremos hacia atrás debemos de hacer lo posible para que el dobles quede en medio de la flor así la flor quedará muy bien centrada en la oreja de la persona que la va a usar luego con el mismo alambre aremos una gota de acuerdo a lo grande que sea nuestra flor mientras más gamrande la flor más grande será la gota para la gota si no lo pueden hacer con sus manos ayudense con algo redondo luego de tener la gota aremos un redondo en uno de las puntas y luego con la pinza doblamos el redondo hacia arriba ahora con la otra punta del alambre le daremos tres vueltas el rededor del redondo que hicimos cortamos el exceso y listo ya tenemos las dos principales piezas.
Step 1: To start we will take 20 gauge wire and the pliers then with the help of our pliers we will make a half round as we see in the photo then the longest piece of envelope and we will fold it up and make another half round again and we will continue doing this until we have five round medians and these will be the petals, then we will bend the longest piece of wire backwards, we must do everything possible so that the medians remain in the middle of the flower so that the flower will be very well centered in the ear of the person who is going to use it, then with the same wire we will make a drop according to how big our flower is, the larger the flower, the bigger the bead will be for the bead if you cannot do it with your hands, help yourself with something round After having the drop we will make a round in one of the ends and then with the pliers we bend the round upwards now with the other end of the wire we will give it three turns around the round that we made we cut the excess and ready we already have the two main pieces.
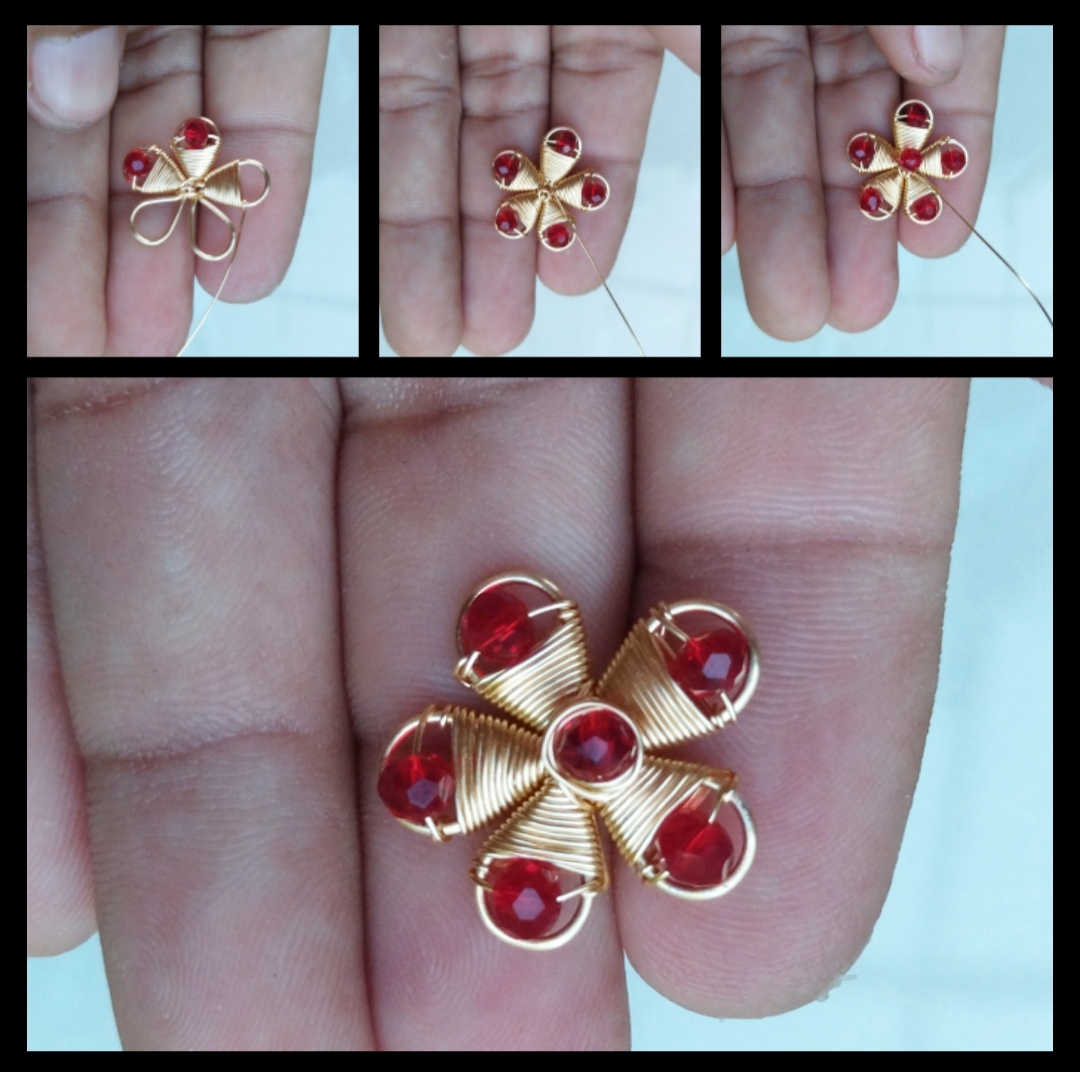
Paso 2: En este paso adornaremos nuestra hermosa flor para adornar tomamos alambre 26 y cristales rojos y la flor, para empezar la punta del alambre la pondremos en medio de la flor y la cruzaremos en medio de cada pétalo luego nos dirigimos a uno de los pétalos y lo envolvemos en alambre solo cubrimos medio metalos aseguramos metemos una piedra y aseguramos nuevamente del otro lado no cortaremos el alambre con ese mismo alambre nos dirigimos a otro pétalos y le aremos lo mismo y así lo seguiremos haciendo asta tener los pétalos adornado con el mismo alambre pondremos un cristal en medio de la flor le damos unas vueltas al rededor del cristal cortamos el exceso y listo ya tenemos una hermosa flor.
Step 2: In this step we will decorate our beautiful flower to decorate we take wire 26 and red crystals and the flower, to start the tip of the wire we will put it in the middle of the flower and we will cross it in the middle of each petal then we go to one of the petals and we wrap it in wire, we only cover half of the metal, we secure it, we insert a stone and we secure it again on the other side we will not cut the wire with that same wire we go to another petals and we will plow the same thing and we will continue doing it until we have the petals Adorned with the same wire, we will put a crystal in the middle of the flower. We wrap it around the crystal a few times, we cut the excess and that's it, we already have a beautiful flower.
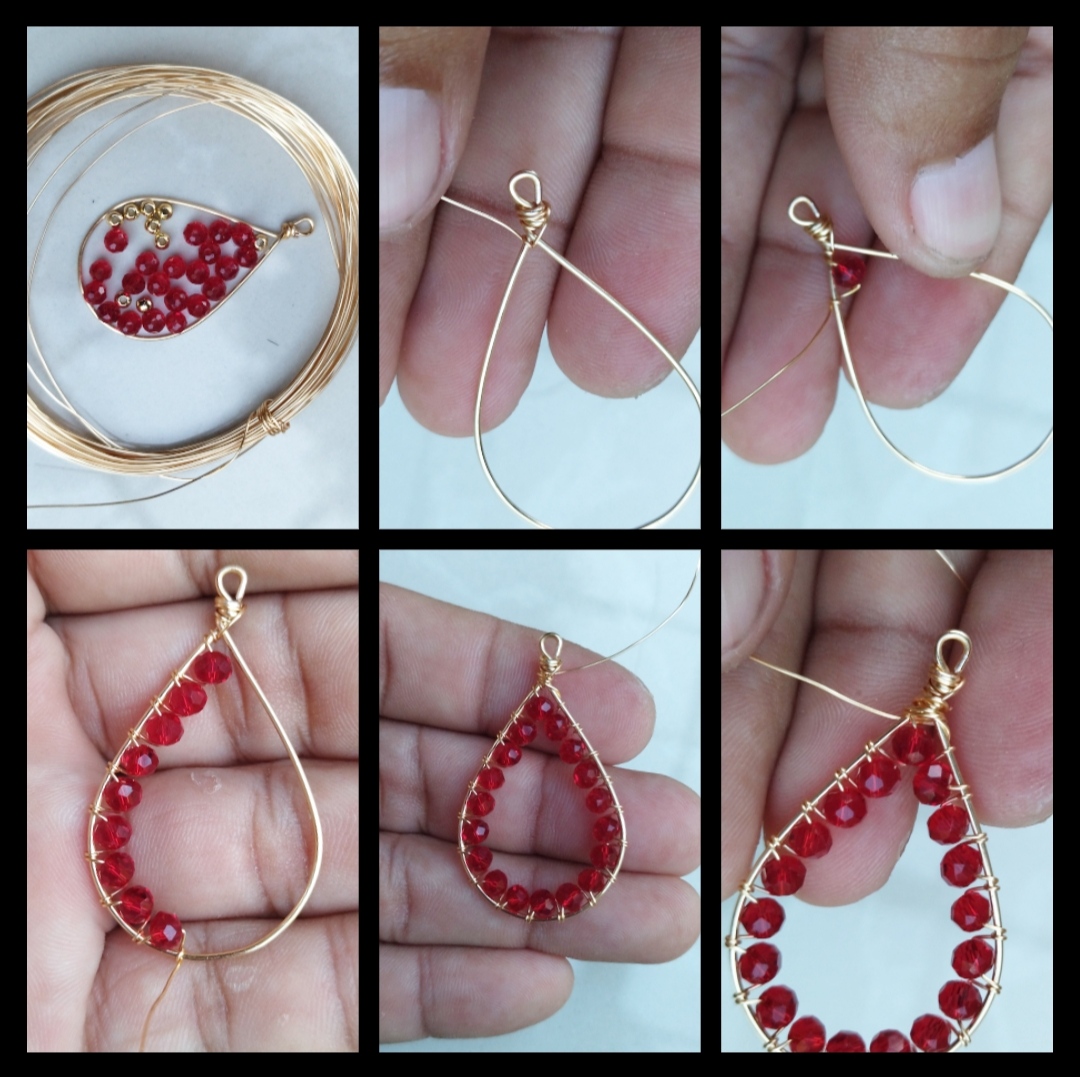
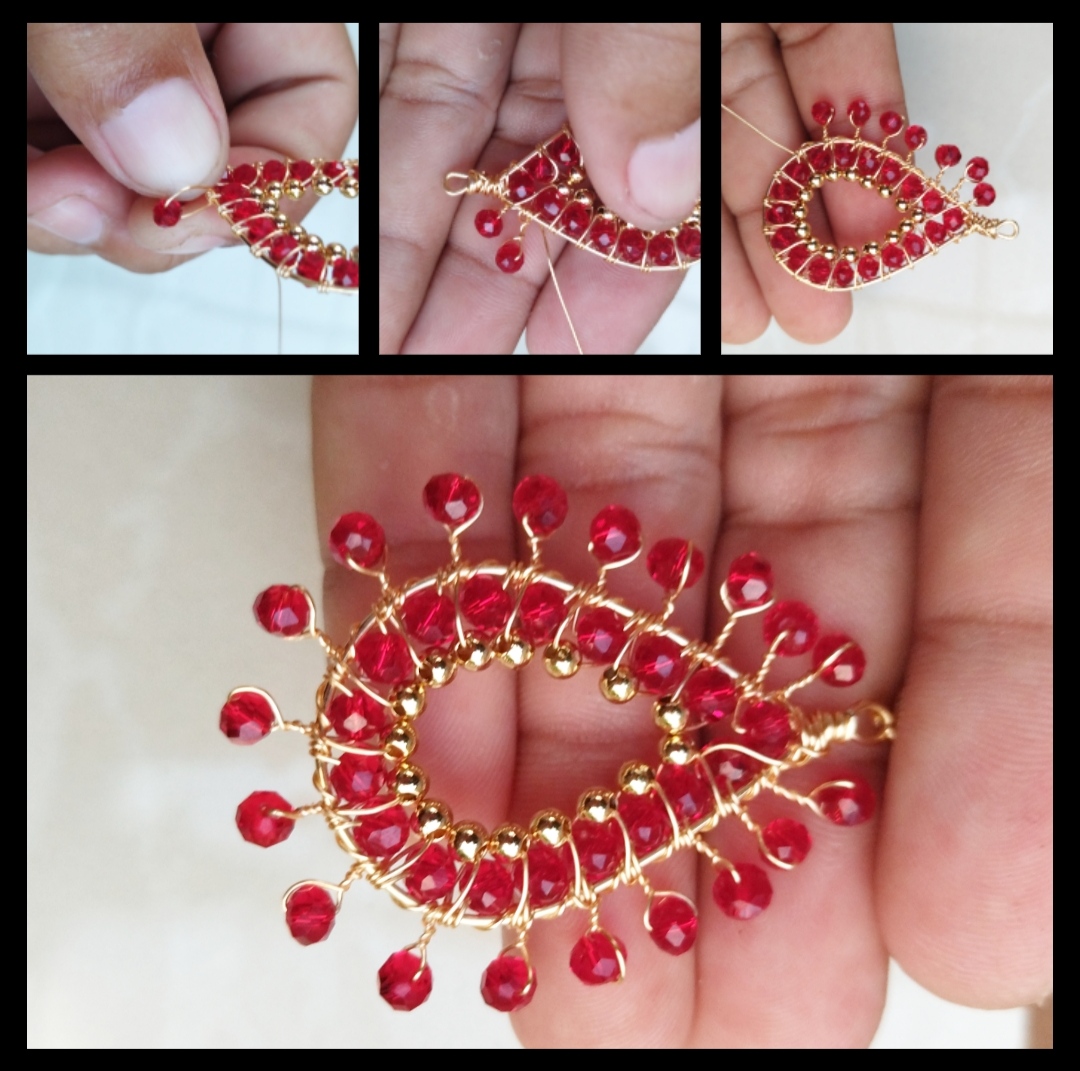
Paso 3: Este paso es un poco largo así que lo dividiré en dos paso para empezar tomamos la gota que realizamos en el primer paso alambre 26 cristales rojos y balines dorados ahora así empezemos, primero entorchamos la punta del alambre en la parte de arriba de la gota donde tenemos el redondo pequeño luego de asegurar el alambre metemos una piedra y aseguramos dándole una vuelta a el alambre en la base que es la gota y así seguiremos haciendo asta tener toda la gota cubierta los cristales deben quedar bien pegados luego con el mismo alambre pondremos los balines dorados pondremos un balín y damos una vuelta pondremos otro y damos otra vuelta y así asta tener todo cubierto aseguramos al final y cortamos el exceso de alambre como pueden ver en la foto estás piedras quedaron en la parte de adentro de la gota
Step 3: This step is a bit long so I will divide it into two steps to begin with we take the drop we made in the first step wire 26 red crystals and golden pellets now let's start like this, first we twist the tip of the wire in the part on top of the drop where we have the small round after securing the wire we put a stone and secure by turning the wire at the base that is the drop and we will continue doing this until we have all the drop covered the crystals should be well glued later With the same wire we will put the golden pellets we will put a pellet and turn it around we will put another one and turn it around and so until we have everything covered we secure at the end and cut the excess wire as you can see in the photo these stones were left on the inside drop
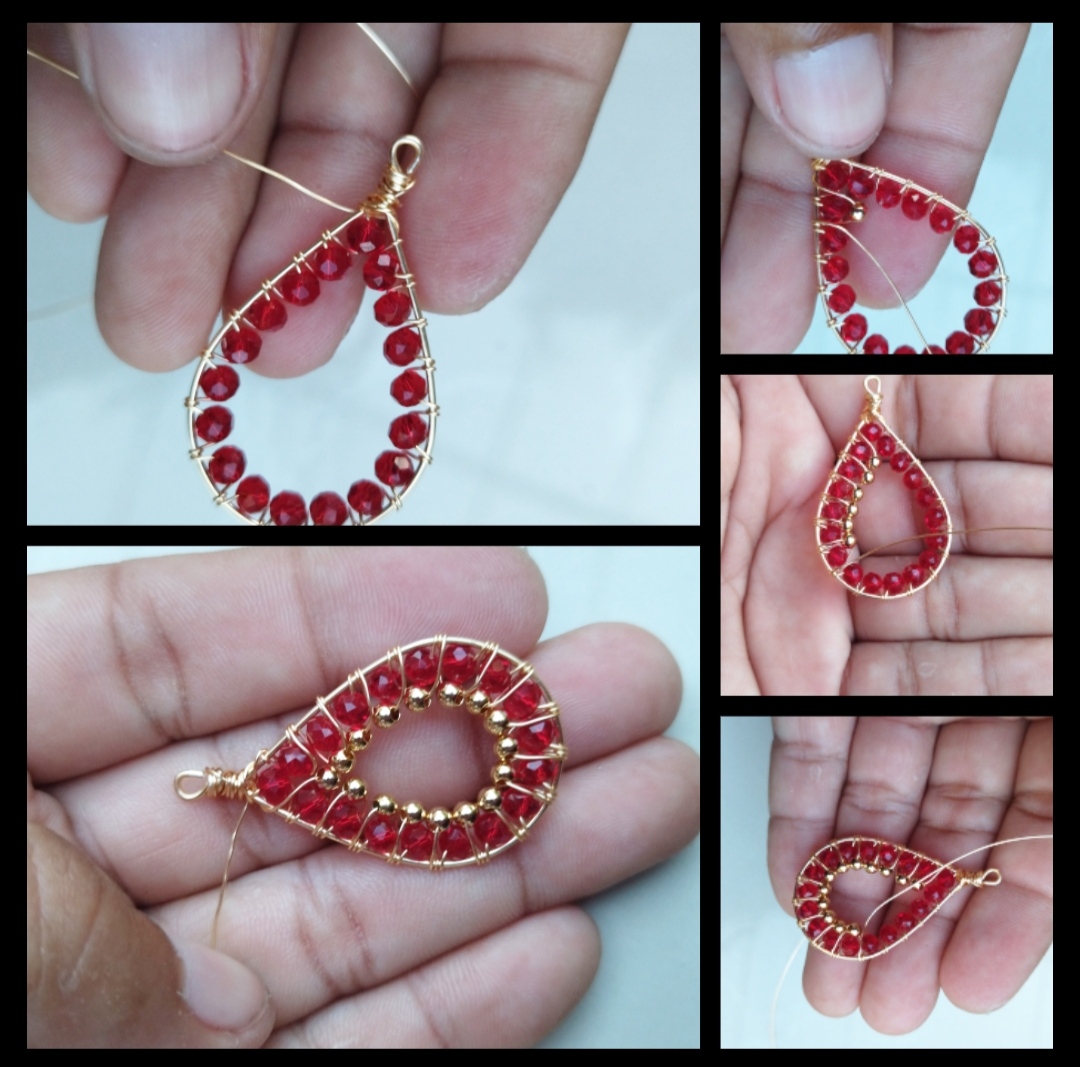
Paso 4: Ya estamos terminando pero ante debemos seguiremos trabajando en la gótica para ente paso conocemos a cortar un trozo de alambre 26 y más cristales para empezar aseguramos la punta luego metemos una piedra pero la dejamos un poco separada metemos la punta del alambre como si fueramos a tejer tomando la base de la gota antes de meter la otra piedra debemos darle unas vuelta a la piedra que ya metimos para que el alambre se entorche y así seguiremos haciendo asta tener toda la gota cubierta por untimo unimos las dos pieza la uniremos con un pequeño redondo como siempre lo hacemos y listo espero me allá explicado bien, muchas gracias por su visita que tengan una feliz noche 😀👍😁🤗👌☺️😉
Step 4: We are finishing but first we must continue working on the gothic for this step we know how to cut a piece of wire 26 and more crystals to start we secure the tip then we insert a stone but leave it a little separated we insert the wire lamp as if we were mod to weave taking the base of the drop before inserting the other stone, we must turn the stone that we already inserted a few times so that the wire is twisted and we will continue doing this until we have the entire drop covered by one last piece, unite the two pieces together We will join with a small round as we always do and that's it, I hope I explained well there, thank you very much for your visit, have a happy night 😀👍😁🤗👌☺️😉
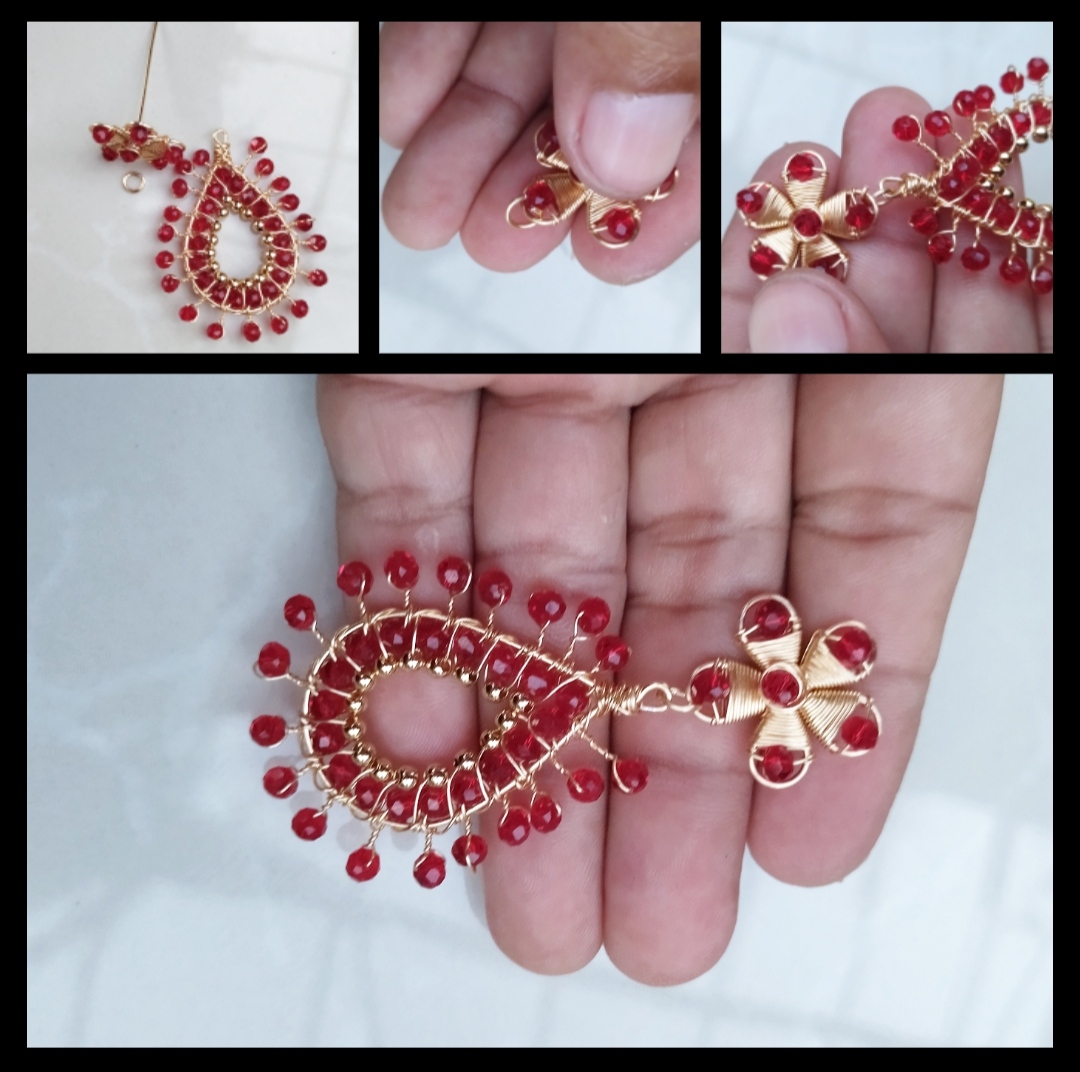
listo nuestros hermoso collar , espero que a las damas les guste, fue un gusto compartir con ustedes .
our beautiful necklace is ready, I hope the ladies like it, it was a pleasure to share with you.
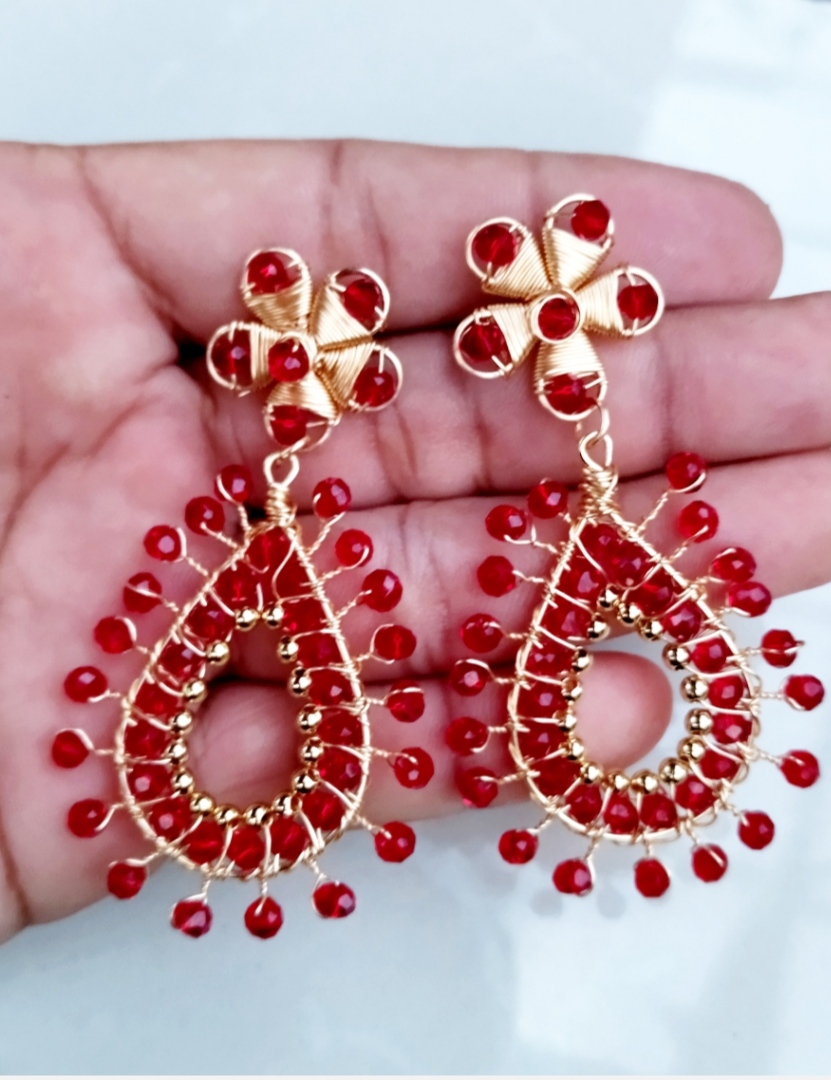
Todas las Fotos son de mi autoría y fueron tomadas con mi Celular Redmi 9T
All Photos are my authorship and were taken with my Redmi 9T Cellphone
@alexanderflx amigo, cómo siempre, regalandonos excelentes creaciones y esta está hermosa, Saludos 🤗
Hola feliz noche, siempre será un gusto compartir con ustedes,😀😁👌☺️😉👍🌹🍓
Que hermosos zarcillos, están bellísimos, gracias por compartir el proceso❤✨❤✨❤
Hola, gracias por decirme que te gustaron siempre es un gusto compartir con ustedes ☺️😉👍
Laborioso trabajo @alexanderflx, pero te quedó precioso, hermoso en verdad, te felicito.
Hola gracias por comentario de verdad es un gusto, que tengas feliz noche ☺️😉👍
Amigo @alexanderflx de verdad que me enamoran tus accesorios, son unas bellezas estos aretes, te felicito 😍😍
Gracias que bueno saber que estoy haciendo un buen trabajo 😉
Guao es admirable tu arte, transformas los insumos de bisutería en arte.
Felicitaciones
Hola feliz día gracias por tu visita es un placer.🌹🍓👍☺️😉
Impactante este color rojo de las cuentas que has usado para elaborar los zarcillos. El color rojo combinado con el dorado del alambre hace ver las prendas femeninas más hermosas. Además que el diseño es precioso.
Holaaa si el color es muy elegante y el dorado del alambre combina muy bien como usted dice, muchísimas gracias por su visita 🍓🌹☺️
Friend, you can't stop surprising me with your new creative tendrils. There are always awesome. How I hope I could cope like you. Congratulations.
Hola muchas gracias, siempre es un placer compartir con ustedes, la verdad es muy fácil solo debemos de tener mucha paciencia, gracias por tu visita 👍feliz día.
Thank you for sharing this post on HIVE!
Your content got selected by our fellow curator rezoanulvibes & you just received a little thank you upvote from us for your great work! Your post will be featured in one of our recurring compilations which are aiming to offer you a stage to widen your audience within the DIY scene of Hive. Stay creative & HIVE ON!
Please vote for our hive witness <3
Gran trabajo ... Yo en diciembre estuve en la isla....
Hola gracias , que le pareció la isla ?? Espero allá tenido una buena estadía en la isla.
Estube en sector el morro, solo fui a la playa.... Que me gustó y bueno... Por lo menos dónde estube no había mucha vida de gente, y en el centro, cierra muy temprano, igual que el transporte es muy poco..... Pero igual vamos a volver, porque tenemos un vuelo abierto
¡Enhorabuena!
✅ Has hecho un buen trabajo, por lo cual tu publicación ha sido valorada y ha recibido el apoyo de parte de CHESS BROTHERS ♔ 💪
♟ Te invitamos a usar nuestra etiqueta #chessbrothers y a que aprendas más sobre nosotros.
♟♟ También puedes contactarnos en nuestro servidor de Discord y promocionar allí tus publicaciones.
♟♟♟ Considera unirte a nuestro trail de curación para que trabajemos en equipo y recibas recompensas automáticamente.
♞♟ Echa un vistazo a nuestra cuenta @chessbrotherspro para que te informes sobre el proceso de curación llevado a diario por nuestro equipo.
🏅 Si quieres obtener ganancias con tu delegacion de HP y apoyar a nuestro proyecto, te invitamos a unirte al plan Master Investor. Aquí puedes aprender cómo hacerlo.
Cordialmente
El equipo de CHESS BROTHERS