EasyEditor: How is it better than the HTML+Markdown editor?
Travelfeed's users can choose between two different editors: the HTML+Markdown Editor and the EasyEditor. While the HTML editor might seem a little bit tricky to the first time user, the EasyEditor is as simple as ABC and it offers some additional features, such as Easy Interlinking, Galleries, and Table of contents. Since the EasyEditor doesn't require you to have any coding knowledge, it is absolutely perfect for everyday use.
All the HTML lovers out there should keep in mind that using HTML or Markdown in a regular EasyEditor text block doesn’t work but it works in a Code block. Those who find it necessary to add a small HTML snippet may always do so by adding a Code block and pasting the code in it. Let's discuss all of EasyEditor's features one by one.
Table of contents
- EasyEditor: How is it better than the HTML+Markdown editor?
- EasyEditor features explained
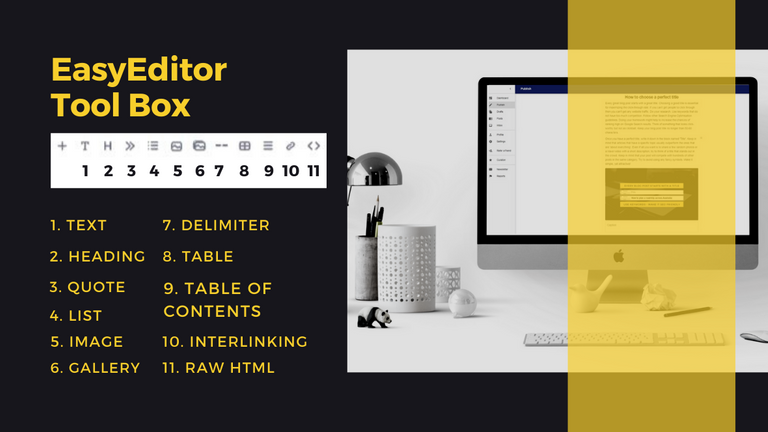
- Text
- Headings
- Quotes
- Lists
- Images
- Gallery
- Delimiter
- Table
- Table of contents
- Embedding other elements
- How to embed Youtube, Facebook & Vimeo videos
- How to embed Instagram posts
- How to embed Spotify and Soundcloud songs
- How to embed Google Maps
- Interlinking Travelfeed articles
EasyEditor features explained
Once you 'Sign Up' and login you may head to the 'Dashboard'. Click 'Publish' to start a new post. It will take you to the publishing page where you will be greeted by several separate sections. While the first one is for the Title, the second one is the so-called EasyEditor section. This is where you do all the typing and editing. Keep in mind that it is a block-based editor, somewhat similar to Wordpress Gutenberg, Divi, or Medium. Mostly because you may move any block up or down and place it anywhere you want.
Text
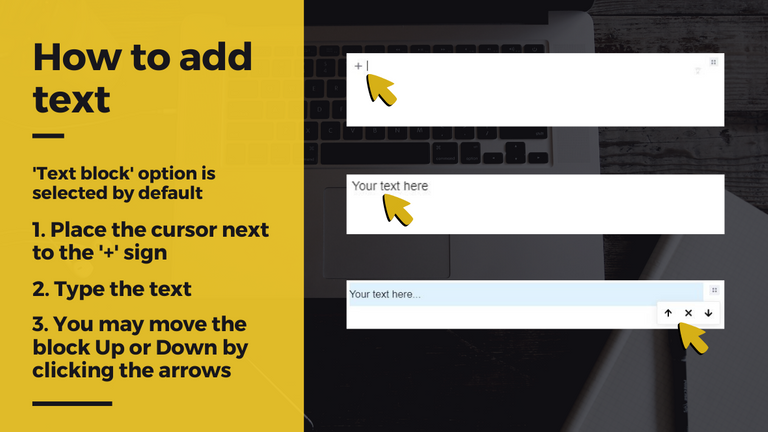
You might want to start by typing some text. The ‘Text block’ option is selected by default. All you have to do to add a new text block is to place the cursor in a new paragraph. Once you start typing a tiny 4-dotted button will appear on the right side of the block. Click on it and a few settings will pop up. These features vary in different types of blocks. In this case, you will get an option to move the Text block up or down or to delete it.
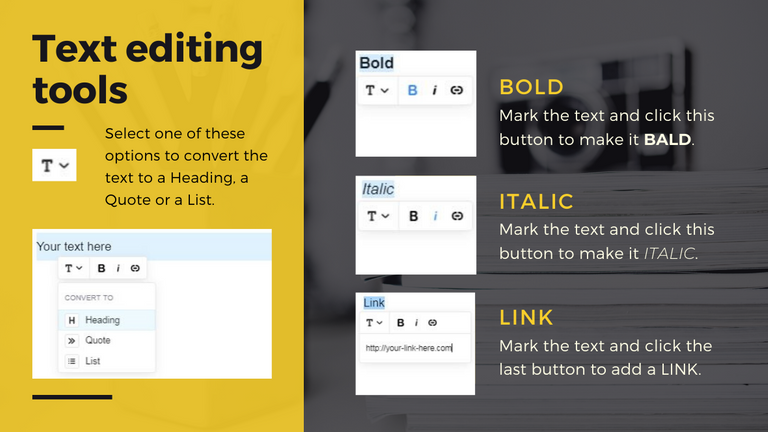
By marking some text and selecting one of these options you can make it Bold, Italic. Keep in mind that those who decide to use some content from outside sources must credit its author by adding a link to his article. In this case, the Link tool will be very useful too. Finally, the selected text may be easily converted to a heading, a quote, or a list in a split of a second.
Headings
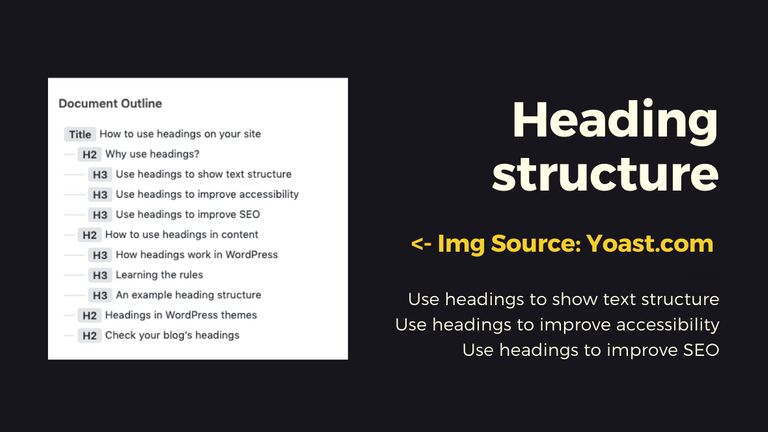
Headings are used for three main reasons. Firstly, they show the text structure and guide readers through the article. Secondly, wisely-chosen headings help to improve SEO. Lastly, headings may help to improve accessibility as they are used for the generation of the table of contents. Since the title is already H1, we highly recommend using only H2 and lower-level headings.
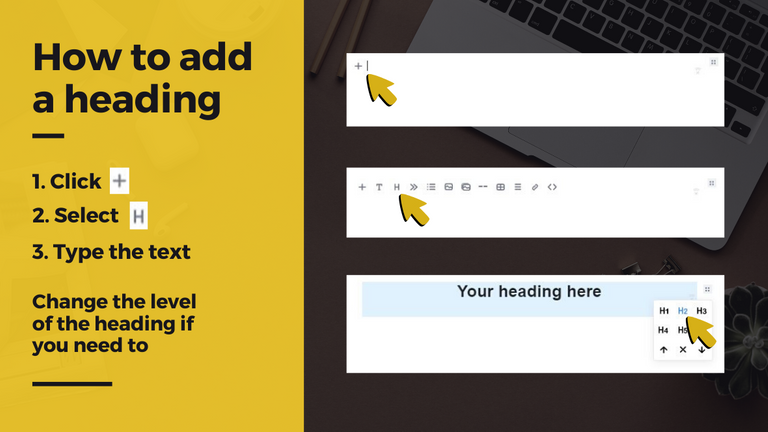
To add a new heading follow instructions in the picture below. To change the level of the heading click the four-dotted button on the right side of the block and choose one of the options. ‘H2’ option is selected by default.
Quotes
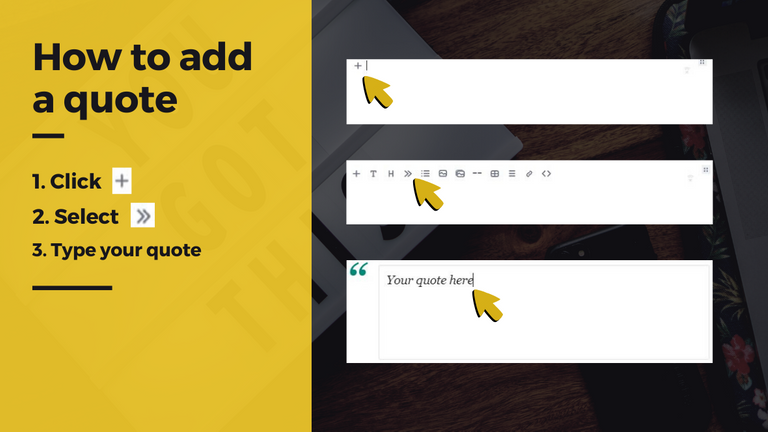
Quotes are often referred to as borrowed wisdom. A carefully selected quote may add a lot of weight to the point you're making. The EasyEditor has a simple to use tool to add it to your blog post in as little as a couple of seconds. Simply click "+" and select ">>" to start a new Quote block. Finally, paste the quote inside the box and press "Enter".
Lists
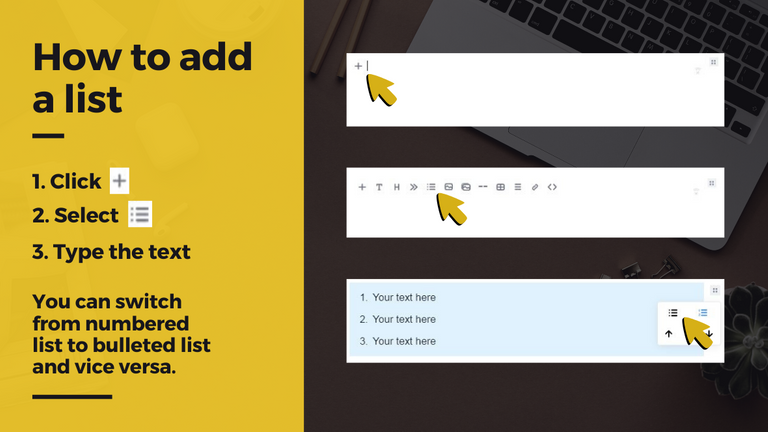
In some cases using the List tool may be useful. For example, if you would like to list "5 essential things that you must take on a trip". The EasyEditor List tool allows you to choose between two types of lists: the numbered list and the bulleted list. While the first one may seem more suitable for making a more solid-looking list, the second one might create a more informal friendly feel. Follow the instructions in the picture below to add a new list to your post.
Images
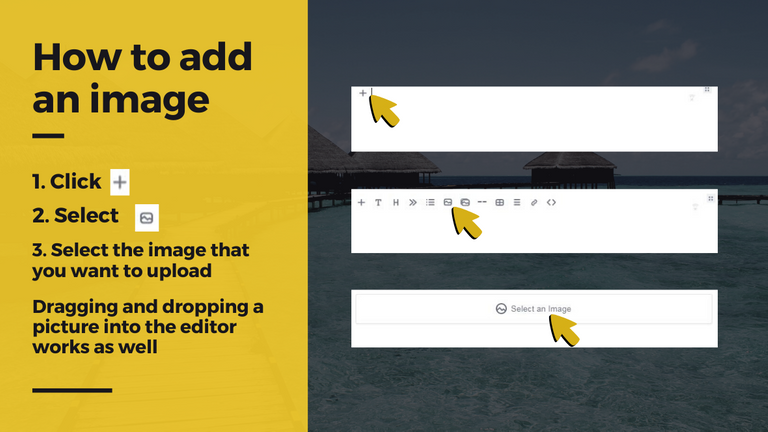
Why should you add images to your blog post? You know how they say. These days providing value is not enough as there are thousands of articles on almost every topic in the world. Standing out won't be possible without some good quality pictures. They make your article more engaging and interesting to read. Remember, quality is the key to success. To add a picture to your blog post, follow the instructions in the picture below.
Gallery
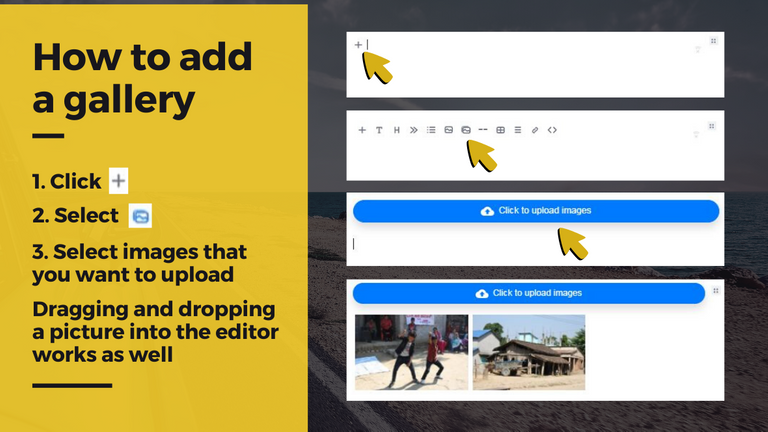
All images uploaded using the Image Gallery block will be displayed as masonry by default where we arrange the images next to each other in a fitting mosaic, combining vertical and horizontal images automatically. You also have the option to change the view to the slideshow mode. It's like a slideshow with thumbnails where you can go back and forth between images.

Delimiter
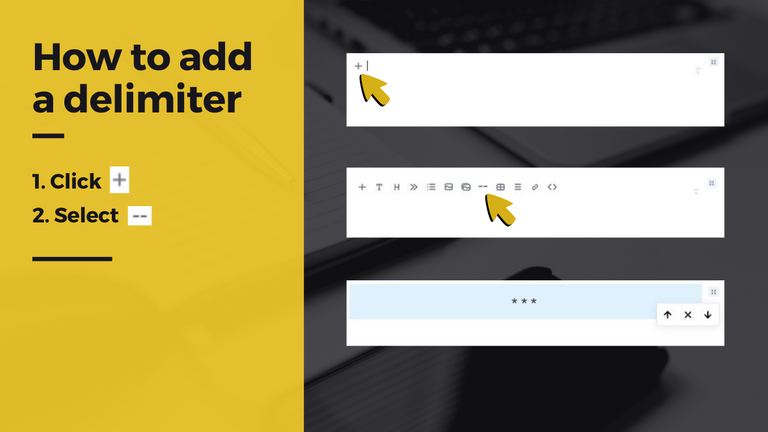
Adding a delimiter might seem logical when the story line jumps from one environment to another. It may also be used to split the signature part from the rest of the post and many other cases. Click '+' and select '--' option to add a delimiter block in your post. It couldn't get easier than that.
Table
Some authors prefer writing more technical articles that fall under the category of 'Travel advice' or similar ones. In this case, a Table block might be handy. It allows the author to layout the information in a very organized way. To add the table block to your article, follow instructions in the picture below.
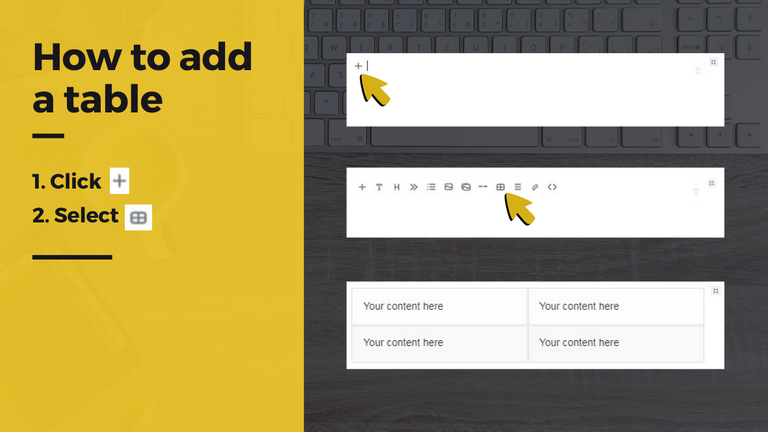
Table of contents
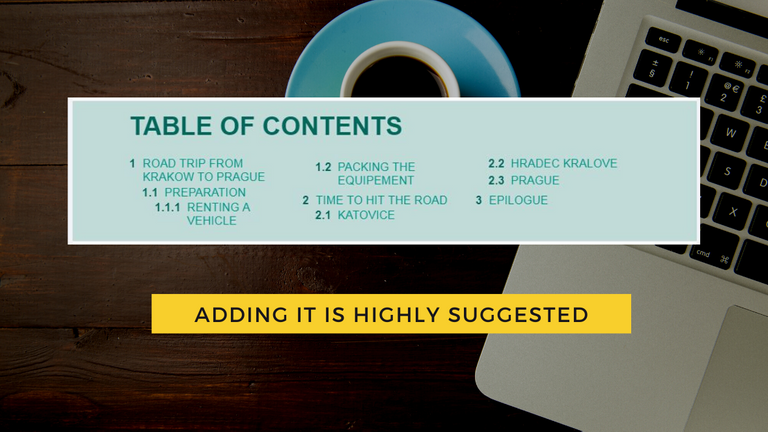
Adding a Table of contents at the beginning of every long article is highly suggested. It gives an overview of your article's content by listing and linking to headings. With this block, you can easily give an overview of your article and give your readers the option to jump to a specific section of the post.
As we mentioned earlier, the title is already H1 so we highly recommend using H2-H6 headings only. If you follow this recommendation, the table of contents will be generated out of H2, H3, and H4 headings. However, if you decide to add some extra H1 headings, the table of contents will be generated out of H1, H2, and H3 headings.
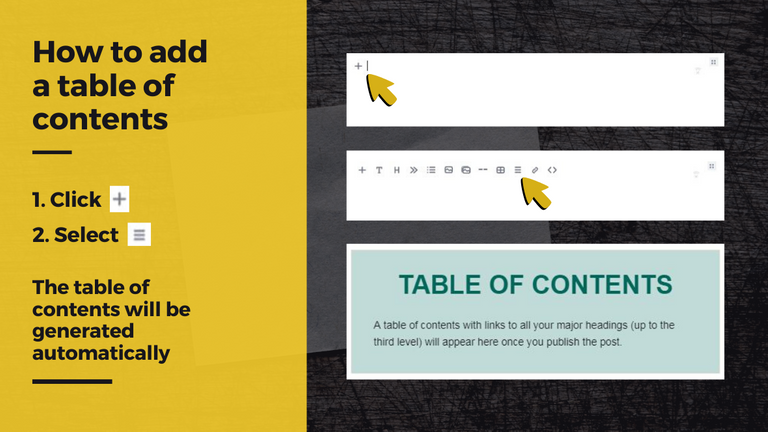
Needless to say that adding a Table of contents might be beneficial from a Search Engine Optimization perspective. The result may be a significant improvement in search rankings and organic traffic. It is generated in a split of a second and doesn't require you to have any coding knowledge. Add the Table of contents to your article by following instructions in the picture below.
Embedding other elements
How to embed Youtube, Facebook & Vimeo videos
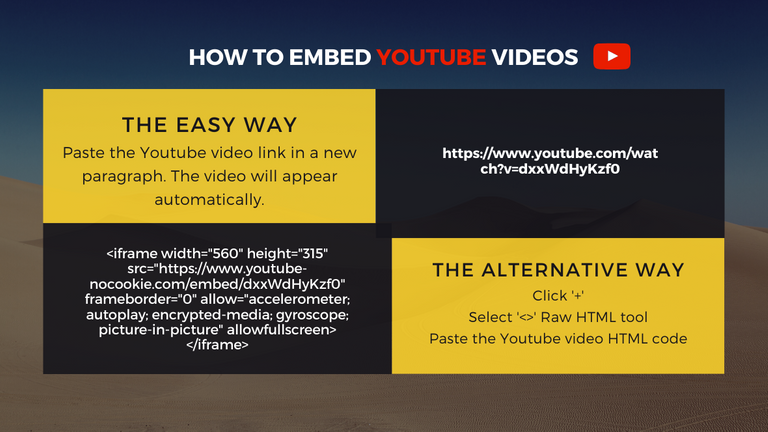
There are two ways to embed a Youtube or Vimeo video in your Travelfeed blog post: The easy way and The alternative way. The easiest way to embed a Youtube or Vimeo video is to copy its link and paste it in a new paragraph. A video preview block will pop up automatically. The hard way is to add a Raw HTML block and to paste the Youtube or Vimeo video HTML code in it.
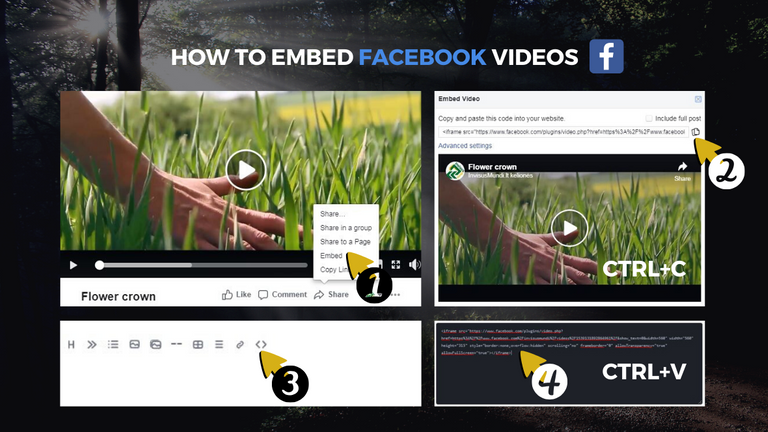
When it comes to embedding Facebook videos, only the second option is available. Follow the instructions in the picture below to find the HTML code of your video. Then Copy and Paste it in a new Raw HTML block. Head to the 'Preview' section at the bottom of the page to see how it will look like after you click ‘Publish’.
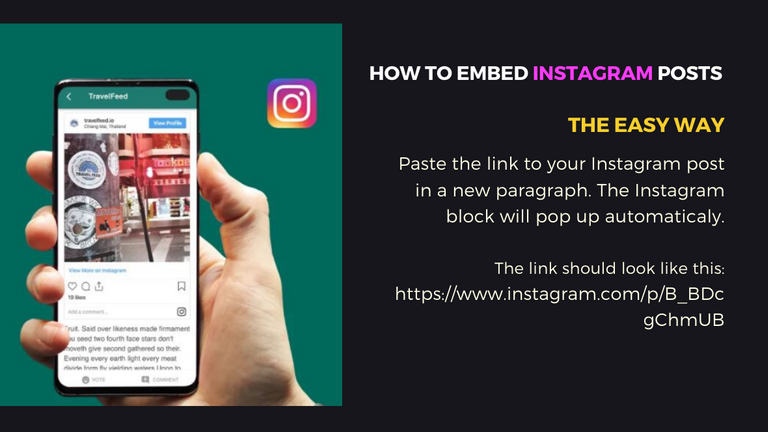
How to embed Instagram posts
This EasyEditor feature empowers you to embed either your own or someone else's Instagram post to your article. It is giving you the chance to add some extra value to your article and draw attention to your own Instagram account. It works as easy as embedding Youtube or Vimeo videos. Copy and paste the link of an Instagram post you would like to embed within the easy editor. And voilà, it pops up.
How to embed Spotify and Soundcloud songs
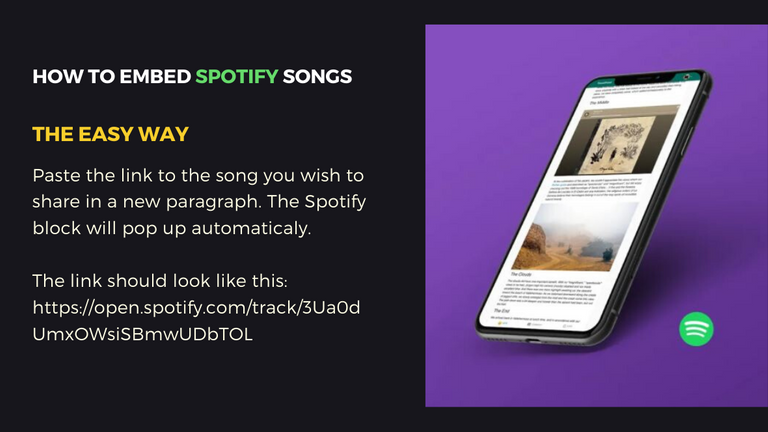
Embedding a well chosen Spotify or Soundcloud audio track will definitely enhance your article and make it stand out. It may also add a certain feeling to it. For example, if you write about your trip to Jordan or Egypt, add an Arabic song and the reader will feel like was there by himself. To embed a Spotify song, paste its link in a new paragraph and the EasyEditor will do the rest.
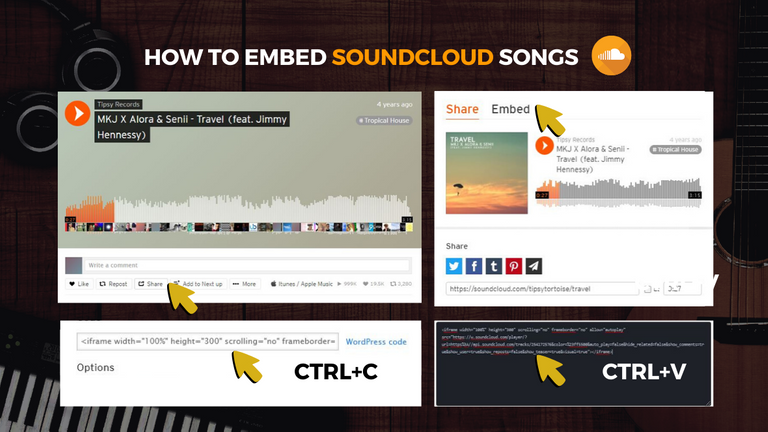
Embedding Soundcloud songs is similar to embedding Facebook videos. Follow instructions in the picture below to find the HTML code of the Soundcloud song. Copy and Paste it in a new Raw HTML block. Head to the 'Preview' section at the bottom of the page to see how it will look like after you click ‘Publish’.
How to embed Google Maps
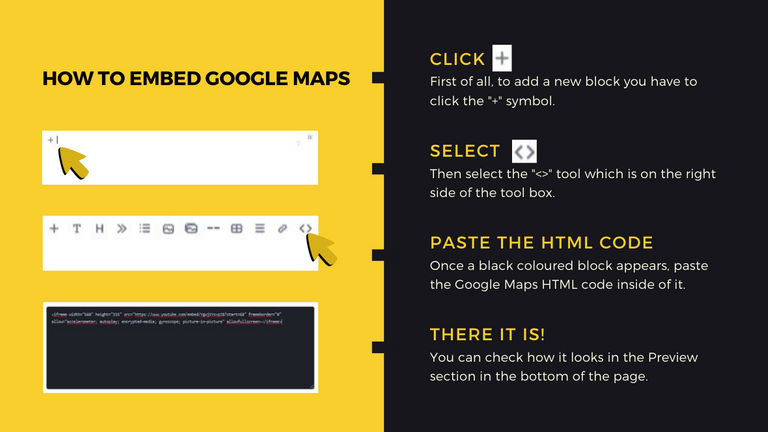
Even if your texts are super interesting to read and your photos stand out for their exceptional quality, there are still some technical improvements that can make your content more engaging. One such feature could be the addition of Google Maps into your travel blog posts. You can embed a Map quickly and easily by adding a Raw HTML block and pasting the HTML code of your chosen map in it.
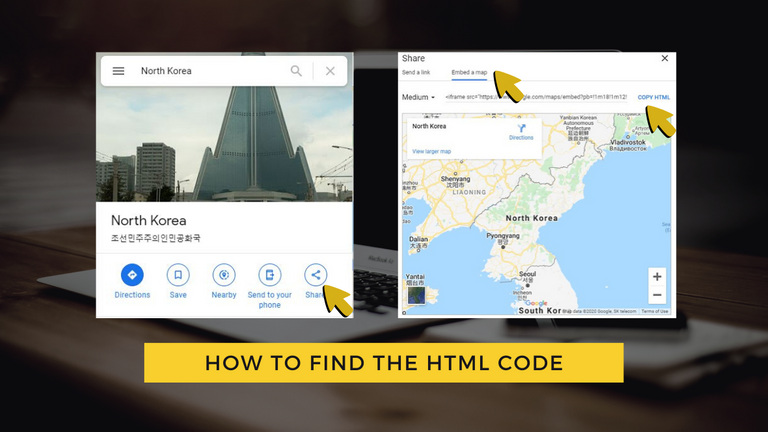
Go to Google Maps and Search for the place that you are writing about. You may also want to use the Google Trip Planner tool to create a trip itinerary. Follow instructions in the picture below to add the code in a new Raw HTML block. Adding Google Maps in your articles may also be noticed by the Google algorithm.
Interlinking Travelfeed articles
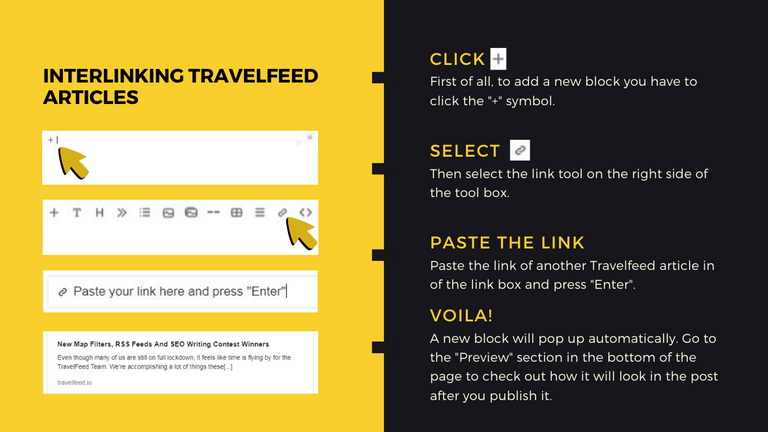
Interlinking your blog posts is very important for two main reasons. Firstly, it lets search engines easily crawl and index all of your articles. Secondly, internal links make it easier for your readers to navigate through your blog and find more content. Linking between two or more articles of the same website is a subject of science called Internal Search Engine Optimization. Long story short, better interlinking means more page views.
Is there a possibility to insert a gif ? Because it doesn't move when I paste it.
Thanks for letting us know! We introduced GIF support a long time ago, I just checked and realized that at some point an update introduced a bug that prevented GIFs from moving.. Should be fixed now:
If you are not uploading but linking to a GIF, just make sure that the URL ends on .gif
thanks! I will test it soon :)
Thank you for information...makes it easy for me to use
Hello TF Team.I have serious issues using your site.Pictures doesn't load. This issue isn't new, but I thought before that it's temporary. Apparently wasn't.
All errors I can see are from steemit images.
I'd stay away from Steem and everything Steemit related.
Same post looks good on both https://hive.blog and https://peakd.com
Another issue when I was trying to post this comment on your site:
Publish failed: GraphQL Error (Code: 403): {"response":{"error":"<!DOCTYPE html>\n(html comment removed: [if lt IE 7]> <html class=\"no-js ie6 oldie\" lang=\"en-US\"> <![endif])\n(html comment removed: [if IE 7]> <html class=\"no-js ie7 oldie\" lang=\"en-US\"> <![endif])\n(html comment removed: [if IE 8]> <html class=\"no-js ie8 oldie\" lang=\"en-US\"> <![endif])\n(html comment removed: [if gt IE 8]><!) <html class=\"no-js\" lang=\"en-US\"> (html comment removed: <![endif])\n<head>\n<title>Attention Required! | Cloudflare</title>\n<meta name=\"captcha-bypass\" id=\"captcha-bypass\" />From your error message it looks like your IP is blacklisted by Cloudflare. Are you maybe using a VPN? Some VPNs are blocked by Cloudflare/require a captcha because they were used by spammers before. Large parts of the internet are using Cloudflare though, so it would be strange if you had issues only on TravelFeed.
Steemitimages has been a reliable and free solution for image delivery and made our life much easier, but in the medium-term we want to move to our own image CDN. But the two solutions are either using a Cloud Service like Amazon S3 which is expensive or setting up image hosting on our server which is more work and less fault tolerant and both would require quite a lot of our limited resources to set up.
Another option would be to move to the hive.blog imagehoster for now. When Hive launched, the hive.blog imagehoster was very unstable and we didn't want to put more load onto it, but that seems to have improved now. When we made the decision to become an independent platform that supports cross-posting to several platforms, starting with Hive and Steem, some folks at Hive took offence that we are not migrating to Hive exclusively, while nobody on Steem seemed to have a problem with that, so we are not sure if they would let us use the hive.blog imagehoster. So for now we are sticking with Steemitimages.
I'm using Privacy Pass from Cloudflare to be immune to that.
Steemitimages was reliable and Steem was too. That's gone now.
Many people are censored by Steemit so I wouldn't be surprised that's their settings.
Personally I think that idea of independent platform is a step backwards that brings all old, well-known centralized troubles and gives no real gains.
That is true, but unfortunately we had to learn that a fully decentralised platform also brings many challenges. We were fully relying on Login Tools (Keychain, Steemconnect) and Steem nodes provided by the community and when most of these node operators shut down and left for Hive, our platform became extremely unstable. In that time we had a decline of almost 50% in daily active users (which we have more than recovered from meanwhile), a hard hit for a small startup like us.
At the same time Hive was not yet stable and in the short time window between the Hive announcement and launch it would have been impossible for us to migrate to Hive. We also had some concerns about Hive, which we hoped would be cleared up but weren't. E.g. some of our users never received Hive, because they (some claim accidentally) voted for the wrong witnesses and we're concerned about the legal challenges of launching our token on a DPOS chain since both Steem and Hive have the situation that the small group of people in control of block production came together and decided to remove or freeze user funds.
We eventually decided that becoming a semi-decentralised platform is the best compromise for now. That is essentially the same as most topic-specific dApps do (3speak, actifit,..): The API fetches data from a centralised database that is populated only from our API (as opposed to the Hivemind-solution we had before that was populated from Blockchain nodes only). Contributing to the "dApp" through other frontends is not possible. But, all content can also be posted to the Blockchain, from where other frontends can access it.
Just like e.g. Actifit we let our user choose whether they would like to post to Hive or to both Steem and Hive, but we also allow our users the option to post to no Blockchain at all - this makes it possible for us to let users sign up with once click with their Facebook or Google account or Email and then set up a blockchain account once they are familiar with our platform instead of overwhelming them with the whole Blockchain and private key stuff.
Allowing posting to both Steem and Hive was also the wish of our community - most don't care about the politics, some want to post to Hive exclusively and a few others only to Steem. We let them choose.
Thank you for letting us know - we'll look into this asap!
Is there any problem going on with Travellfeed website? Because I am unable to upload photos.
Hi guys,
I have a question and I am asking it under this post, hope you don't mind...
It is regarding posting through travelfeed.io using easy editor.
When I want to pin my post to Pinmapple (you probably kbow what that is), I can not hide the code. In which format should I write it, not to be visible in my post, but to be written, so it will be pinned.
Thank you for your answer in advance and keep up your great work at my favorite community!
Hey man, we somehow missed your comment, sorry about that. If you publish through TravelFeed, we automatically pin your post to Pinmapple as well via a hidden code snippet, all you need to do is add a location in the TravelFeed editor, so no need to add a code snippet manually :)
Btw, we recently added new posting options for Hive in our new SEO tool, so you can now post to any Hive community and customise options such as beneficiaries and rewards type.
Hoping to see you and your awesome photos back on TravelFeed soon :)
Hey thank you for the reply guys!
Better late than never right :)
Great to hear you have that automated with Pinmapple.
Will definitely stop by in the near future and write post from some nice location :)
Thank you guys and keep uo your great work.
Awesome, as always we are excited for your posts! Thanks for supporting us, it means a lot to hear that our work is appreciated. We are working hard to build the most awesome platform for travel bloggers and we couldn't do that without you and other community members helping us to get a bit better every day :)
Thanks . Its very helpful
It really is not that easy to use. I could not "justify texto" and there were many paragraphs that were separated. I will keep trying on a new post
Thanks for the feedback, Marcy!
Justifying text ist currently not supported since EasyEditor only supports markdown styles. If you really want to justify your text, you can do that with HTML in a custom code block.
What do you mean about separating paragraphs and is there a way that we can improve EasyEditor to become more easy?
I don't know how to work with easy editor yet.
I will prepare other publications to learn. I want to use the advantage of the photo gallery.
With regard to separating paragraphs. Some sentences were not edited correctly. I already corrected them!
Thanks for the answer @travelfeed!
Is there a way to add a trip say 10 years ago with images & video etc - is there a option to add year/ date from the past - not every trip is happening right now ... but a lot from the past - I just joined so I'm am not familiar yet!
There is an option for that in the TravelFeed editor under Seo => Advanced Options => Backdate post