Being as powerful as the Germanic god Thor, who can cast lightning bolts, is certainly something many people desire. But this desire can come true. Because at least visually, you can do it too.
In this tutorial I would like to introduce you to the secrets of creating lightnings in GIMP.
LMAC School - How to add lightnings
1. Requirements
You may need to have a copy of the GIMP software to understand this tutorial. GIMP is a free, open source tool for image processing of all kinds. Lots of people say GIMP is the open source Photoshop. I agree with this statement at least for the functionality I personally need.
You can download GIMP here: Click
I created this tutorial for GIMP version 2.10.20 (and newer versions).
We will work with layers in this tutorial. If you do not know how to work with layers, just take a look into the LMAC School - How to work with layers post.
Since this tutorial is for advanced GIMP users, I won't explain every tool in the examples.
2. Basics
2.1. Special brushes
One of the ways to create lightning bolts that I would like to show you is using so-called Special Brushes. These are brushes that are not included in GIMP and have to be installed by yourself.
I have already explained how to install Special Brushes in GIMP in the tutorial LMAC School - How to add clouds or smoke in section "2.1.2. Painting with a special brush".
I have not made an explicit example in the example section for creating lightning bolts using Special Brushes. This is because it is just as easy as creating clouds with the same technique. The only difference is the lighting of the lightning bolts. But you can learn how this works in both of the two examples below.
Note: Lightning bolts that you create using Special Brushes will look the same in each of your pictures.
You can download some nice lightning brushes from here: Click
2.2. Light
Where a lightning bolt shoots out of the clouds, where a lightning bolt is hitting something and on the path of the lightning itself, the surroundings are more or less brightly illuminated. Therefore, for realistic results, it is often not enough to create only the lightning bolt.
In the example photo below, you can see that the lighting gradually fades away from the lightning bolts. Near them, the light is brightest.
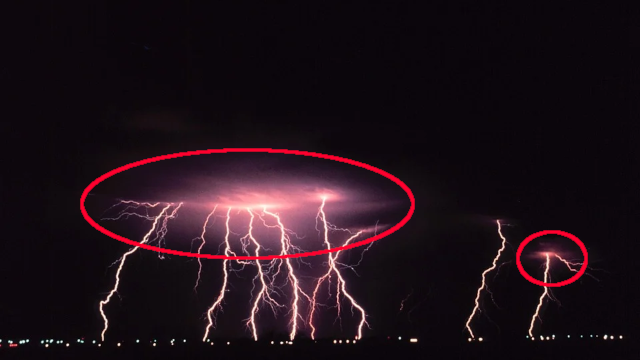
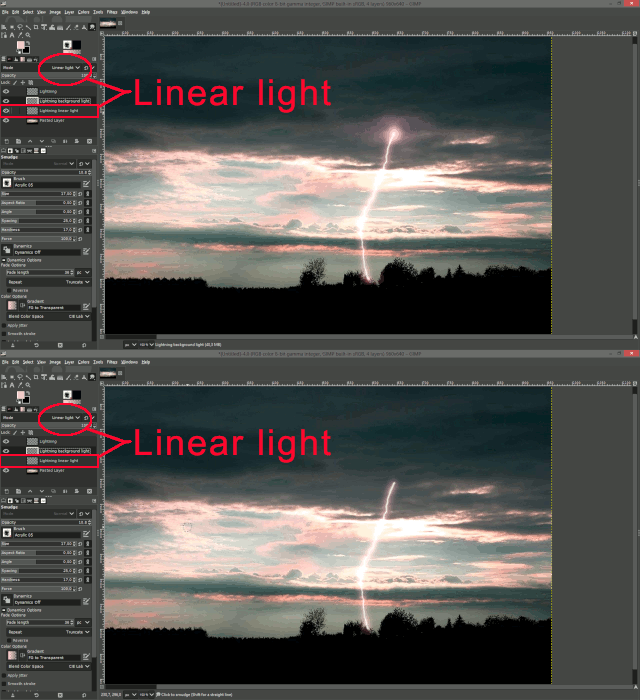
In GIMP, this light can easily be created with the Paintbrush tool and a very soft brush on an extra layer with the mode set to "Linear Light".
3. Examples - Learn to be a bit like Thor
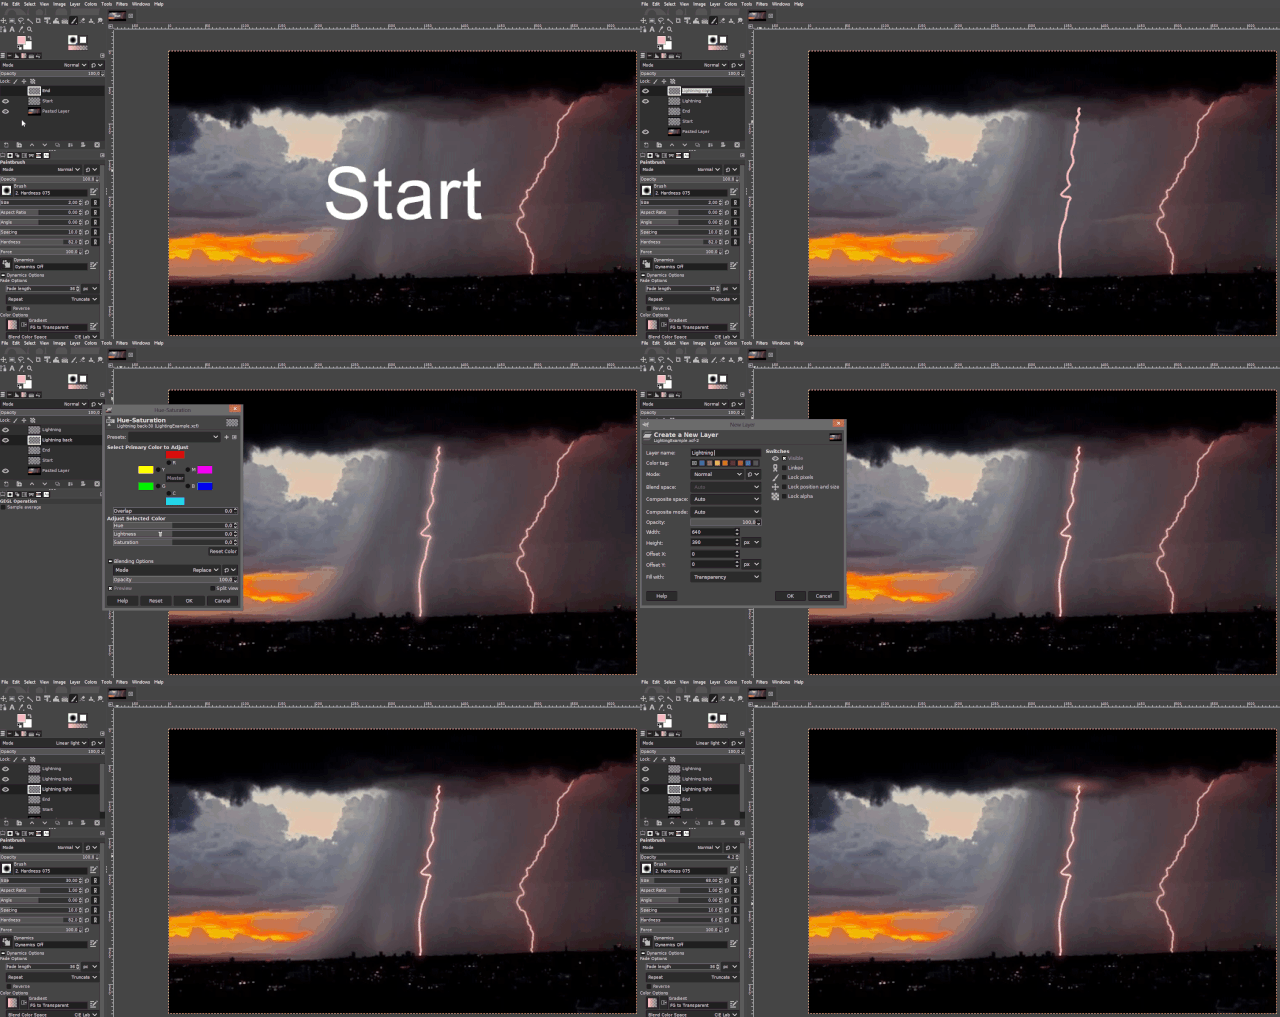
In the subsections below, I would like to show you how to create lightning bolts practically and with the help of example animations. I have used the same template photo for both of the examples. You can download it here to try it yourself: Click
3.1. Painting a lightning bolt
As complex as a lightning bolt may appear, it is very easy to paint it. You may be surprised, but after 2 cans of coffee you can paint even the most beautiful bolts of lightning. A shaky hand is very useful to give the lightning a natural look.
Look closely at the lightning in photos like the example photo here in the tutorial. Look at the thickness of the bolt in pixels, the color and its shape and use this as a guide when you paint your own lightning bolts.
In the photo of this example, the bolt has a thickness of 1.5 pixels and approximately a color of RGB 80, 60, 64 (Hex: cc99a3).
3.1.1. Step by step
Activate the Paintbrush tool, set a brush size of 1 or 1.5 and a brush hardness of about 80.
Steal the color of the lightning bolt with the color picker tool or set the foreground color manually to RGB 80, 60, 64 (Hex: cc99a3).
Create a new layer on top of the other layers of your image and set the mode to Screen or Linear Light.
Paint your bolt how and where you want it.
Duplicate this layer and move it under the layer of your lightning bolt. Set the mode of this layer to Linear Light.
Use the Gaussian Blur tool with a value of around 3.5x3.5.
If necessary, lower the brightness of this layer a little.
Create another layer below the layer you just worked on. Set the mode of this layer to Linear Light as well.
Paint with a soft brush at a size of about 70-80. Set the aspect ratio to 1.00 and the opacity to a very low value.
Paint the light with the color of the bolt where you need it.
Paint a little dot at the point where the lightning bolt is created with a lighter shade or white.
Take a screenshot quickly! No one will believe you without it. :-D
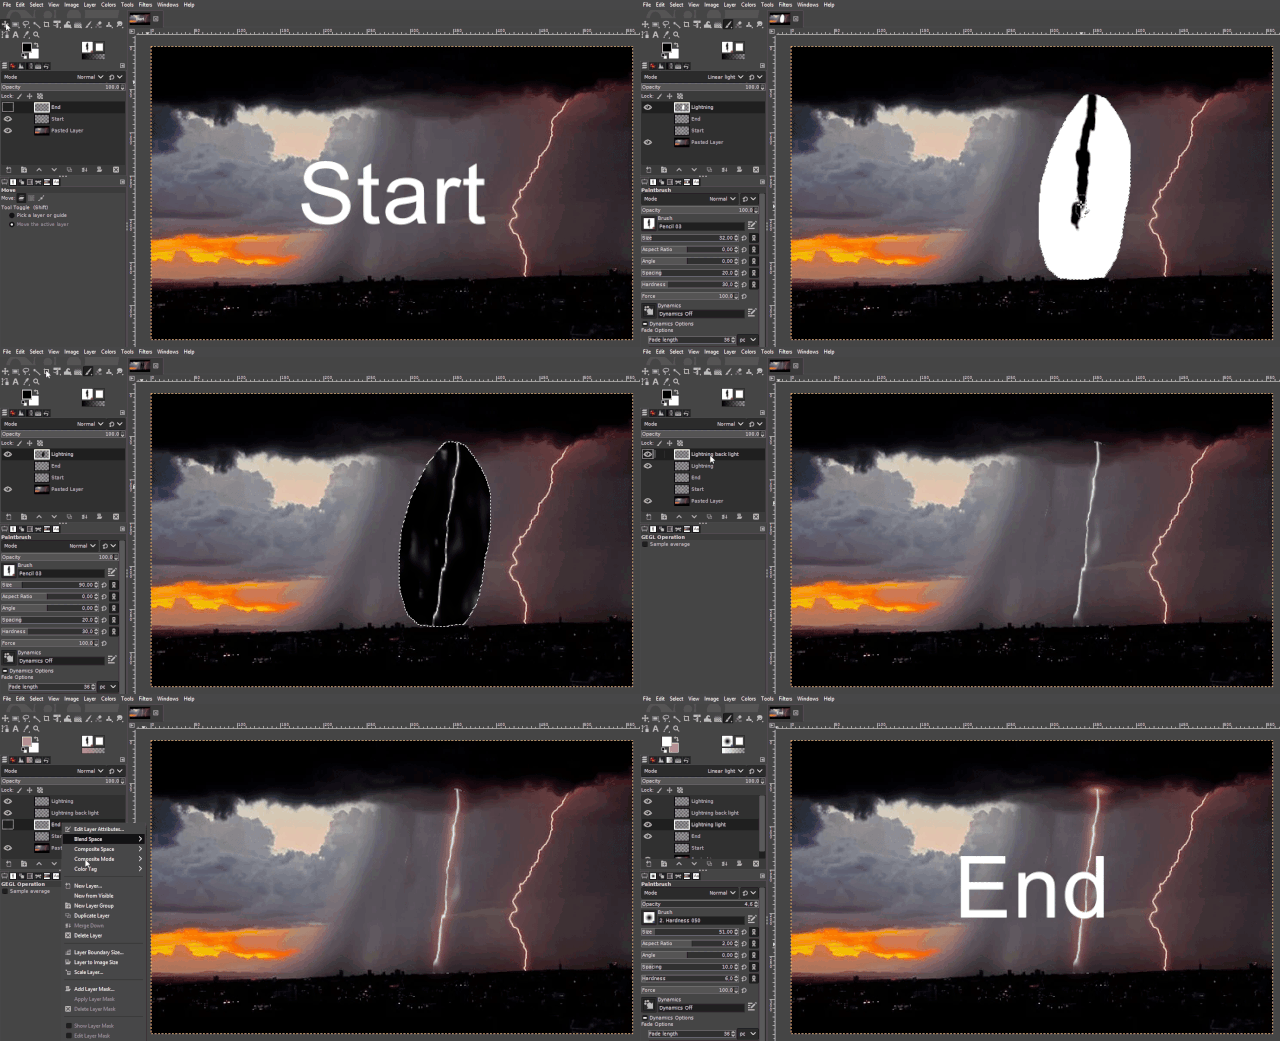
3.1.2. All steps in one GIF
3.2. The Difference Clouds trick
This is an old and relatively well-known trick. The way you can create a lightning bolt with this trick is very abstract, but also very effective. You do not paint the lightning directly, but a contrast. Where the contrast is strongest, a line is generated with the Difference Clouds tool. This line is then separated from the background with the Levels tool and then cut out.

At first sight it looks like painting lightning bolts is much more efficient. But you can achieve interesting effects with the trick explained here by experimenting a little with brush dynamics and brush hardness when painting the contrast image.
3.2.1. Step by step
- Create a new layer on top of your other layers. Name this layer "Lightning".
- Activate the Free Select tool (Lasso) and draw an oval area where you want the lightning to be. (See example animation).
- Fill this selection with white color.
- Select the color black as foreground color.
- Activate the Paintbrush tool, set the brush hardness to 30 and the brush size to 90.
- Paint a line in the selection area from top to bottom. Feel free to tremble a little. You can also activate the paintbrush option "Jitter".
- Now paint the area to the left of the line black.
- Open the "Filters" menu, then the submenu "Render/Noise" and click on the menu item "Difference Clouds".
- Click on the menu item "Colors/Invert" to invert the colors in the selection area. Now you can see the lightning bolt.
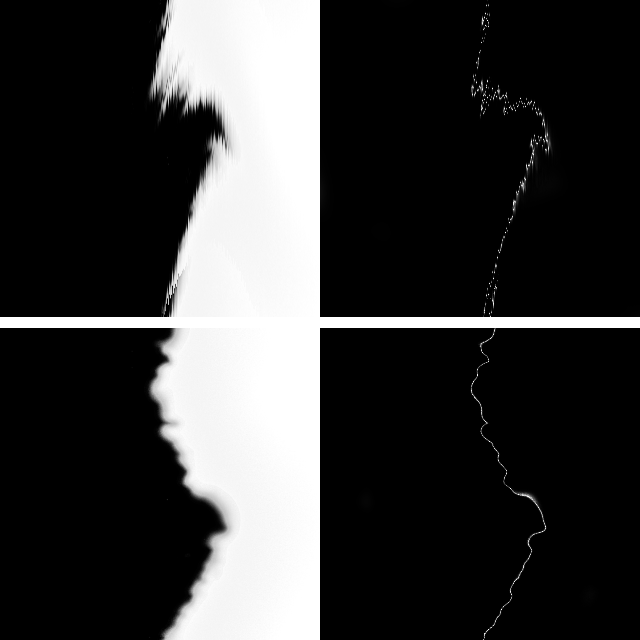
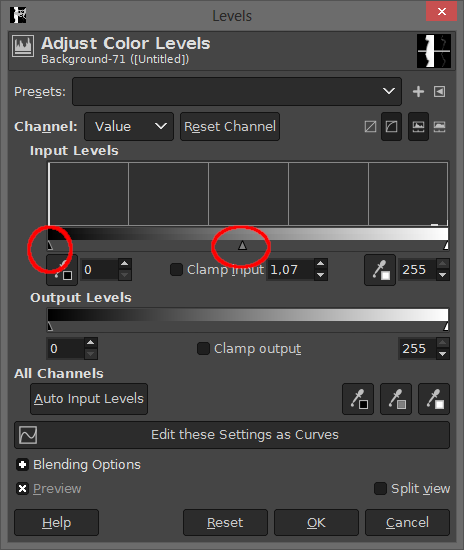
- Open the levels dialog ("Colors/Levels"). First move the middle arrow in the "Input" area to the right until it turns black around the lightning bolt. With the right arrow you can make some adjustments. (See screenshot below.)
- Delete the selection (not the content of the selection) ("Select/None").
- Use the paintbrush tool with black color to remove remaining artefacts around the lightning bolt.
- Open the dialog "Color to Alpha" ("Colors/Color to Alpha") and select black as the color to be transparent.
- Set the layer mode to "Linear Light".
- Create another layer below the layer you just worked on. Set the mode of this layer to Linear Light as well. Name it "Lightning back light".
- Activate the "Lightning" layer again.
- Use the "Alpha to selection" function to create a selection around the lightning.
- Open the "Grow" selection dialog and set the growth to 3 pixels.
- Go back to the "Lightning back light" layer and fill it with a color you want for the lighting of the bolt. You can use the color from the previous example. (RGB 80, 60, 64 (Hex: cc99a3))
- Use the Gaussian Blur tool with a value of around 3.5x3.5.
- Create another layer below the "Lightning back light" layer you just worked on. Set the mode of this layer to Linear Light as well. Name it "Lightning light"
- Paint with a soft brush at a size of about 70-80. Set the aspect ratio to 1.00 and the opacity to a very low value.
- Paint the light with the color of the bolt where you need it.
- Paint a little dot at the point where the lightning bolt is created with a lighter shade or white.
- Adjust the opacity of the "Lightning light" layer until you get the result you want.
3.2.2. All steps in one GIF
Best regards
QuantumG
PS: 25% of the rewards for this post go to LMAC as beneficiary ( #supportlmac ).
I'm sure you've already noticed that I'm not a native English speaker. Because there are most probably some linguistic pimples all over my text.
Therefore, I would like to ask for your help if you find any passages in the text that are too difficult or impossible to understand. Please let me know in the comments section. Then I will correct the relevant passages immediately and express my heartfelt thanks to you. :-)
╭━━⋞ ☙ My NFT artworks ≻≺ ♖ My dCity ⋟━━╮
╰━━━━⋞ ♫ My Rising Star(s) ⋟━━━━╯
How delightful, @quantumg! So many times I want to add lightning and I have to borrow a bolt or two from Pixabay. Never satisfying. You once again answer a question and solve a problem. Thanks a lot, our resident art scholar in LMAC
Hi. I'm glad you found it useful.
I know that only too well. I have also often borrowed bolts from photos. But it's always such a Sisyphean task to cut them out.
That's why, in the end, I preferred to learn to act like Thor myself. :-D
PS: Thank you very much for the tip. :-)
🎨🎈
The rewards earned on this comment will go directly to the person sharing the post on Twitter as long as they are registered with @poshtoken. Sign up at https://hiveposh.com.
This is a cracking tutorial quantumg!
Thanks for sharing. I am going to use this as I create digital art using GIMP. I've never experimented with making lightening, but now I have a clear and easy process to follow.
Thanks again :)
Why haven't I been following on these tutorials? This is just a mind-building class here. Right now, I am feeling guilty.
I am going to all tutorials post to read up. I have to take part in these contests.
Gracias. Un abrazoteDear @quantumg. Qué tarde me entero se esta clase. Tengo que estudiarla.