Hello Hivers,
How about creating a webpage where you will host your arts, especially 3D arts/ models so you can rotate them, see them in different angles and maybe share with friends?
Maybe one day they might be interested in buying one of your collections as an NFT.😆
Today I want to introduce you to three.js. It is a library used to display 3D models in a web browser. Developers don't need to create a new platform for users to experience 3D graphics when using three.js.
When I learn something new, I like to work on a simple project where I can use the new technology immediately. I will come back to learn the concepts and their working rules later. Usually, people will learn the concepts first and then work on a project. I just want to say that everyone has different learning styles and that's totally ok if we're different.
What you need
A text editor
There are three popular text editors: VSCode, Atom and Sublime Text. I personally use VSCode because I got to know about it first and almost everyone I know uses it.
https://www.developpez.net/forums/attachments/p447406d1/a/a/a
Live Server Extension
This is an extension in VSCode that helps me to make my existing server live. I just need to right-click on my html file, choose Open With Live Server, and my simple app will go live on localhost immediately.
A web browser
Almost any web browser can run three.js. I assume no one is using Internet Explorer at this point. It is being discontinued.
Simple setup before we start
This is a simple project so it doesn't require much setup. Below are the steps to follow.
- Create a new folder
- Download Node.js here
- Go to the terminal and cd to your root directory a.k.a. the new folder you just created in Step 1
- Type npm init -y //
setup the package.json file - Type npm install express //
add more routes later with express - Type npm install three //
install three.js libraries
Phew! We're done with installing basic stuff already. Now we move on with setting up the repo.
Set up the repo
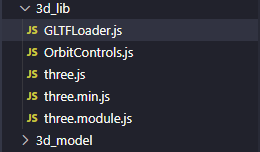
Inside three.js folder, there is a lot of stuff that won't be in use for this small project. I will just copy the essential files to a new folder named 3d_lib ( You can name whatever you want).
Below are 5 files I need:
- three.js
- three.min.js //
three.min.js is a minified version of three.js with fewer whitespaces and comments - three.module.js //
GTLFLoader.js and OrbitControls.js import properties from this file
We can find the first three files in node.modules/three/build/src
- GTLFLoader.js
Inside node.modules/three/examples/jsm/loaders - OrbitControls.js
Inside node.modules/three/examples/jsm/controls
I have prepared these files in 3d_lib folder.
One more step is to open GTLFLoader.js and OrbitControls.js, then change 'three' to './three.module.js'
As we have already changed the location of these files, we need to update the path to import them properly.
GTLFLoader.js
//GTLFLoader.js
import {
    AnimationClip,
    Bone,
    Box3,
    ....
    Vector2,
    Vector3,
    VectorKeyframeTrack,
    sRGBEncoding
} from './three.module.js'; // prior to change: from 'three'
OrbitControls.js
//OrbitControls.js
import {
    EventDispatcher,
    MOUSE,
    Quaternion,
    Spherical,
    TOUCH,
    Vector2,
    Vector3
} from './three.module.js'; // prior to change: from 'three'
3 basic components in three.js
Before we start
Let's create a web page to display three.js. I create index.html. This is the root file of my app. CSS and Javascript files will be loaded via references from index.html.
I place essential scripts at the end of the body before our closing </body> tag because they impact the render of the page.
I can place a <script> element in either the <head> or <body> element . However, if it is placed in the head and one of the scripts fails to load, any content on our page physically lower than the failing script may not render or will error. It might result in a blank page with no HTML and CSS. It's better to load all HTML content before loading our scripts.
<!DOCTYPE html>
<html lang="en">
<head>
    <meta charset="UTF-8">
    <meta http-equiv="X-UA-Compatible" content="IE=edge">
    <meta name="viewport" content="width=device-width, initial-scale=1.0">
    <title> My first three.js app </title>
</head>
<body>
    <script type="module" src="./3d_lib/three.js"></script>
    <script type="module" src="./3d_lib/three.min.js"></script>
    <script type="module" src="./3d_lib/three.module.js"></script>
    <script type="module" src="./3d_lib/GLTFLoader.js"></script>
    <script type="module" src="./3d_lib/OrbitControls.js"></script>
    <script type="module" src="./app.js"></script>
</body>
</html>
Create the scene
I create a new JS file named app.js
We need three things: scene, camera, and renderer to display 3D graphics with three.js
The renderer is used to render the scene with a camera.
Scene
The scene is a "room" for us to place our 3D models inside. It is a class with no parameters.
Camera
The camera is like our eyes. We use "our eyes" to see things. When we are in the scene (the room), if we don't include a camera (open our eyes), we can't see anything.
There are many kinds of cameras in three.js (I heard so but I don't know any other camera lol) but this simple app just needs a perspective camera.
Four parameters of the perspective camera are field of view, aspect ratio, near and far.
- field of view: the extent of the scene that is seen on the display. The value is in degrees.
- aspect ratio: the window or canvas width divided by the height. I use the window's inner width and height here because I haven't styled my web page yet. I will change them to canvas width and height later when adding CSS.
- near: any object closer than near won't be rendered.
- far: any object further than far won't be rendered.
Renderer
The renderer is like our brain. If we don't set up the renderer, it's like we have brain damage and we can't process images even when we have eyes (I'm not a doctor lol, I just want to compare the objects to make the concepts less abstract).
We need to append the renderer to the document's body or the canvas.
//scene setup
const scene = new THREE.Scene();
//camera setup
const camera = new THREE.PerspectiveCamera(
75,
window.innerWidth / window.innerHeight,
0.1,
1000
);
camera.position.set( 0, 0, 100 );
camera.lookAt( 0, 0, 0 );
//renderer setup
const renderer = new THREE.WebGLRenderer();
renderer.setSize(window.innerWidth, window.innerHeight);
document.body.appendChild(renderer.domElement);
Import a loader → upload your 3D model to your scene
We import the GLTF loader at the beginning of app.js ( your Javascript working file ).
import { GLTFLoader } from "./3d_lib/GLTFLoader.js";
I downloaded the model here
I opened the model in Blender and exported it to glb format, then I saved it in a folder named 3d_model. This folder needs to be created inside the working folder we created since the beginning.
I set the position and scale the model so it's too small or big on the screen. If the model hasn't faced the direction we wanted yet, we can rotate the model using model.rotation.x (or y or z).
Finally, remember to add the model to the scene or "the room". If we don't place the object in the room, we just step into an empty room so there's nothing for us to look at.
const loader = new GLTFLoader();

loader.load("./3d_model/house.glb", function (gltf) {
  const model = gltf.scene;
  model.position.set(0, -5, 0);
  model.scale.set(2, 2, 2);
  model.rotation.y = Math.PI / -2;
  model.rotation.x = Math.PI / 15;
  scene.add(model);
});
Set up the light so we can see the model
If you step into a room and there is no light source, the whole room would be totally in black. You can't see anything without any light source.
I add some different types of light sources here. I might add or remove more later. At this point, I will just set up these 3 light sources.
//set up ambient light
const light = new THREE.AmbientLight(0x404040); // soft white light
scene.add(light);

//set up directional light
const pointLight = new THREE.PointLight(0xffffff);
pointLight.position.set(10, 5, 30);
scene.add(pointLight);
Render the scene
If we don't add this step, the scene wouldn't be rendered.
requestAnimationFrame produces higher quality animation than when using setTimeout or setInterval.
function animate() {
  requestAnimationFrame(animate);
  renderer.render(scene, camera);
}
animate();
Final display
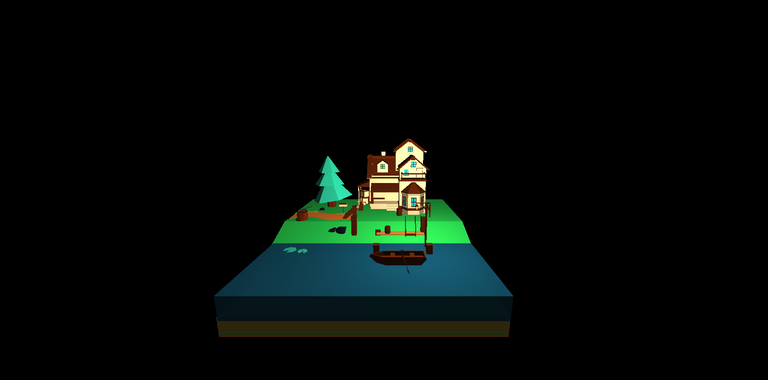
Hooray! We did it. We uploaded our first 3D model to our web page.
Next time, we will add styles to the page so it will be more good-looking.
Thanks for stopping by and reading my post. Take care and have fun coding :D
Congratulations @mikevuu! You have completed the following achievement on the Hive blockchain and have been rewarded with new badge(s):
Your next target is to reach 200 upvotes.
You can view your badges on your board and compare yourself to others in the Ranking
If you no longer want to receive notifications, reply to this comment with the word
STOPCheck out the last post from @hivebuzz: