
look at the gif here
♥ Español ♥
Debido al buen recibimiento que tuve en estos días con mi tutorial de sombreado texturizado, me animé a enseñarles mas cositas. Esta vez traigo un pequeño tutorial de como hacer un mockup de un stickers.
¡Espero lo disfruten y lo pongan en practica!
♥ English ♥
Due to the good reception that I had these days with my textured shading tutorial, I was encouraged to teach them more things. This time I bring a small tutorial on how to make a sticker mockup.
I hope you enjoy it and put it into practice!
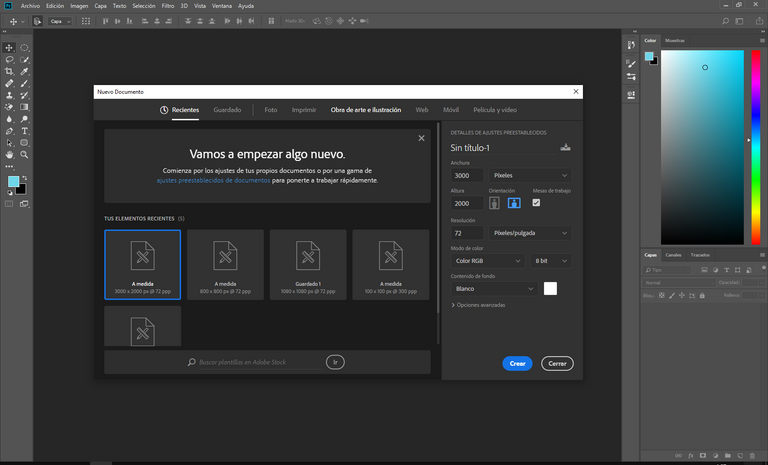
Lo primero sera crear una mesa de trabajo con las medidas que mostrare en la imagen.
The first thing will be to create a work table with the measurements that I will show in the image.
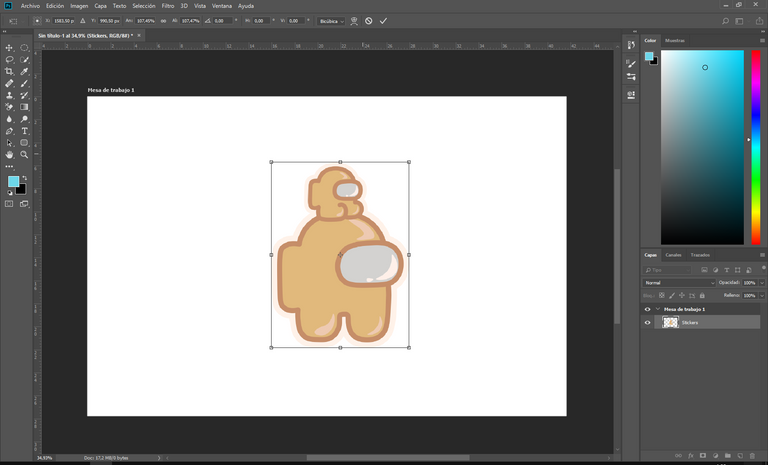
Colocamos el vector que queremos usar para el sticker.
We place the vector that we want to use for the sticker.
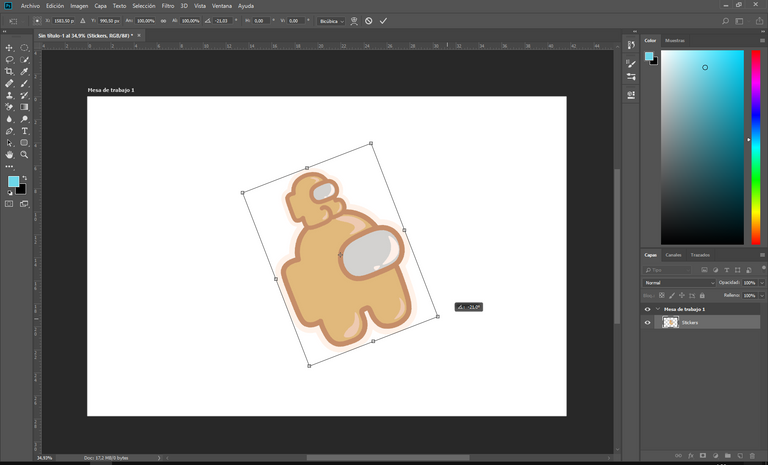
Usamos Ctrl+T para transformar y giramos el elemento -21º.
We use Ctrl + T to transform and turn the element -21º.
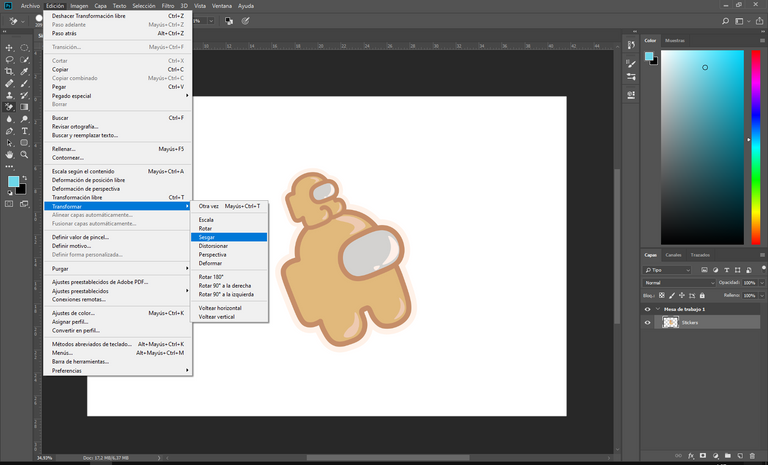
Luego vamos a Edición> Transformar> Inclinar y mientras mantenemos presionada la tecla Alt usamos el mouse para inclinar la esquina superior derecha 7º.
Then we go to Edit> Transform> Incline and while holding down the Alt key we use the mouse to incline the upper right corner 7º.
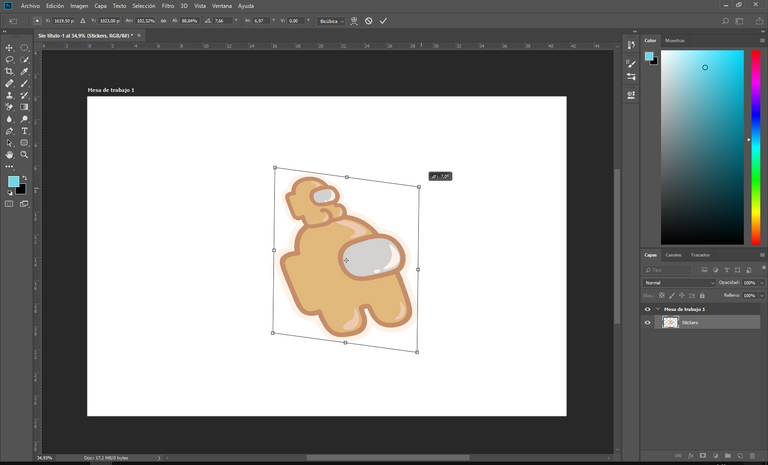
Nos debe quedar algo así.
We must have something like this.
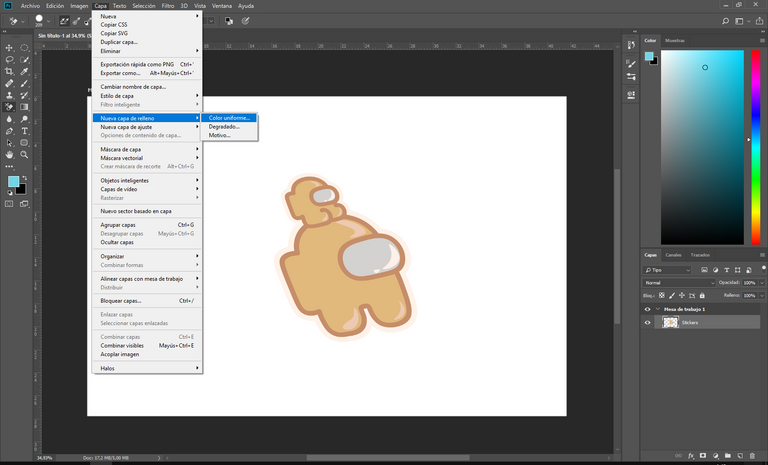
Vamos a la sección de Capa> Nueva capa de relleno> Relleno de color uniforme.
Let's go to the Layer section> New fill layer> Solid color fill
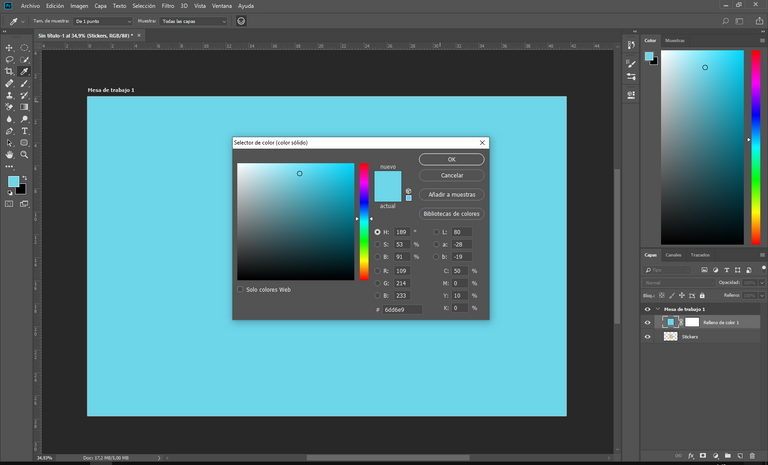
colocamos el siguiente código #6dd6e9 y luego hacemos clic en Aceptar.
We put the following code
#6dd6e9 and then click OK.
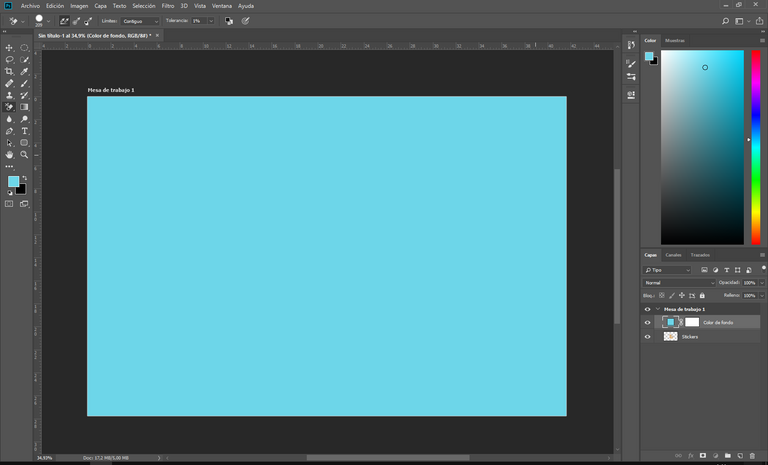
Nombraremos la capa como "Color de fondo" y la colocaremos en la parte inferior del panel de capas.
We will name the layer "Background Color" and place it at the bottom of the layers panel.
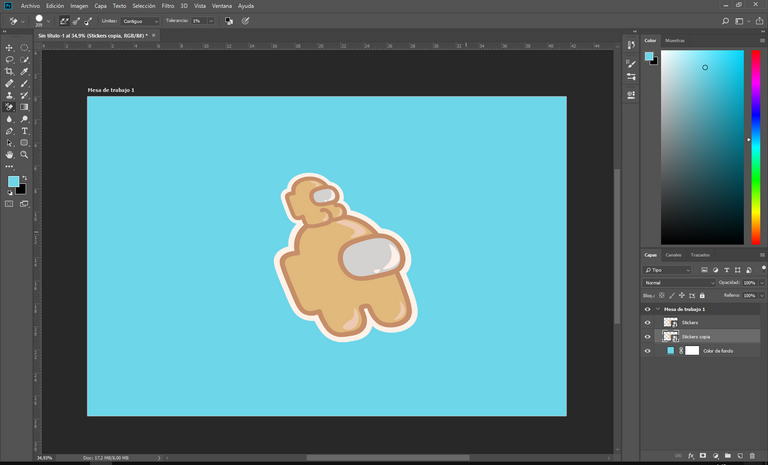
Convertiremos la capa del vector en objeto inteligente y la dublicamos con Ctrl+J.
We will convert the vector layer into a smart object and duplicate it with Ctrl + J.
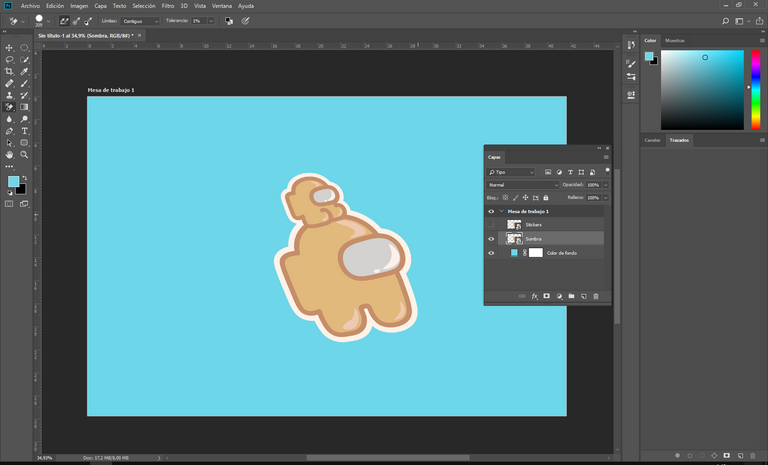
Nombramos la capa duplicada como "Sombra" y ocultamos la que está por encima, el panel de capas debería queda como se muestra en la imagen.
We name the duplicated layer as "Shadow" and we hide the one above, the layers panel should be as shown in the image.
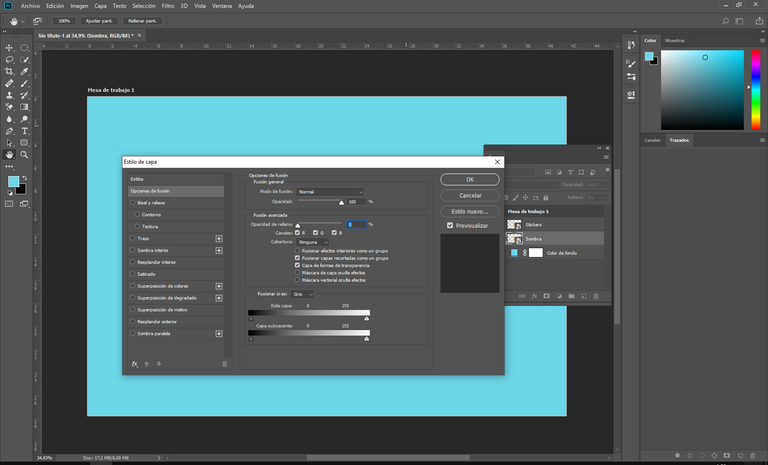
Hacemos doble clic en la capa "Sombra" para abrir la ventana de *Estilo de capa* y establecemos la Opacidad de relleno en 0.
Hacemos doble clic en la capa "Sombra" para abrir la ventana de * Estilo de capa * y establecemos la Opacidad de relleno en 0.
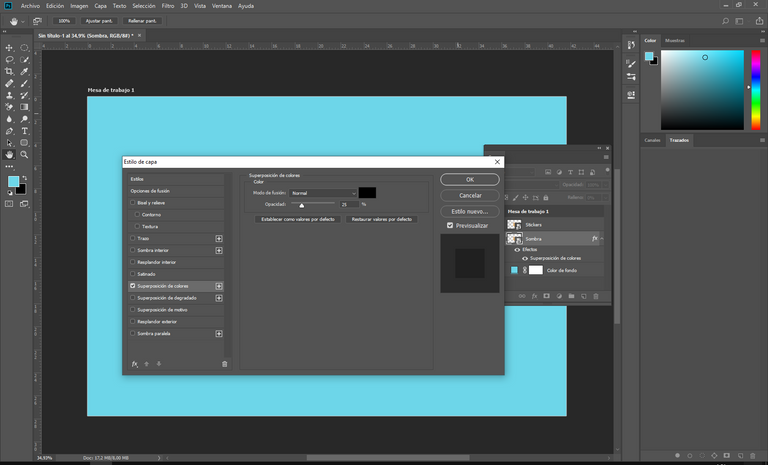
Vamos a superposición de color y usamos el negro (#000000) a 25% de opacidad.
We are going to overlay color and use black (# 000000) at 25% opacity.
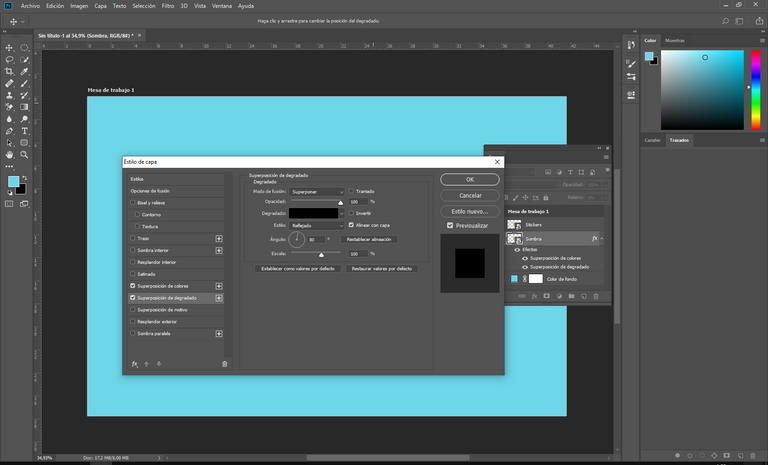
Ahora nos dirigimos a el apartado de superposición de degradado y colocamos degradado de negro a negro , modo de fusión de superposición y 100% de opacidad.
Now we go to the Gradient Overlay section and place Black to Black Gradient, Overlay Blending Mode and 100% Opacity.
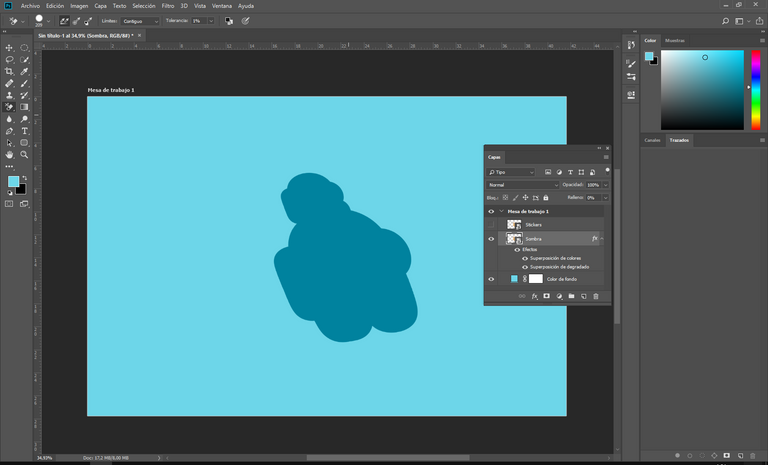
La capa de sombra debería verse así.
The shadow layer should look like this.
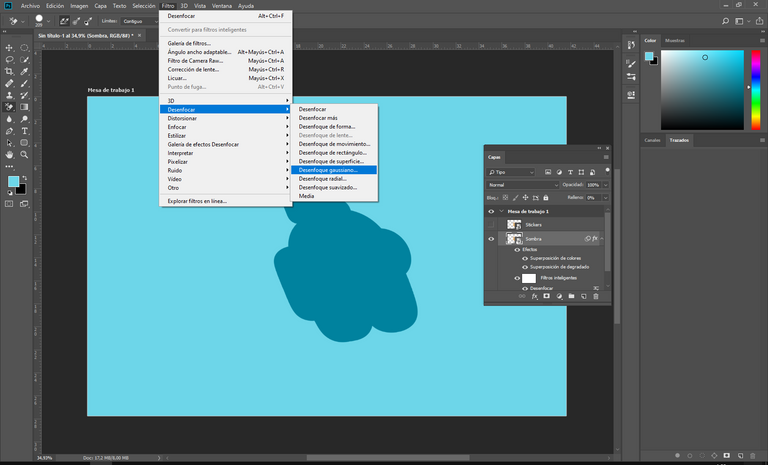
Ahora vamos a Filtro> Desenfocar > Desenfoque gaussiano
Now let's go to Filter> Blur> Gaussian Blur
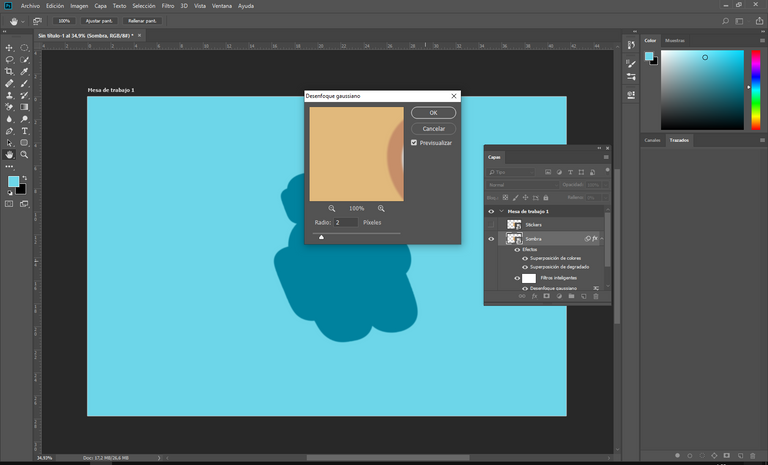
Aplicamos un desenfoque de 2 píxeles, luego le damos click en aceptar.
We apply a blur of 2 pixels, then we click on accept.
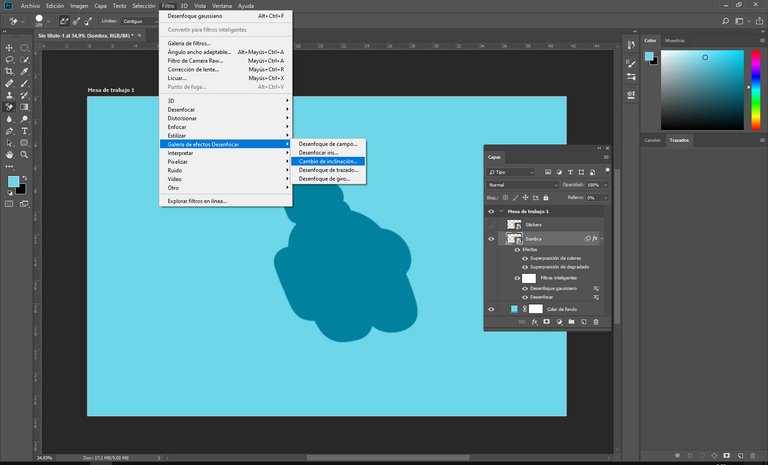
Vamos ahora a Filtro> Galería de desenfoque> Cambio de inclinación.
Let's now go to Filter> Blur Gallery> Tilt Shift.
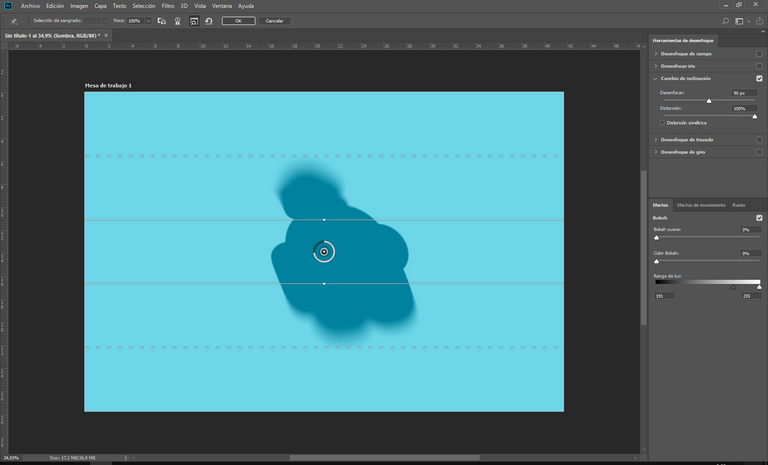
configuramos el desenfoque como se muestra en la imagen con Desenfoque de 90 px y 100% de distorsión.
we set the blur as shown in the image with Blur of 90 px and 100% distortion.
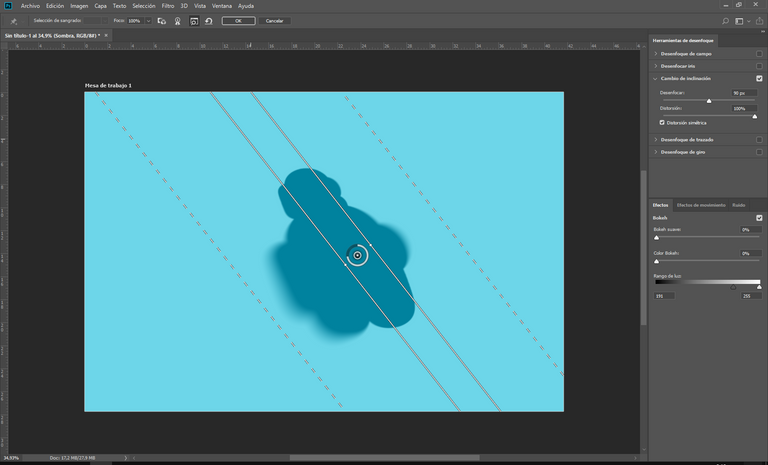
Configuramos la direccion a nuestro gusto, como mejor se vea.
We configure the address to our liking, as best seen.
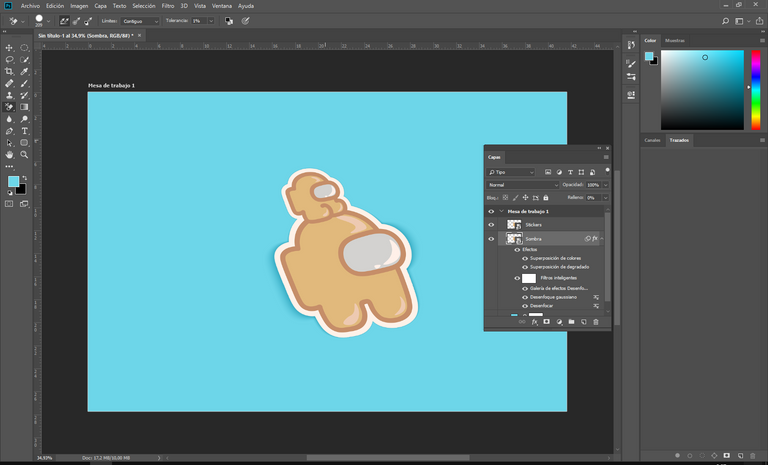
Volvemos a la capa principal y le activamos la visibilidad, seleccionamos ahora esa capa.
We return to the main layer and activate the visibility, we now select that layer.
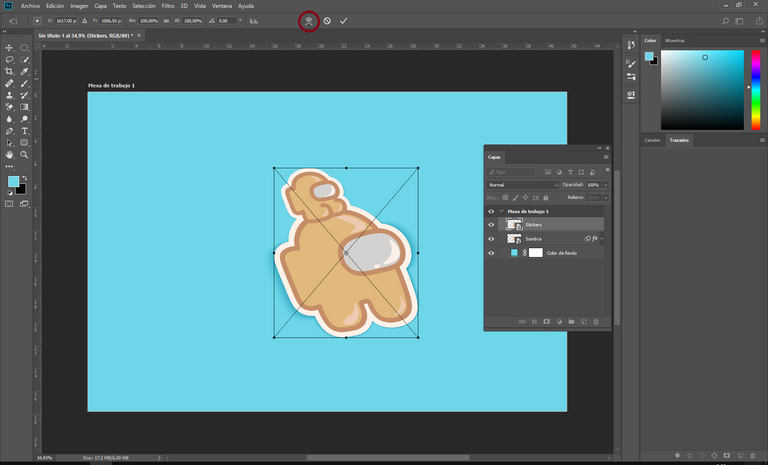
Volvemos a usar el Ctrl+T para activar la opción de transformar, luego nos vamos a la parte superior y activamos el modo de deformar.
We use Ctrl + T again to activate the transform option, then we go to the top and activate the warp mode.
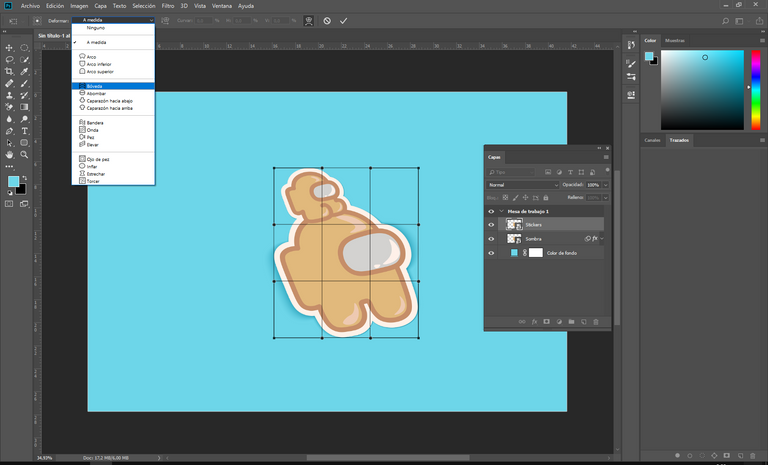
Desde el menú desplegable, elija la forma de arco.
From the drop down menu choose the arc shape.
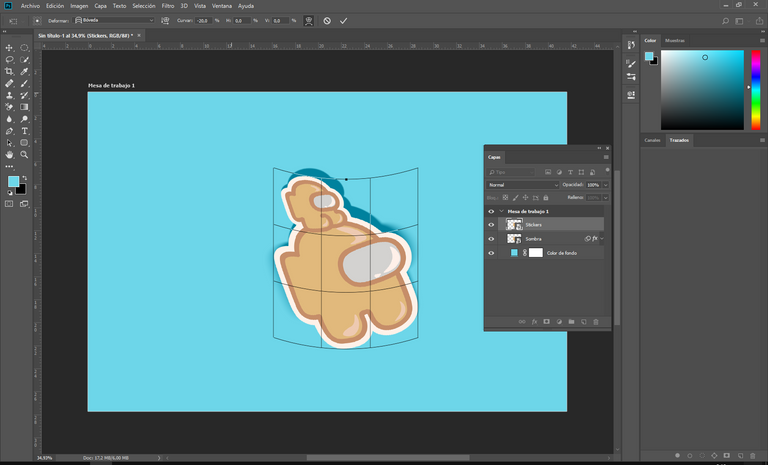
Y ahora configure el Bend en -20%.
And now set the Bend to -20%.
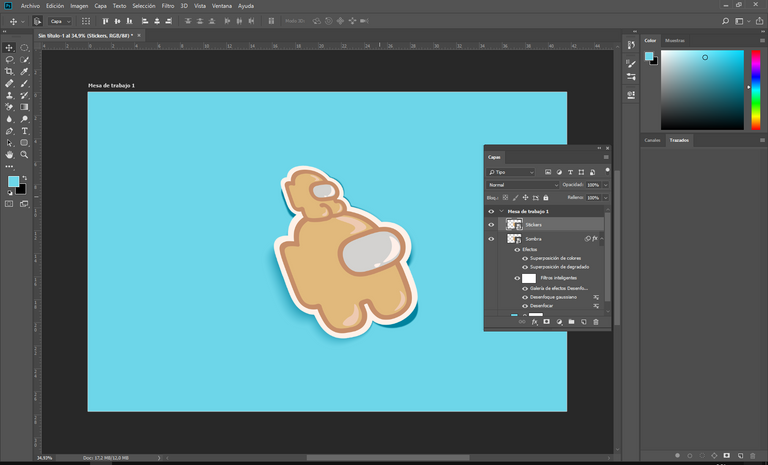
Acomodamos el sticker sobre la sombra.
We arrange the sticker on the shadow.
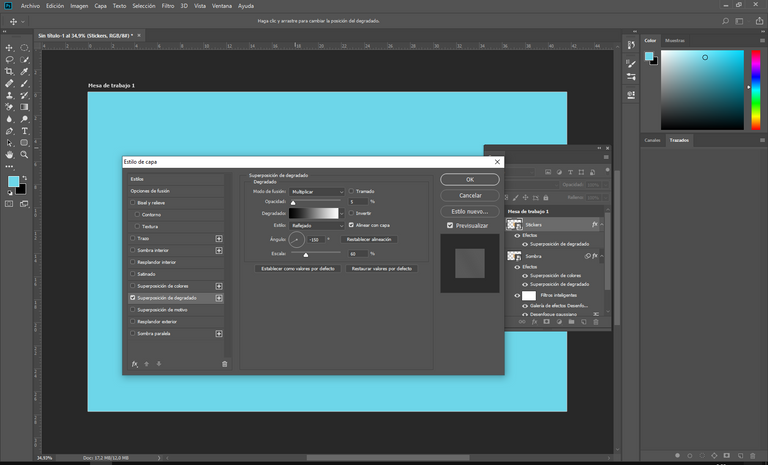
Haga doble clic en la capa Sticker para abrir la ventana Estilo de capa y aplique una superposición de degradado usando la configuración que se ve en la imagen.
Double click the Sticker layer to open the Layer Style window and apply a Gradient Overlay using the settings seen in the image.
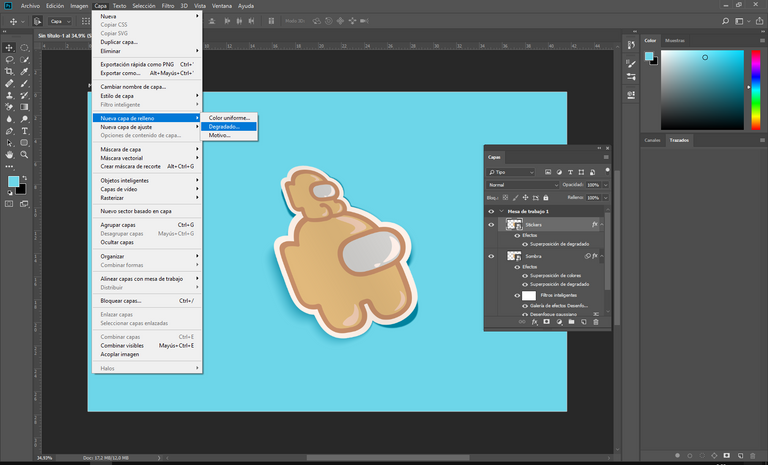
Vamos nuevamente a Capa> Nueva capa de relleno> Degradado.
Let's go back to Layer> New Fill Layer> Gradient.
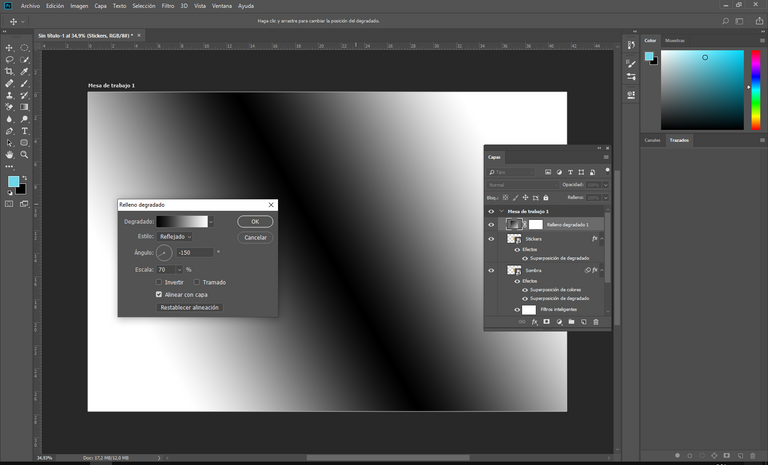
Usamos la configuración que se muestra a continuación.
We use the configuration shown below.
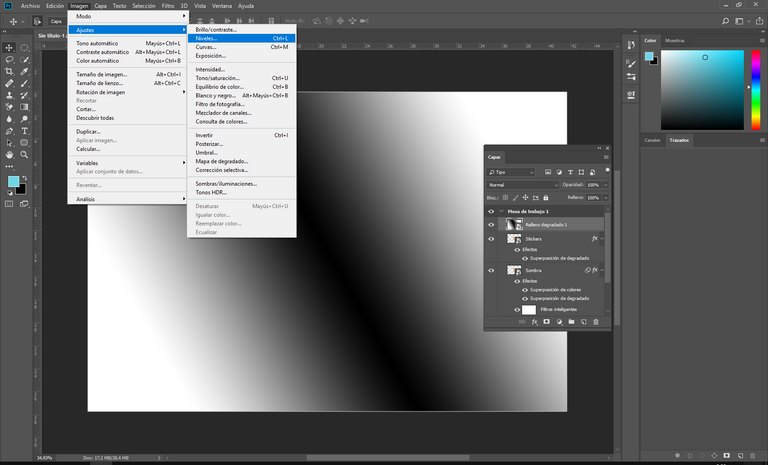
Convertimos la capa en objeto inteligente y luego nos vamos a Imagen> Ajustes> Niveles.
We convert the layer into a smart object and then we go to Image> Adjustments> Levels.
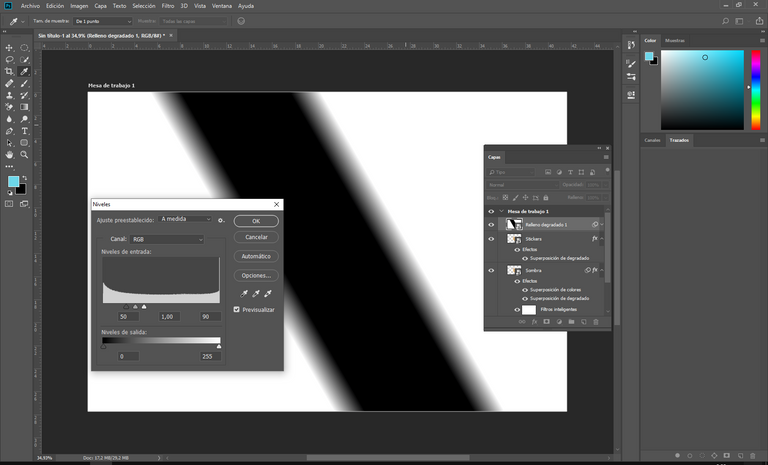
Establezca el Nivel de entrada de sombra en 50 y el Nivel de entrada de resaltado en 90.
Set the Shadow Input Level to 50 and the Highlight Input Level to 90.
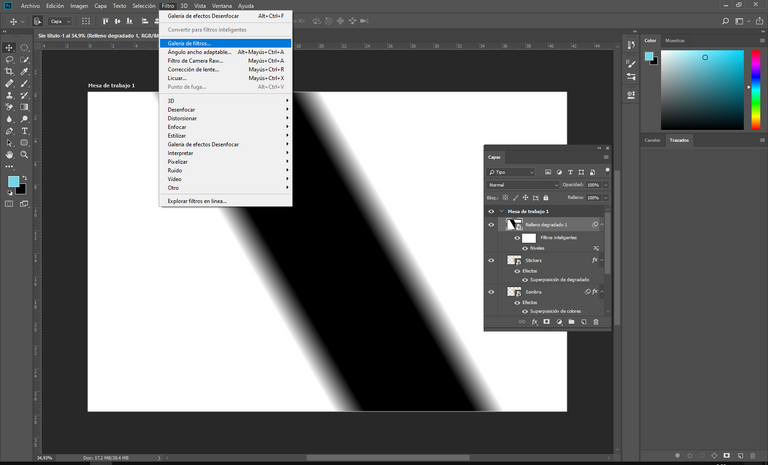
Vamos a Filtro> Galería de filtros.
Let's go to Filter> Filter Gallery.
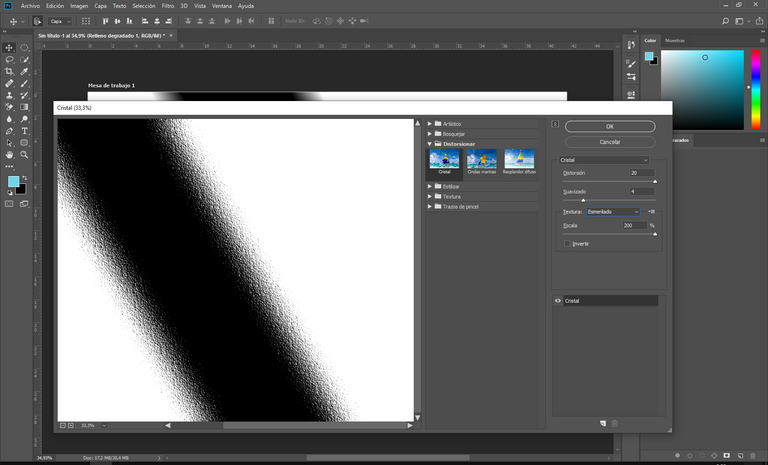
Elija Vidrio y Establezca la distorsión en 20 y la suavidad en 4.
Choose Glass and Set the distortion to 20 and the smoothness to 4.
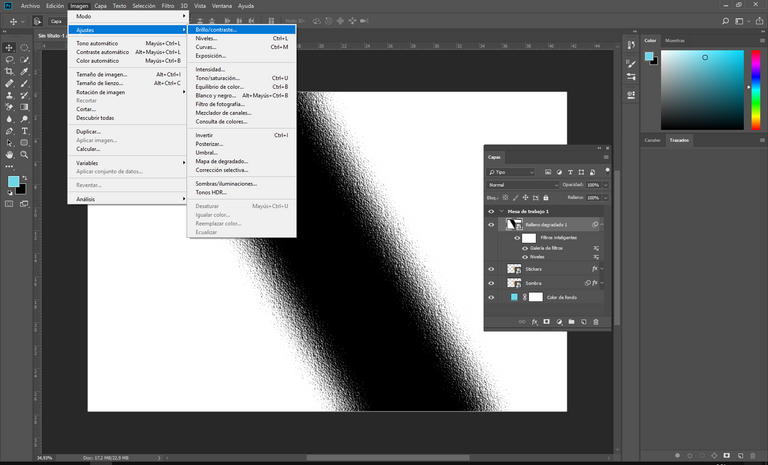
Vamos a Imagen> Ajustes> Brillo / Contraste.
Let's go to Image> Adjustments> Brightness / Contrast.
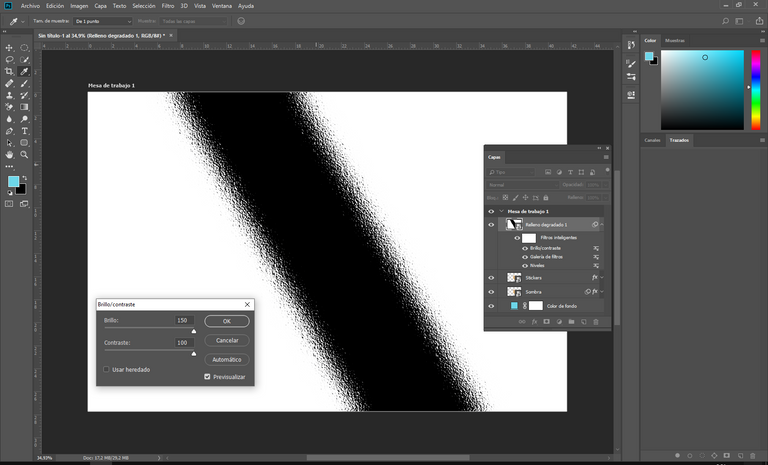
Colocamos 150 para Brillo y 100 para Contraste.
We set 150 for Brightness and 100 for Contrast.
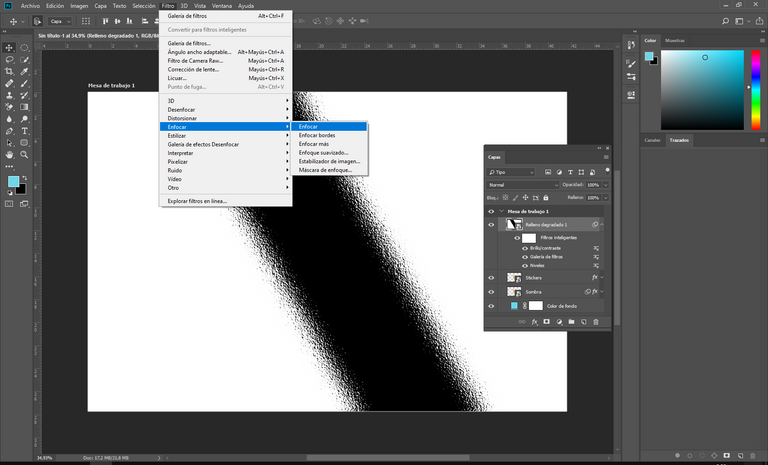
Para terminar vamos a Filtro> Enfocar> Enfocar.
To finish we go to Filter> Focus> Focus.
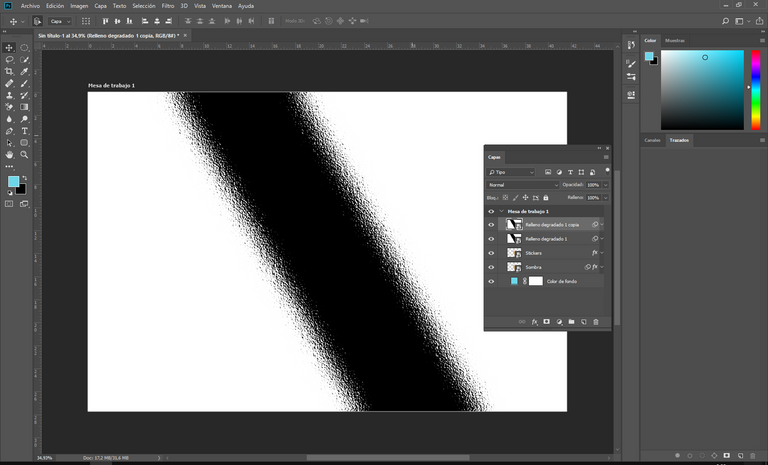
Duplicamos la capa, seleccionando ambas creamos una mascara de recorte a la capa Sticker.
We duplicate the layer, selecting both we create a clipping mask to the Sticker layer.
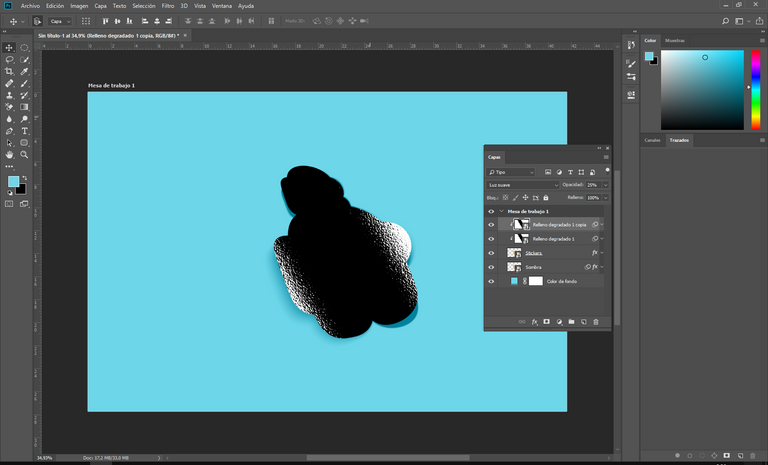
Se debería ver asi. Ahora seleccionamos la capa superior y establecemos el Modo de fusión en Luz suave y Opacidad en 25%.
It should look like this. Now we select the top layer and set the Blending Mode to Soft Light and Opacity to 25%.
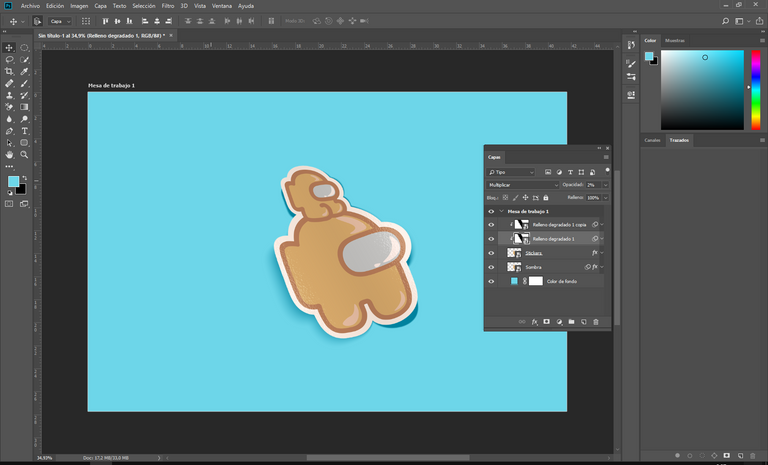
En la copia inferior del efecto de brillo, configure el Modo de fusión en Multiplicar y la Opacidad en 2%.
On the bottom copy of the glow effect, set the Blending Mode to Multiply and the Opacity to 2%.
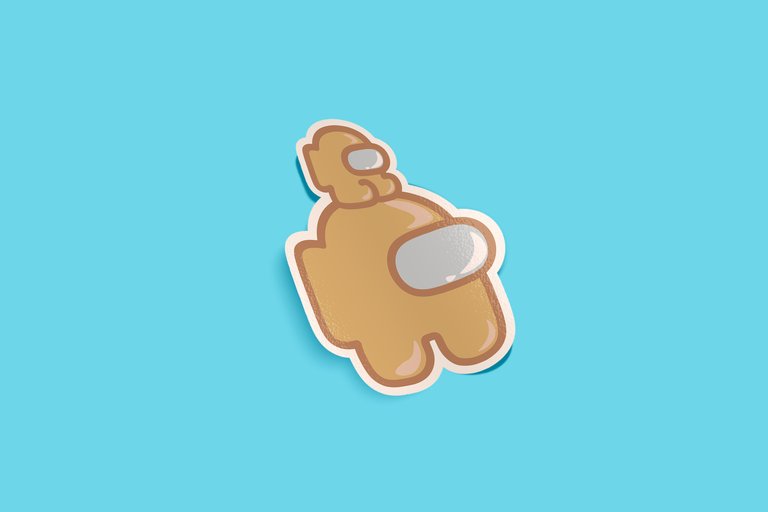
¡Listo! Este seria el resultado final, solo queda modificarlo al gusto para un mejor resultado.
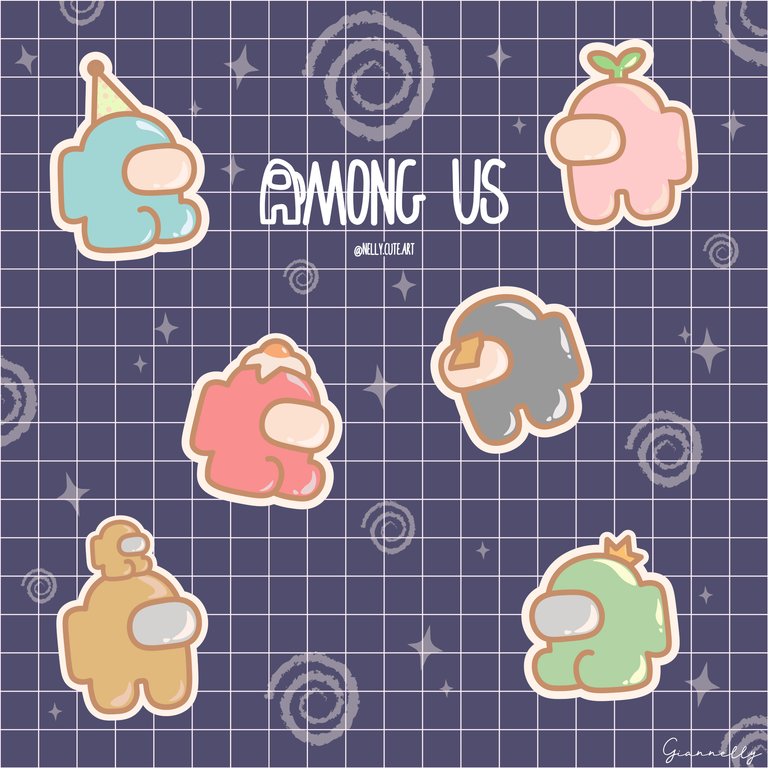
Es una buena opción si quieres visualizar el como serian tus sticker de una ilustración que hayas hecho. En mi caso se trata de una ilustración que hice de Among Us
Ready! This would be the final result, it only remains to modify it to taste for a better result.
It is a good option if you want to visualize how your sticker would be of an illustration that you have made. In my case it is an illustration that I did of Among Us
Gracias por leer, si te interesan mis ilustraciones puedes pasarte por mi instagram ♥ publico pequeños dibujitos siempre que puedo.
Thanks for reading, if you are interested in my illustrations, you can visit my instagram ♥ I publish small drawings whenever I can.


Congratulations @giannelly! You have completed the following achievement on the Hive blockchain and have been rewarded with new badge(s) :
You can view your badges on your board and compare yourself to others in the Ranking
If you no longer want to receive notifications, reply to this comment with the word
STOPDo not miss the last post from @hivebuzz: