Spanish Version
Buenas gente! Como estan? Espero que hayan arrancado muy bien su semana! Aca estamos de vuelta con un nuevo devlog. En esta semana estuve pensando como poder planificar y empezar con las decoraciones de cada habitacion. Como mencionamos anteriormente, la idea es poder hacer toda la casa procedural/random ya que si bien desarrollar una algoritmo para eso es mas complejo y lleva mas tiempo hace que cada vez la casa se sienta unica y casi no haya probabilidades de que te salgan dos casas iguales.
Como fueron viendo en los devlogs anteriores ya tenemos la estructura de la casa bastante armada. Estama semana tambien aproveche para ponerle pisos a los pasillos ya que todavia no lo habiamos hecho y a cerrar los pasillos para ya tener toda la casa cerrada por completo.
Mentira nos falta el techo pero eso lo agregamos despues :D
Para el interior de la casa planifique los siguientes pasos. Si bien son pasos generales y pueden ser modificados a lo largo del desarrollo nos sirven para tener una guia de como trabajar.
- Asignar a cada sala un "rol" o "tipo". Por ejemplo cocina, dormitorio, baño, etc. Para asignar cada tipo mi idea es decidirlo a traves del tamaño de las habitaciones que se generaron ya que por ejemplo para una cocina o dormitorio vamos a necesitar mas espacio que un baño.
Luego de asignarlas cada tipo de sala tendra un script con los pasos a seguir para construir esa sala (Esto lo vamos a especificar mas en detalle mas adelante cuando ya estemos creando la logica de cada sale).

Luego dividire cada dormitorio en grillas de 1x1 para ir detectando que parte del dormitorio esta ocupada. Si una parte esta ocupada se tendra que buscar otro lugar y en el caso de que no haya mas espacio ese objeto no se colocara.
La grilla ademas va a estar dividida en zonas. Esas zonas van a ser en medio, en las esquinas y en los laterales ya que hay objetos que tienen que ir pegados a las paredes como cuadros o estantes y otros normalmente son puestos en el medio como mesas por ejemplo.

Luego empezare a colocar objetos de mas importantes a menos importantes y de mas grandes a menos grandes.
Y Para finalizar con que cada objeto tenga su logica para agregar decoraciones en ellos. Por ejemplo que una mesa pueda agregar platos, sillas, cubiertos, etc.
Este seria la planificacion general con la cual voy a empezar a trabajar. A medida que vayamos avanzando con cada zona voy a ir detallando el proceso de cada una.
Esto fue todo por hoy. Como siempre gracias por tomarse el tiempo de leer el post! Cualquier comentario o critica son bienvenidos! Nos vemos el proximo lunes!

English Version
Hi Folks! How are you? I hope your week is off to a great start! Here we are back with a new devlog. This week I've been thinking about how to plan and start with the decorations of each room. As we mentioned before, the idea is to make the whole house procedural/random because even though developing an algorithm for that is more complex and time consuming, it makes the house feel unique and there is almost no chance that two houses will be the same.
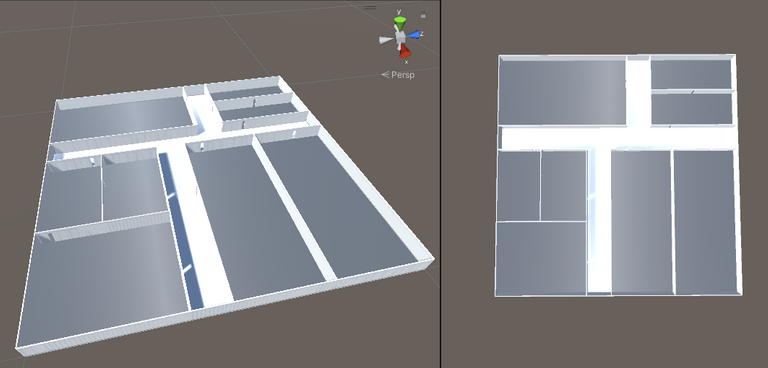
As you have seen in the previous devlogs we already have the structure of the house pretty much assembled. This week I also took the opportunity to put floors in the corridors since we hadn't done it yet and to close the corridors to have the whole house completely closed.
No we are missing the roof but we will add that later :D
For the interior of the house plan the following steps. Although they are general steps and can be modified along the development, they are useful to have a guide of how to work.
- Assign each room a "role" or "type". For example kitchen, bedroom, bathroom, etc. To assign each type my idea is to decide it through the size of the rooms that were generated since for example for a kitchen or bedroom we will need more space than a bathroom.
After assigning them each type of room will have a script with the steps to follow to build that room (We will specify this in more detail later when we are already creating the logic of each room).
Then I will divide each bedroom into 1x1 grids to detect which part of the bedroom is occupied. If a part is occupied it will have to look for another place and in the case that there is no more space that object will not be placed.
The grid will also be divided into zones. These zones will be in the middle, in the corners and on the sides since there are objects that have to be attached to the walls like pictures or shelves and others are usually placed in the middle like tables for example.
Then I will start placing objects from more important to less important and from bigger to less big.
And to finish with that each object has its logic to add decorations on them. For example that a table can add plates, chairs, cutlery, etc..
This would be the general planning with which I will start working. As we move forward with each zone I will be detailing the process of each one.
That's all for today. As always thanks for taking the time to read the post! Any comments or criticisms are welcome! See you next Monday!