Stable Diffusion V2 was released on November 23, and is the first text-to-image model to be comprised completely of open-source components (previous versions still relied on OpenAi's CLIP model, whose dataset is closed-source). While V2 prompts really well for a number of use-cases right out of the box (albeit differently than its predecessors), one of the things it was designed to do best was to act as a base upon which to fine-tune models.
Model creation is kind of my jam. I've been creating fine-tuned unconditional diffusion models like Pixel Art Diffusion and Sprite Sheet Diffusion since June of this year, and I started training GANs in early 2020. I also wrote a guide to training your own unconditional diffusion model, as well as a guide to GAN-building. I'd already been working with a Dreambooth notebook to fine-tune Stable Diffusion 1.5 with my own datasets, so when Stable Diffusion v2 came out, I made a really simple fork of the notebook with it--and a few improved default settings--added in. In the last few days since release, a number of people have asked me for both the notebook and training tips, so I figured I'd kill two birds with one stone, share the notebook, and write a training guide for it.

To complete this tutorial, you will need:
- A Google Colab account (Pro is recommended)
- ImageAssistant, a Chrome extension for bulk-downloading images from websites
- BIRME, a bulk image cropper/resizer accessible from your browser
- My Fork of Shivam Shrirao's DreamBooth colab notebook
Step 1: Gathering your dataset
This section is more or less a direct port from my 2020 piece on training GANS, since dataset gathering and prep is basically the same for diffusion models. The only changes made pertain to dataset size for DreamBooth.
AI models generate new images based upon the data you train the model on. The algorithm's goal is to approximate as closely as possible the content, color, style, and shapes in your input dataset, and to do so in a way that matches the general relationships/angles/sizes of objects in the input images. This means that having a quality dataset collected is vital in developing a successful AI model.
If you want a very specific output that closely matches your input, the input has to be fairly uniform. For instance, if you want a bunch of generated pictures of cats, but your dataset includes birds and gerbils, your output will be less catlike overall than it would be if the dataset was made up of cat images only. Angles of the input images matter, too: a dataset of cats in one uniform pose (probably an impossible thing, since cats are never uniform about anything) will create an AI model that generates more proportionally-convincing cats. Click through the site linked above to see what happens when a more diverse set of poses is used--the end results are still definitely cats, but while some images are really convincing, others are eldritch horrors.


If you're interested in generating more experimental forms, having a more diverse dataset might make sense, but you don't want to go too wild--if the AI can't find patterns and common shapes in your input, your output likely won't look like much.
Another important thing to keep in mind when building your input dataset is that both quality and quantity of images matter. Honestly, the more high-quality images you can find of your desired subject, the better, though the more uniform/simple the inputs, the fewer images seem to be absolutely necessary for the AI to get the picture. Even for uniform inputs in a non-DreamBooth model, I'd recommend no fewer than 1000 quality images for the best chance of creating a model that gives you recognizable outputs. For more diverse subjects, three or four times that number is closer to the mark, and even that might be too few. Really, just try to get as many good, high res images as you can. For DreamBooth, way fewer images are needed than for a full model. My datasets for it are usually around 30-70 high-quality images and event that may be too many for a lot of cases.
But how do you get high-res images without manually downloading every single one? Many AI artists use some form of bulk-downloading or web scraping. Personally, I use a Chrome extension called ImageAssistant. This extension bulk-downloads all the loaded images on any given webpage into a .zip file. Downsides of ImageAssistant are that it sometimes duplicates images, and it will also extract ad images, especially if you try to bulk download Pinterest boards. There are Mac applications that you can use to scan the download folders for duplicated images, though, and the ImageAssistant interface makes getting rid of unwanted ad images fairly easy, and it's WAY faster than downloading tons of images by hand.
Images that are royalty-free are obviously the best choice to download from a copyright perspective. AI outputs based on datasets with copyrighted material are a somewhat grey area legally. That being said, it does seem to me that Creative Commons laws should cover such outputs, especially when the copyrighted material is not at all in evidence in the end product. I'm no lawyer, though, so use your discretion when choosing what to download. A safe, high-quality bet would be to search on Getty images for royalty-free images of whatever you're building an AI model to duplicate, and then bulk-download the results.
Step 2: Preprocessing Your Dataset
This is where we get all of our images nice and cropped/uniform so that the training notebook (which only processes square images) doesn't squash rectangular images into 1:1 aspect ratios.
For this step, head over to BIRME (Bulk Image Resizing Made Easy) and drag/drop the file you've saved your dataset in. Once all your images upload (might take a minute, depending on the number of images), you'll see that all but a square portion of the images you've uploaded are greyed out. The link I've provided should have "autodetect focal point" enabled, which will save you a ton of time manually choosing what you want included in the square, but you can also do your selections by hand, if you wish. When you're satisfied with all the images you've selected, click "save as Zip."
We're choosing to save images as 512x512 squares instead of 256x256 squares because even though our model outputs will be 256x256, the training model doesn't care what size the square images it's provided are. Saving our dataset as 512x512 images means that, should we decide to train a 512x512 model in the future, we don't have to re-preprocess our dataset.
Step 3: Training your Model
Head over to the DreamBooth notebook.
First, you'll click the play button arrow next to the "Check type of GPU and VRAM" section.

If this is the first time you've ever used a Colab notebook, please note that you'll be clicking a lot of these. From here on out, I'll only mention the sections that you need to enter information into or understand before hitting the play button, but generally speaking, if you see a play button, click it.
The first section you'll need to enter information into is the "Login to HuggingFace 🤗" section. You do this by creating an account on Huggingface, agreeing to the ToS linked in the notebook, creating a "Write" token in your settings, and pasting the token into the field in the notebook.

The next section you'll need to enter info in is "Settings and run". Here, specify your desired output directory in Drive. Type something you'll remember, it will make a folder for you.

In the "Define your Concepts List" section, you will need to specify a few things:
instance_prompt: decide what word or phrase you want to use to evoke the style you're baking into Stable Diffusion. If you're training on a dataset of your own art, for instance, you might want to use "art by [your name]."
class_prompt: a prompt that invokes the category of thing your dataset belongs to. For instance, if your art is all pen-and-ink pointillism art, try something like "pen-and-ink pointillist illustration". It pays to double-check the prompt in Stable Diffusion before committing to it--if it generates crummy images, you may want to reconsider a prompt that works better.
instance_data_dir: what you want the folder your instance data is saved in to be called
class_data_dir: what you want the folder your class data is saved in to be called

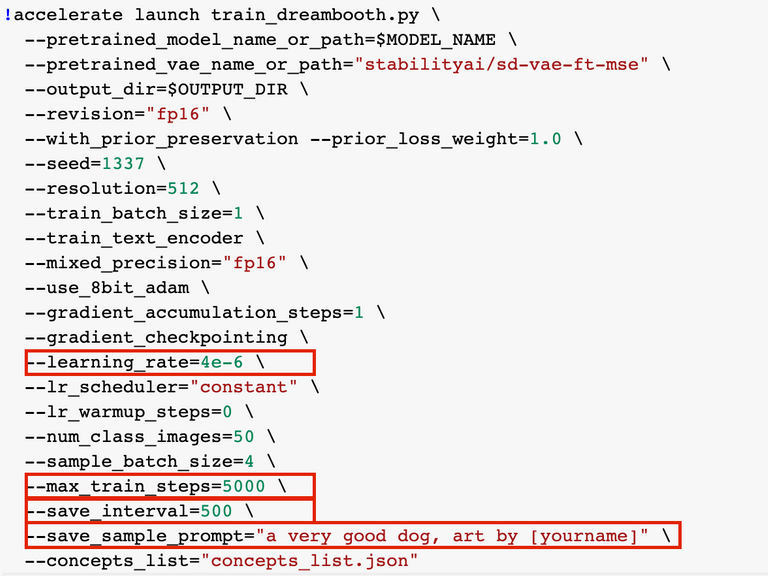
The "Training Settings" section is mostly best left alone unless you're really experienced--or feeling adventurous! The exceptions to this are as follows:
learning_rate: the default of 4e-6 seems to work pretty well for a diverse range of image types, but it could be that raising it or lowering makes more sense for your datasets. Experiment if you like--we might all learn something new and cool!
max_train_steps: You'll likely want to bump this up for datasets over about 30 images and down for smaller ones.
save_interval: How often your model saves weights and outputs training sampled to your Drive. The files are big, and can quickly take up room, so if you have limited Drive space, delete older ones as you train.
save_sample_prompt: Change this to one that makes sense with your model--and make sure to include your instance prompt!! This will be the prompt used to save images at regular intervals (set with save_interval) during training.
Step 4: Testing your Model
After you're done training, you'll definitely want to take your new model for a spin. This notebook makes that really easy to do.
First, you'll want to determine which checkpoint you want to use. You'll do this by
Loading the latest weights directory

Generating a grid of all the sample images from the weights saved in your weights folder

Have a look at all of the samples compared to one another and choose the saved step number that you like best. Copy that weights folder's path into the weights_dir field (or just delete the number at the tail end of the path already there and type the step number you want in its place).
After that, run the next two cells to package the weights directory into a smaller package that can run in things like Deforum Diffusion.
Now for the fun part! To test your model once it's all packaged up, enter an arbitrary seed number in the seed field...


... then enter whatever prompt you want in the prompt field, change the cfg scale and steps if you want (the defaults are the same settings that generated the sample images during training), and hit the play button to see your new model in action!
Before you forget, move the .ckpt file you've created from the weights folder and onto your main drive so that you don't accidentally delete it when you're clearing up your drive later, and also make sure you save it as something you'll be able to remember easily. Now you have a .ckpt file you can use in web interfaces to create anything you like in the specific style you've trained!
[I'll add some sample images from a model I created here later today, but I'm having colab issues as I write this, so it'll have to wait until my resource credits recharge to do it! Be excited, though--they're WAY neat.]

The Hive.Pizza team manually curated this post.
$PIZZA slices delivered:
n1t0 tipped kaliyuga
@ivanov007(2/15) tipped @kaliyuga
You can now send $PIZZA tips in Discord via tip.cc!
You have to use Google Pro to use these collabs right? They've been reducing GPUs for free users and this type of training collab would just crash for me last I tried.
If you keep your VRAM usage under 10 gigs (I think that's the free cutoff), you might be able to run this in a free account--I enabled a VRAM-conserving training flag
This is lovely, I will give it a trier soon
Brilliant!
Thanks for this info! I've tried running the colab a few times, but it always errors out when I get to the conversion to ckpt step. It seems like it might be a drive path issue, but I can't seem to track down the problem.(the error I get is: "FileNotFoundError: [Errno 2] No such file or directory: '4000/unet/diffusion_pytorch_model.bin'")
I tried doing that step locally, but then when I try to use the converted ckpt in automatic, I just get brown noise, no matter what I prompt.
Any ideas as to what I might be missing?
Very Nice!
It's really helpful to have a step-by-step guide on how to use Stable Diffusion V2 and fine-tune it with custom datasets. Your tips on gathering and preparing the input dataset are especially useful. I had tried out the DreamBooth notebook and seen what kind of results I can get.
The results are tremendous! 🚀🚀🚀
bruh @avid.serosik mitte
Great information - but as well a lot to do to run my own system.
awesome!!!
!PIZZA
https://reddit.com/r/DreamBooth/comments/1108qfd/training_db_sample_images_look_so_much_better/
The rewards earned on this comment will go directly to the people sharing the post on Reddit as long as they are registered with @poshtoken. Sign up at https://hiveposh.com.
great tutorial
!PIZZA
!HBIT