English Version
Art in any of its forms is something special that develops our imagination and makes our creativity grow and allows us to express ourselves in many ways. This also applies to digital art and that is what I am going to show you in this post. I have been learning Photoshop for some time now, a very useful programme for editing and designing images and which contains very versatile tools that allow us to give free rein to our enthusiasm for creating. What I like about this kind of art is that I can create effects that are often not possible, or complicated to achieve in the traditional way.
Although not as fast as I would like, I have been learning some techniques in Photoshop. I have been able to experiment with the most basic things and create images that have allowed me to gain in knowledge and better yet, in the satisfaction of creating something of my own. In this post I dare to share one of them, along with the steps of the process.
The idea came to me because I was looking for how to create sea waves 🌊, and the way I found was with the different options offered by filters, and here I describe how I did it.
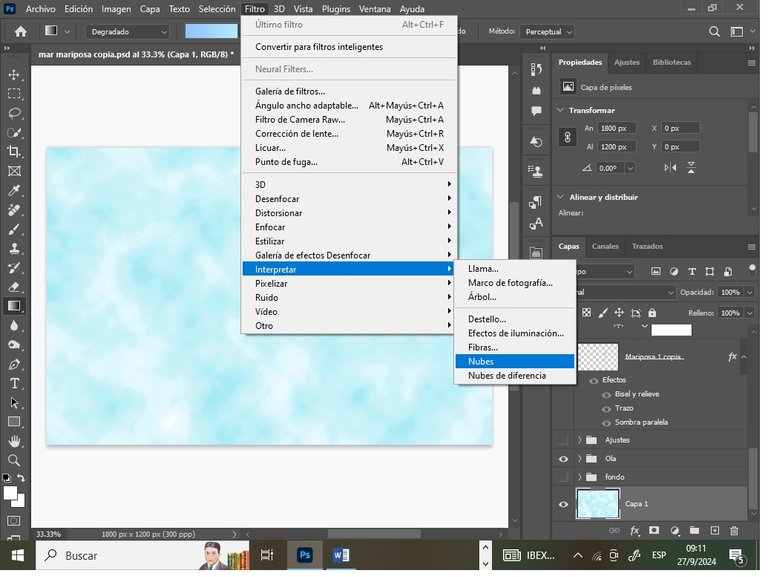
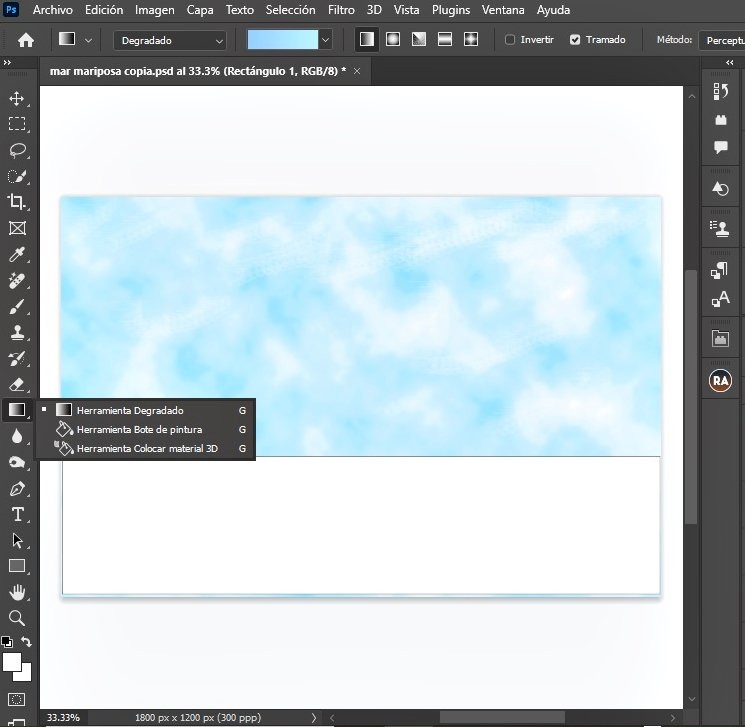
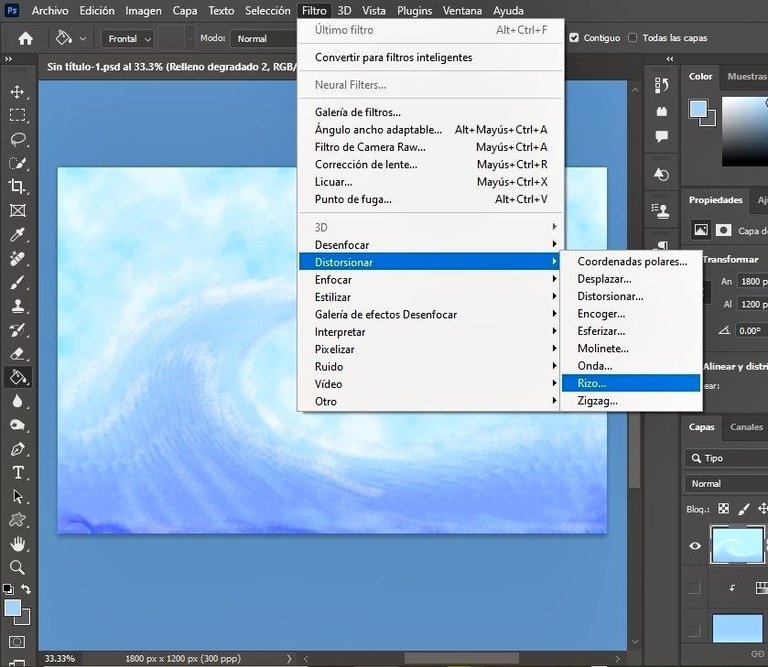
As a first step I create a layer and in the option Filters/Interpret, I choose the option Clouds. In a second step, on another layer, I select a rectangular space in the inferior border and I place in it a gradient in blue colours (there are several options of blue to choose according to the taste of each one), later, without leaving the filters, I go to the option Distort/ Roll, and I choose the maximum in quantity and the maximum in size, this step I repeat it once more, but this time in size I choose Medium. Continuing in the Filters I go to the option Distort/ Twirl and there I put an angle of 225, although this option can vary depending on how they want the wave.
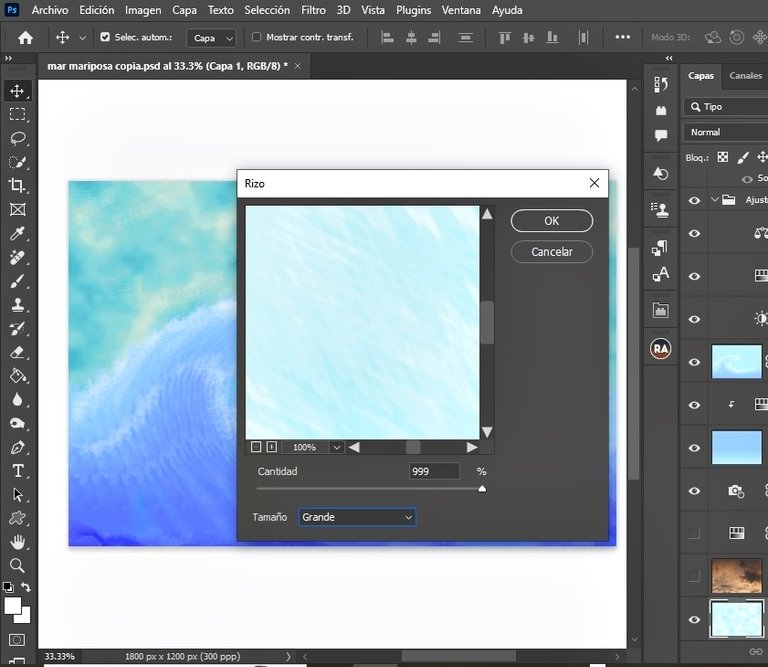
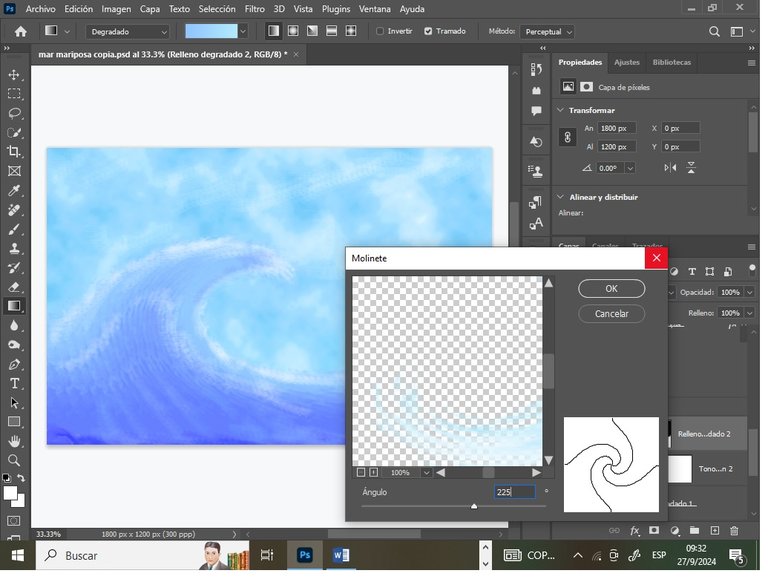
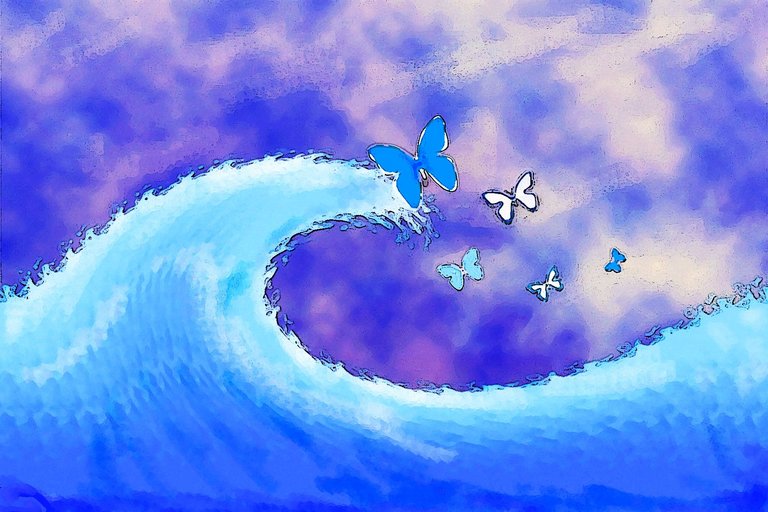
The next thing I did was to beautify it, according to my personal taste, adding more colour and contrasts. Also with the brush tool I increased the white colour on the crest of the wave and on the upper part of the sea, and darkened the background. This is how my sea wave turned out.
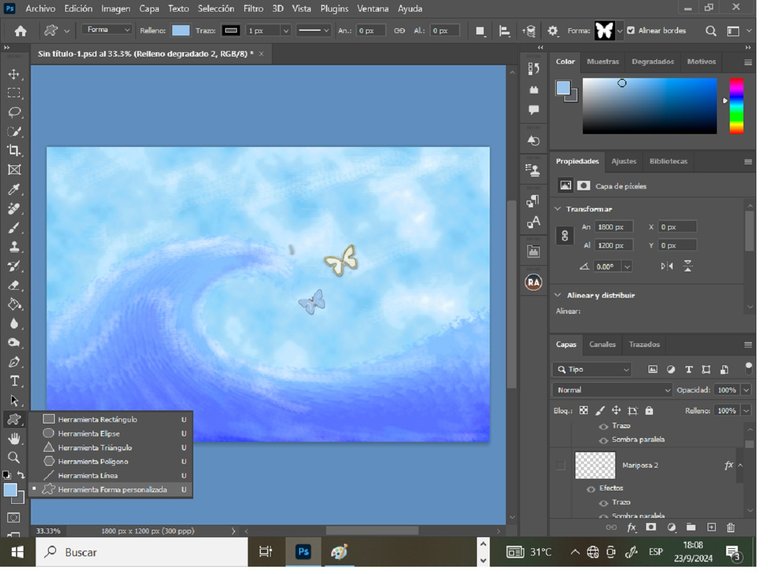
The butterflies were added with the custom shapes tool, and I modified the size, colour and location of each one according to how I wanted it to look in the image. Each butterfly shape is created on a different layer, so it is easier to customise them in terms of colours and other details. To make it easier to create effects on the butterflies, I converted them to pixel images, as the shape tool creates vectors.
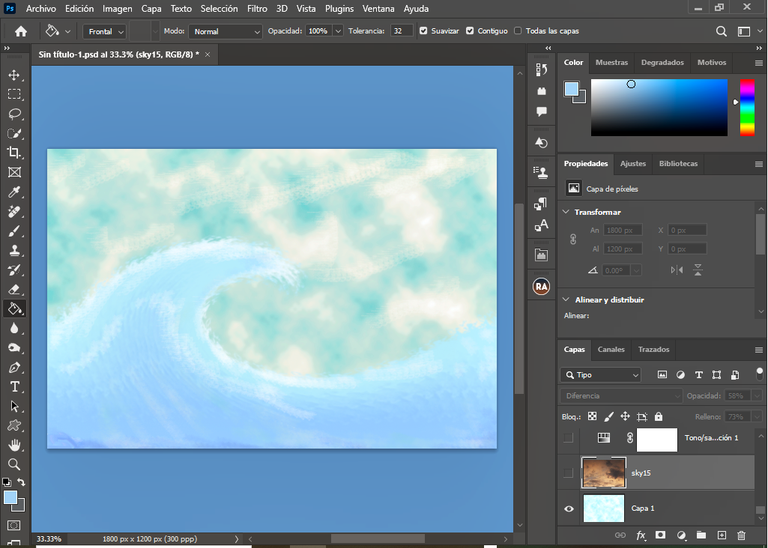
In addition to the background layer that resembled clouds, I added an image of a sky with slightly reddish clouds and with the blending mode ‘lighten’ and decreased the opacity and fill a little until I got the image to my liking.
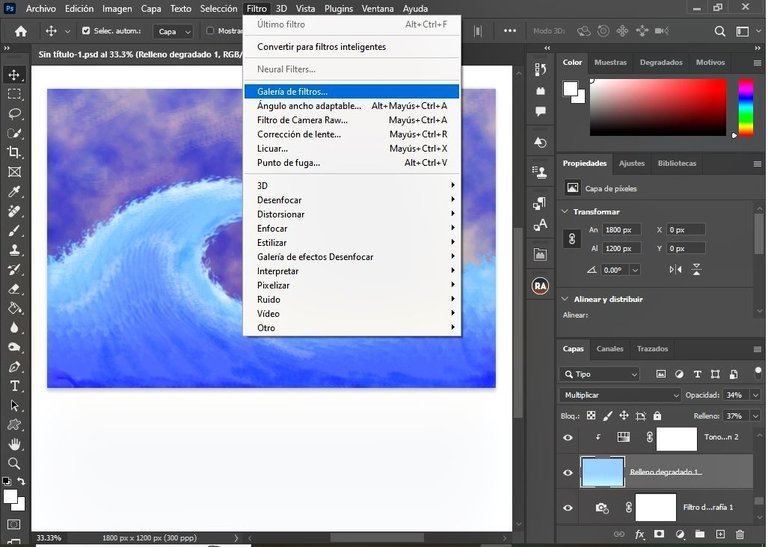
Finally, in the filter gallery, I chose and applied an artistic filter to simulate more real painting. Here, as in the others, you adjust the values according to the result you want to achieve, according to your personal taste and what you want.
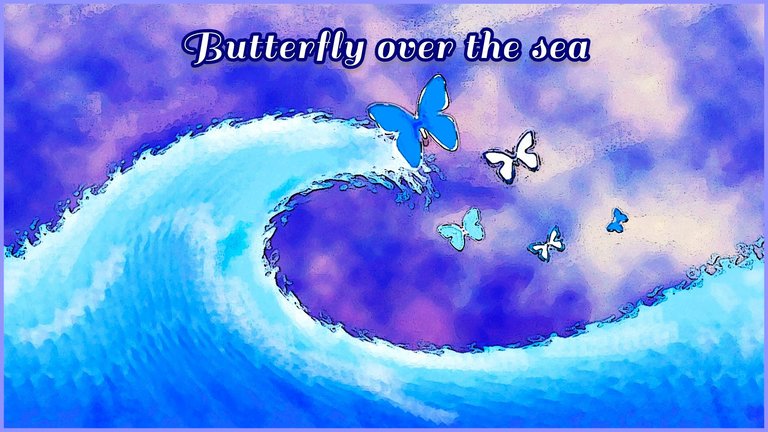
This is the final result with which I feel happy, especially because I learned new things creating this image. I hope you like it too.
🦋🦋🦋
Versión en Español
El arte en cualquiera de sus formas es algo especial que desarrolla nuestra imaginación y hace crecer nuestra creatividad, permitiéndonos además expresarnos de muchas maneras. Esto también se aplica al arte digital y es lo que vengo a mostrar en esta publicación. Llevo un tiempo aprendiendo Photoshop, un programa muy útil en la edición y diseño de imágenes y que contiene herramientas muy versátiles que nos permiten dar rienda suelta a nuestro entusiasmo por crear. Lo que me gusta de este tipo de arte es que puedo crear efectos que muchas veces no son posibles, o complicados de lograr de la manera tradicional.
Aunque no tan rápido como quisiera, he ido aprendiendo algunas técnicas en Photoshop. He podido experimentar con las cosas más básicas y crear imágenes que me han permitido ganar en conocimiento y mejor aún, en la satisfacción de crear algo propio. En esta publicación me atrevo a compartir una de ellas, junto con los pasos del proceso.
La idea se me ocurrió porque estaba buscando como crear olas de mar 🌊, y la forma que encontré fue con las diferentes opciones que ofrecen los filtros, y aquí les describo la manera en que lo hice.
Como primer paso creo una capa y en la opción de Filtros/ Interpretar, escojo la opción Nubes. En un segundo paso, sobre otra capa, selecciono un espacio rectangular en el borde inferior y coloco en ella un degradado en colores azules (hay varias opciones de azules a escoger según el gusto de cada quien), después, sin salir de los filtros, voy a la opción Distorsionar/ Rizo, y escojo el máximo en cantidad y el máximo en tamaño, este paso lo repito una vez más, pero esta vez en tamaño escojo Mediano. Siguiendo en los Filtros voy a la opción Distorsionar/ Molinete y ahí le pongo un ángulo de 225, aunque esta opción puede variar dependiendo de cómo deseen la ola.
Lo siguiente que hice fue embellecerla, según mi gusto personal, poniéndole más color y contrastes. También Con la herramienta pincel fui aumentando el color blanco en la cresta de la ola y en la parte superior del mar, y oscureciendo el fondo. Así quedó mi ola de mar.
Las mariposas las añadí con la herramienta de formas personalizadas, y fui modificando el tamaño, el color y la ubicación de cada una según cómo quería que se viera en la imagen. Cada forma de mariposa se crea en una capa diferente, por lo que es más sencillo personalizarlas en cuanto a colores y demás detalles. Las mariposas para que me fuera más sencillo crear efectos sobre ellas, las convertí a imágenes en pixeles, ya que la herramienta de formas lo que crea son vectores.
Además de la capa de fondo que asemejaba a las nubes, añadí una imagen de un cielo con nubes un tanto rojizas y con el modo de fusión aclarar y disminuí un poco la opacidad y el relleno hasta lograr que la imagen quedara a mi gusto.
Para concluir, en la galería de filtros, escogí y apliqué un filtro artístico para simular más pintura real. Aquí como en los demás se van ajustando los valores según el resultado que se desee lograr, acordé con el gusto personal y lo que se desee.
Este es el resultado final con el que me siento a gusto sobre todo porque aprendí cosas nuevas creando esta imagen. Espero que también sea de su agrado.
Contenido original del autor. © 2024 @jordy0827. Todos los derechos reservados.


Thank You!
Hermosa Ola salpicando belleza tiernas e inocentes mariposas que dan un aliento de esperanza en la composición.
Este tipo de trabajo siempre me recuerda en otro nivel conceptual a la mítica ""Ola " del grabador japonés Fujiyama.
Muy elegante y precisa exposición teórica sobre el tema y la técnica utilizada.
Más éxitos.
Muchas gracias, pues me alegro que te haya gustado, eso me hace hacer el próximo mejor.
El fondo me dejó hipnotizada, qué precioso te quedó
Gracias! 🤗
Me gustó el resultado final , buen trabajo!! 👌💯
Gracias!
Que bonito trabajo creativo amiga , tienes mucha sensibilidad , me gustó ver el proceso y mucho más el resultado ❤️