Practicando la ilustración digital
¡Heeeey que tal amigo de hive! Ya tenía bastante tiempo sin publicar algo al blog, me di un pequeño descanso de unas semanas, ¿por que? pues salió trabajo full así que me tuve que centrar en eso, pero ya estoy bastante mas libre así que quise volver a publicar algo.
Esta vez te traigo un pequeño sketch digital que hice, y el arte final el cual terminé de trabajar con photoshop. Ya por fin pude comprar un nuevo celular, este nuevo movil tiene una pantalla de unas 5 pulgadas y es bastante genial, su camara es muy buena así que pronto estaré trayendo fotos de nuevo para que puedas ver su calidad mucho mejor.
Volviendo al tema principal, descargué una aplicación bastante buena para dibujar en el, la app se llama Autodesk Sketchbook y es super genial, la versión de pago te deja hacer un montón de cosas, pero la versión de grátis (es la que uso actualmente) te deja hacer unos artes bastante elaborados, tienes un montón de pinceles a tu disposición, ademas de las herramientas básicas las cuales son muy buenas.
Este es el primer sketch que hago desde el celular y fue un experimento para probar como era la app y como se usan los pinceles, aun estoy aprendiendo pero les traeré mas dibujitos como este y mejores.
Practicing digital illustration
Heeeey, how are you friends with the hive? I have a lot of time without posting something on the blog, I took a short break of a few weeks, why? because I got a job, so I had to focus on that, but I'm already much freer, so I wanted to republish something.
This time I bring you a little digital sketch that I made, and the final art I finished working with photoshop. Finally I was able to buy a new cell phone, this new cell phone has a screen of about 5 inches and is quite cool, its camera is very good, so soon I will bring back photos so you can see its quality much better.
Going back to the main theme, I downloaded a pretty good app to draw, the app is called Autodesk Sketchbook and it's super cool, the paid version allows you to do a lot of things, but the free version (it's the one I use today) allows you to make some pretty elaborate arts, you have a lot of brushes at your disposal, plus the basic tools that are very good.
This is the first sketch I make from my cell phone and it was an experiment to test what the app was like and how brushes are used, I'm still learning, but I'll bring you more drawings like this and better.
Proceso de dibujo | Draw process
Para el este pequeño sketch tome una foto a un boceto de un caimán que hice hace unos días para otra ilustración.
For this little sketch take a picture of an alligator sketch I made a few days ago for another illustration.

Luego ya dentro de la app importe la foto al lienzo de dibujo y la coloque donde quería para comenzar a trazar la linea y le baje opacidad para que no fuese tan fuerte y no me molestara tanto la linea que iba a hacer.
So already inside the application, I imported the photo to the drawing canvas and placed it where I wanted to start drawing the line, I lowered the opacity so that it was not so strong and did not bother much when making the final line

Ya que no conozco todavía muy bien este programa, este momento de hacer la línea fue bastante tenso, pues no sabía que pincel utilizar y que tipo de línea me daría este y como funcionaría etc. Luego de hacer un par de garabatos probando la mayoría de los pinceles que trae la app, decidí que iba a utilizar uno de plumilla básico.
El tipo de línea que me dejaba este pincel era bastante limpio y preciso así que no tuve mucho problema para hacer todo el trazo del dibujo. Además de que no buscaba realizar algo muy elaborado.
Since I do not know this program very well yet, this moment of making the line was quite tense, because I did not know what brush to use and what kind of line this would give me and how it would work, etc. After making a couple of doodle try most of the brushes the app brings, I decided I was going to use a basic pencil.
The type of line that left me this brush was quite clean and accurate, so I didn't have much trouble making the whole stroke of the drawing. Besides, I didn't want to do something very elaborate.

Luego de hacer la línea de forma rápida y sencilla llegue a otro punto en el que pase otros minutos explorando la app para saber que hacer. El color, ¿como lo hago? ¿que pinceles uso? ¿que efectos puedo conseguir? fueron unas de las tantas preguntas que pasaron por mi mente en ese momento.
Luego de ver la ventana de color, decidí hacer un coloreado plano con pequeños detalles de sombras sin elaborar mucho, usé un pincel que emula la punta de un marcador para pintar todo el caimán, y usé un tono azul turquesa pues me llamó la atención este tono en la ventana de color.
After making the line quickly and easily get to another point where you spend another minute exploring the app to know what to do. Color, how do I do it? What brushes do I use? What effects can I get? were one of the many questions that went through my mind at the time.
After seeing the color window, I decided to make a flat coloring with small details of shadows without making much, I used a brush that emulates the tip of a marker to paint the whole alligator, and I used a turquoise blue tone because I was struck by this tone in the color window.

Con un pincel texturizado le coloque una textura con poca opacidad a todo el dibujo, y con un tono mas oscuro de turquesa hice unas lineas de sombra bastante sencillas.
With a textured brush I placed a texture with little opacity to the whole drawing, and with a darker shade of turquoise I made some shade lines quite simple.

Aquí les dejo una captura del pincel que utilice para realizar la línea, una plumilla a 2,5 de puntaje.
Y como pueden ver en la otra cap hay un montón de pinceles mas, así que la posibilidad de creación con cada pincel es bastante grande.
Here's a screenshot of the brush you use to make the line, a pen at 2.5 score.
And as you can see in the other cap there are a lot more brushes, so the possibility of creating with each brush is quite large.


En esta cap pueden ver el tono que usé para el caimán, es muy genial que esta app te muestre un catalogo de tonos de la marca copic colors, específicamente el tono que usé fue un BG 02, para el fondo tomé el color que me sugería como complementario la misma app.
In this cap you can see the tone I used for the alligator, it is very great that this app shows you a catalog of tones of the brand copic colors, specifically the tone I used was a BG 02, for the background I took the color that suggested me as complementary the same app.


Como pueden ver en esta cap la ventana de herramientas es bastante variada, no he usado muchas de estas opciones así que no tengo mucho que decir de ellas, pero pronto las iré probando para entender mucho mejor su uso.
La que si me hubiese gustado utilizar para esta ilustración es la de imágenes secuenciales, ya que esta graba la pantalla mientras dibujas y te guarda un vídeo en cámara rápida de todo el proceso, pero esa la descubrí después de realizar la ilustración.
As you can see in this cap the tool window is quite varied, I have not used many of these options so I do not have much to say about them, but soon I will try them to understand much better their use.
The one that if I would have liked to use it for this illustration is that of sequential images, since it records the screen while you draw and saves you a video in quick camera of the whole process, but that one I discovered after performing the illustration.

Aquí pueden ver cuales fueron las capas que utilicé, una con la linea, una con el color de relleno, una con las sombras, una tiene la textura que agregue con el pince, y hay otra con el color de fondo.
Here you can see what layers I used, one with the line, one with the fill color, one with the shadows, one has the texture that I added with the pince, and there is another with the background color.

Y ya luego de unos minutos de prueba y experimentación así quedó la ilustración final dentro de la app.
Me gustó mucho el resultado así que se me ocurrió la idea de colocarle una frase para darle mas interés y probar quizá algunos efectos para el fondo, y así darle también mayor dinamismo.
And already after a few minutes of testing and experimentation so the final illustration remained within the app.
I really liked the result so I came up with the idea of placing a phrase on it to give it more interest and maybe try some effects for the background, and thus give it more dynamism as well.

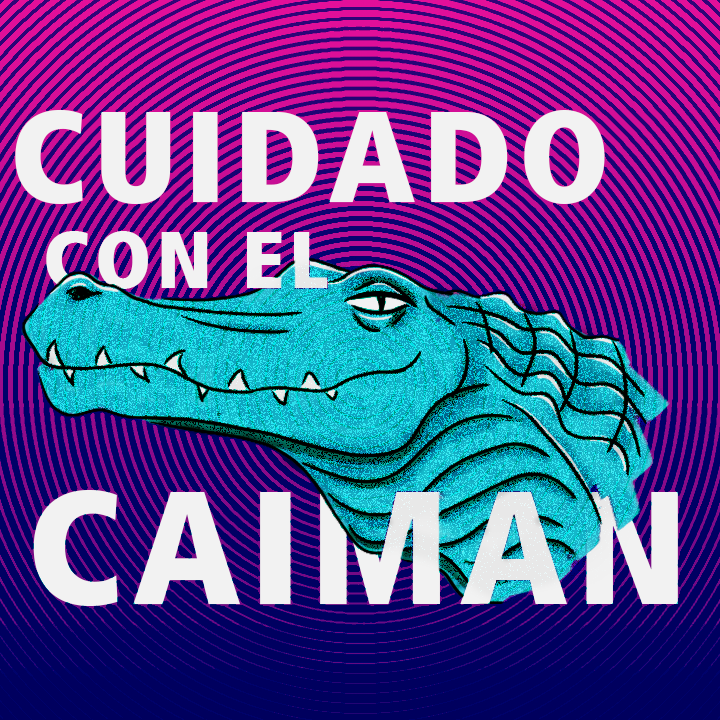
Para ello me llevé la imagen a photoshop, para el fondo con la ventana de galería de filtros, usando el filtro de semitono agregué una textura radial, además cambié los colores con un ajuste de saturación de color.
Para el caimán usando un filtro de ruido pude agregarle una textura bastante interesante, además con un ajuste de curvas en modo de fusión multiplicar pude reforzar las sombras, dándole mayor fuerza e interés.
Ya por último agregué la tipografía usando la frase cuidado con el caimán, una frase que se me ocurrió mientras hacía el sketch en autodesk y que pensé que quedaba bastante bien con el dibujo. Con una composición interesante y unos cuantos juegos que unían la tipografía con el sketch ya tenía terminado este experimento que resultó en una gráfica bastante cool.
To do this I took the image to photoshop, for the background with the filter gallery window, using the semitone filter I added a radial texture, plus I changed the colors with a color saturation setting.
For the alligator using a noise filter I was able to add a rather interesting texture, in addition with a curve adjustment in multiplying mode I was able to reinforce the shadows, giving it greater strength and interest.
Finally I added the typography using the phrase careful with the alligator, a phrase that occurred to me while sketching in autodesk and that I thought looked pretty good with the drawing. With an interesting composition and a few games that matched the typography with the sketch I had already finished this experiment which resulted in a fairly cool graph.
Aproveché ya que me gustó y lo subí a mi cuenta de instagram personal, si gustan pueden ir a ver ese post.
I took advantage as I liked it and uploaded it to my personal instagram account, if you like you can go see that post.
- Aquí les dejo el link | Here's the link :
Post de instagram de la ilustración

Por aquí pueden ver pequeños detalles de la ilustración.
A pesar de que comenzó como una idea muy sencilla resultó un pequeño proyecto bastante interesante, quizá haga mas gráficas ilustradas de este estilo, usando distintos animales y distintas frases populares, o que se me ocurran.
Here you can see small details of the illustration.
Although it started as a very simple idea it was a rather interesting little project, I may make more illustrated graphs of this style, using different animals and different popular phrases, or that I can think of.


.png)
.png)
- Por ultimo pueden ver una comparativa con la ilustración terminada de autodesk y la ilustración final.
Finally, you can see a comparison with autodesk's finished artwork and final illustration.

Puedes ver trabajos de ilustración, diseño y fotografía en mi cuenta de instagram así que te invito a seguirme también por allá:
You can see illustration, design and photography works in my instagram account so I invite you to follow me there too:
IG: @aleluuyya