English
Hello friends of the hive house, in my recent post dedicated to Steward, in collaboration with the user @rybass, I ended up creating a last drawing where I renewed my profile image and included it in it, in part it was a perfect excuse to get to work on my old but friendly image, however, after hours of work between that and the rest of images of my partner, it is undeniable that we have very different styles.
I finished the image but between the strokes and colors, I was left with the desire to make an image of @rybass's character more attached to my style, plus it was my way of thanking her for the great work she did for my butler.
The concept was simple, I wanted to make a more minimalist rybass, much more adorable but at the same time give an impression of danger, this because it just seemed much more fun and eye-catching to see.
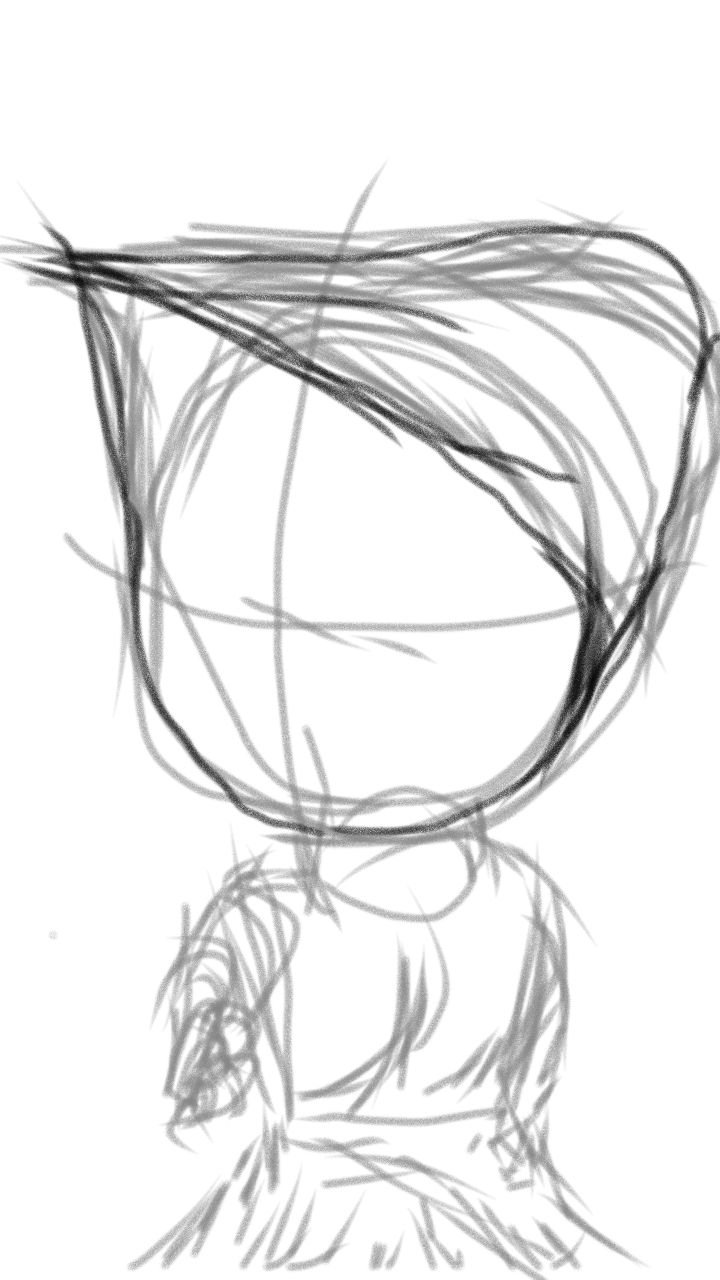
The main draft I made it on my Samsung phone because I had no electrical service at that time, in a program called "HiPaint" and while the light came I started to design the first lines of general idea, curiously it did not take me too long, perhaps the practice has finished me become an artist .... More or less.
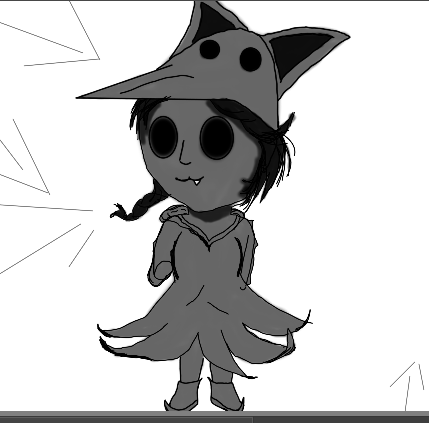
After the arrival of the light, I transferred what I had already made to my Netbook and made the idea concrete: a cat with the cap of the face of rybass plus a dress that would rise with a mysterious shadow (by this time I was not very clear how I would make the dress.
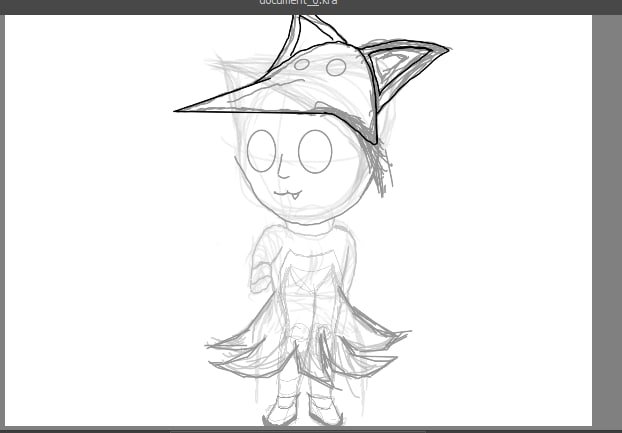
Besides that I had to make some legs apart from the main image, since I'm not very good at that section, so I ended up making some realistic legs that I would later minimize and adapt to the rest of the drawing.
After a couple of tinkering and a lot of trial and error, which would take me about 3 hours before I finished the model of the lines that would actually go inside the drawing, but this was actually the easiest part of the job as now I had to give it shape and more depth with colors, lights and shadows.

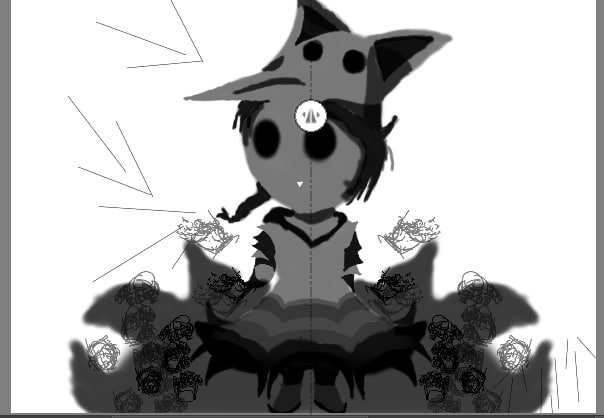
Starting with the shadows, it is a tedious process, since it was necessary to interlace a series of black tones that when playing with the opacity of the layers would pass to gray and depending on the degree of the shadow and its contraposition to where I imagined that the lights would go and I was guided with some simple lines, since this would define the thickness of the shadow and therefore its opacity.
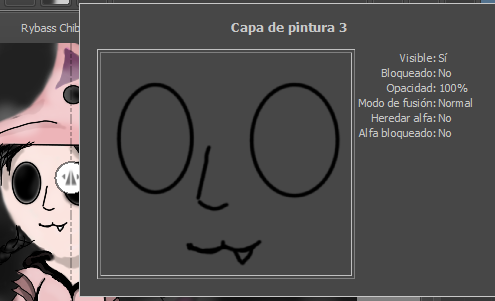
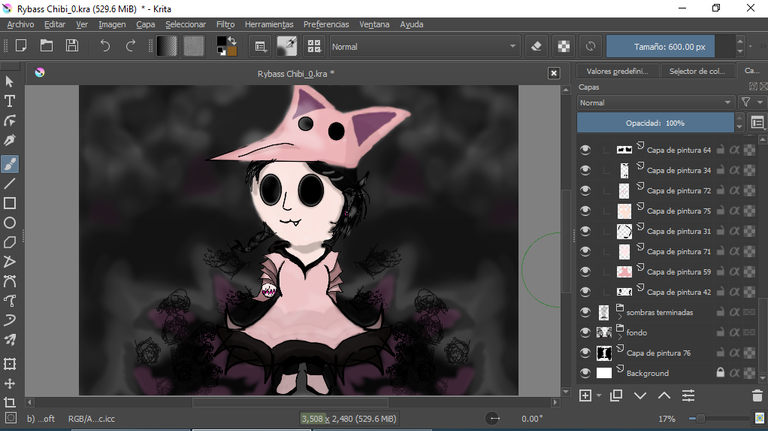
I had to try to use several layers for the different parts of the drawing, since for some time I have been developing this style of drawing based on shadows and I have liked the results that it has left me, besides the possibility of segmenting the drawing, quickly modify parts of it, change colors among other things, and I like to think that my methodology has helped me to create more things and not be afraid of losing ideas along the way.
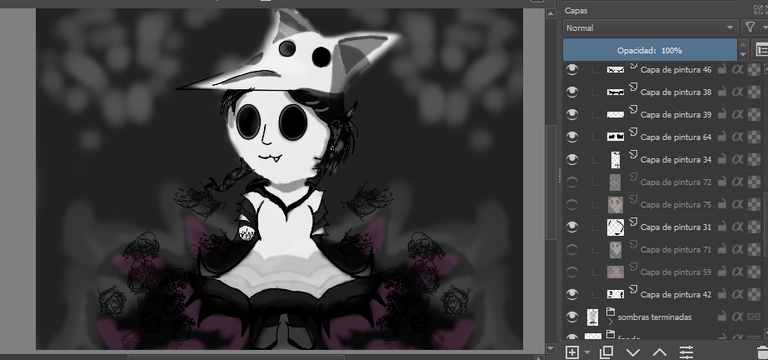
Just look at this insanity, the same simple face of rybass is his own cape. Unfortunately there are times when this little computer suffers a lot with its eccentric owner.
After doing all the shading come the lights, this section I am still developing, since I am not an expert, try to focus on the theory that dictates that the lights are like water from a stream that falls on the drawing space, which can impact, bounce or reflect on an object. Something that in practice is seen as something very simple to do but at the moment of truth is complex and entangling.
Despite this I managed to make a simple approach and highlight with light some details that enrich the image, after the great battle of the shadows and add these small lights, we came to the part where I benefit most from having so many layers and such a "gothic" methodology, the colors.
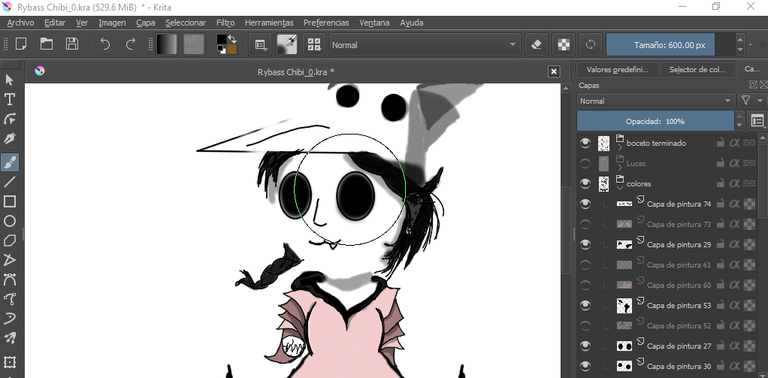
First of all I had to reorganize my layers because apart from the work of creating them and adapting them to the somber style they have at that moment, if I wanted to finish the job well, I should not be afraid to modify what I already considered an achievement, I had to give shape to my idea of the mini rybass in color, so playing with the opacity of the layers and the new color layers that would go over these and others below the shadows I ended up with a total of more than 74 layers, 4 different groups of layers and an almost total distribution of the shadows around the colors.
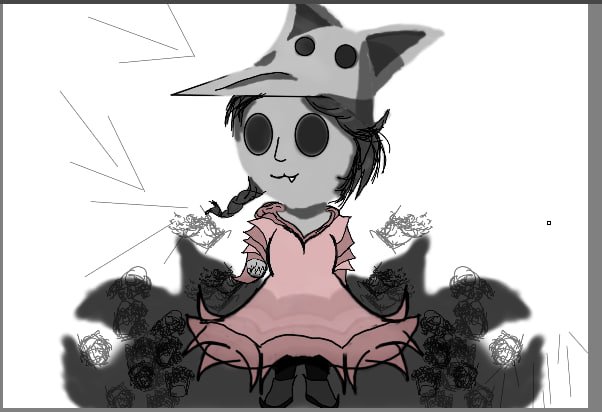
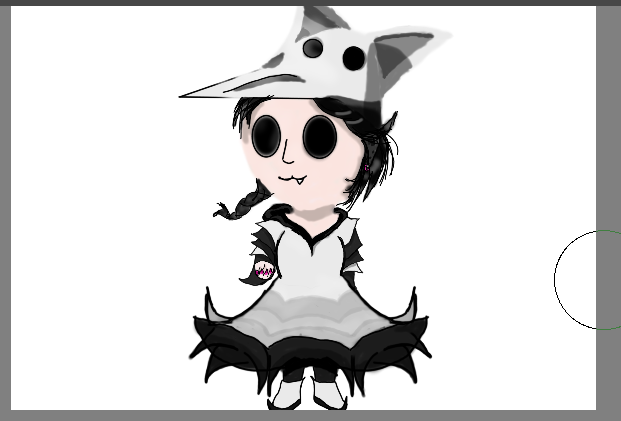
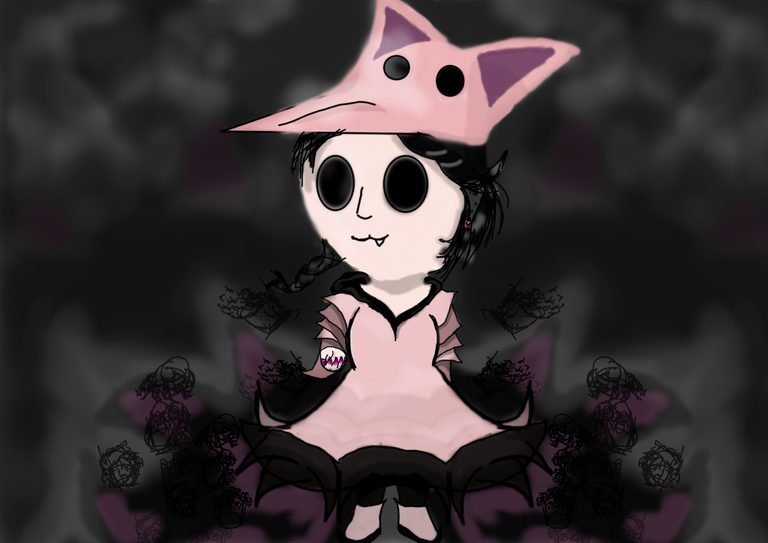
This is the final result.
The best thing about this job is that by keeping the original file, the multitude of layers and the ability to alter their opacity, I can create multiple styles from an already formed drawing.
To say goodbye, I want to thank again @rybass for all the work he was doing, and I couldn't stay without doing anything when the idea was so clear in my mind, I hope you really like it, it was a lot of hours but I'm pleased to see that I've improved a lot with respect to my previous drawings.
Thank you for reading.
Translated with Deepl Translate
Español
Hola amigos de la casita hive, en mi reciente post dedicado ha Steward, en colaboración con la usuaria @rybass, termine creando un último dibujo en donde renovada mi imagen de perfil y la incluía dentro de ella, en parte fue una excusa perfecta para ponerme a trabajar en mi vieja pero amigable imagen, sin embargo, tras las horas de trabajo entre esa y el resto de imágenes de mi compañera, es innegable que tenemos estilos muy diferentes.
Terminé la imagen pero entre los trazos y colores, me quedé con las ganas de hacer una imagen del personaje de @rybass más apegado a mi estilo, además de que era mi manera de agradecer el gran trabajo que ella realizó por mi mayordomo.
En concepto era simple, quería hacer una rybass más minimalista, mucho más adorable pero al mismo tiempo dar una impresión de peligro, esto por que simplemente me parecía mucho más divertido y llamativo de ver.
El borrador principal lo realice en mi teléfono Samsung ya que no tenía servicio eléctrico en ese momento, en un programa llamado “HiPaint” y mientras llegaba la luz me puse a diseñar las primeras líneas de idea general, curiosamente no me tomo demasiado tiempo, quizás la práctica me ha terminado de convertir en una artista... Más o menos.
Tras la llegada de la luz, pase lo ya elaborado a mi Netbook y concrete la idea: una gata con la gorra de la cara de rybass más un vestido que se elevaría con una sombra misteriosa (para este momento no tenía muy claro cómo haría el vestido.
Además de ello tuve que realizar unas piernas a parte de la imagen principal, ya que ese apartado no se me da demasiado bien, por lo que termine haciendo unas piernas realistas que luego minimizaría y adaptaría al resto del dibujo.
Tras un par de arreglos y mucho ensayo y error, cosa que me tomaría en torno a unas 3 horas antes de terminar el modelo de las líneas que irían realmente dentro del dibujo, pero esto era en realidad la parte más fácil del trabajo ya que ahora había que darle forma y más profundidad con colores, luces y sombras.
Empezando con las sombras, es un proceso un poco tedioso, ya que había que entrelazar una serie de tonos negros que al jugar con al opacidad de las capas pasarían a grises y dependiendo del grado de la sombra y su contraposición a donde yo ya me imaginaba que irían las luces y me guiaba con unas simples líneas, pues esto definiría el grosor de la sombra y por lo tanto su opacidad.
Debía de procurar usar varias capas para las distintas partes del dibujo, ya que desde hace un tiempo vengo desarrollando este estilo de dibujo basado en sombras y me ha gustado los resultados que me ha dejado, además de la posibilidad de segmentar el dibujo, modificar rápidamente partes de él, cambiar colores entre otras cosas, y me gusta pensar que mi metodología me ha ayudado a crear más cosas y no tener miedo a perder ideas en el camino.
Solo miren esta locura, la misma cara tan simple de rybass es su propia capa. Lamentablemente hay veces en que este pequeño ordenador sufre mucho con su dueño tan excéntrico.
Tras realizar todo el sombreado vienen las luces, este apartado lo sigo desarrollando, ya que no soy un experto, intente enfocarse en la teoría que dicta que las luces son como agua de un riachuelo que cae sobre el espacio del dibujo, que puede impactar, rebotar o reflectar sobre un objeto. Algo que en las prácticas se ve como algo muy simple de realizar pero que a la hora de la verdad es complejo y enredador.
Pese a ello logré hacer un enfoque simple y resaltar con luz algunos detalles que enriquecen la imagen, luego de la gran batalla de las sombras y agregar estas pequeñas luces, llegamos a la parte donde más me beneficia tener tantas capas y una metodología tan “gótica” los colores.
Primero que nada tenia que reorganizar mis capas ya que aparte del trabajo de crearlas y adaptarlas al estilo sombrío que tienen en ese momento, si quería terminar bien el trabajo, no debía temer le a modificar lo que yo ya consideraba un logro, debía darle forma a mi idea de la mini rybass a color, por lo que jugando con la opacidad de las capas y las nuevas capas de color que irían sobre estas y otras por debajo de las sombras lo que terminaría en un total de mas de 74 capas, 4 grupos de capas distintos y una distribución casi que total de las sombras al rededor de los colores.
Este es el resultado final.
Lo mejor de este trabajo es que al mantener el archivo original, la multitud de capas y la capacidad de alterar su opacidad, puedo crear múltiples estilos de un dibujo ya formado.
Para despedirme, quiero volver a agradecer a @rybass por todo el trabajo que estuvo realizando, y no podía quedarme sin hacer nada cuando la idea estaba tan clara en mi mente, espero que realmente les guste, fueron muchas horas pero me complace ver que he mejorado bastante con respecto a mis anteriores dibujos.
Gracias por leer.
Traducido con Deepl Translate
~~~ embed:1711087356638269765?t=XuFkgWBQiyx24GNfWmZ8HQ&s=19 twitter metadata:bGFjYXNpdGFoaXZlfHxodHRwczovL3R3aXR0ZXIuY29tL2xhY2FzaXRhaGl2ZS9zdGF0dXMvMTcxMTA4NzM1NjYzODI2OTc2NXw= ~~~
Ame los dibujos te quedaron geniales felicidades mi querido amigo a ti lo que te sobra es talento.
Muchas gracias mayi, a ti también te sobra talento y elegancia
Jajaja gracias por lo que me toca
Congratulations @kirogames! You have completed the following achievement on the Hive blockchain And have been rewarded with New badge(s)
Your next target is to reach 2000 upvotes.
You can view your badges on your board and compare yourself to others in the Ranking
If you no longer want to receive notifications, reply to this comment with the word
STOPCheck out our last posts:
HOLY S- 😱😱😱
POR DIOS MIRA ESOOOO ❤️❤️❤️
Me encanta, simplemente me da un sentimiento muy bonito, gracias por tanto esfuerzo, se que un dibujo lleva su tiempo y su dedicación y tener un puesto en una obra, me hace sentir agradecida, quedó genial!!! Mil gracias! ❤️❤️❤️
ENGLISH
HOLY S- 😱😱😱
MY GOODNESS LOOK AT THAAAAT ❤️❤️❤️
I love it, it just gives me such a nice feeling, thank you for so much effort, I know a drawing takes time and dedication and to have a post on a work, makes me feel grateful, it looked great!!!! A thousand thanks! ❤️❤️❤️
No te preocupes, te mereces mi reconocimiento y gratitud, gracias por colaborar conmigo
Contáctenos para saber más del proyecto a nuestro servidor de Discord.
Si deseas delegar HP al proyecto: Delegue 5 HP - Delegue 10 HP - Delegue 20 HP - Delegue 30 HP - Delegue 50 HP - Delegue 100 HP.
Muchas gracias!
Has sido curado por @visualblock / You've been curated by @visualblock
Bienvenidas delegaciones / Delegations welcome
Trail de Curación / Curation Trail
Vota por nuestro Testigo aliado - @hispapro / Vote for our allied Witness - @hispapro
Más información sobre el testigo aquí / More information about the witness here
Saludos amigo, esto es toda una obra de arte, felicidades.