Saludos cordiales para todos los lectores. Para el esta ocasión, vengo con un tutorial detallado para realizar una increíble flor de Lirio.
Warm greetings to all readers. For this occasion, I come with a detailed tutorial to make an amazing Lily flower.
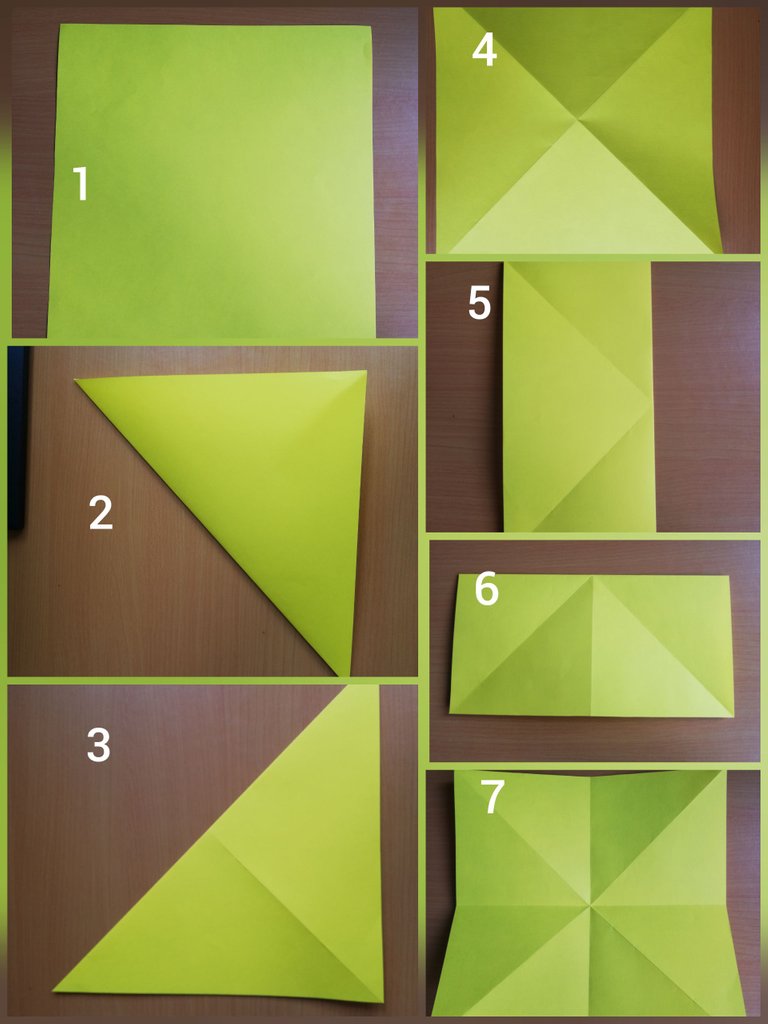
- Para comenzar, necesitaremos una hoja cuadrada del color que deseen para la flor (1)
- Doblaremos una esquina hacia otra para formar una diagonal (2)
- Repetiremos el proceso para obtener la otra diagonal (3)
- Abrimos (4) y ahora le damos vuelta a la hoja
- Doblaremos por la mitad vertical (5)
- Abrimos y doblamos por la mitad horizontal (6) y abrimos (7)
- To begin, we will need a square sheet of the color you want for the flower (1)
- Fold one corner towards the other to form a diagonal (2)
- We will repeat the process to get the other diagonal (3)
- We open (4) and now we turn the sheet over
- Fold in half vertically (5)
- We open and fold in half horizontally (6) and open (7)
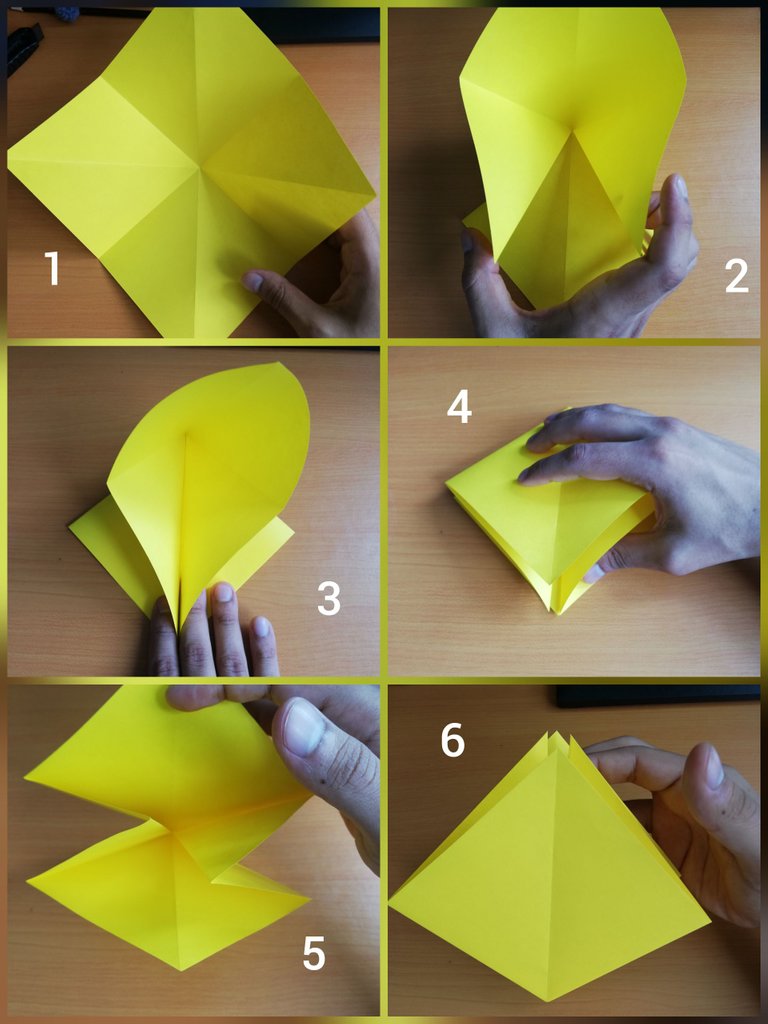
- Ahora buscaremos cerrar (1) desde los laterales (2) y (3)
- Bajamos la parte superior (4)
- Volteamos la posición hacia arriba (5) y (6)
- Now we will seek to close (1) from the sides (2) and (3)
- We lower the upper part (4)
- We flip the position up (5) and (6)
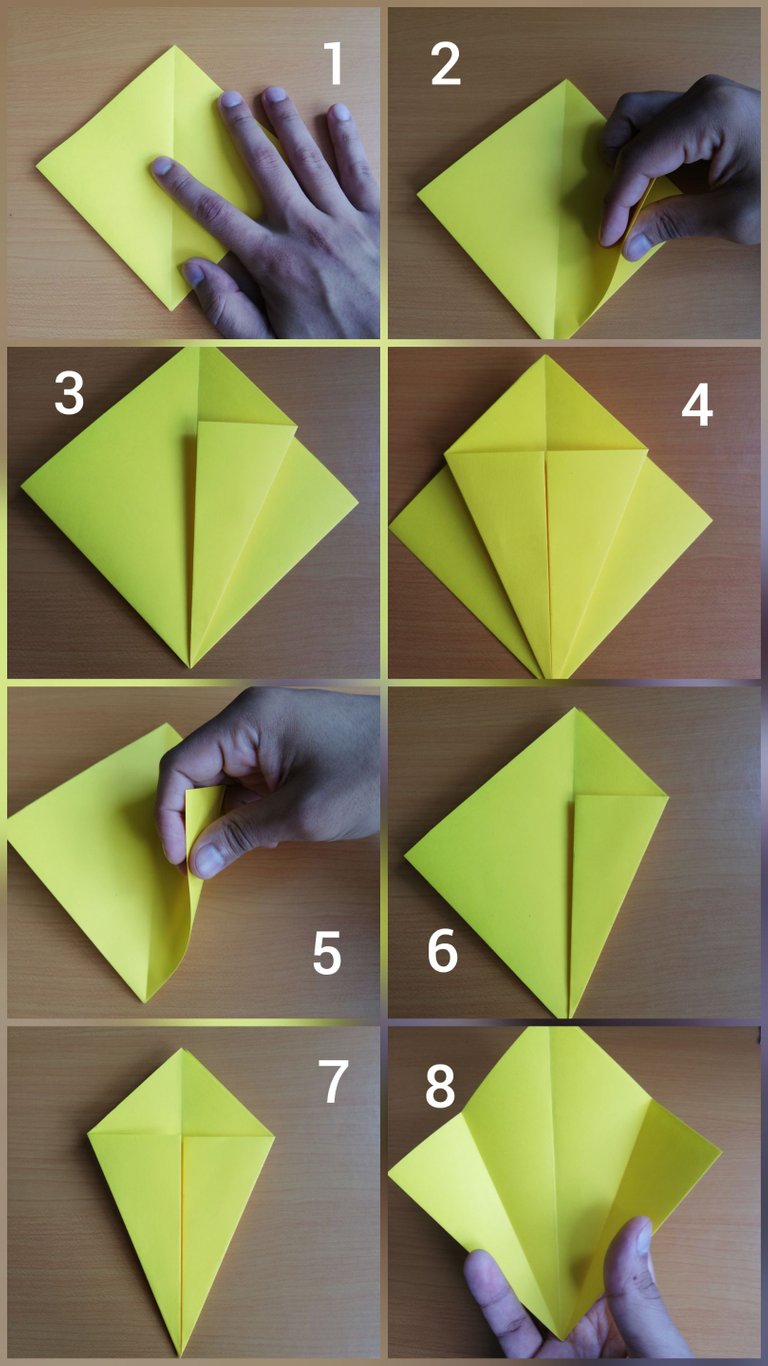
- Ya en posición (1), doblaremos la parte inferior para formar un triángulo de un lado (2) y (3)
- Repetimos con el otro lado inferior (4)
- Damos vuelta y doblamos los triángulos nuevamente (5), (6) y (7)
- Abrimos los triángulos (8)
- Already in position (1), we will fold the lower part to form a triangle of one side (2) and (3)
- Repeat with the other bottom side (4)
- Turn and fold the triangles again (5), (6) and (7)
- Open the triangles (8)
- Lo que haremos ahora, es invertir los triángulos marcados (1), (2) y (3) y nos queda (4)
- Repetimos con el otro lado (5), (6) y (7) y nos queda (8)
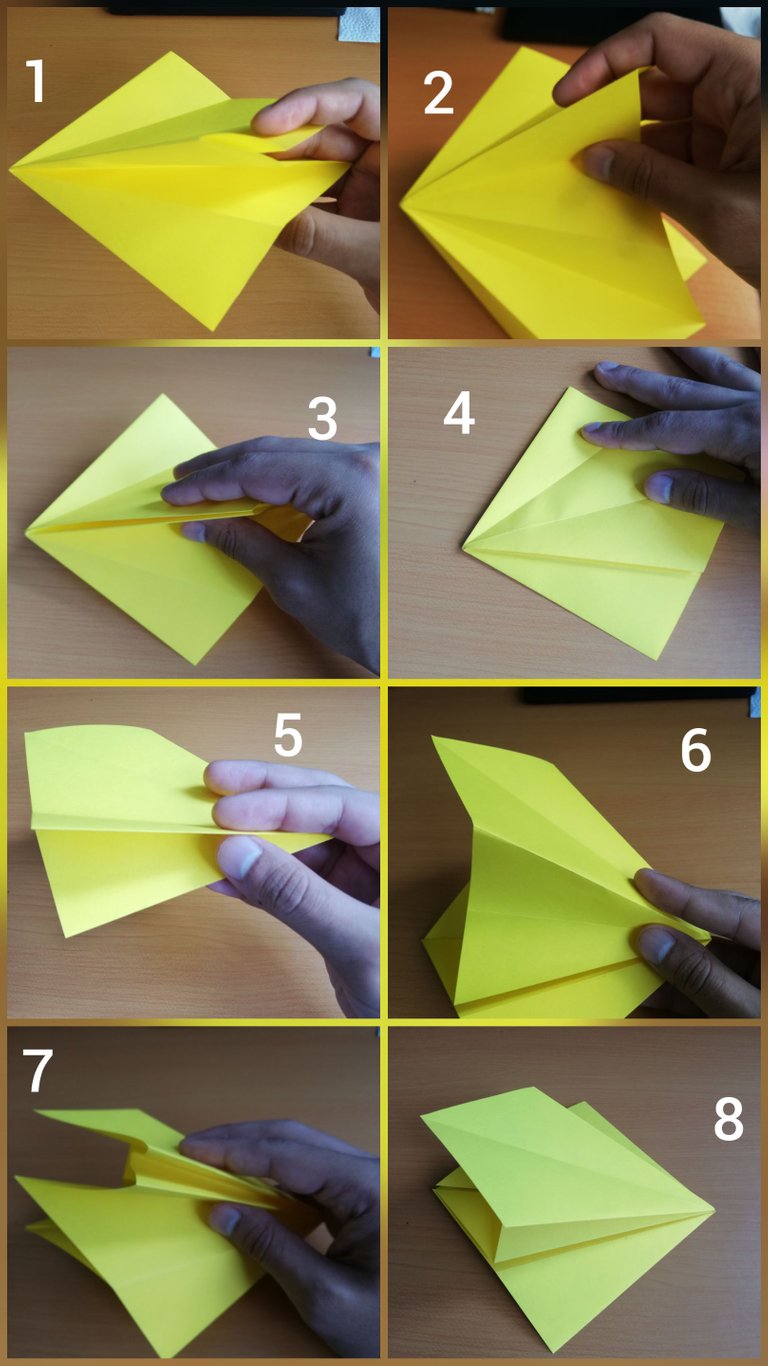
- Repetimos el mismo proceso con los triángulos restantes (1, 2, 3, 4, 5, 6, 7, 8)
- Repeat the same process with the remaining triangles (1, 2, 3, 4, 5, 6, 7, 8)
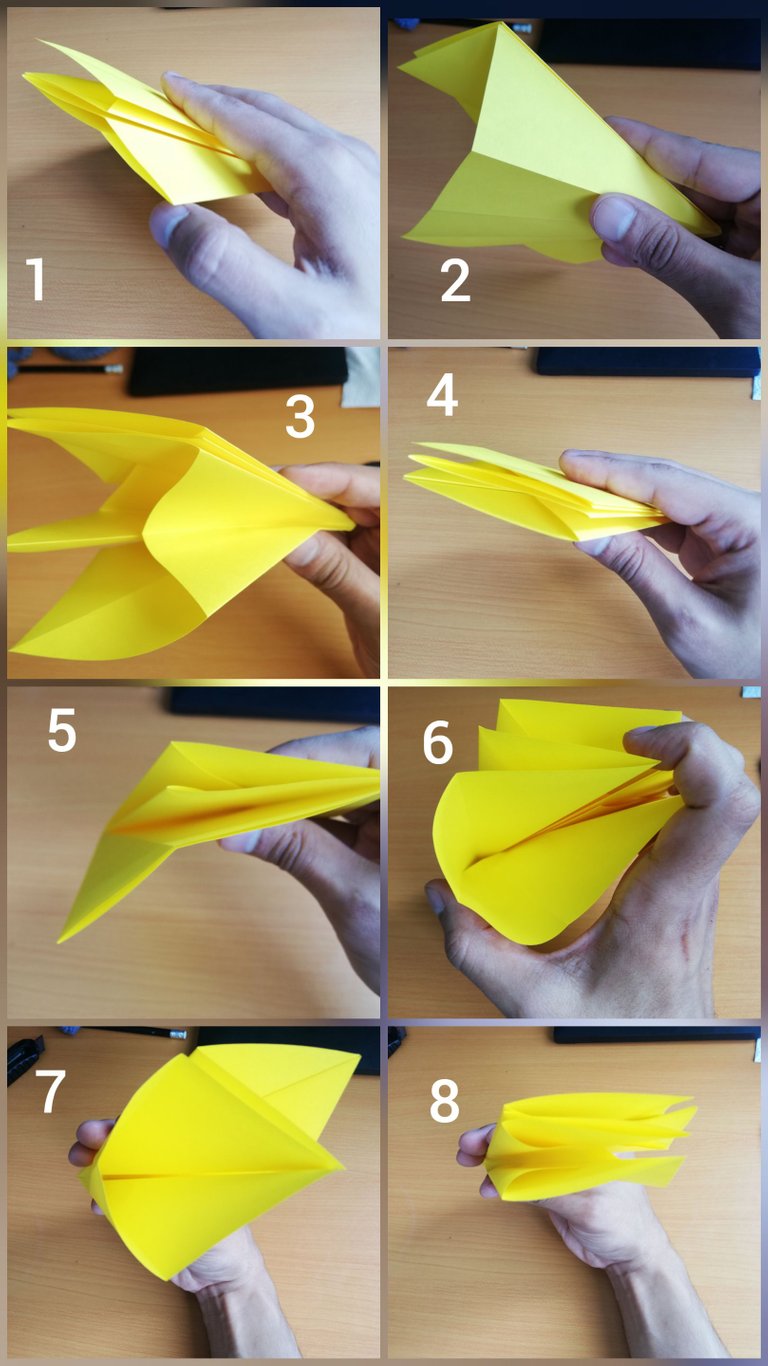
- Cerramos la posición (1) y pasamos el lado izquierdo (2) al lado derecho (3)
- Le damos vuelta y repetimos el procedimiento (4) y (5)
- Nos queda (6)
- We close the position (1) and pass the left side (2) to the right side (3)
- We turn it over and repeat the procedure (4) and (5)
- We are left with (6)
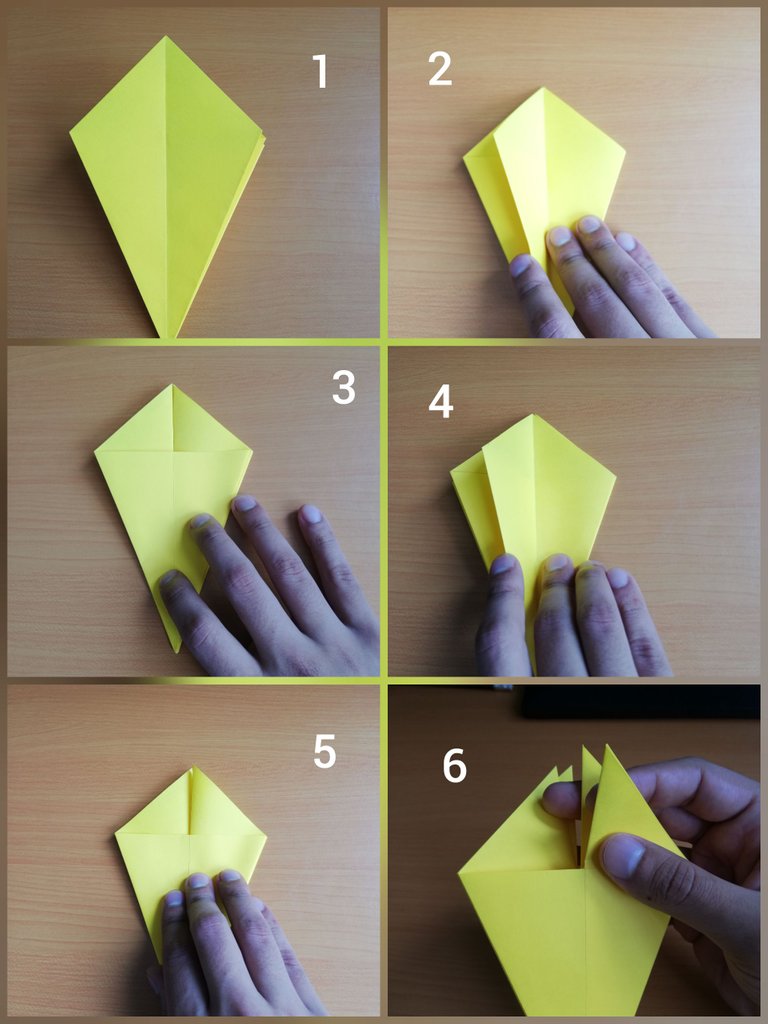
- Doblaremos las esquinas para formar un triángulo en la parte superior (1), (2) y (3)
- Abriremos (4)
- Buscaremos invertir los triángulos formados (5) y (6)
- Repetimos y nos queda (7) y (8)
- Fold the corners to form a triangle at the top (1), (2) and (3)
- We will open (4)
- We will try to invert the triangles formed (5) and (6)
- Repeat and we are left with (7) and (8)
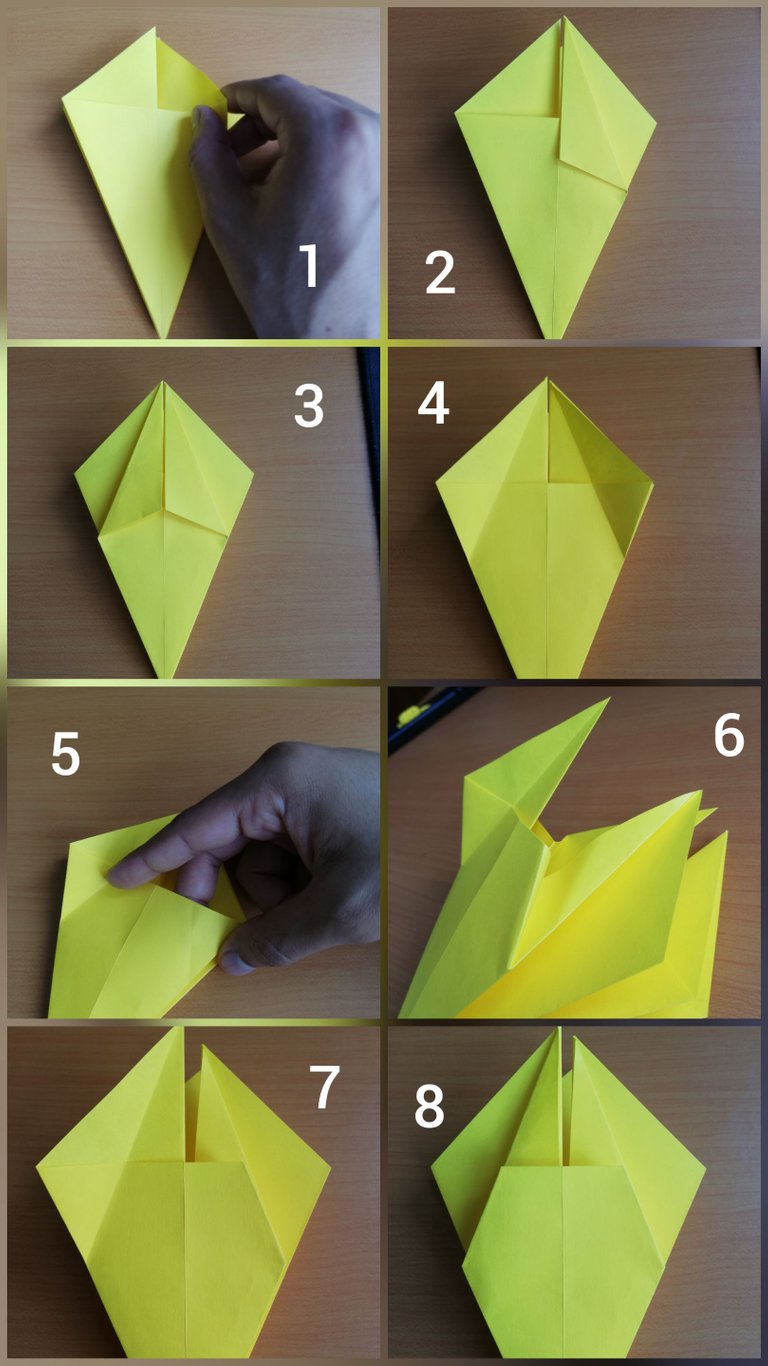
- Damos vuelta y repetimos el proceso anterior (1, 2, 3, 4, 5)
- Tomaremos los laterales y cerraremos hacia el centro (6) y (7)
- Nos quedará (8)
- Turn over and repeat the previous process (1, 2, 3, 3, 4, 5)
- We will take the sides and close towards the center (6) and (7)
- We will be left with (8)
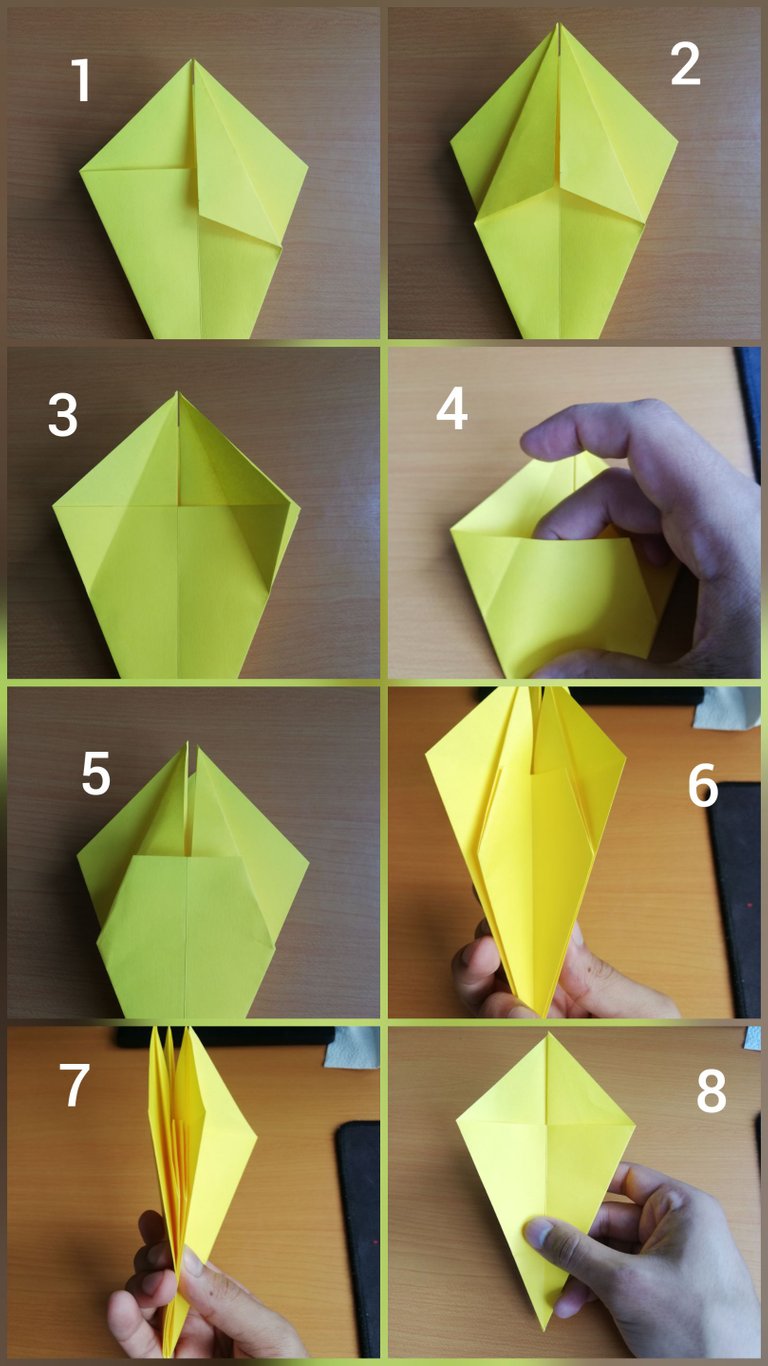
- Formaremos nuevamente los triángulos (1)
- Invertiremos los triángulos (2) y (3)
- Voltearemos (4) y repetiremos el proceso (5, 6, 7)
- We will form the triangles (1) again
- Invert the triangles (2) and (3)
- We will flip (4) and repeat the process (5, 6, 7)
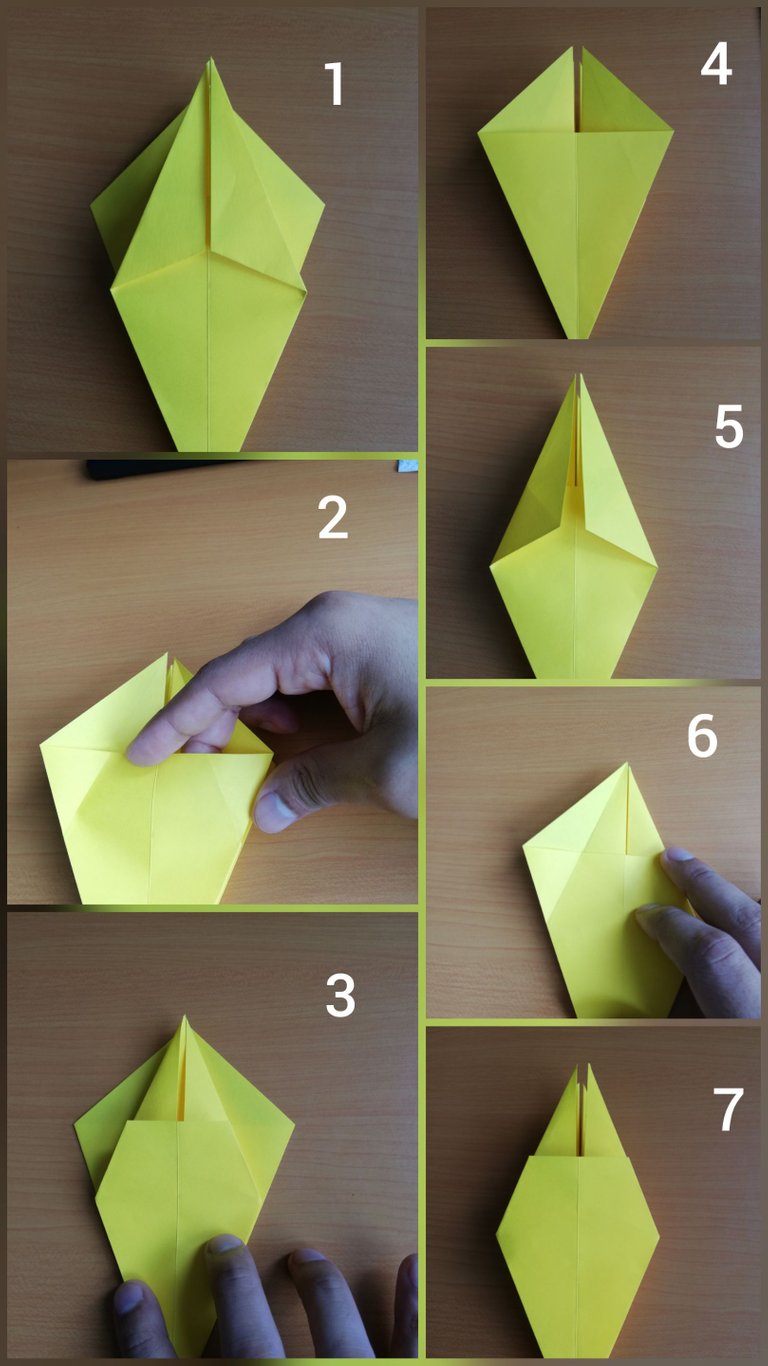
- Doblaremos las puntas superiores para formar unos pequeños triángulos (1), (2) y (3)
- Abriremos (4)
- Buscaremos invertir los triángulos (5), (6) y (7)
- Cerramos (8)
- Fold the upper ends to form small triangles (1), (2) and (3)
- We will open (4)
- We will try to invert the triangles (5), (6) and (7)
- Close (8)
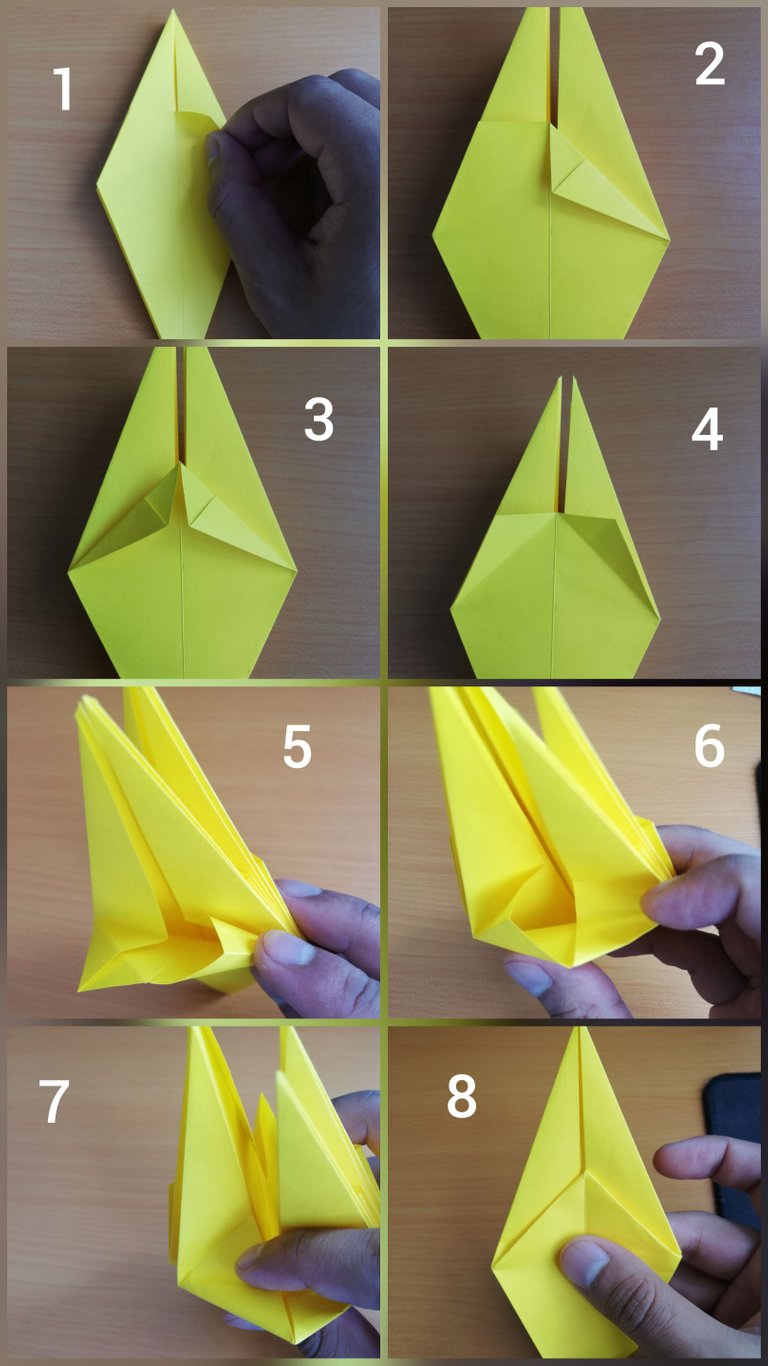
- Damos vuelta y repetimos el procedimiento anterior (1, 2, 3, 4)
- Ahora doblamos el triángulo hacia abajo para marcar (5) y (6)
- Turn over and repeat the previous procedure (1, 2, 3, 4)
- Now we fold the triangle down to mark (5) and (6)
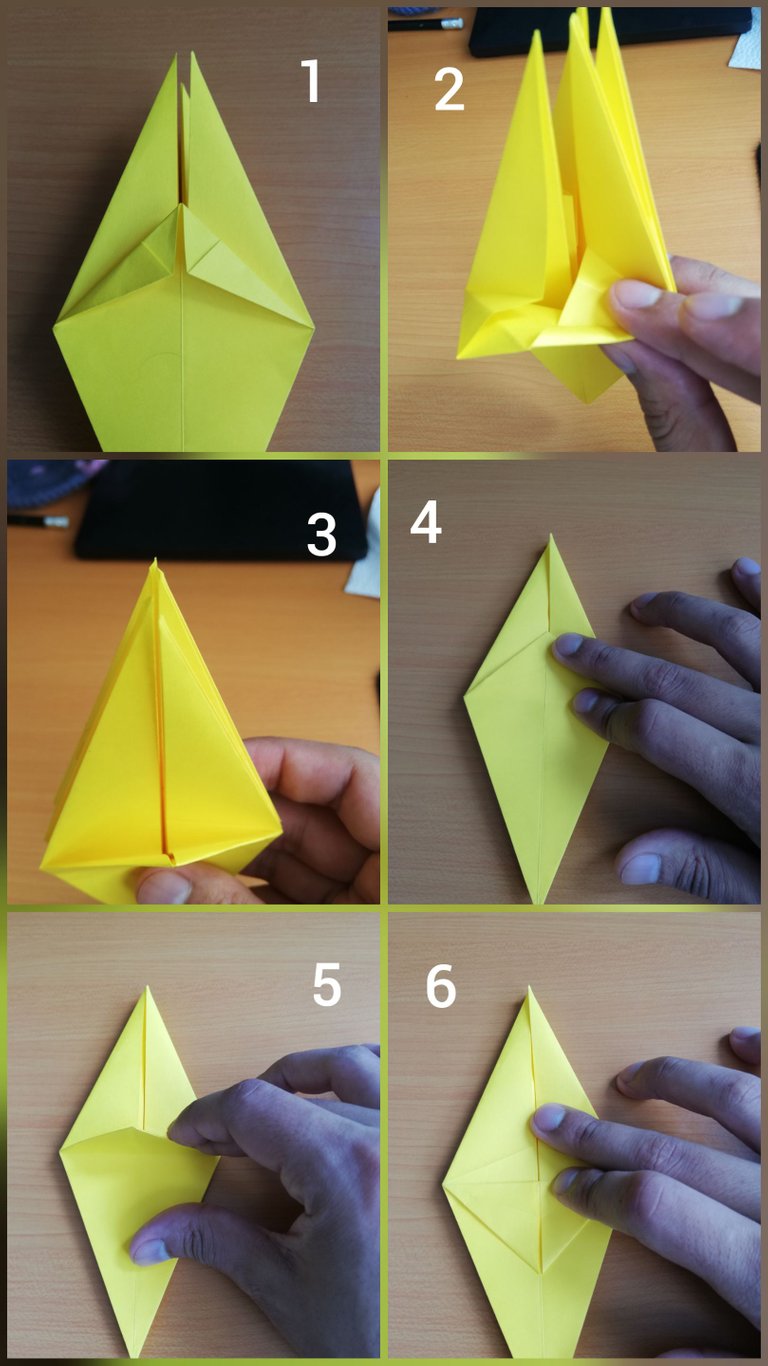
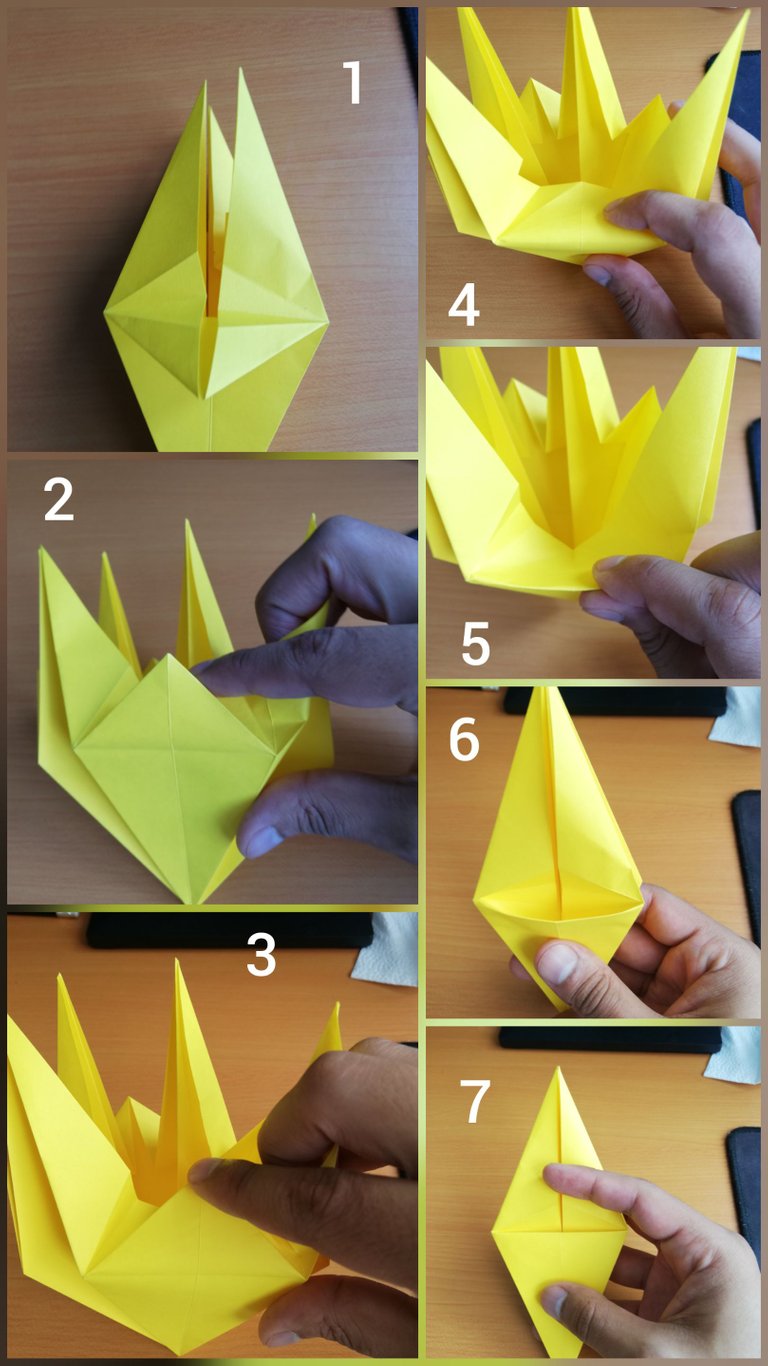
- Ahora buscaremos introducir el triángulo (1) hacia dentro
- Abriendo (3) para poder doblar por las marcas (4), (5)
- Cerramos (6) y (7)
- Now we will seek to introduce the triangle (1) inwards.
- Opening (3) in order to be able to bend by the marks (4), (5)
- Closing (6) and (7)
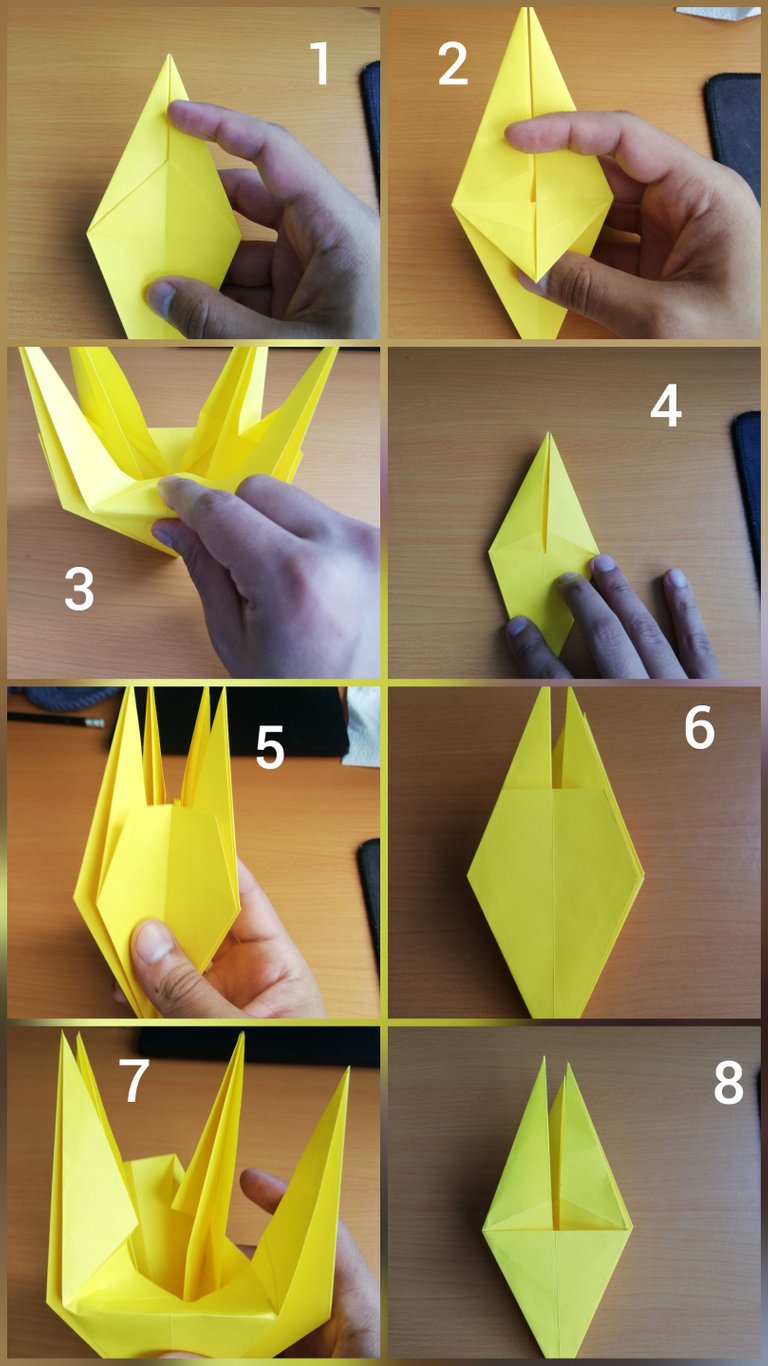
- Volteamos (1) y repetimos el procedimiento anterior (2), (3) y (4)
- Abrimos por los costados (5) y nos queda (6)
- Repetimos el procedimiento anterior en ambos lados(7) y (8)
- Turn over (1) and repeat the above procedure (2), (3) and (4)
- Open the sides (5) and we have (6)
- We repeat the previous procedure on both sides (7) and (8)
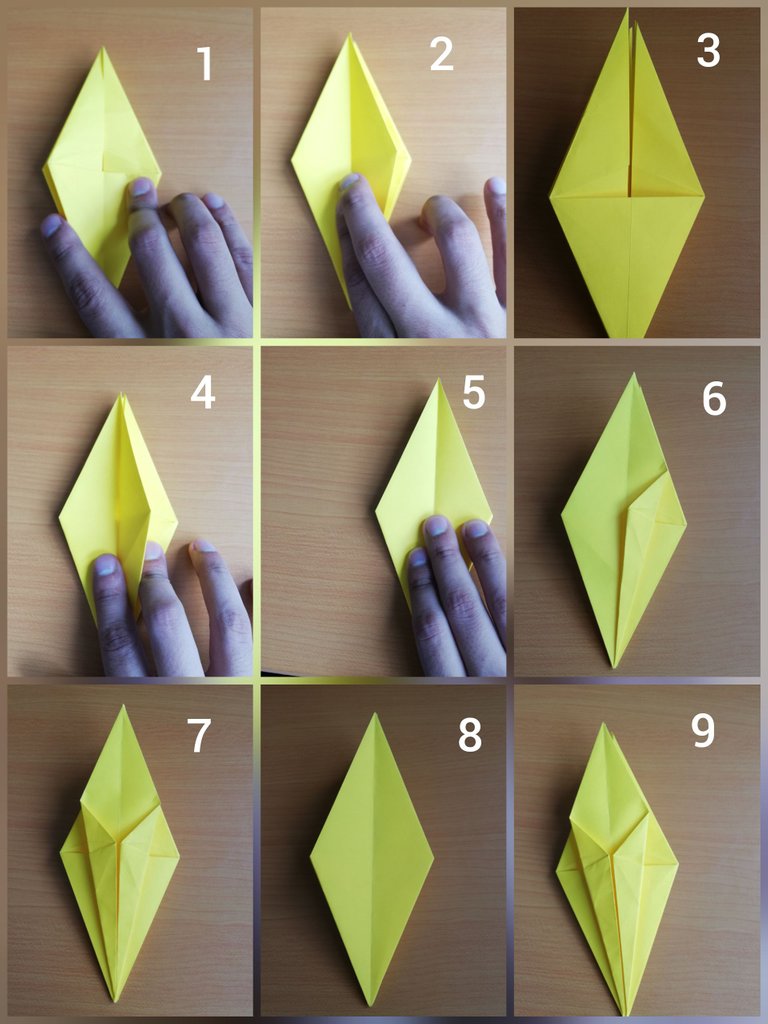
- Llevaremos el lado izquierdo (1) hacia la derecha (2)
- Volteamos (3) y repetimos (4) y (5)
- Ahora formaremos unos triángulos en la parte inferior (6) y (7)
- Volteamos y repetimos (8) y (9)
- We will take the left side (1) to the right (2)
- We flip (3) and repeat (4) and (5)
- Now we will form some triangles in the lower part (6) and (7)
- We flip and repeat (8) and (9)
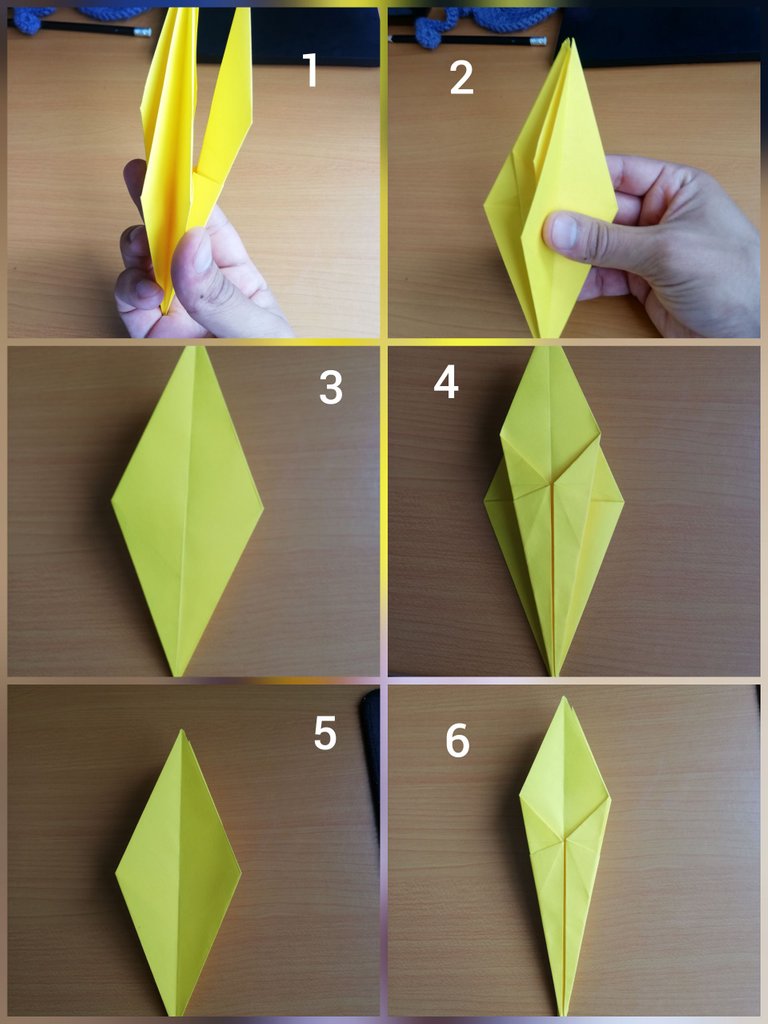
- Tomamos los laterales y cerramos hacia el centro (1) y (2)
- Nos queda (3) y repetimos el procedimiento anterior (4)
- Damos vuelta (5) y repetimos el procedimiento anterior (6)
- We take the sides and close towards the center (1) and (2)
- We are left with (3) and repeat the above procedure (4)
- Turn over (5) and repeat the above procedure (6)
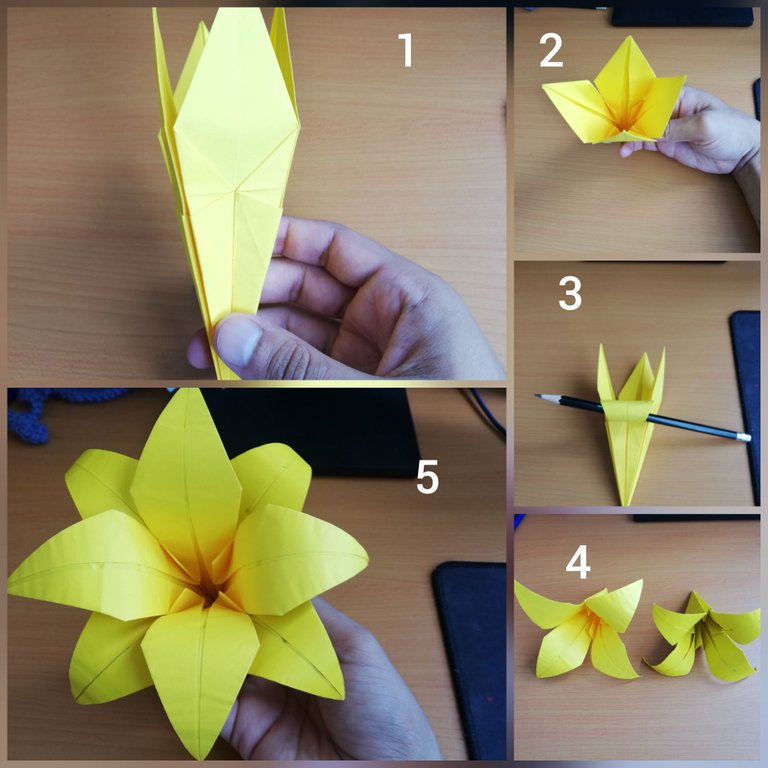
- Abrimos un poco (1)
- Visto desde otro ángulo (2)
- Buscamos un lápiz para darle curva a las hojas (3)
- Y repetimos todo con otro papel para tener (4)
- Introducimos una dentro de la otra (5)
Con esto estaría lista la flor. También con una sola hoja si no desea repetir todo el procedimiento.
- We open a little (1)
- Seen from another angle (2)
- We look for a pencil to give curve to the leaves (3)
- And we repeat everything with another paper to have (4)
- We introduce one inside the other (5)
With this the flower is ready. Also with a single sheet if you do not want to repeat the whole procedure.
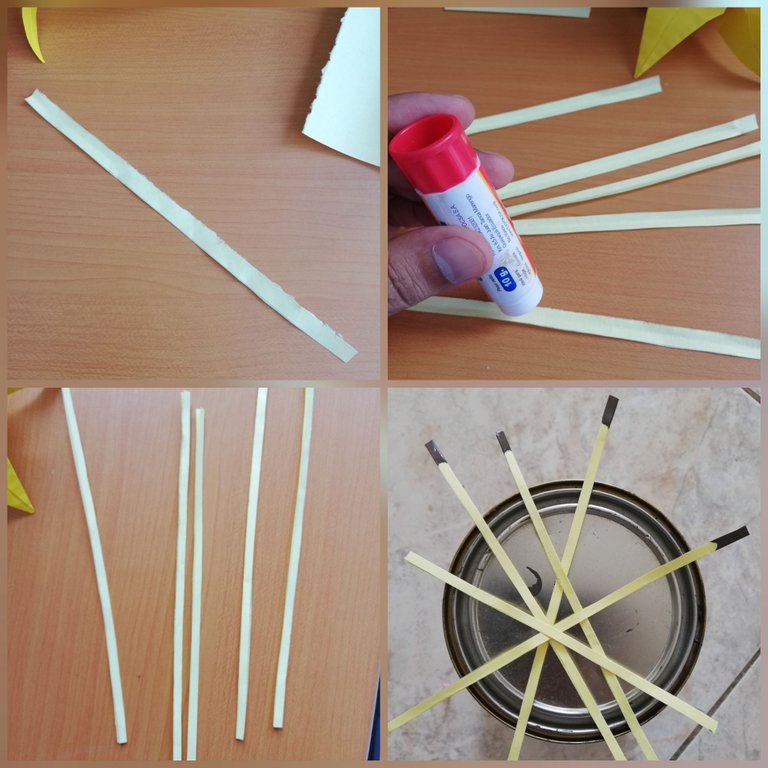
Para un detalle extra, corté unos rectángulos muy delgados y alargados, le coloque pega, los doblé por la mitad y les pinté la punta.
For an extra detail, I cut some very thin and elongated rectangles, glued them together, folded them in half and painted the tip.
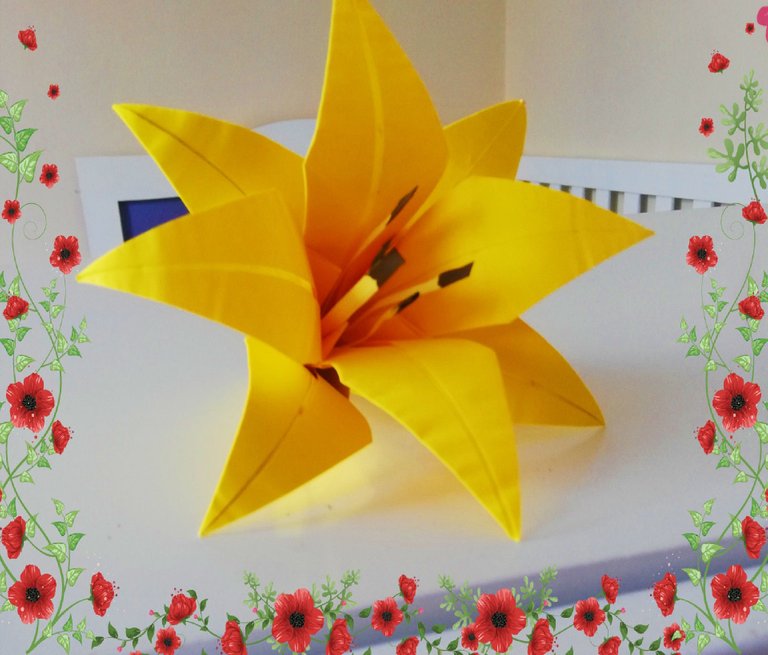
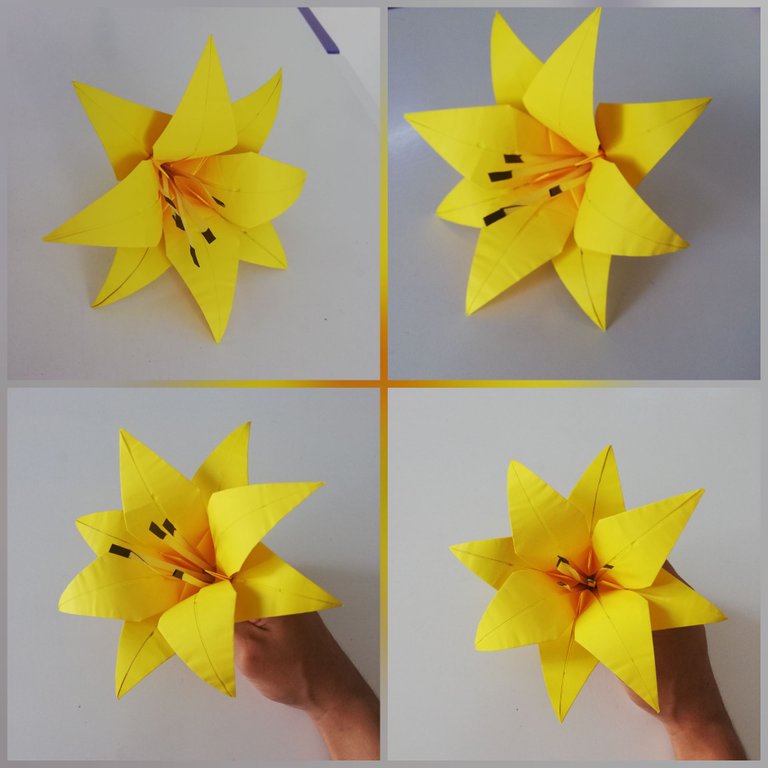
El resultado, una bella flor de lirio.
The result, a beautiful lily flower.
Con esto me despido hasta una próxima publicación, atento a sus recomendaciones y opiniones. Si desean alguna flor en particular, me lo pueden dejar en los comentarios.
With this I say goodbye until a future publication, attentive to your recommendations and opinions. If you want any flower in particular, you can leave it in the comments.

Otros Origamis/ Other Origami
Hermosa Flor de Loto en origami/
Beautiful Lotus Flower in origami
(Tutorial)
Boomerang en origami, Si vuelve!/
Origami Boomerang, If it comes back!
(Tutorial)
Fotos de mi autoría/Photos of my authorship

Saludos y gracias al todo el equipo por el apoyo. Me esforzaré para seguir aportando post de calidad.
Guao te quedo súper espectacular, buen acabado, y ese amarillo vibrante le da un toque, muy bonito tu trabajo.
Saludos! lleva su trabajo pero el resultado es espectacular. Me alegra que te haya gustado.
Congratulations @suzaku8! You have completed the following achievement on the Hive blockchain and have been rewarded with new badge(s) :
Your next target is to reach 400 comments.
You can view your badges on your board and compare yourself to others in the Ranking
If you no longer want to receive notifications, reply to this comment with the word
STOPCheck out the last post from @hivebuzz:
Support the HiveBuzz project. Vote for our proposal!
Wow @suzaku8 No se cómo lo hacés! Yo me pierdo en el segundo doblé. Te quedan geniales. Requiere paciencia hacer estás hermosas figuras. Muy buenos trabajos realizas. Excelente! Saludos y mucho éxito!
Saludos! Y gracias! 😁 Bueno, como todo, con práctica. Además, cada quien desarrolla más afinidad hacia ciertas cosas.
Es increíble, satisfactorio y agradable poder realizar este tipo de origamis, hiciste un trabajo excelente y un muy paso a paso, gracias por compartir algo tan genial, saludos.
Saludos! Ha sido un placer. Disfruto haciendo origamis e intento ser lo más detallado posible en los tutoriales, por si alguien lo quiere intentar. Gracias por pasarte por acá
Me encanto esa flor de origami quedo hermosa, todos los pasos lo explicaste muy bien y hace que las demás personas la puedan hacer. Tienes una creatividad increíble
Saludos! Y gracias por tu apreciación. Espero lograr que otras personas se animen a realizar origamis. Me parece un arte de lo. Más interesante.
Congratulations, your post has been upvoted by @dsc-r2cornell, which is the curating account for @R2cornell's Discord Community. Enhorabuena, su "post" ha sido "up-voted" por @dsc-r2cornell, que es la "cuenta curating" de la Comunidad de la Discordia de @R2cornell.
Thanks for the support
Un tutorial muy completo, el origami es un arte sorprendente requiere de mucha paciencia, excelente trabajo.
Saludos! Como lo mencionas, es muy sorprendente, aun sigo descubriendo nuevas cosas en este arte y lo disfruto por ello. Gracias por apreciar mi trabajo.
The steps that you presented are easy to follow. The projects is really interesting. !discovery 13
Thank you for your appreciation and rating.
This post was shared and voted inside the discord by the curators team of discovery-it
Join our community! hive-193212
Discovery-it is also a Witness, vote for us here
Delegate to us for passive income. Check our 80% fee-back Program
Thanks for the support.
vayaa que genial y agilidad veré si me sale gracias por los paso felicidades.
Saludos! un placer. Cualquier duda me puedes comunicar.