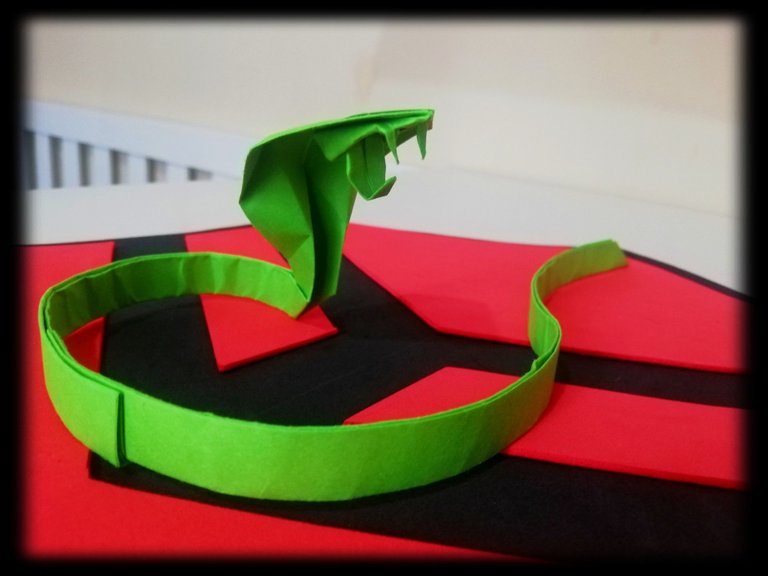
Saludos cordiales para todos los lectores. Buscando nuevos retos en el arte del origami, para esta ocasión, me animé a realizar uno, de nivel avanzado, de una estupenda Serpiente Cobra.
Warm greetings to all readers. Looking for new challenges in the art of origami, for this occasion, I decided to make an advanced level of a wonderful Cobra Snake.
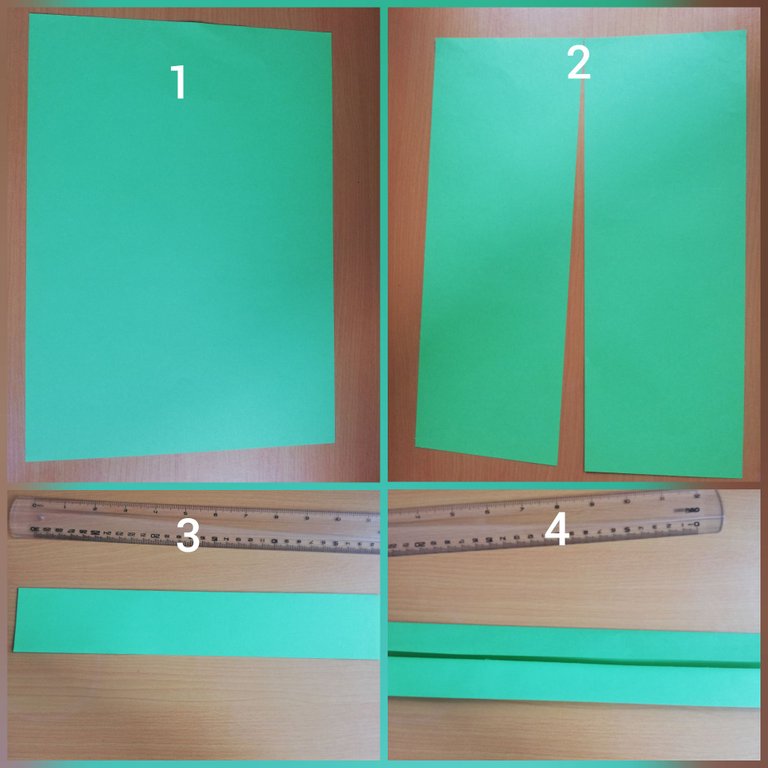
- Para comenzar, podemos usar una hoja tamaño carta o A4 (1)
- La picamos por la mitad (2)
- Tomamos una mitad y la doblamos por la mitad (3)
- Abrimos y doblamos ambos extremos laterales, hacia el centro (4)
- To start, we can use a letter or A4 size sheet of paper (1)
- Cut it in half (2)
- We take one half and fold it in half (3)
- We open and fold both lateral ends, towards the center (4)
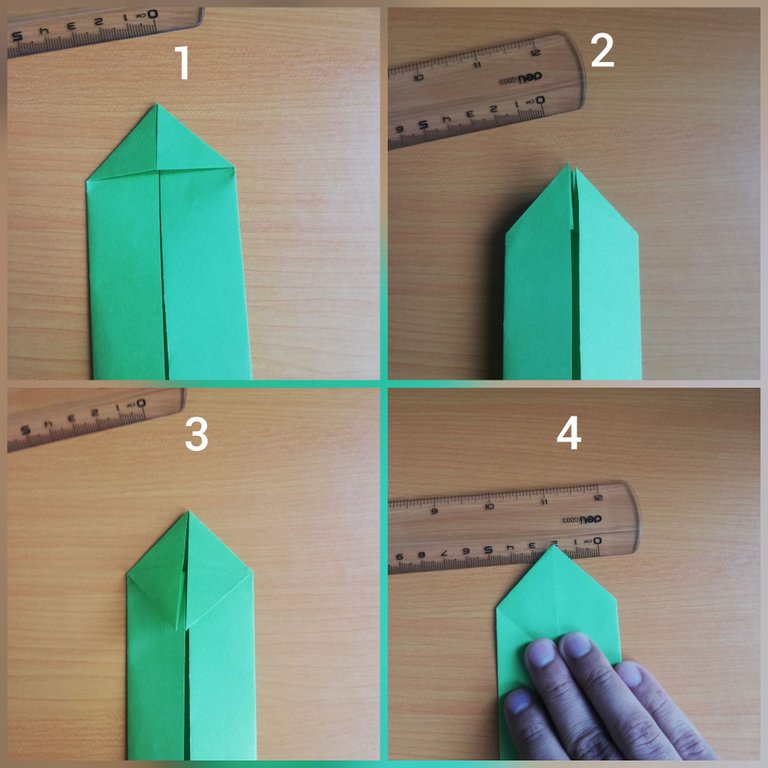
- Doblamos para formar triángulos en un extremo (1)
- Abrimos e invertimos las puntas como para tener los triángulos internamente (2)
- Bajamos las dos puntas superiores (3)
- Volteamos la hoja (4)
- Fold to form triangles at one end (1)
- Open and invert the ends as if to have the triangles internally (2)
- Lower the two upper ends (3)
- Turn the sheet over (4)
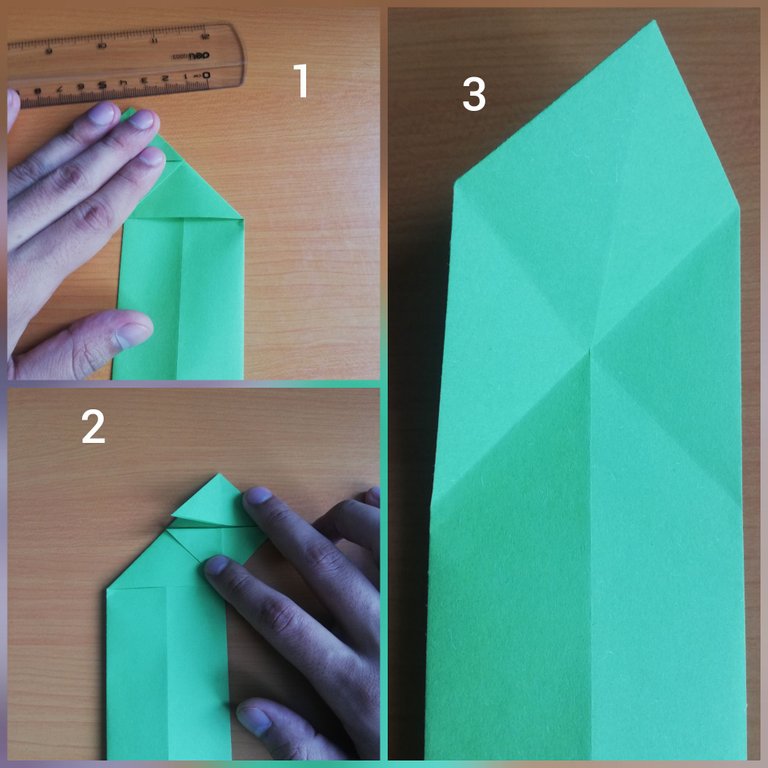
- Ahora doblamos para un lado (1) y luego para el otro (2), para dejar marcada las diagonales (3)
- Now we fold to one side (1) and then to the other (2), to mark the diagonals (3)
- Ahora doblaremos hacia atrás por donde se interceptan las diagonales (1)
- Invertiremos las puntas para formar triángulos internos (2)
- Pasamos hacia un lado los triángulos (3)
- Now we will bend backwards where the diagonals intersect (1)
- Invert the points to form internal triangles (2)
- We pass the triangles to one side (3)
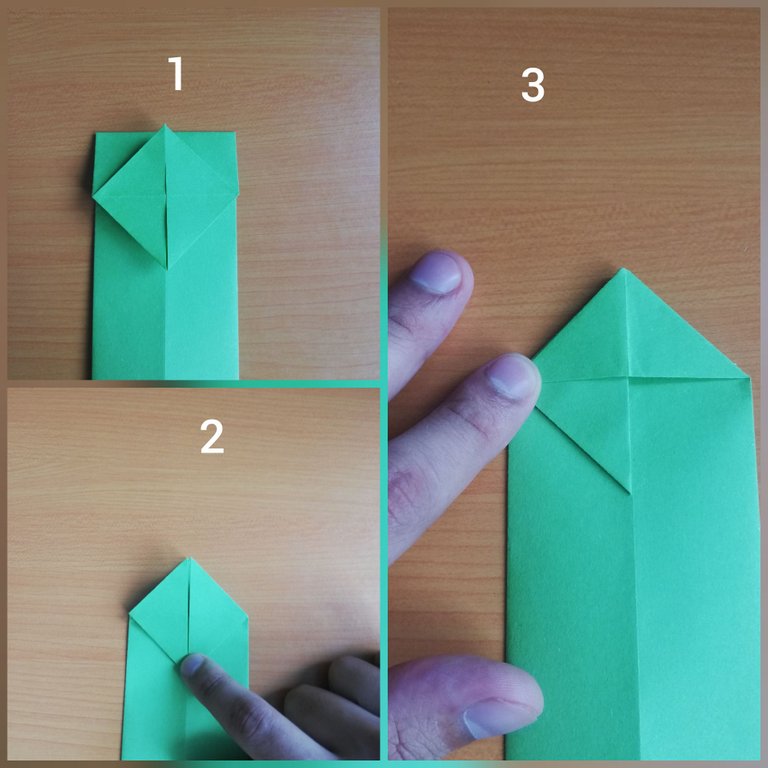
- Formaremos un triángulo en la parte inferior del rombo para marcar (1)
- Abrimos y formaremos un triángulo en la parte superior del rombo para marcar (2)
- Abrimos (3) y con ayuda de esas marcas, doblaremos y cerraremos el triángulo hacia abajo (4)
- We will form a triangle at the bottom of the rhombus to mark (1)
- We open and form a triangle at the top of the rhombus to mark (2)
- We open (3) and with the help of these marks, we will fold and close the triangle downwards (4)
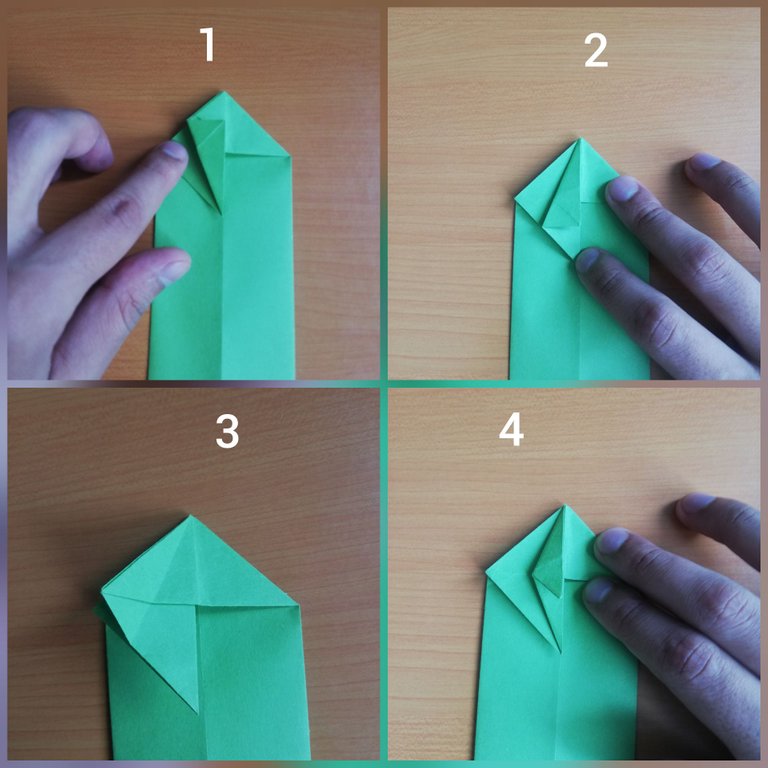
- Ahora pasamos lo realizado de lado (1) y el triángulo en el fondo, también (2)
- Repetimos el procedimiento anterior (3)
- Abrimos y nos queda (4)
- Now we pass the done side (1) and the triangle at the bottom, also (2)
- We repeat the previous procedure (3)
- We open and we have (4)
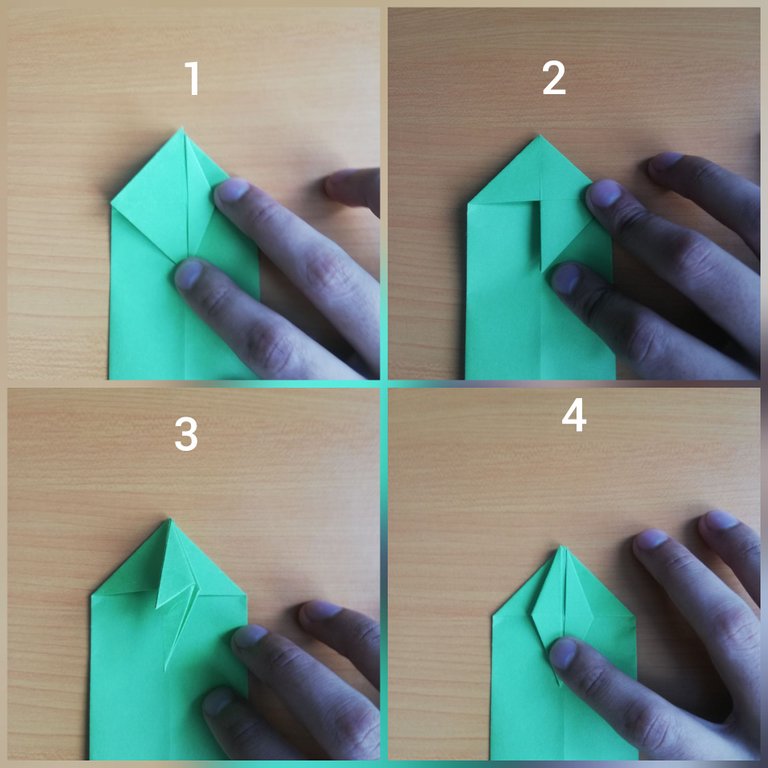
- Doblamos la parte inferior del rombo hacia arriba (1)
- Le doblamos un poco los costado hacia el centro (2)
- Bajamos la parte del rombo que subimos (3), lo que doblamos anteriormente servirá de soporte
- Ahora de la parte superior del rombo sacamos ligeramente a los costados y doblamos las puntas para obtener los colmillos (4)
- Fold the lower part of the rhombus upwards (1)
- Fold the sides a little towards the center (2)
- Lower the part of the rhombus that we raised (3), what we folded previously will serve as support
- Now from the upper part of the rhombus we take out slightly to the sides and bend the ends to obtain the fangs (4)
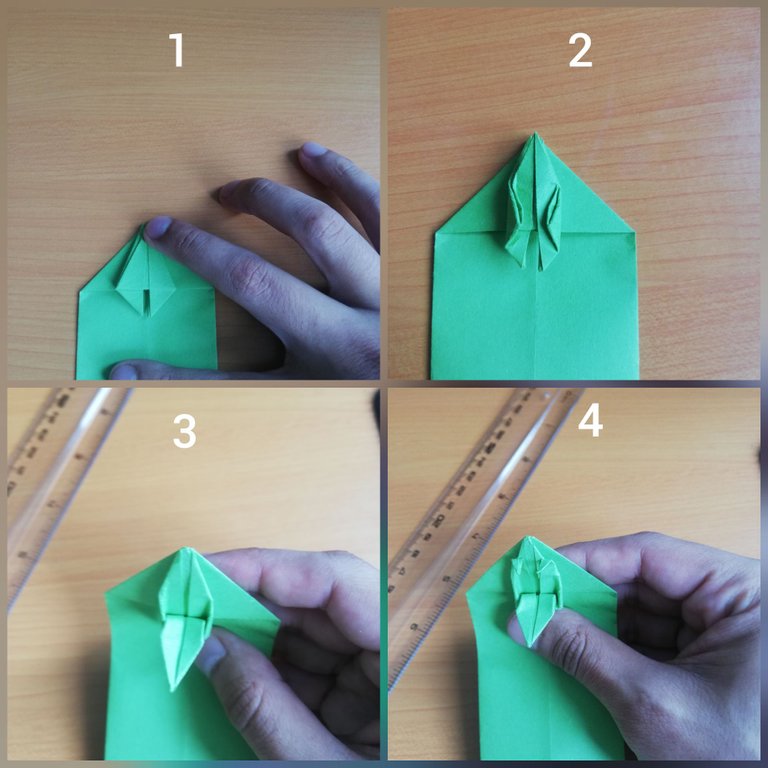
- Volteamos la hoja (1)
- Repetimos el procedimiento para marcar las diagonales (2)
- Ahora doblaremos de cada esquina superior al centro de las diagonales (3) para obtener otras diagonales marcadas (4)
- Turn the sheet over (1)
- Repeat the procedure to mark the diagonals (2)
- Now we fold from each upper corner to the center of the diagonals (3) to obtain other marked diagonals (4)
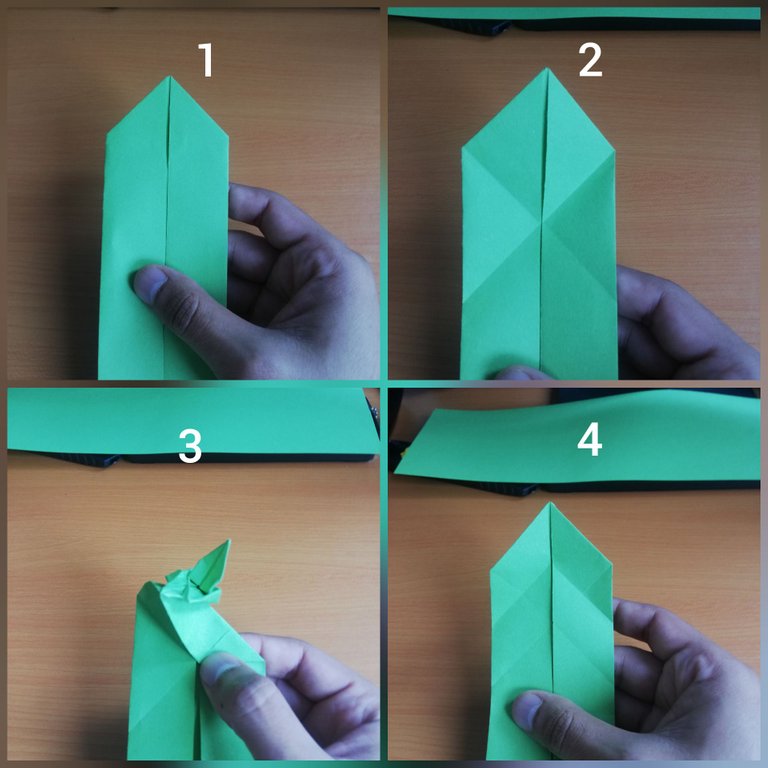
- Doblaremos los laterales del cuerpo hacia el centro (1) hasta la marca de las diagonales
- Doblaremos hacia abajo como abriendo el lomo del cuerpo (2)
- Y le daremos forma a la parte posterior de la cabeza (3) con ayuda de las diagonales marcadas
- Fold the sides of the body towards the center (1) up to the mark of the diagonals
- Fold down as if opening the back of the body (2)
- And we will shape the back of the head (3) with the help of the marked diagonals
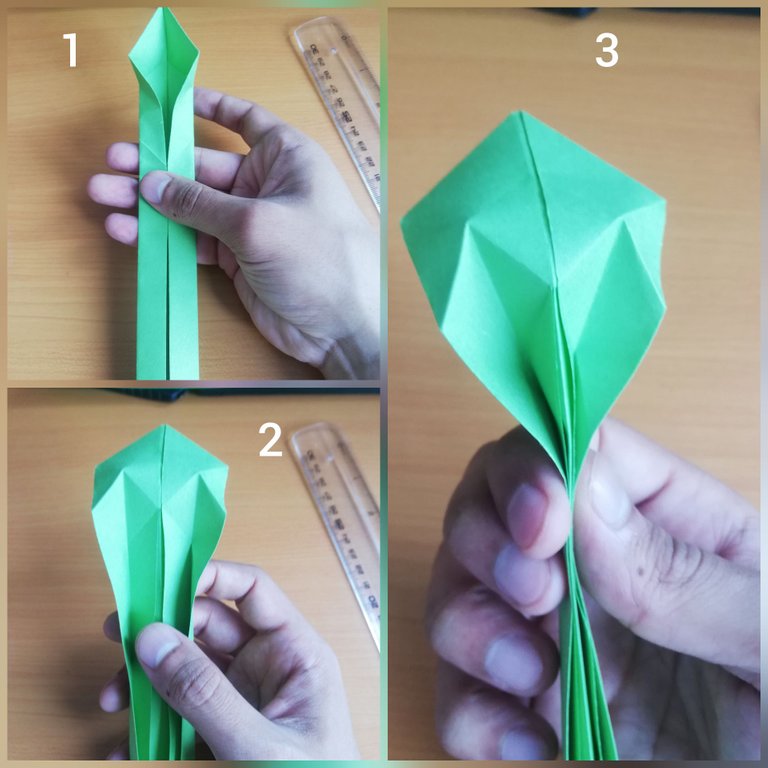
- Doblaremos un poco abajo de la cabeza para marcar (1)
- Abriremos el lomo un momento (2) para poder doblar con ayuda de las marcas, y que el cuerpo que cerrado pero con forma de "L" (3)
- Ahora procedemos a doblar el cuerpo en círculo para darle curva (4)
- We will fold a little below the head to mark (1).
- We will open the back a moment (2) to be able to fold with the help of the marks, and that the body is closed but with "L" shape (3)
- Now we proceed to fold the body in a circle to give it a curve (4)
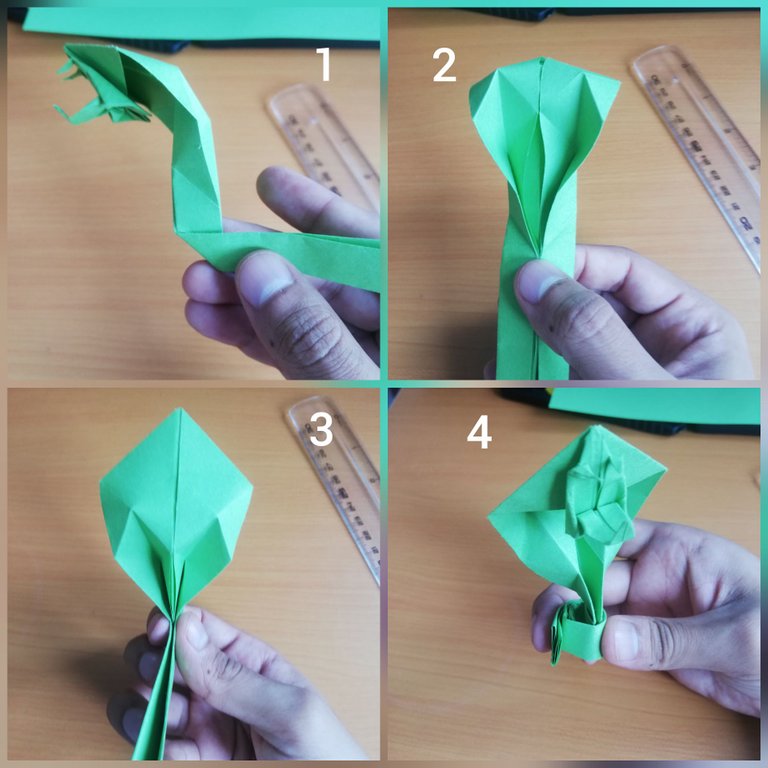
- Tomaremos la otra parte de la hoja picada (1)
- La doblaremos por la mitad para luego doblar los laterales hacia el centro, Ahí podemos aprovechar para formar unos triángulos en un extremo (2)
- Luego cerramos por la mitad a lo largo (3)
- Con esta extensión de cuerpo, la unimos con la otra parte (4), dejando la punta con los triángulos como punta de la cola
- Nos quedaría lista nuestra serpiente Cobra
- We will take the other part of the chopped sheet (1).
- We will fold it in half and then fold the sides towards the center, there we can take advantage to form some triangles at one end (2)
- Then we close it in half lengthwise (3)
- With this body extension, we join it with the other part (4), leaving the tip with the triangles as the tip of the tail
- Our Cobra snake is now ready
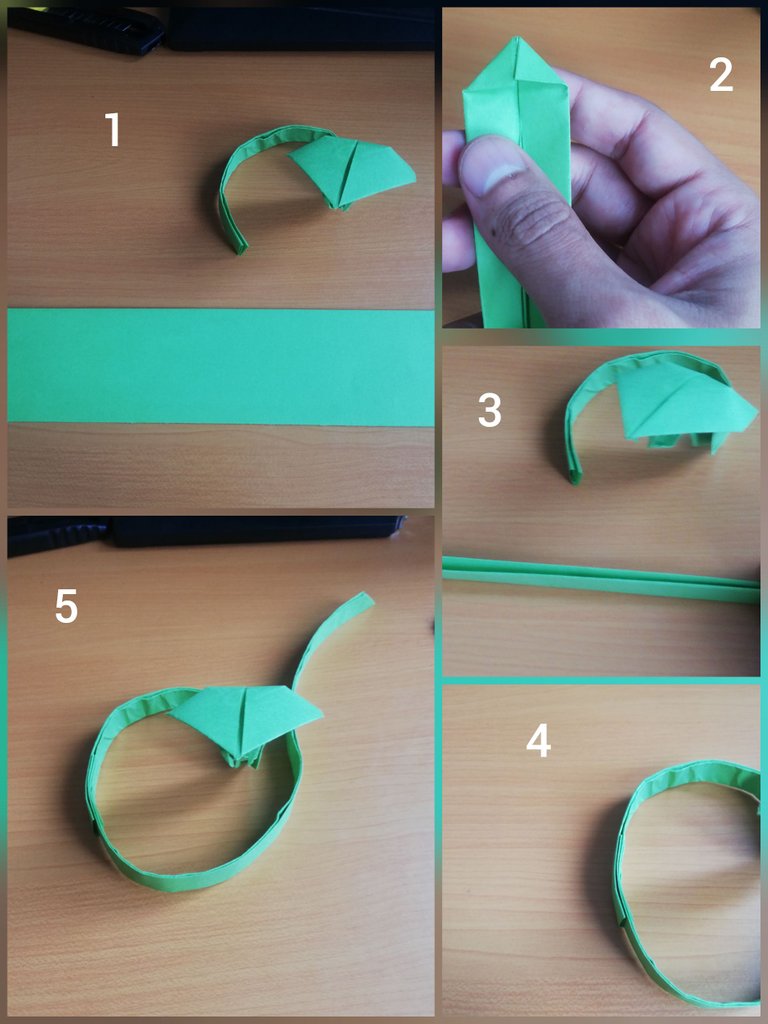
Nota: Si la mandíbula no se sostiene bien de la parte superior de la cabeza, pueden colocar un toque de pega blanca
Note: If the jaw does not hold well on the top of the head, a dab of white glue can be applied
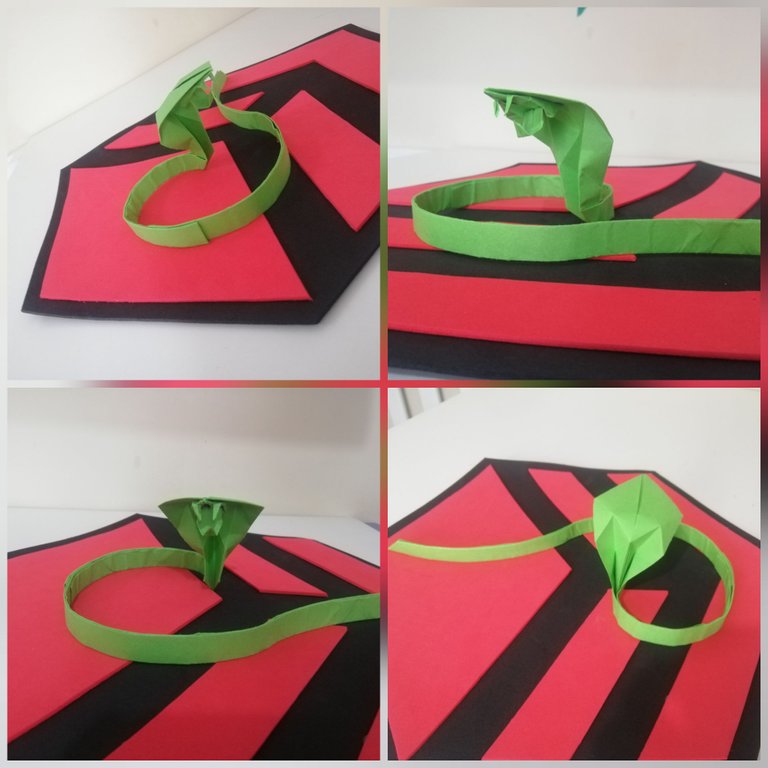

El tutorial que he seguido para la realización de este increíble origami está hecho por Art & Crafts. Con esto me despido hasta una próxima publicación, atento a sus comentarios de opiniones y sugerencias.
The tutorial that I followed for the realization of this incredible origami is made by Art & Crafts. With this I say goodbye until a next publication, attentive to your comments of opinions and suggestions.

Otros/other Origamis
Hermosa Flor de Loto en origami/
Beautiful Lotus Flower in origami
(Tutorial)
Boomerang en origami, Si vuelve!/
Origami Boomerang, If it comes back!
(Tutorial)

Fotos de mi autoría/Photos of my authorship
Me encantó ese resultado de tu diestro trabajo con el origami. Es impresionante la presencia de esa cobra, que ya de por sí lo es en fotos y videos. Y cómo lo logras, proceso que ilustras muy didácticamente. Gracias y saludos, @suzaku8.
Muchas gracias @josemalavem por tu apreciación y comentario. Saludos!.
Que precisión, me encanto primera vez que veo una cobra en origami 😅. Quedo súper.
Me encanó cuando vi el tutorial y no me aguanté. Ahora forma parte de mi colección.
Increíble serpiente,te quedo fantástica!sigue así y mucho exitos!
Saludos! y muchas gracias. Seguiré, tenlo por seguro. Ya tengo en la mira un insecto genial.
Congratulations @suzaku8! You have completed the following achievement on the Hive blockchain and have been rewarded with new badge(s) :
Your next target is to reach 70 posts.
You can view your badges on your board and compare yourself to others in the Ranking
If you no longer want to receive notifications, reply to this comment with the word
STOPCheck out the last post from @hivebuzz:
Support the HiveBuzz project. Vote for our proposal!
Wow!!! Excelente los detalles, me encanta. Saludos!
Saludos y gracias!
Naguara @suzaku8 ... Que bonito trabajo! Tienes bastante destreza realizando estas figuras! Es increíble cómo de un simple papel, haces creaciones tan bonitas.
Saludos! Y si, hay muchas recreaciones interesantes e impresionantes. Poco a poco iré trayendo más 😁. Gracias por pasarte por acá
me encantan tus trabajos de origami son muy buenos y los tutoriales muy bien hechos!
Saludos! gracias por el alago. Espero seguir mejorando y asombrando con los Origamis.
Siempre me han gustado las serpientes te quedo muy bien!
Saludos! ya somos dos. Y mi favorita es la cobra... Gracias por comentar.
This is really good origami. I am fascinated to how ingenious paper folding or origami can create good forms and shapes. !discovery 15
Greetings! I am still amazed at what I continue to achieve, so I will continue to show the wonders of origami. Thanks for your support.
Good to hear that, @suzaku8. Keep flourishing!
This post was shared and voted inside the discord by the curators team of discovery-it
Join our community! hive-193212
Discovery-it is also a Witness, vote for us here
Delegate to us for passive income. Check our 80% fee-back Program
Thank you for your support and appreciation of my work.
Me encantó el resultado y lo explicas muy bien. tendré que hacerlo como 8 veces antes de que salga medianamente bien jaja. Saludos