
English Version
Versión Español
Saludos a todos y bienvenidos bueno cambiando un poco la temática que hasta ahora se estaba trabajando en este blog voy a trabajar con bases de datos y formulas en excel ya que es una herramienta muy potente y se que muchas personas aun no tienen un buen dominio de esta herramienta por lo que he decido realizar algunos tutoriales no voy a dejar de hacer diseños ya que me gusta poder diseñar pero también trabajo con otras aplicaciones así que voy a hacer tutoriales variado este es el primero de una serie de publicaciones destinadas al mejor manejo de excel espero les guste!
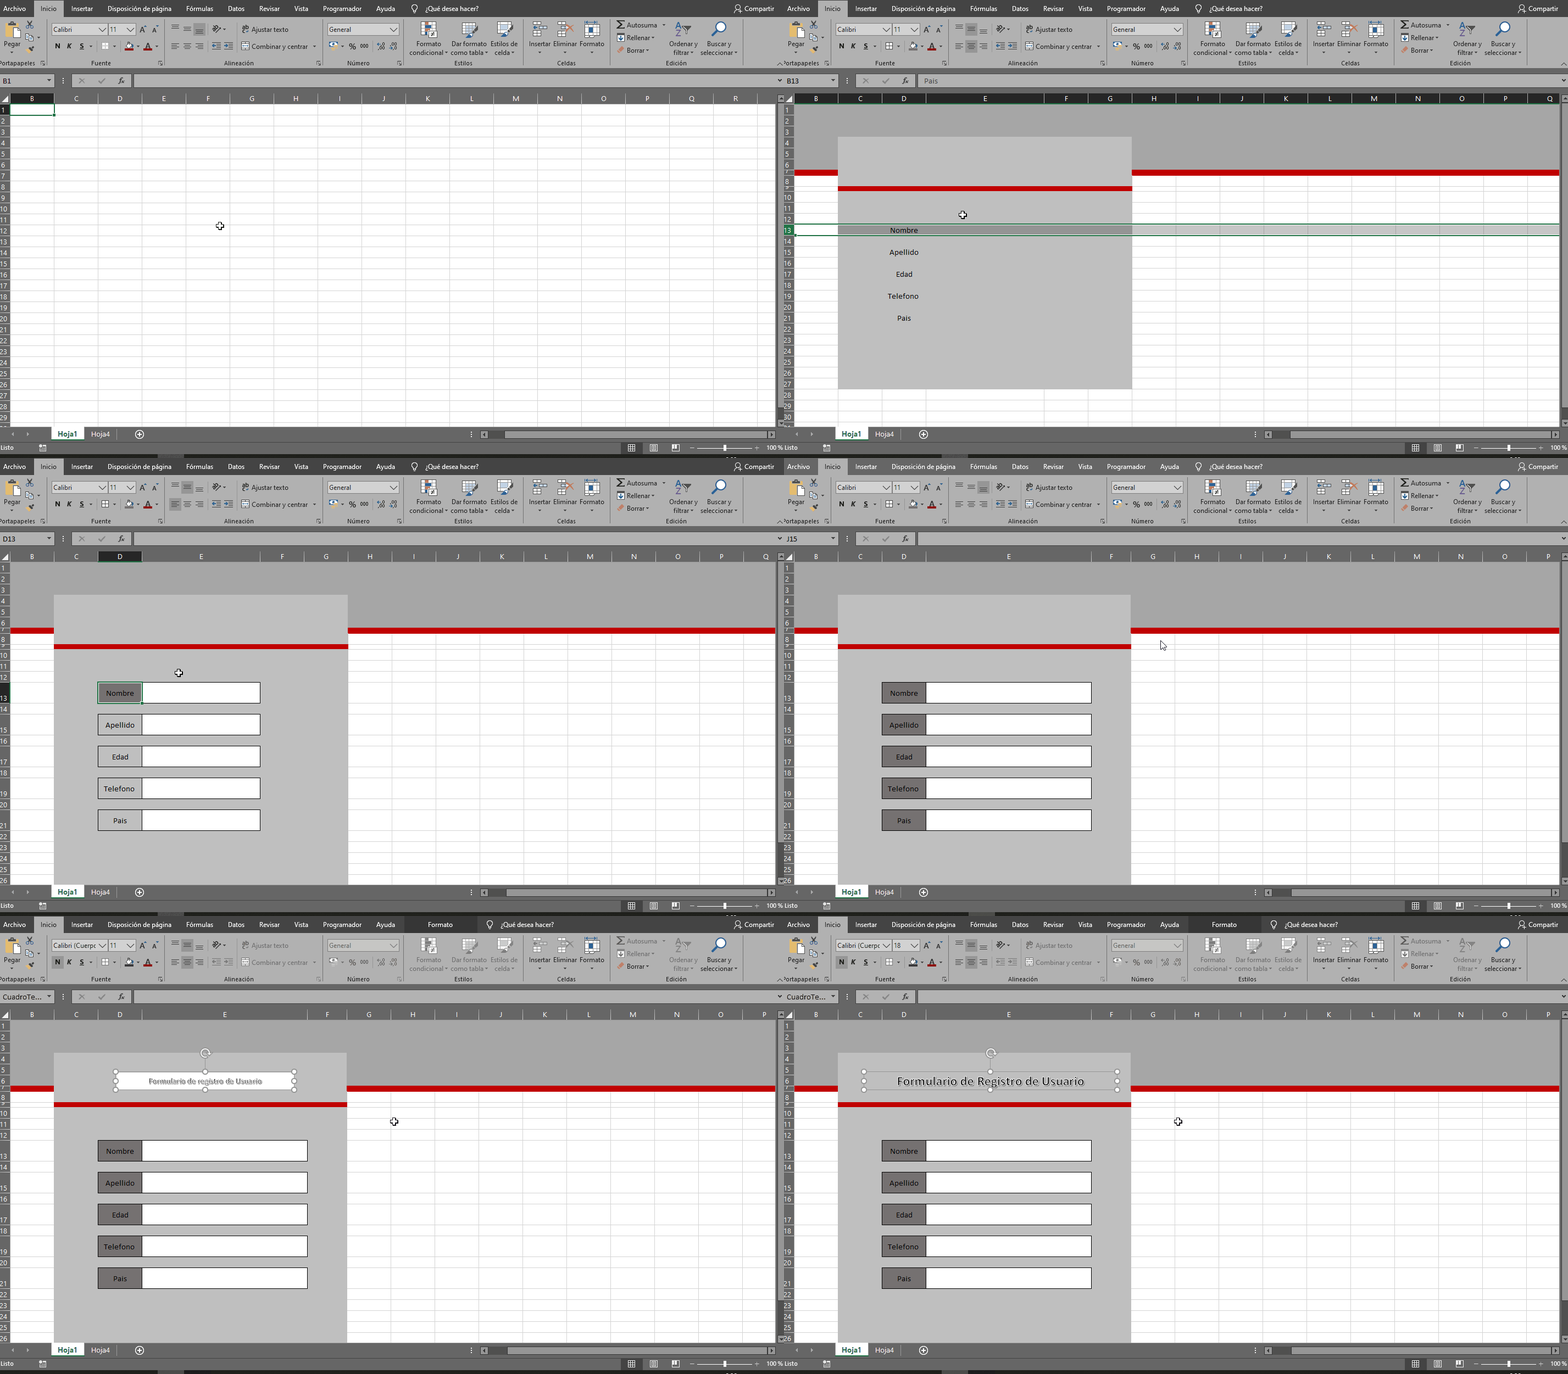
Lo primero es dar le un formato atractivo por lo que decidí usar una combinación de colores grises y rojos sin embargo ustedes pueden usar las combinaciones que les parezcan más atractivas usé una altura en las filas de 28,5 para tener suficiente espacio para las cajas de texto del formulario.

The first thing is to give it an attractive format so I decided to use a combination of gray and red colors however you can use the combinations that you find more attractive I used a height in the rows of 28.5 to have enough space for the text boxes of the form.
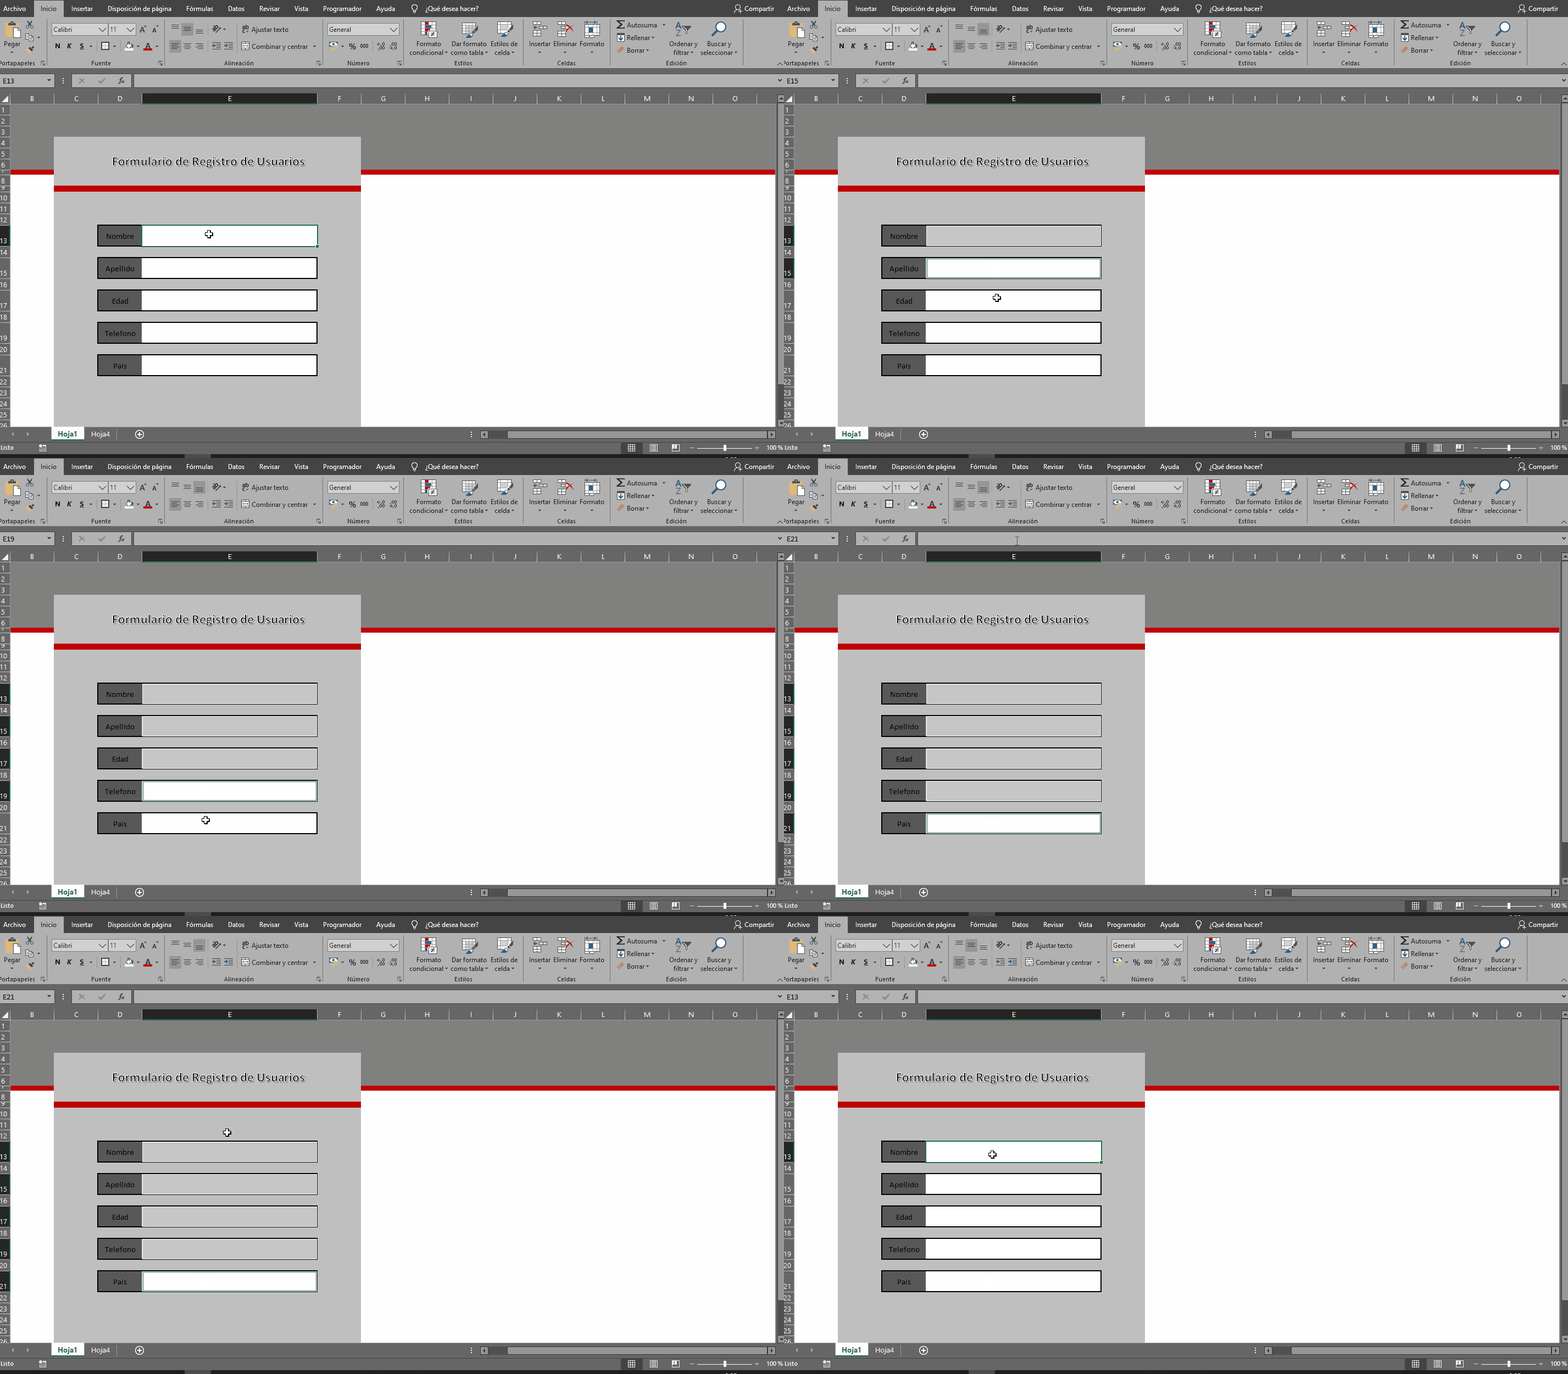
Acá seleccionamos cada celda y le damos sangría de manera que al escribir no nos quede el texto tan próximo a la etiqueta.

Here we select each cell and indent it so that when we write we don't have the text so close to the label.
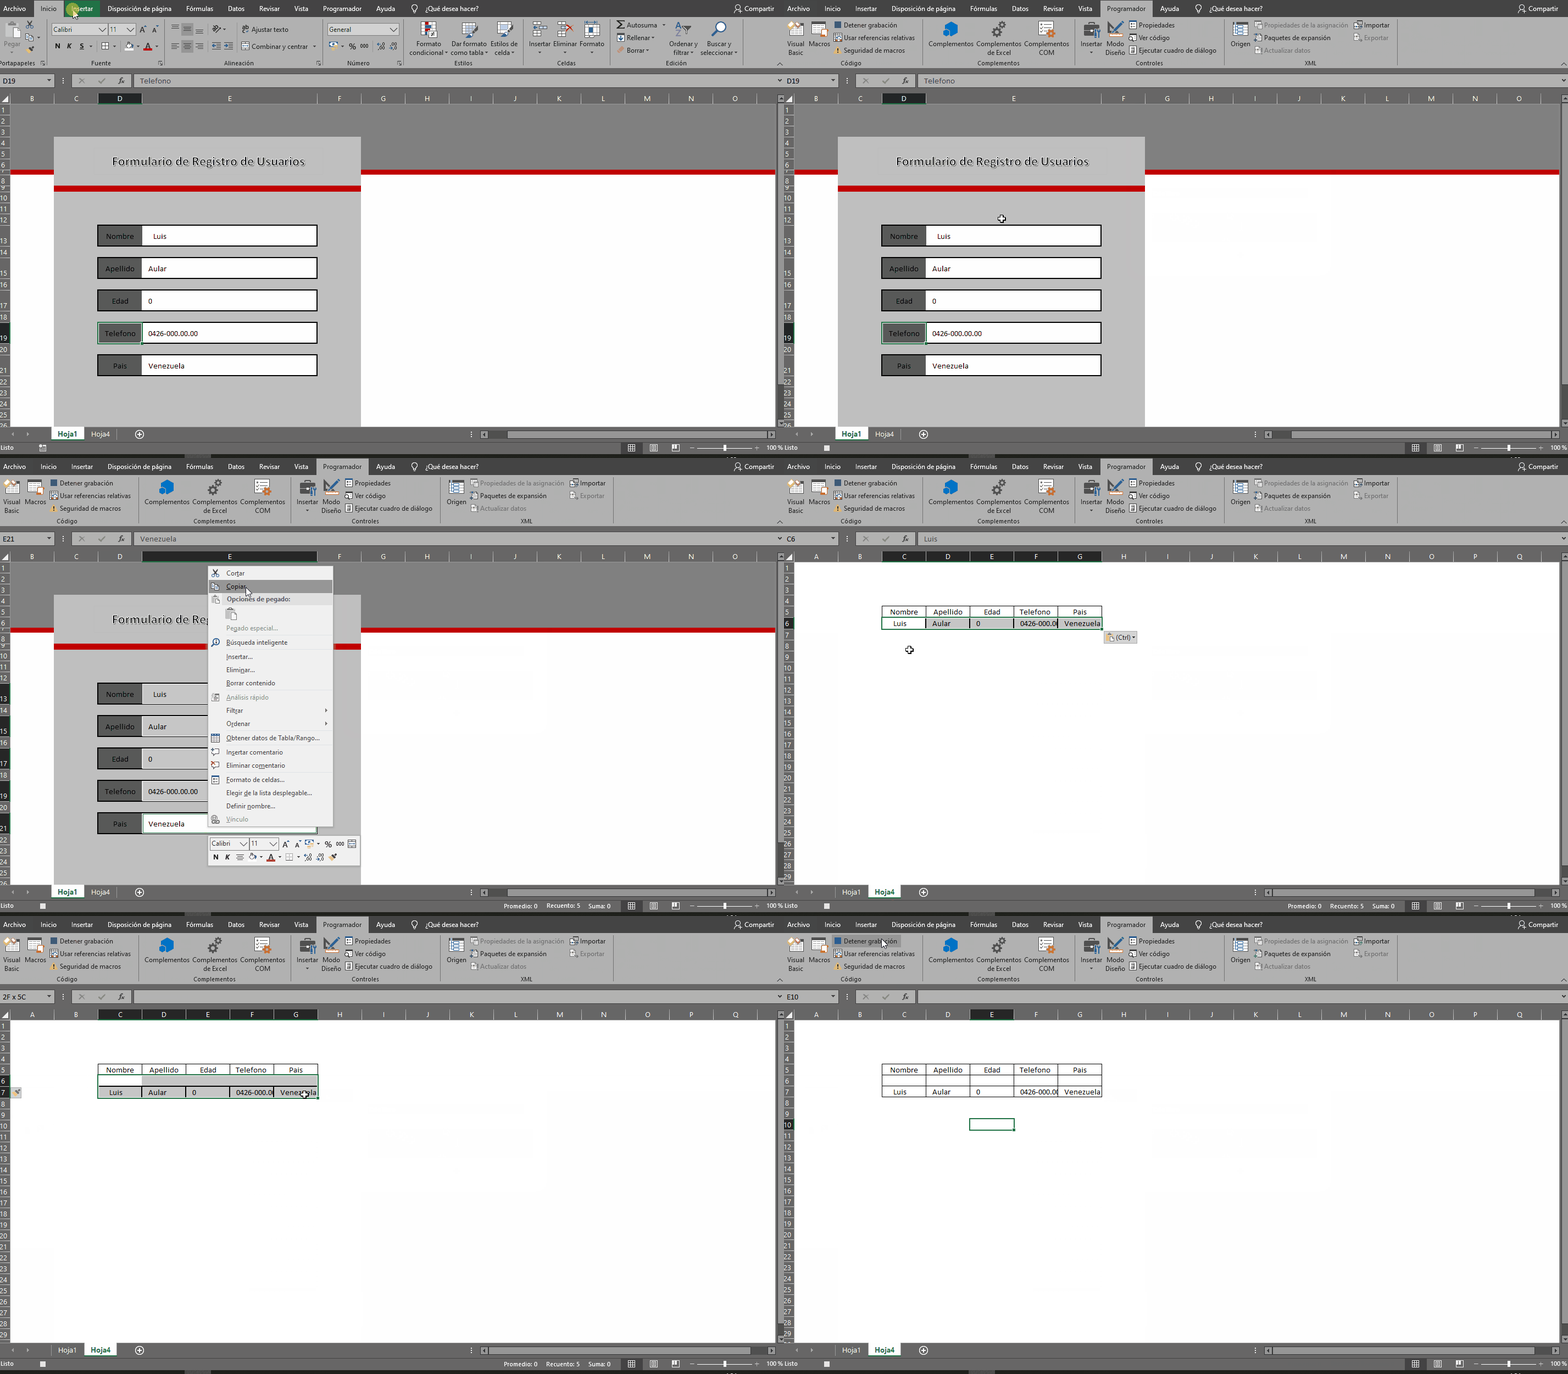
Vamos a la etiqueta programador vamos al apartado macro en iniciamos la grabación de una macro una vez iniciado les pedirá un nombre pueden colocar cualquiera o dejar el nombre por defecto, ahora vamos a la hoja donde tenemos nuestro formulario seleccionamos celda por celda y le damos copiar una vez copiemos vamos a nuestra hoja de base de datos en la cual se irán guardando los datos damos clip derecho en la primera celda en la que vamos a cargar los datos y seleccionamos la opción pegado especial luego transponer una vez estén los datos nos vamos al borde y clip derecho seleccionamos insertar de esta manera la fila baja un nivel y nos evita que los datos se reescriban al guardarlos.

Let's go to the programmer tab and start recording a macro. Once started, you will be asked for a name, you can put any name or leave the default name, now we go to the sheet where we have our form we select cell by cell and give it a copy once we copy it we go to our database sheet in which the data will be saved we give right clip in the first cell where we are going to load the data and select the special paste option then transpose once the data is there we go to the edge and right clip we select insert this way the row goes down a level and prevents the data from being rewritten when saved.
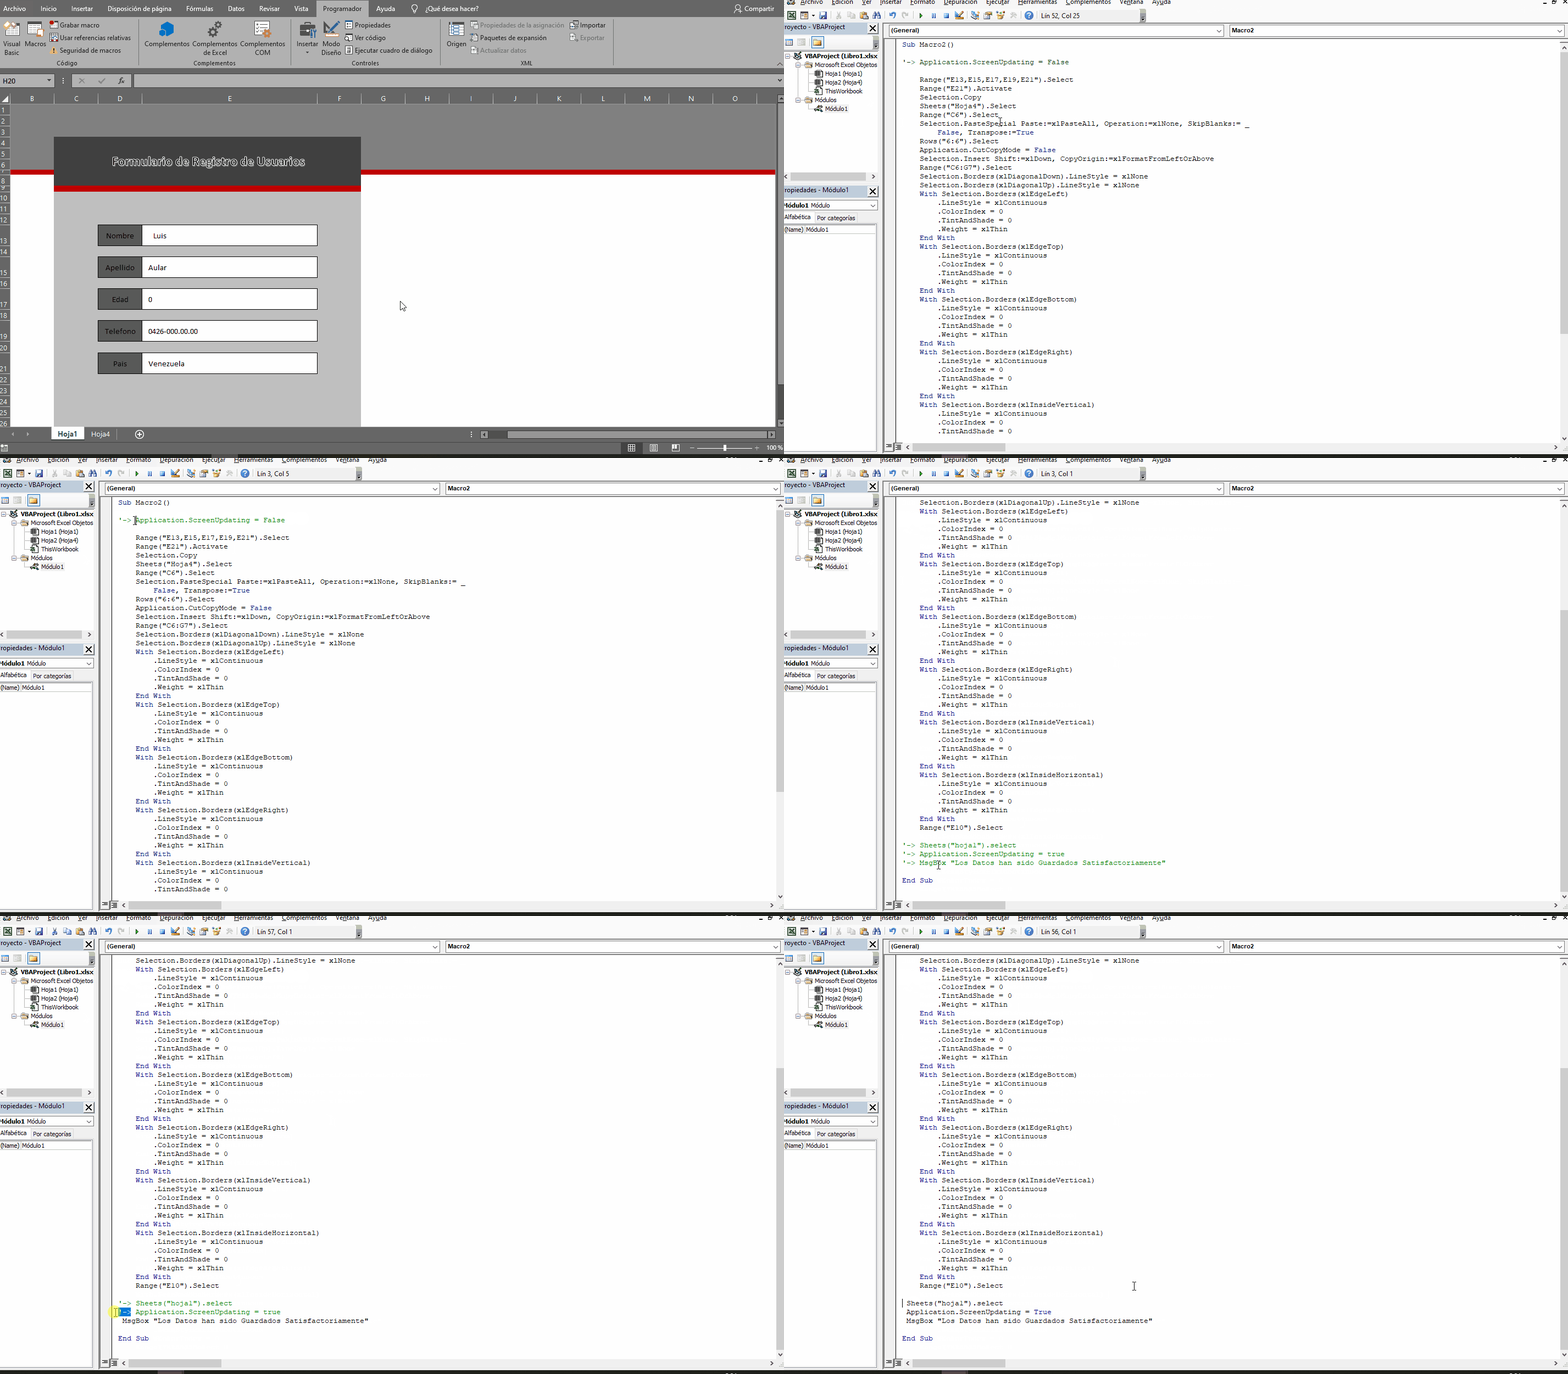
Realizar algunos ajustes al código de la macro basta con volver a la pestaña programador, pero en este caso le datos en visual Basic a la izquierda nos aparece el árbol de directorios del documento Excel y seleccionamos módulos luego modulo1 si vemos el gif notaran que realizo un sombre al principio del código y uno al fina esto porque hay que colocar lo siguiente:
al principio del código corta y pega lo siguiente:
Application.ScreenUpdating = False'deshabilita actualización de Pantalla
al final del código corta y pega lo siguiente:
Sheets("hoja1").select'selecciona la hoja formularioApplication.ScreenUpdating = true'habilita la actualización de pantallaMsgBox "Los Datos han sido Guardados Satisfactoriamente"'mensaje de que todo salió bien

Make some adjustments to the code of the macro just go back to the programmer tab, but in this case the data in Visual Basic on the left we have the directory tree of the Excel document and select modules then module1 if we see the gif you will notice that I make a shadow at the beginning of the code and one at the end this because you have to place the following:
at the beginning of the short code and paste the following:
Application.ScreenUpdating = False'disables screen update
at the end of the short code and paste the following:
Sheets("sheet1").select'select the form sheetApplication.ScreenUpdating = true'enables screen updateMsgBox "Data has been satisfactorily saved"'message that everything went well
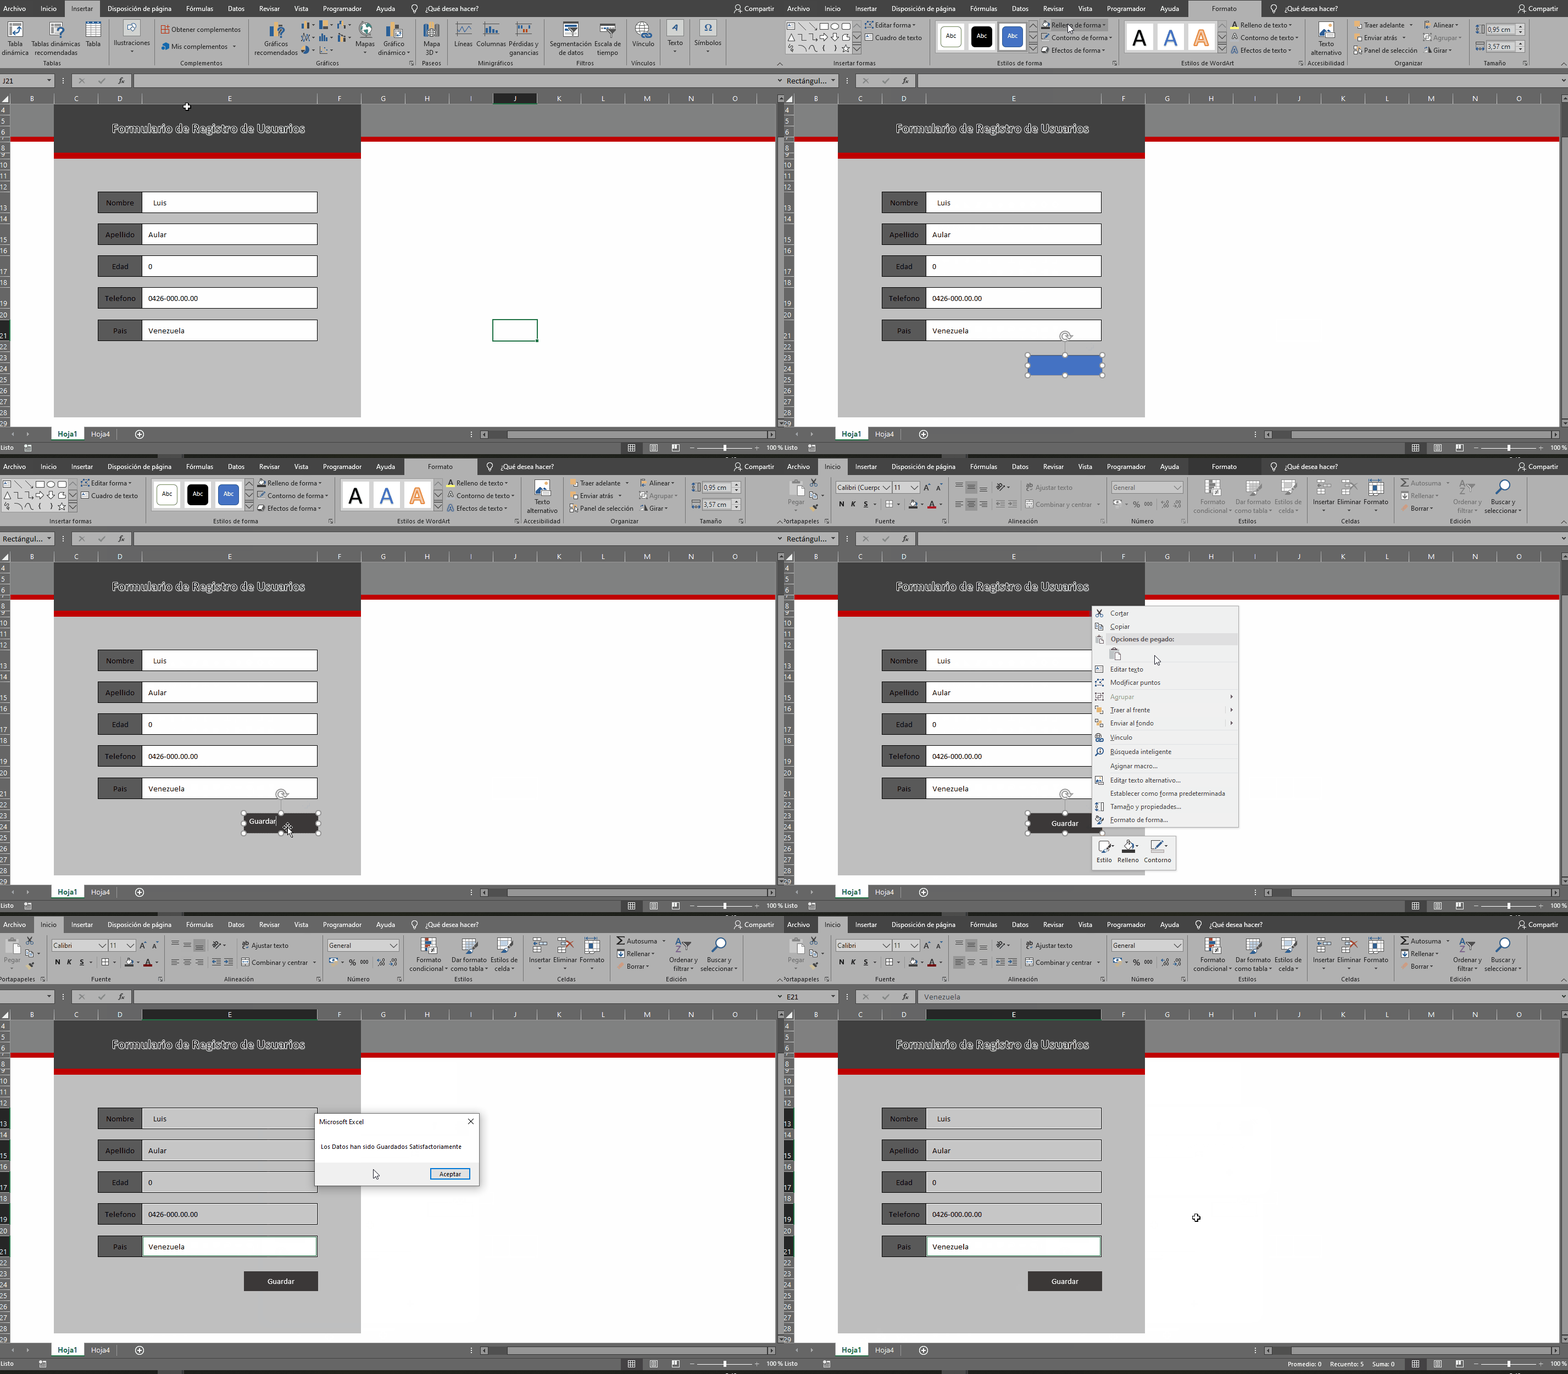
Creamos un botón que ejecute nuestra macro esto es muy sencillo y podemos usar las figuras geométricas de Excel creamos un rectángulo le asignamos colores y escribimos guardar luego lo seleccionamos le damos clip derecho y le damos en asignar macro escogemos la macro que creamos previamente y listo ahora podemos hacer una prueba de funcionamiento.

Create a button that runs our macro this is very simple and we can use the geometric figures of Excel create a rectangle assign colors and write save then select it give right clip and give in assign macro choose the macro that we created previously and ready now we can make a test run.
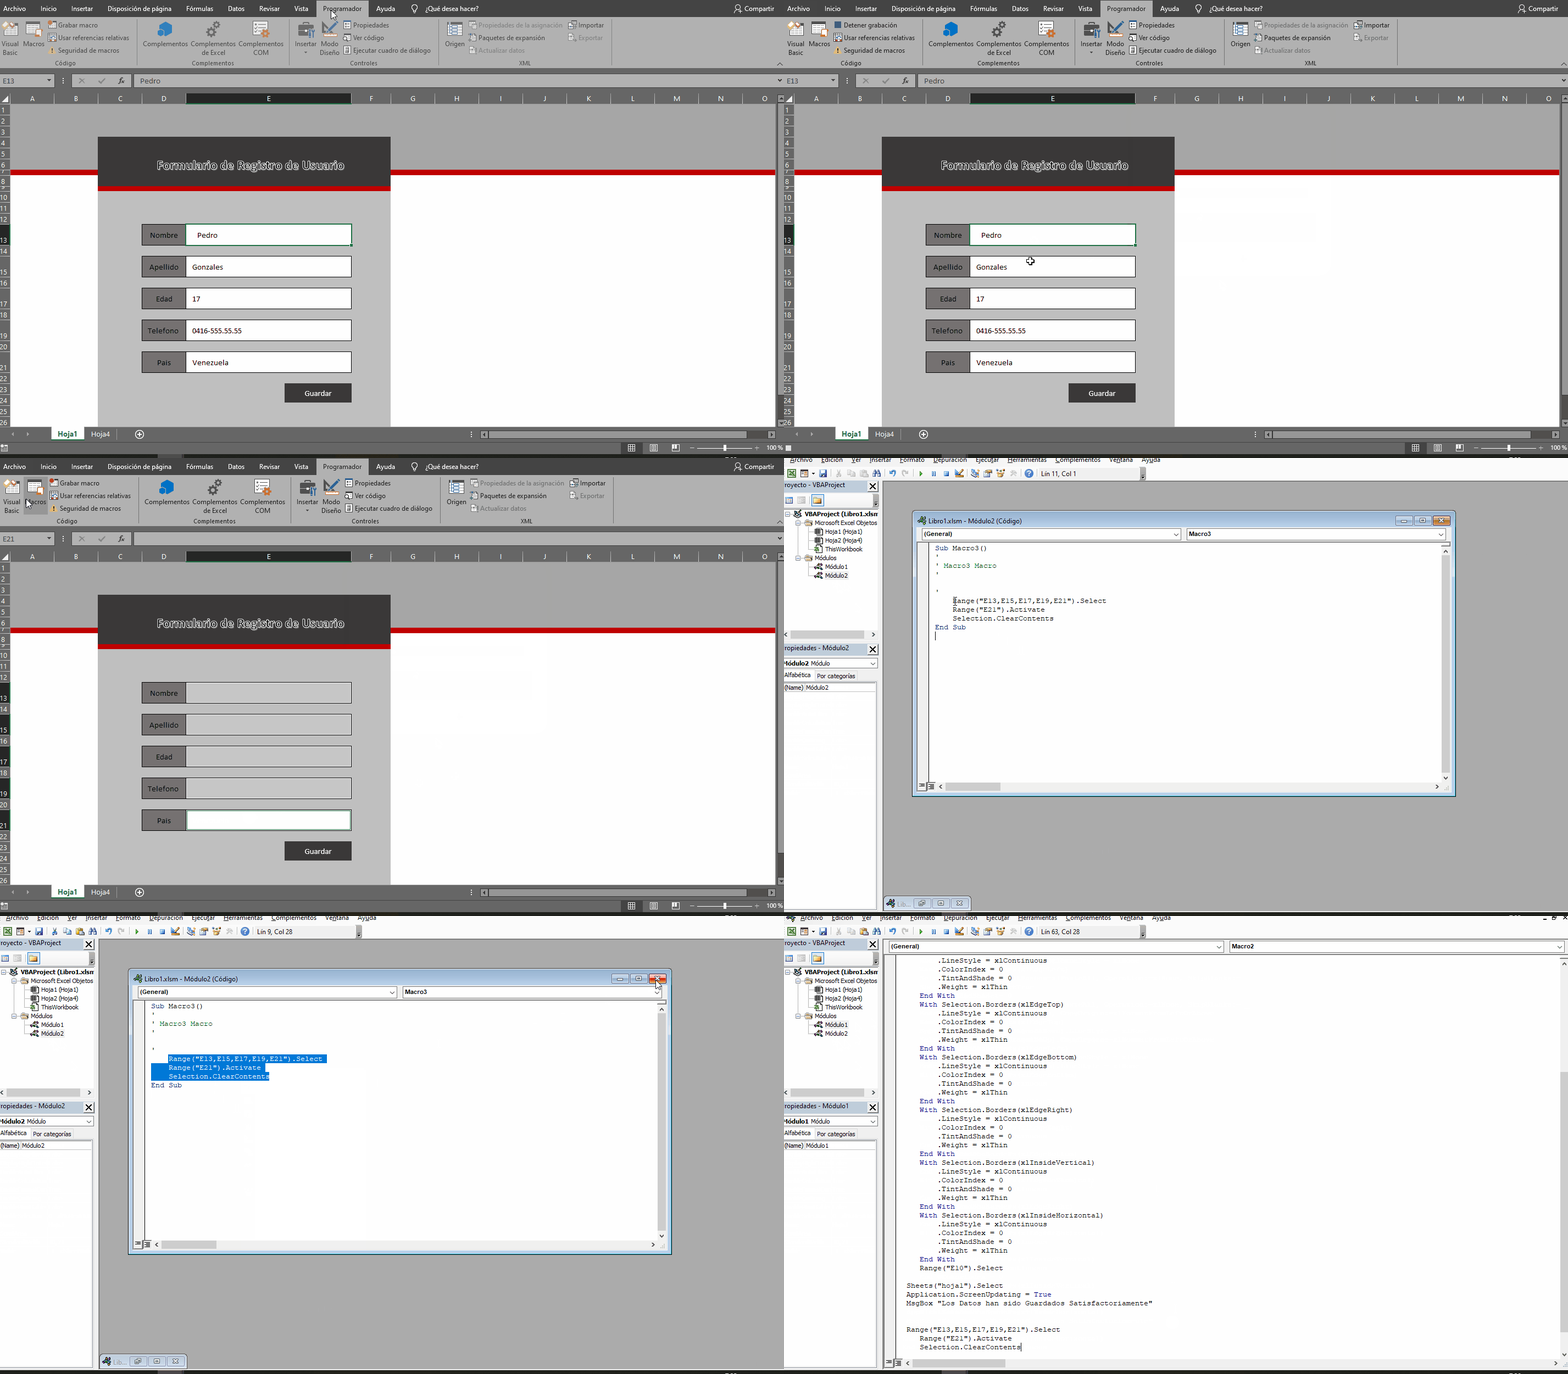
Ya nuestro formulario funciona perfectamente pero nos falta que no limpie los cajas de texto de manera automática una vez se guarde nuestro registro para ello vamos a crearnos una sencilla macro así que nos vamos al apartado programador y luego a macro nos pide un nombre asignamos cualquiera igual no lo necesitaremos una vez el sistema esta grabando la macro seleccionamos nuestras cajas de texto y borramos el contenido con la tecla suprimir una vez se borre frenamos la macro ahora nos vamos a visual Basic y en el árbol de directorios de módulos nos vamos al nuevo modulo o buscamos en el módulo que ya teníamos y veremos que nos aparece un código nuevo este lo copiamos y lo colocamos después del código de nuestra macro primaria y listo ya Excel limpiara las cajas luego de guardar la el registro.

Our form already works perfectly but we need not clean the text boxes automatically once we save our record for it we will create a simple macro so we go to the section programmer and then the macro asks us for a name we assign any like not need it once the system is recording the macro we select our text boxes and we delete the content with the delete key once it is deleted we stop the macro now we go to visual Basic and in the modules directory tree we go to the new module or we look in the module that we already had and we will see that a new code appears this we copy it and we place it after the code of our primary macro and that's it Excel will clean the boxes after saving the register

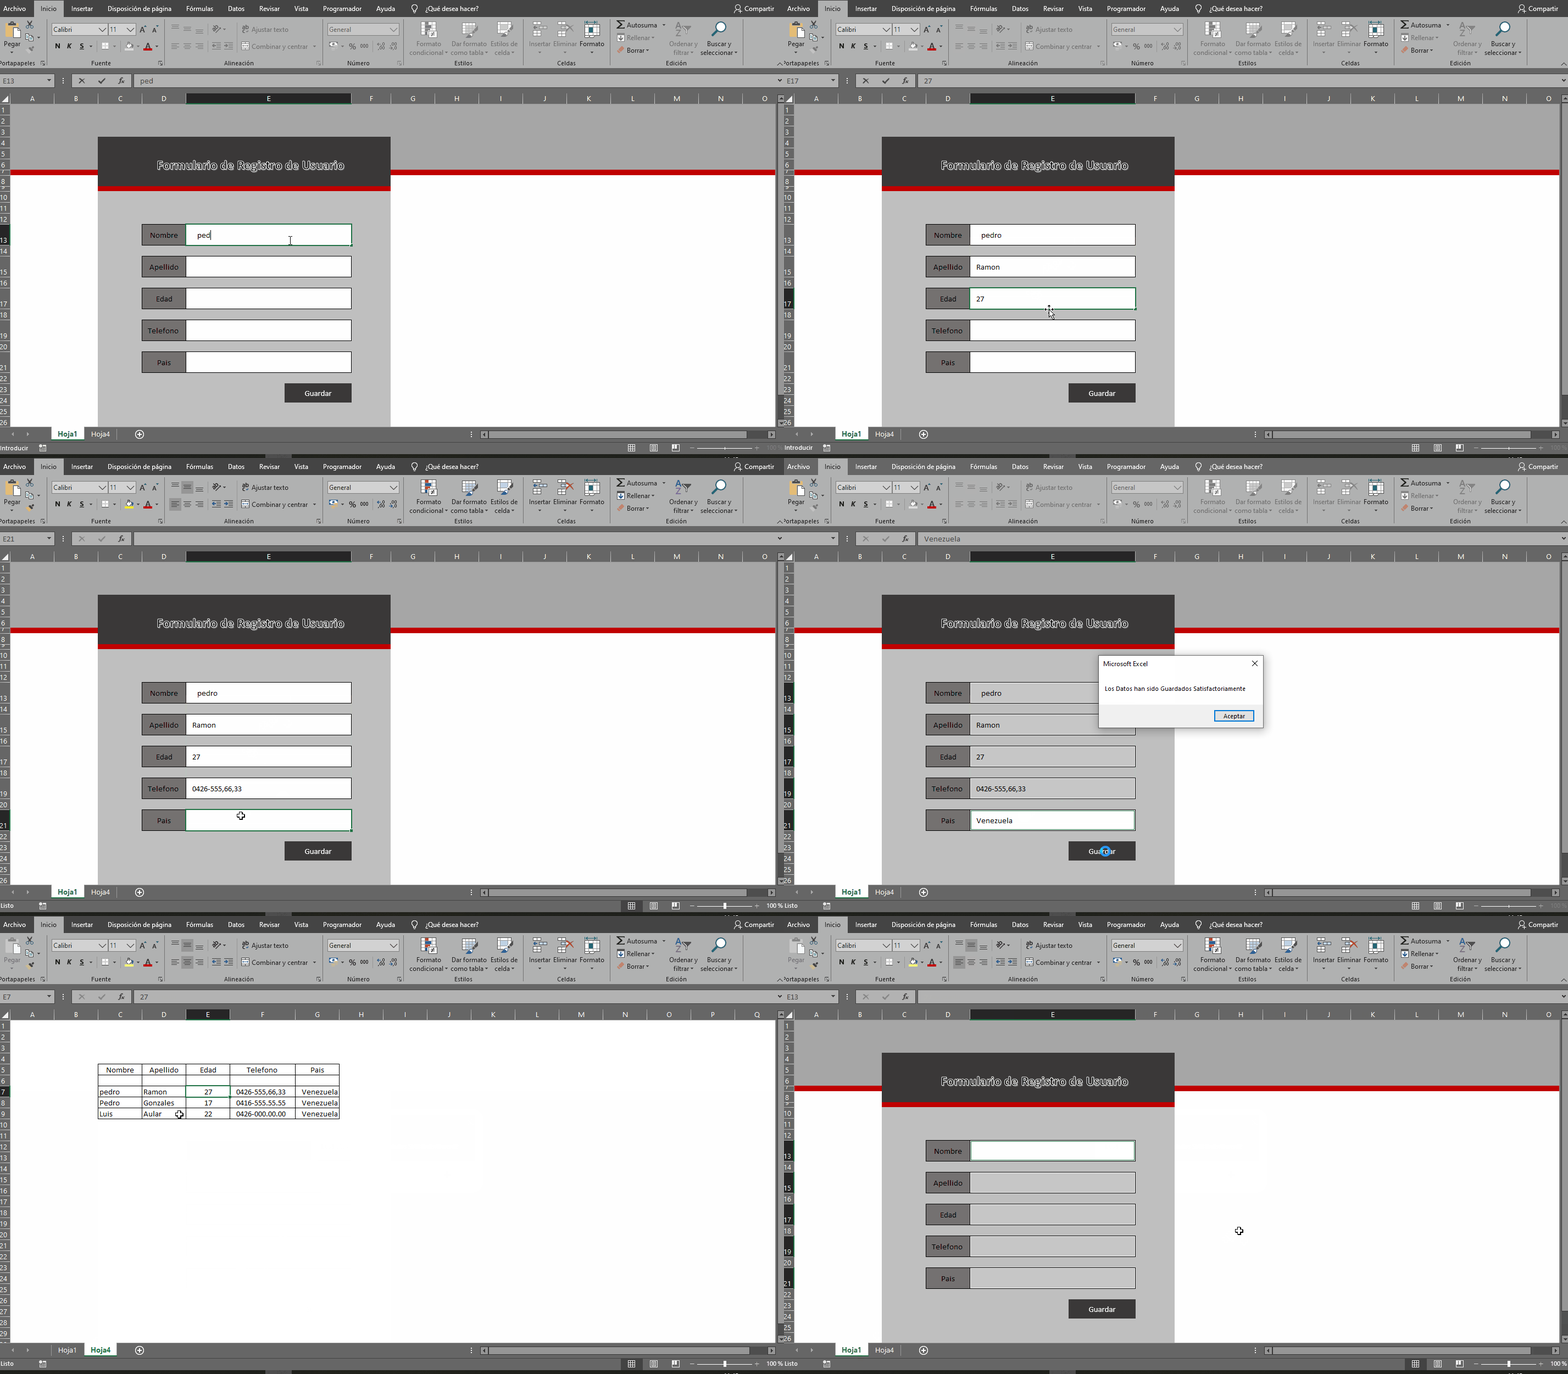


 |
 |
 |
|---|

1.-Un nuevo Comienzo en Hive
2.-Jhonny Bravo en Photoshop
3.-Krunk en photoshop
4.-Dexter Version Femenina en Photoshop
5.-Timmy Turner en Photoshop
6.-La Garrapata en Photoshop
7.-Trixie en Photoshop
8.-BB8 en Power Point

Tambien Puedes Visitar

| 
| 
|
|---|
Congratulations @luisaular! You have completed the following achievement on the Hive blockchain and have been rewarded with new badge(s) :
You can view your badges on your board And compare to others on the Ranking
If you no longer want to receive notifications, reply to this comment with the word
STOPTo support your work, I also upvoted your post!
Do not miss the last post from @hivebuzz:
Support the HiveBuzz project. Vote for our proposal!
Your post has been curated by us! Received 22.00% upvote from @opb. Do consider delegate to us to help support our project and earn 100% of daily rewards!
Do join our discord channel to give us feedback, https://discord.gg/dS6Cfn
* Please note that the curation was carried out by experimental bot, based on the criteria : 1. Not plagiarised, 2. Post > 5min, 3. Author reputation > 25, 4. higher upvote for monthly subscriberDo upvote this commment if you 💚 our service :)
Esta genial. Muy bien explicado y con buenos gif donde se ve cada paso.
¡Buen post!