Español
¡Saludos chicos! El día de hoy les traigo otro tutorial, pero un poco diferente, el anterior hablaba sobre traer tus STEEMS hacia HIVE utilizando la plataforma de @blocktrades, la aplicación UPHOLD y la plataforma de Orinoco.io.
Si quieres leer mi tutorial anterior, solo haz clicn en el siguiente enlace
En este tutorial, les enseñaré cómo cambiar sus HIVE en Bs (VEF) utilizando la plataforma de @blocktrades y la plataforma de Orinoco.io.
Este tutorial es realizado, porque muchos venezolanos hacen vida en esta plataforma y muchos utilizan las ganancias de estas publicaciones como un ingreso extra que pueden utilizar para sustentarse, ahora, como no existe una manera rápida de realizar ese procedimiento de cambiar HIVE y HBD por Bs (VEF), decidí hablar sobre ello.
English
Greetings guys! Today I bring you another tutorial, but a little different, the previous one talked about bringing your STEEMS to HIVE using the @blocktrades platform, the UPHOLD application and the Orinoco.io platform.
If you want to read my previous tutorial, just click on the following link
In this tutorial, I'll teach you how to trade your HIVE in Bs (VEF) using the @blocktrades platform and the Orinoco.io platform.
This tutorial is made, because many Venezuelans make life on this platform and many use the earnings of these publications as an extra income that they can use to support themselves, now, as there is no quick way to carry out this procedure to change HIVE and HBD for Bs (VEF), I decided to talk about it.
¿Qué es UPHOLD? | What's UPHOLD?
Uphold es una plataforma gestora de servicios financieros tales como trading, envío de divisas y criptomonedas o —en resumidas cuentas— es una plataforma que permite el envío seguro, rápido y gratuito de cualquier tipo de moneda (cripto | flat).
Registrarse en esta plataforma es totalmente gratuito y pueden hacerlo haciendo click aquí, lo único que necesitan —para tener mejores beneficios—, es verificar su identidad al subir una foto de ustedes con algún documento que pueda identificarlos (cédula o pasaporte).
Ahora, la pregunta importante, ¿qué vamos a hacer con Uphold? Bien, la idea es que los HIVES que van a obtener de la plataforma, serán enviados a esta plataforma una vez que se hayan creado la cuenta, más adelante —en este mismo post— les explicaré cómo.
Uphold is a financial services manager platform that manages a lot of transactions as trading, sending flat currencies and cryptocurrencies or —in short— it is a platform that allows the safe, fast and free delivery of any type of currency (crypto | flat).
Registering on this platform is totally free and you can do it by clicking here, the only thing you'll need —to have better benefits— is to verify your identity by uploading a photo of you holding a document that can identify you (ID or passport).
Now, the important question here is: what are we going to do with Uphold? Well, the idea is that the HIVES that you are going to get from the platform, will be sent to this platform once the account has been created, later —in this same post— I'll explain how.
¿Qué es ORINOCO.IO? | What's ORINOCO.IO?

Ya conocemos la primera plataforma, ahora, esta segunda plataforma debe ser bastante familiar para muchos de los que hicieron vida en STEEMIT; Orinoco.io es una plataforma de cambio (Exchange) que cambiaba STEEMS y SBD en Bolívares en un principio, para los venezolanos, pero que luego, aumentó las posibilidades al aceptar cambio de BTC y EOS.
Para utilizar esta plataforma, entra en el siguiente link, debes registrarte presionando el botón de REGISTRARSE que está arriba a la derecha (botón naranja) y colocar tu información.
Entonces, ¿qué vamos a hacer con Orinoco.io? Simple, en esta plataforma cambiaremos nuestros HIVES por Bs (VEF) sin ningún problema.
¿Cómo haremos eso? Bien, acá están los pasos con detalles.
Ok, we already know about Uphold, now, this second platform must be quite familiar to many of those who created content on STEEMIT; Orinoco.io is a exchange platform that changed STEEMS and SBD in Bolívares at first, for Venezuelans, but later, it increased the possibilities by accepting change of BTC and EOS.
To use this platform, enter the next link, you must register by pressing the REGISTER button at the top right (orange button) and place your information.
So what are we going to do with Orinoco.io? Simple, on this platform we will trade our HIVES for Bs (VEF) without any problem.
How are we going to do that? Okay, here are the steps with details.
¿Qué es @blocktrades? | What's @blocktrades?
@blocktrades es una página donde podemos realizar cambios entre una variedad increíble de criptomonedas, es un excelente exchange, muy rápido y muy confiable.
Por supuesto, debes registrarte también en la página, así que solo haz click aquí, luego, nos logueamos y apenas ingresamos en la página podemos ver la calculadora de cambio.
Ahora, ¿qué haremos con @blocktrades? Fácil, vamos a enviar nuestro HIVE o HBD hacia Uphold para luego cambiarlo en Orinoco por Bs (VEF), ya veremos cómo:
@blocktrades is a page where we can make changes between an incredible variety of cryptocurrencies, it is an excellent exchange, very fast and very reliable.
Of course, you must also register on the page, so just click here, then, we login and as soon as we enter the page we can see the exchange calculator.
Now what will we do with @blocktrades? Easy, we are going to send our HIVE or HBD to Uphold and then trade it in Orinoco for Bs (VEF), let's see how:
Paso 1: Entrar en nuestra cuenta de Uphold | Step 1: Enter in our Uphold account
Muy bien, en primer lugar, debemos entrar al siguiente link luego de habernos creado la cuenta, colocamos nuestras credenciales y deberíamos ver algo como esto:
Very well, first of all, we must enter the following link after we have created the account, we put our credentials and we should see something like this:
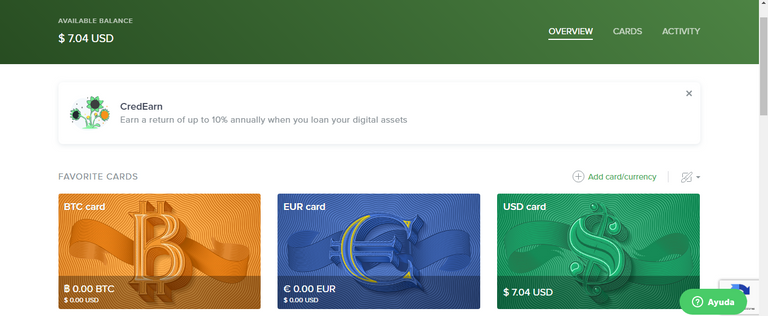
En nuestro «dashboard» dentro de Uphold, podremos ver una variedad grande de tarjetas (ver imagen de arriba), pero ahora, la que vamos a utilizar para este tutorial, será la tarjeta verde (USD card), así que le vamos a dar click a esa tarjeta.
Una vez que le demos click, nos aparecerá lo siguiente:
In our dashboard inside Uphold, we will be able to see a large variety of cards (see image above), but now, the one that we are going to use for this tutorial, will be the green card (USD card), so we are going to click on that card.
Once we click on it, we'll see something like this:
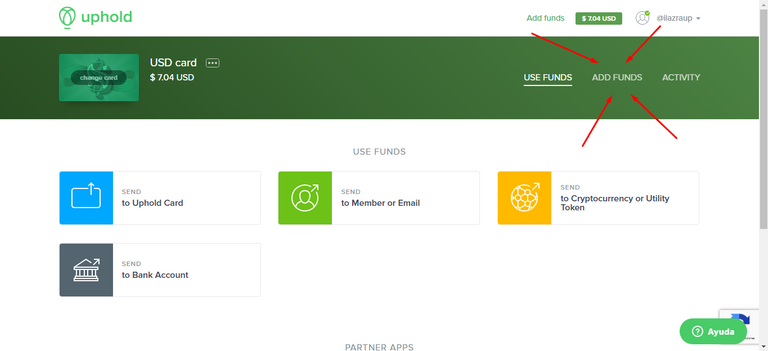
Como queremos es agregar fondos, es decir recibir dinero y no enviar, vamos a darle click a donde dice ADD FUNDS (añadir fondos), y veremos lo siguiente:
Since we want to add funds, that is, receive money and not send, we are going to click where it says ADD FUNDS, and we will see something like this:
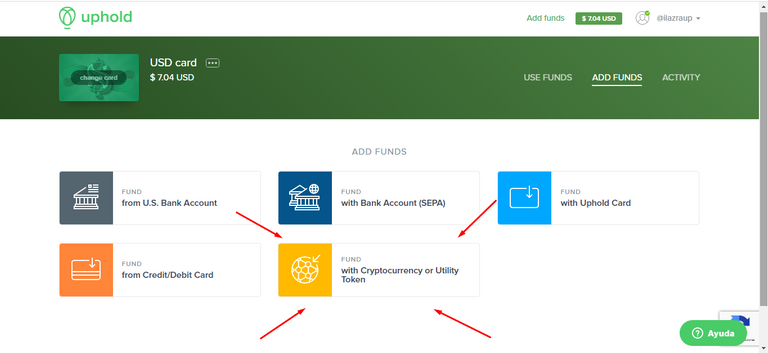
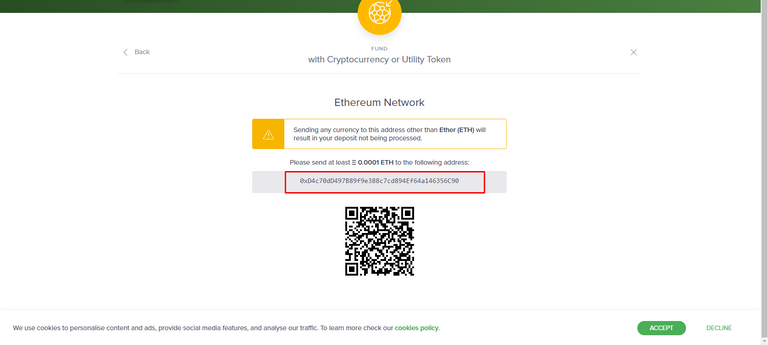
Como queremos recibir una criptomoneda (ETH), vamos a darle click al botón que dice with Cryptocurrency or Utility Token y veremos lo siguiente:
Since we want to receive a cryptocurrency (ETH), we are going to click on the button that says with Cryptocurrency or Utility Token and we will see something like this:
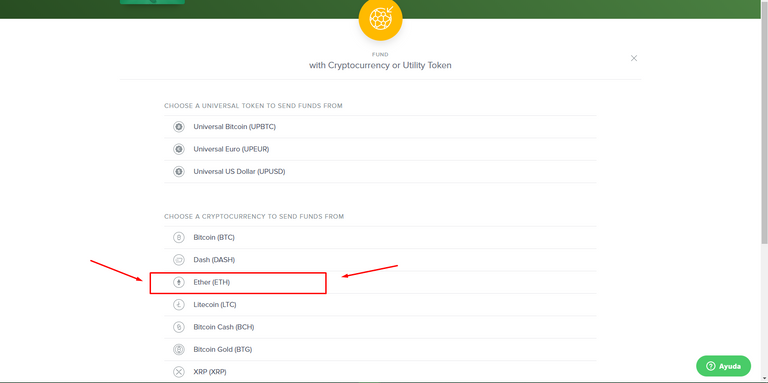
Hay una enorme variedad de criptomonedas y tokens que podemos utilizar para recibir fondos en nuestra tarjeta, pero en este caso, vamos a utilizar el Ethereum (ETH) porque tiene mejor tasa de cambio para Uphold (BTC cobra comisiones), así que vamos a seleccionarlo y verán algo como esto:
There is a huge variety of cryptocurrencies and tokens that we can use to receive funds on our card, but in this case, we are going to use Ethereum (ETH) because it has a better exchange rate for Uphold (BTC charges commissions), so let's select it and you will see something like this:
Si es primera vez que van a usar la Wallet de ETH, les pedirá crear una, solo tendrán que darle a un botón de «crear Wallet» y ya, sin mucha complejidad.
Luego de que la tengan, solo tendrán que copiar esa dirección de su wallet y colocarla en un archivo .txt para el siguiente paso:
If it is the first time that you're going to use the ETH Wallet, it will ask youto create one, they will only have to give a "create Wallet" button and that's it, without much complexity.
After you have it, you will only have to copy that address from your wallet and save it in a .txt file for the next step:
Paso 2: Entrar a @blocktrades y tradear los HIVE/HBD | Step 2: Enter to @blocktrades and trade the HIVE/HBD
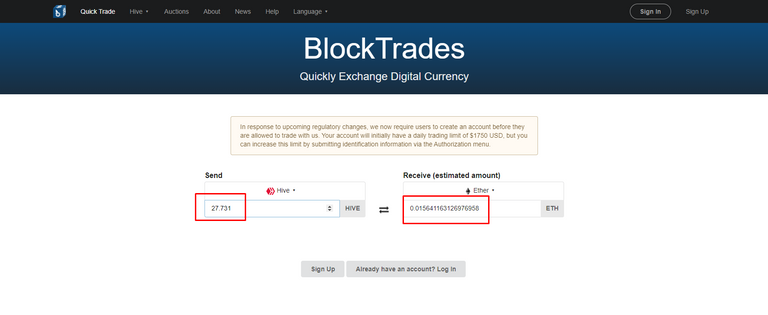
Vamos a entrar en la página de @blocktrades y realizar un cambio; debemos seleccionar en la opción de la izquierda (SEND) lo que vamos a enviar y en la opción de la derecha (Receive) lo que vamos a recibir.
Como queremos enviar a Uphold nuestros HIVE o HBD elegimos cualquiera de esas dos opciones y colocamos un monto.
Como ejemplo, yo enviaré todo el HIVE (27.731) y HBD (1.816) que tengo en la Wallet en este momento a mi cuenta de Uphold cambiado en Ethereum (ETH).
Let's go to the @blocktrades page to make a trade; We must select in the left option (SEND) what we are going to send and in the right option (Receive) what we are going to receive.
Since we want to send to Uphold our HIVE or HBD we choose either of those two options and enter an amount.
As an example, I'll send all the HIVE (27,731) and HBD (1,816) that I have in the Wallet at the moment to my Uphold account in Ethereum (ETH).
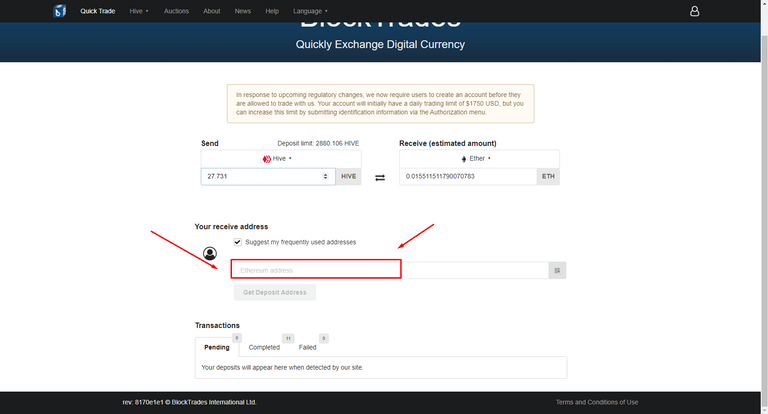
Una vez que nos hayamos logueado y hayamos seleccionado lo que queremos enviar y recibir (HIVE/HBD - ETH), tenemos que llenar los datos que aparecen en la foto de arriba.
Donde dice Ethereum Address, colocamos la dirección obtenida en el paso 1 y @blocktrades nos indicará a dónde debemos enviar los HIVE/HBD.
Once we have logged in and we have selected what we want to send and receive (HIVE/HBD - ETH), we have to fill in the information that appears in the photo above.
Where it says Ethereum Address, we put the address obtained in step 1 and @blocktrades will indicate where we should send the HIVE/HBD.
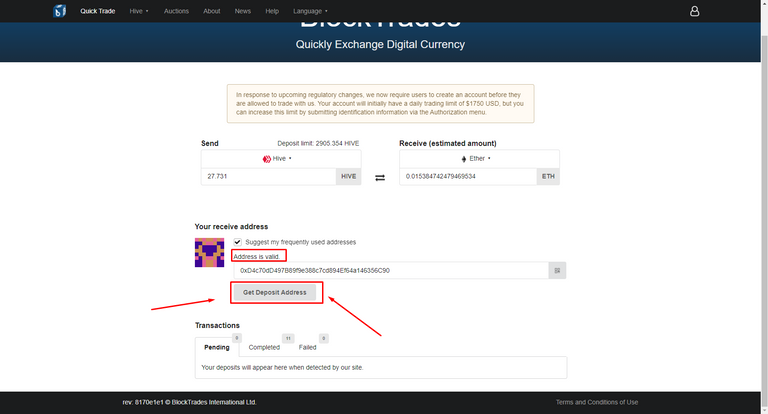
Al colocar la dirección de ETH que obtuvimos en Uphold, la página nos dirá si es válida o no, una vez que veamos el letrero que dice Address is valid, presionamos el botón Get Deposit Address y vemos lo siguiente:
By placing the ETH address we got in Uphold, the page will tell us if it is valid or not, once we see the sign that says Address is valid, we press the button Get Deposit Address and we see the following:
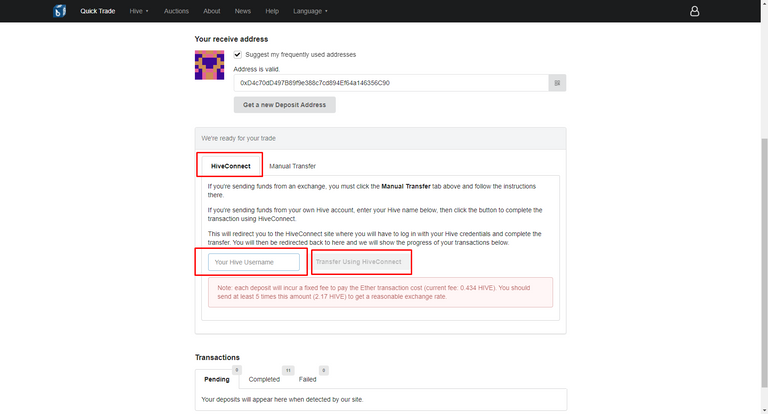
Recomiendo altamente que utilicen Hive Connect para hacer el cambio, ya que al hacer el cambio manual podrían tener un error de tipeo y terminar quemando sus criptomonedas, entonces, luego de colocar su nombre de usuario donde dice Your Hive Username, le damos al botón Transfer Using HiveSigner y veremos lo siguiente:
I highly recommend that you use Hive Connect to make the trade, as doing the manual trade could cause you to have a typing error and end up burning your cryptocurrencies, then, after placing your username where it says Your Hive Username, we hit the Transfer Using HiveSigner button and we will see the following:
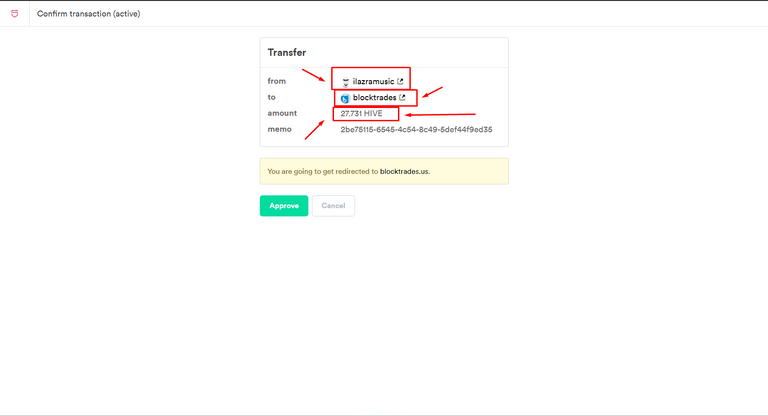
Como pueden ver, en HiveSigner nos aparece la transacción, nos indica el nombre de usuario que colocamos, nos indica que le vamos a enviar a @blocktrades y nos muestra el monto.
Luego, solo le damos click al botón Approve y listo, solo nos queda esperar que nuestro dinero llegue a nuestra cuenta de Uphold.
As you can see, in HiveSigner the transaction appears to us, it indicates the username that we place, it indicates that we are going to send it to @blocktrades and it shows us the amount.
Then, we just click the Approve button and voila, we can only wait for our money to reach our Uphold account.

Para tener la completa certeza de que enviamos el dinero como era, en la Wallet te debería salir la transacción, fíjense que yo hice los dos envíos (uno en HIVE y uno en HBD), porque cambié dos veces utilizando @blocktrades.
To have the complete certainty that we send the money as it was, in the Wallet the transaction should come out, note that I made the two shipments (one in HIVE and one in HBD), because I changed twice using @blocktrades.
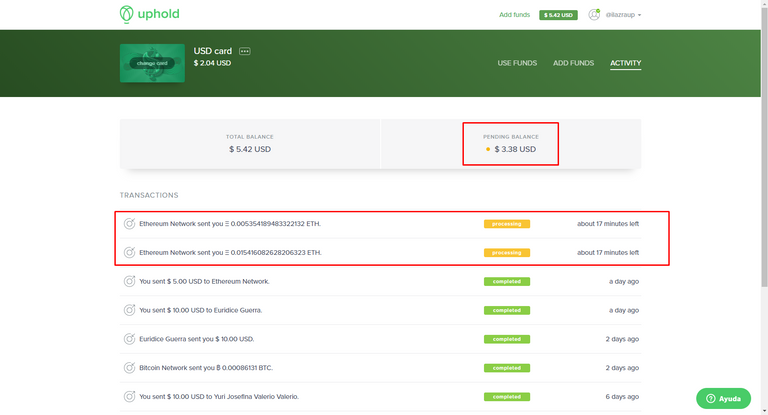
Ahora, si vamos a nuestra cuenta de Uphold, entramos en nuestra USD card y le damos click a la pestaña Activity, me aparecen dos envío desde Ethereum Network, esos son los envíos de @blocktrades hacia mi cuenta.
Nota: Los envíos de criptomonedas como BTC y ETH suelen tardar entre 15 minutos y 3 horas, así que, si no les llega el envío tan rápido, no desesperen.
Now, if we go to our Uphold account, enter in our USD card and click on the Activity tab, two shipments will appear from Ethereum Network, those are the @blocktrades posts to my account.
Note: Cryptocurrency shipments like BTC and ETH usually take 15 minutes to 3 hours, so if the shipment doesn't arrive so fast, don't despair.
Paso 3: Entrar en Orinoco.io | Step 3: Enter in Orinoco.io

Al entrar en la página de Orinoco.io (pueden hacerlo a través del siguiente enlace), deben darle click a iniciar sesión una vez que ya hayan creado sus cuentas.
Luego, van a realizar un envío de USD en BTC (la única criptomoneda que acepta que podamos enviar desde Uphold) de la siguiente manera:
When entering the Orinoco.io page (you can do it through the following link), you must click log in once you have already created our account.
Then, you will send the USD in BTC (the only cryptocurrency that accepts that we can send from Uphold) as follows:
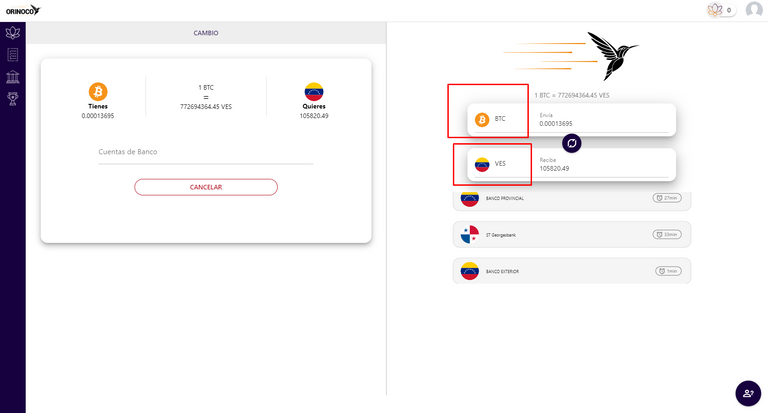
Una vez que entramos en nuestra cuenta de Orinoco.io, vamos a seleccionar para enviar BTC y para recibir Bs (VEF) como podemos ver en la imagen. Una vez hecho esto, nos aparecerá el cuadro que está a la izquierda en la imagen de arriba, donde, podemos observar que nos dan la tasa de cambio, nos muestran cuánto BTC vamos a enviar y cuántos Bs nos enviarán.
Once we enter our Orinoco.io account, we will select to send BTC and to receive Bs (VEF) as we can see in the image. Once this is done, the box on the left will appear in the image above, where we can see that they give us the exchange rate, they show us how much BTC we are going to send and how many Bs we'll receive.
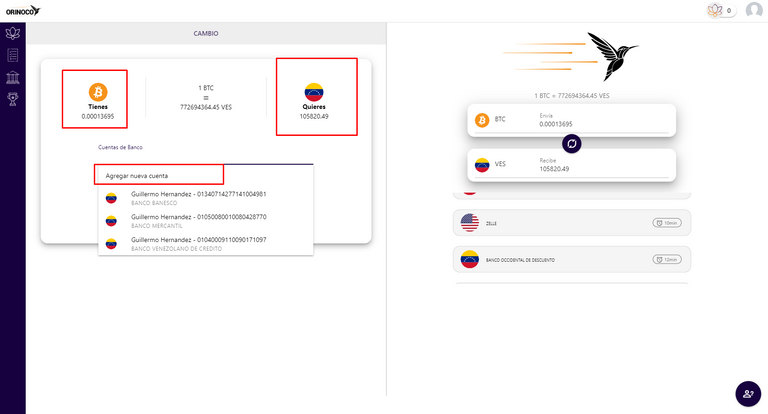
Luego, tenemos que hacer click en el cuadro que dice Cuentas de Banco para seleccionar a dónde recibiremos los Bs (VEF); si no tenemos una, le damos click a la opción de Agregar nueva cuenta y llenamos todos los datos.
Ahora, una vez que seleccionamos la cuenta, veremos algo como esto:
Then, we have to click on the box that says Bank Accounts to select where we will receive the Bs (VEF); if we don't have one, we click on the Add new account option and fill in all the data.
Now once we select the account we will see something like this:
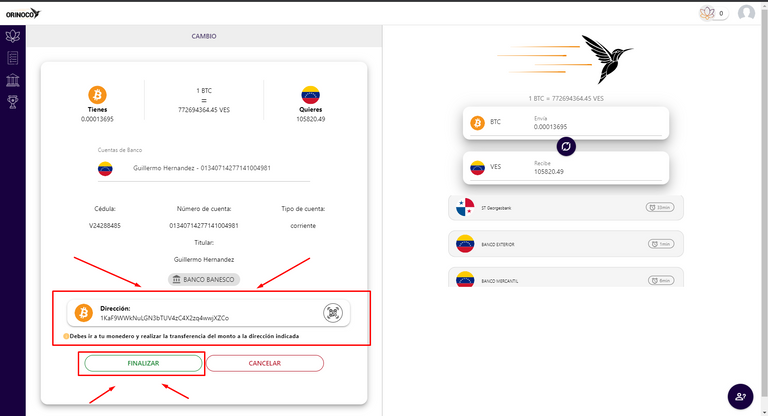
Nos aparece un cuadro informativo más amplio, donde nos sale una dirección de una Wallet de BTC, esta dirección la vamos a necesitar para realizar el envío a través de nuestra cuenta de Uphold.
Así que la copiamos y nos dirigimos hacia nuestra cuenta de Uphold para hacer el envío, de la siguiente manera:
A more comprehensive information box appears, where we get an address for a BTC Wallet, we will need this address to send it through our Uphold account.
So we copy it and go to our Uphold account to make the shipment, as follows:
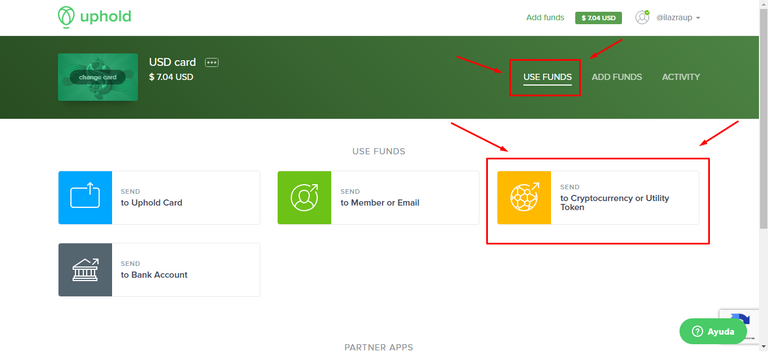
Haremos exactamente lo que hicimos en el paso 1, pero ahora vamos a darle click a la pestaña USE FUNDS y volvemos a darle click a to Cryptocurrency or Utility Token, luego, vamos a elegir lo que queremos enviar, en mi vaso será Bitcoin, entonces, veremos lo siguiente:
We will do exactly what we did in step 1, but now we are going to click on the USE FUNDS tab and click again on to Cryptocurrency or Utility Token, then, we will choose what we want to send, in my glass it will be Bitcoin, then, we will see the following:
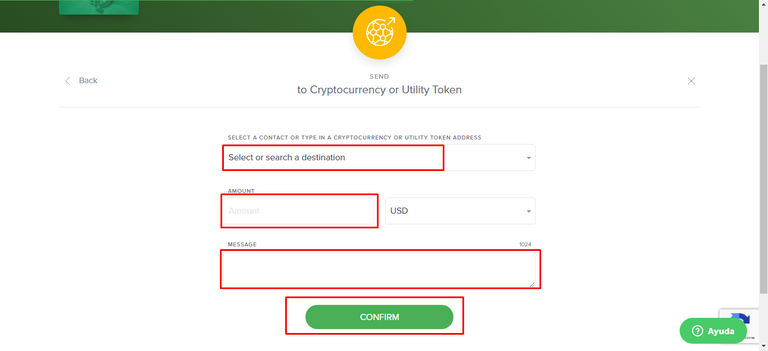
Ahora, solo tenemos que colocar la cuenta o Wallet destino, ahí vamos a colocar la Wallet que copiamos desde la página de Orinoco.io, luego colocamos el monto (en USD) a enviar, podemos colocar un mensaje (opcional) y le damos al botón de Confirm.
¡Listo! Ahora solo tendremos que esperar que nuestro querido Colibrí nos haga la transacción en Bs (VEF) apenas les lleguen los BTC a ellos.
Now, we just have to put the account or destination Wallet, there we are going to put the Wallet that we copy from the Orinoco.io page, then we put the amount (in USD) to send, we can put a message (optional) and we hit the Confirm button.
Ready! Now we just have to wait for our beloved Hummingbird to make the transaction in Bs (VEF) as soon as the BTC reaches them.

¡Eso es todo chicos! ¡Muchas gracias por leerme! Espero que disfruten este tutorial, estaré subiendo otros bastante útiles próximamente!
No olviden dejarme un comentario para seguir creciendo.
That's it guys! Thank you very much for reading me! I hope you enjoy this tutorial, I'll be posting other quite useful ones soon!
Don't forget to leave me a comment to continue growing.
Por acá dejo el enlace a mi tweet publicitando mi post: | Here's the link of my tweet where I make publicity of my tutorial:
#posh #oc
Hola Ilaz. Orinoco también te recibe los Hive por DM y los convierte a Nectar, luego en su plataforma solo tienes que hacer la conversión de Nectar a bolívares. ;-)
¡Excelente saber eso mister @ylich! Lo bueno es que esta guía, además de servir para cambiar nuestros HIVE/HBD en Bs, también nos sirve para poder ahorrar en USD en Uphold nuestras criptos o ahorrarlas en Bitcoin o transformarlas en cualquier otra cosa que necesitemos por si acaso jajaja
Pero definitivamente esa información es sumamente útil y de paso ayuda a resumir pasos, muchas gracias :D
Lástima, la verdad, que la tasa sea tan poco competitiva @ylich. Recomiendo mejor, usar el camino indicado por @ilazramusic, en lugar de cambiar a Néctar. Saludos..!
Hay que cambiar los ETH a BTC dentro de Uphold para poder pasarlos a orinoco??
No, luego de que los tienes en Uphold, los envías desde la misma USD Card, pero en vez de seleccionar ETH, seleccionas BTC, y colocas como Wallet Destino la que te da la página de Orinoco.
Brutal hermano!!!!
con cual consideras que es mejor realizar esos movimientos? con el HIVE o el HBD, yo mandare ese saldo a uphold
Por la fluctuación del precio, es mucho más factible tramitar con HBD, porque mientras los transformas en HIVE, el precio cambia mucho en esos 3 días.
ok muchas gracias por la informacion. otra cosa, a la hora de pasar la crypto a uphold es mejor ETH o LTC??