Saludos mi querida comunidad, hoy les traigo el adelanto del Rom Hacking que estoy realizando y los segundos pasos que estoy dando, para que de esta manera aprendan vosotros algunos tips de Rom Hacking y quizás se animen a crear vuestro propio Rom Hack.
En esta ocasión, luego de organizar todo lo comentado en el primer tema el cual lo puedes conseguir en el siguiente enlace: My First Pokémon RomHack.
Luego de haber organizado las Rutas y los Pokémon Salvajes que aparecerán en ellas, para poder darle mas variedad al juego y poder incluir la mayoría de los Pokémon (sin incluir todo Galar y Alola, con mínimas excepciones), tuve que agregar algunos mapas extras y explicaré el proceso de utilizar la Herramienta del Advance Map.
Además, añadí algunos ajustes al tema de las Tiendas y Objetos.
::: Objetos :::
- Los objetos valiosos adquieren el doble de su valor.
- Los objetos Potenciadores mantienen su valor y son añadidos en algunas tiendas.
- Los objetos Evolutivos adquieren el triple de su Valor y son añadidos en algunas tiendas.
- Los Objetos de Botiquín reducen hasta 10 veces su valor.
- Los objetos de Batalla reducen su valor hasta 50%.
- Las Vitaminas son añadidas en varias tiendas y reducen hasta 10 veces su valor.
- Todos los tipos de Pokeball se añaden a todas las tiendas, incluyendo la Masterball con un elevado precio por cada una.
- Las MT/MO mantienen su valor y pueden obtenerse en algunas tiendas.
- Las bayas triplican su valor y se conseguirán en algunas tiendas.
Greetings my dear community, today I bring you the preview of the Rom Hacking I'm doing and the second steps I'm taking, so that in this way you can learn some Rom Hacking tips and maybe you will be encouraged to create your own Rom Hack.
This time, after organizing everything discussed in the first topic which you can get in the following link:
My First Pokémon RomHack.
After having organized the Routes and the Wild Pokémon that will appear in them, in order to give more variety to the game and to be able to include most of the Pokémon (not including all Galar and Alola, with minimal exceptions), I had to add some extra maps and I will explain the process of using the Advance Map Tool.
Also, I added some adjustments to the Shops and Items theme.
::: Objects ::::
- Valuable items acquire double their value.
- Power-up items keep their value and are added in some stores.
- Evolutionary items acquire triple their value and are added in some stores.
- First Aid items reduce up to 10 times their value.
- Battle items reduce their value up to 50%.
- Vitamins are added in several stores and reduce up to 10 times their value.
- All types of Pokeballs are added to all stores, including the Masterball with a higher price per Pokeball.
- MT/MO keep their value and can be obtained in some stores.
- Berries triple their value and will be available in some stores.

:::::::::::::::::::::::::::::::::
ADVANCE MAP
:::::::::::::::::::::::::::::::::
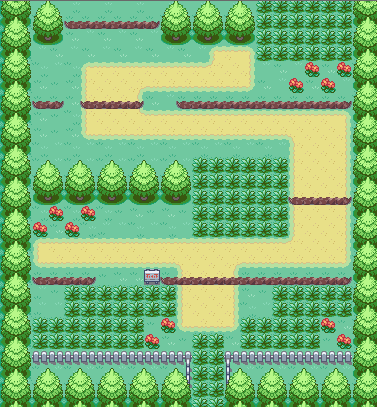
Debido a la gran diversidad de Pokémon y Clasificados por una Geografía personalizada para cada Ruta, tuve que agregar varios mapas al juego original, por lo que podremos encontrar algunos lugares de interés y en la que podrán aparecer Pokémon Singulares o Legendarios, lo que amerita ir siempre preparados y con alguna Masterball. Tomaré de ejemplo el "VIRIDIAN FOREST" el conocemos un mapa que es el siguiente: (vease la siguiente imagen)
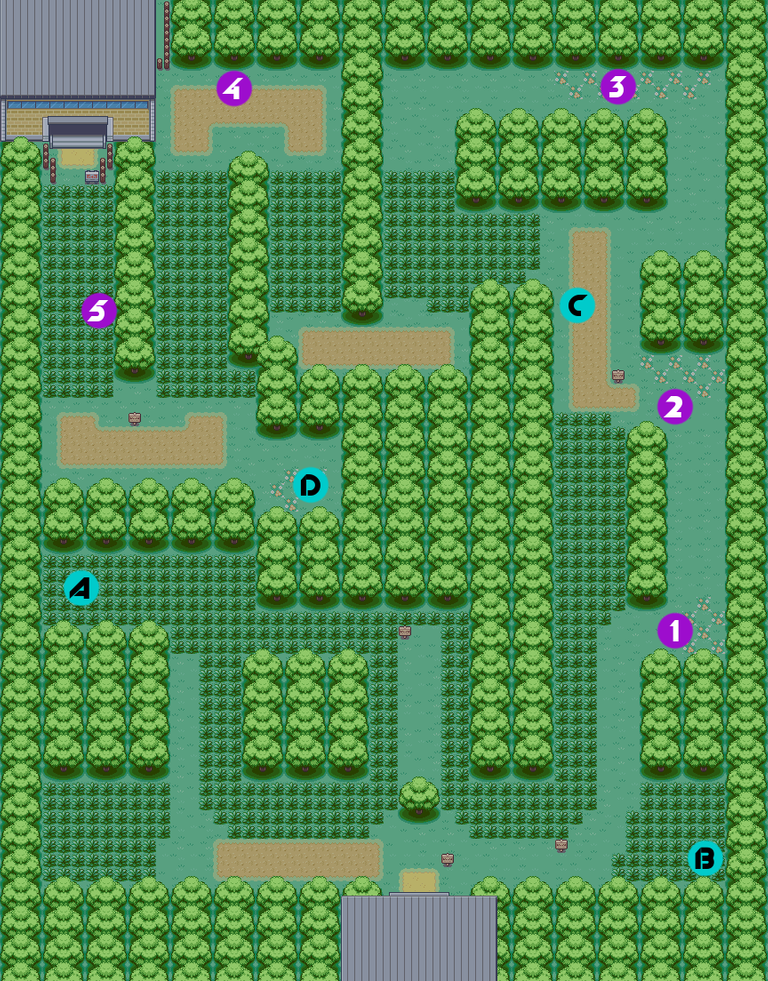
Ajustamos su diseño y agregamos una entrada a un mapa extendido donde se conseguirán más cantidad de Pokémon y lo mas interesante aún, puede que consigan algún evento de Pokémon Legendario o Singular, les tocará explorar los diversos mapas cuando comparta la Rom Terminada con ustedes, pero hablemos del proceso de agregar un mapa personalizado al juego.
Due to the great diversity of Pokémon and Classified by a customized Geography for each Route, I had to add several maps to the original game, so we can find some places of interest and in which may appear Singular or Legendary Pokémon, which merits always go prepared and with some Masterball. I will take as an example the "VIRIDIAN FOREST" we know a map that is as follows: (see the following image)
We adjust its design and add an entrance to an extended map where you will get more quantity of Pokémon and the most interesting thing even, you may get some Legendary or Singular Pokémon event, it will be your turn to explore the various maps when I share the Finished Rom with you, but let's talk about the process of adding a custom map to the game.
:::::::::::::::::::::::::
AÑADIENDO UN NUEVO MAPA
:::::::::::::::::::::::::
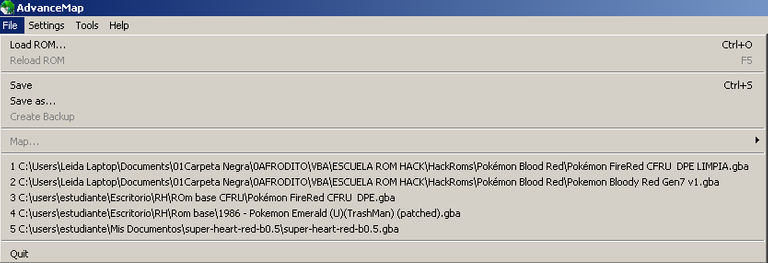
Cuando abrimos nuestra herramienta del Advance Map, tendremos que cargar la ROM sobre la cuál vamos a trabajar, para ello vamos ->FILE<- damos click y se nos abre la pestaña, luego damos click a -> LOAD ROM<- (vease la siguiente imagen)
When we open our Advance Map tool, we will have to load the ROM on which we are going to work, for this we go ->FILE<- click and the tab opens, then click -> LOAD ROM<- (see the following image).
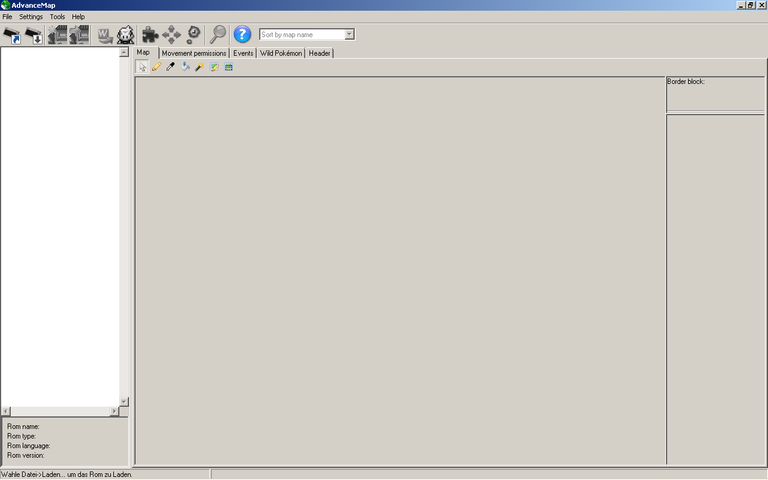
Una vez cargado nuestra ROM, tendremos que saber como movernos por toda la interfaz de la Herramienta.
Iré explicando cada apartado poco a poco para que lo entiendan y sepan las diferentes opciones.
Once our ROM is loaded, we will have to know how to move through all the interface of the Tool.
I will explain each section little by little so that you understand it and know the different options.

->OPEN ROM<- Lo mismo que acabamos de realizar anteriormente, sirve para Cargar una ROM y trabajar en ella.
->SAVE<- Sirve para guardar todos los cambios realizados en los Mapas trabajados hasta el momento.
->CREATE NEW MAP<- Acá es donde podemos trabajar nuevos mapas personalizados, crearlos desde cero para luego agregarlos a la ROM.
->INSERT MAP<- Una vez que tenemos nuestro mapa creado, esta opción nos permitirá insertar dicho mapa en la ROM.
->SHOW SPRITES<- Con esta opción podremos ver los Sprites de Entrenadores y los diversos eventos agregados al Mapa.
->BLOCK EDITOR<- Esta opción nos permite editar los "Tiles" de cada Mapa, como es una opción avanzada no profundizaré mucho en ella.
->MAP CONECTIONS<- Permite editar las diversas conexiones del Mapa, esto no debe confundirse con los Warps y ésto es mayormente utilizado para las Rutas.
->CLASIFICADOR<- Nos permitirá clasificar la Lista de Mapas a través de diferentes opciones, que son las siguientes:
==Sort by == Organiza la lista de Mapas por Banco y Número de Mapa, cada Mapa pertenece a un Banco y tiene una cifra que lo identifica. Por ejemplo, el mapa "Viridian Forest" pertenece al Banco nro 1, y es el Mapa nro 0 de dicho banco.
==Sort by map name== Organiza la Lista de Mapas por Nombre, sin mucho que discutir, organiza todos los Mapas por nombre asi que para un conocedor de los Mapas del juego se le facilita mucho el trabajo. Por ejemplo, el mapa que estamos trabajando aparece como "viridian Forest (1.0)", fijense que también nos dice entre paréntesis el número de banco y mapa al lado del nombre.
==Sort by Tileset number== Clasifica los mpas por Tileset utilizados en el mismo. Los Tileset es el conjunto de Tiles que se utilizan para crear el Mapa, Los Tiles son esas pequeñas texturas que determinan "lo que se observa" en cada Pixel o "recuadro" del mapa. En otra ocasión hablaé mas al respecto.
==Sort by tileset grouping= Lo mismo que lo anterior, pero lo clasifica por los dos tilesets utilizados en dicho Mapa.
==Mix.map name and tileset== Clasifica los Mapas por nombre y tileset utilizado, asi de simple.
De todas estas opciones, las que mas utilizo para trabajar son las dos primeras, organizar por nombre u organizar por bancos.
En la parte izquierda de la Interfaz tendremos la "Lista de Mapas", hay tres opciones de organizador que son las siguientes (vease imagen 1):
->OPEN ROM- The same as above, it is used to load a ROM and work on it.
->SAVE- It is used to save all the changes made in the maps worked so far.
->CREATE NEW MAP- Here is where we can work new custom maps, create them from scratch and then add them to the ROM.
->INSERT MAP- Once we have our map created, this option will allow us to insert this map in the ROM.
->SHOW SPRITES- With this option we will be able to see the Sprites of Trainers and the diverse events added to the Map.
->BLOCK EDITOR- This option allows us to edit the "Tiles" of each Map, as it is an advanced option I will not go deep into it.
->MAP CONECTIONS- Allows to edit the diverse connections of the Map, this should not be confused with the Warps and this is mostly used for the Routes.
->SORTING- It will allow us to sort the Map List through different options, which are the following:
==Sort by == - Sorts the Map List by Bank and Map Number, each Map belongs to a Bank and has a number that identifies it. For example, the map "Viridian Forest" belongs to Bank number 1, and is Map number 0 of that bank.
==Sort by map name== - Organizes the Map List by Name, without much discussion, it organizes all the Maps by name so for a connoisseur of the Maps in the game it makes the work much easier. For example, the map we are working on appears as "viridian Forest (1.0)", notice that it also tells us in brackets the bank and map number next to the name.
==Sort by Tileset number== - Sorts the mpas by Tileset used in the map. The Tileset is the set of Tiles that are used to create the Map. The Tiles are those small textures that determine "what is observed" in each Pixel or "square" of the map. On another occasion I will talk more about it.
==Sort by tileset grouping= - Same as above, but it sorts by the two tilesets used in that Map.
==Mix.map name and tileset== Sorts the Maps by name and tileset used, as simple as that.
Of all these options, the ones I use the most to work with are the first two, organize by name or organize by banks.
On the left side of the interface we will have the "Map List", there are three organizer options which are the following (see image 1):
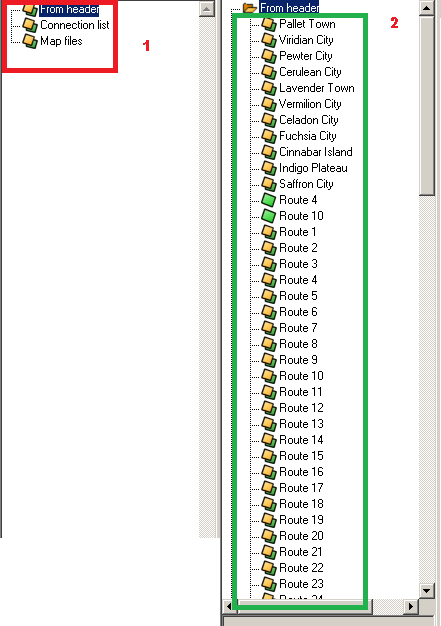
->FROM HEADER<- Muestra los mapas por cabezal, y es la opción que mas utilizo y la que recomiendo puesto que es la más fácil de comprender al utilizar el ->CLASIFICADOR<- mostrado anteriormente. Cuando cargen los Mapas los verás clasificados en pequeñas Carpetas con nombre, por ejemplo, en la imagen 2 se puede ver la Lista de Cabezales o Carpetas, seleccionaremos "PALLET TOWN" y al dar doble click a ese Cabezal se nos abren todos los Mapas Relaciondos pertenecientes a ese Cabezal. "Pallet Town (3.0) es el Mapa del Pueblo, los demás mapas son: nuestro hogar, la casa de nuestro rival y el laboratorio del profesor Oak". Observar la imagen 2:
->FROM HEADER<- Shows the maps by head, and it is the option I use the most and the one I recommend since it is the easiest to understand when using the ->CLASSIFIER<- shown above. When you load the Maps you will see them classified in small Folders with name, for example, in the image 2 you can see the List of Heads or Folders, select "PALLET TOWN" and when you double click on that Head all the related Maps belonging to that Head will be opened. "Pallet Town (3.0) is the Town Map, the other maps are: our home, our rival's house and Professor Oak's lab". See image 2:

Como puedes deducir, organizar el cabezal es excelente, ya que podremos abrir diversos cabezales por "Rutas" y poder trabajar en base a ellas con el ->CLASIFICADOR<-.
Al Dar dobleclick a un Mapa de la Lista, se nos cargará en la Pantalla y podremos trabajar sobre él.
As you can deduce, organizing the head is excellent, since we will be able to open different heads by "Routes" and to be able to work on the basis of them with the ->CLASSIFIER<-.
By double-clicking on a Map in the List, it will be loaded on the Screen and we will be able to work on it.
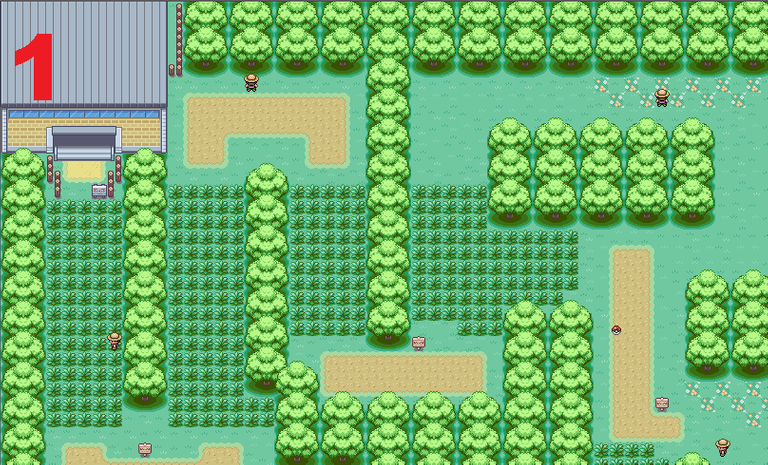
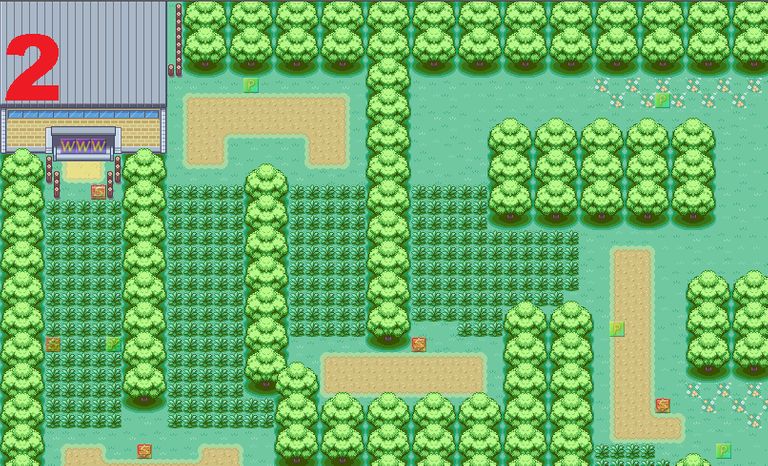
Cuando se nos carga el Mapa podremos ver los Sprites de los Entrenadores y los Sprites de los Objetos (vease imagen 1), si damos click en ->SHOW SPRITES<- podremos intercambiar la vista entre los Sprites y los EVENTOS del MAPA (vease imagen 2).
Los Eventos del Mapa son Scripts, y hay 4 Tipos de Eventos: Persona, Cartel, Warp y Scripts, pero de esto hablaremos en su momento.
En la interfaz central, al cargar un Mapa tendremos varias opciones de trabajo que son las siguientes:
When the Map is loaded we can see the Trainers Sprites and the Objects Sprites (see image 1), if we click on ->SHOW SPRITES<- we can switch the view between the Sprites and the MAP EVENTS (see image 2).
The Map Events are Scripts, and there are 4 types of Events: Person, Poster, Warp and Scripts, but we will talk about this in due time.
In the central interface, when loading a Map we will have several work options which are the following:
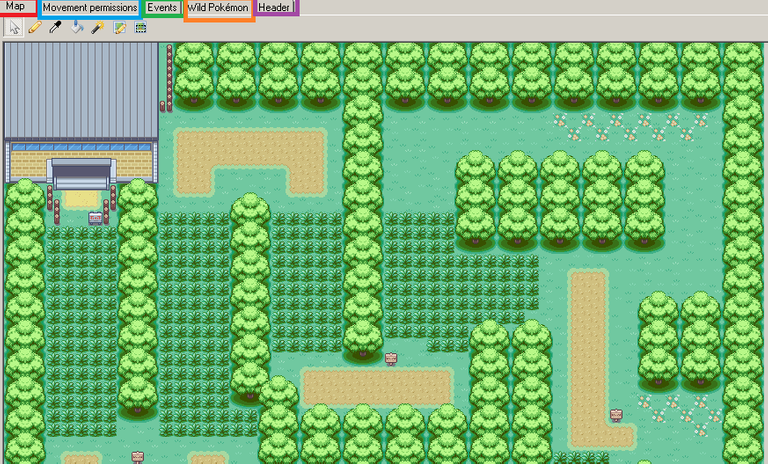
->MAP<- Acá se muestra el Mapa y se puede trabajar los tileset sobre él y Modificarlo a gusto.
->MOVEMENT PERMISSIONS<- En éste apartado identificaremos cada Pixel del Mapa con un código, lo que nos permitirá editar por donde nuestro personaje puede caminar, donde no puede hacerlo, cuales zonas son acuaticas, y diversas opciones más.
->EVENTS<- Acá podremos observar, editar y agregar los diferentes eventos del Mapa.
->WILD POKEMON<- Acá podremos agregar y modificar los Pokémon que aparecerán en el Mapa y justamente en éste apartado es que estoy trabajando actualmente.
->HEADER<- Nos muestra la opciónes de Cabezal del Mapa, podremos ver y escoger los Tilesets del Mapa, seleccionar el Tema Musical de dicho mapa, ver sus dimensiones (en Pixeles) el nombre del Cabezal de dicho mapa y algunas opciones extras como clima y tipo de Ruta.
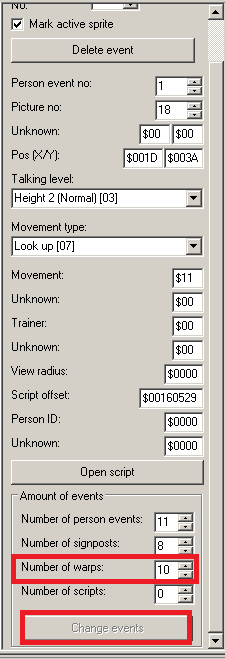
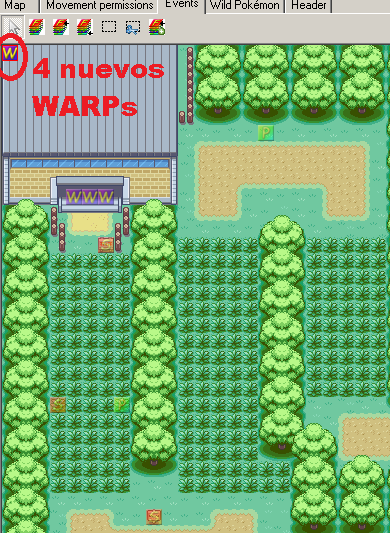
Vamos a seleccionar el mapa "VIRIDIAN FOREST", nos vamos a la interfaz de ->EVENTS<- y veremos los eventos del Mapa, en la parte de abajo podemos editar la cantidad de Eventos. Como Vamos a crear una nueva zona para el "VIRIDIAN FOREST" añadiremos cuatro eventos de WARP y le damos click a "Change Events" (vease la siguiente imagen)
->MAP<- Here the Map is shown and you can work the tileset on it and modify it to taste.
->MOVEMENT PERMISSIONS<- In this section we will identify each Pixel of the Map with a code, which will allow us to edit where our character can walk, where he cannot walk, which zones are aquatic, and diverse options more.
->EVENTS<- Here we will be able to observe, edit and add the different events of the Map.
->WILD POKEMON<- Here we will be able to add and modify the Pokémon that will appear in the Map and it is precisely in this section that I am working at the moment.
->HEADER<- It shows us the Map Header options, we will be able to see and choose the Tilesets of the Map, select the Musical Theme of this map, see its dimensions (in Pixels) the name of the Header of this map and some extra options like weather and type of Route.
We are going to select the map "VIRIDIAN FOREST", we go to the interface of ->EVENTS<- and we will see the events of the Map, at the bottom we can edit the amount of Events. As we are going to create a new zone for the "VIRIDIAN FOREST" we will add four WARP events and click on "Change Events" (see the following image).
Esto nos conducirá a un nuevo Mapa, pero para eso tendremos que crearlo e Insertarlo.
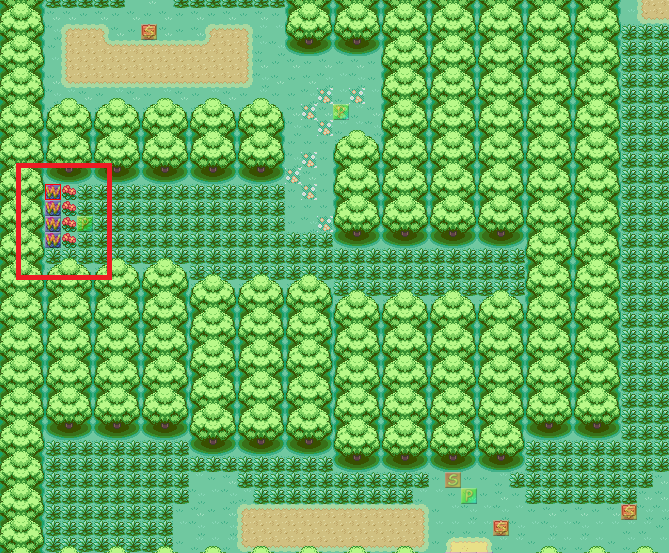
Explicaré como utilizar los Tilesets y como editar nuevos mapas e insertarlos en otro tema, en mi caso creé un Mapa 26x26 con el mismo Tileset del VIRIDIAN FOREST, pero para resumir, vean la siguiente imagen del Mapa creado y añadido a la ROM s otra parte del VIRIDIAN FOREST toamente nueva y personalizada, para agregar más Pokémon al juego clasificados por su Geografía.
This will lead us to a new Map, but for that we will have to create and Insert it.
I will explain how to use the Tilesets and how to edit new maps and insert them in another topic, in my case I created a 26x26 Map with the same Tileset of the VIRIDIAN FOREST, but to summarize, see the following image of the Map created and added to the ROM s another part of the VIRIDIAN FOREST totally new and customized, to add more Pokémon to the game classified by their Geography.
Éste trabajo lo tengo que realizar con varios Mapas, para poder agregar la mayor cantidad de Pokémon al juego.
Les seguiré actualizando el tema a medida que siga trabajando en la ROM.
Muchas gracias a toda la comunidad que me apoya y que les encanta el Tema del RomHack o simplemente, son amantes de la saga Pokémon. Espero jugar con ustedes la RomHack y pasar divertidos momentos. Un saludo y abrazo, se les quiere un montón.
This work I have to do with several Maps, in order to add as many Pokémon as possible to the game.
I will keep updating the theme as I continue working on the ROM.
Thank you very much to all the community that supports me and that love the RomHack theme or simply, are lovers of the Pokémon saga. I hope to play with you the RomHack and have fun times. Greetings and hugs, you are loved a lot.
Pokemon is one of my favorite games and it's great to see more people in the community who love this game. Apparently you design a scenario or a map in the game and it's quite fun!
Btw there are a lot of quality gaming posts and gamers in Hive Gaming community. If you visit their posts and they will visit yours too. So that's how you progress on Hive. Consider this suggestion, have a nice day!
Hey, thanks for the suggestion. I'll stop by more often for the different topics of the community. Regards
Congratulations @nyxafrodito! You have completed the following achievement on the Hive blockchain and have been rewarded with new badge(s):
Your next target is to reach 400 upvotes.
You can view your badges on your board and compare yourself to others in the Ranking
If you no longer want to receive notifications, reply to this comment with the word
STOPCheck out the last post from @hivebuzz:
Support the HiveBuzz project. Vote for our proposal!
Siempre había oído sobre las rooms modificadas y se que algunas en concreto se han ganado el cariño de los fanáticos y mucha popularidad a lo largo del tiempo, pero nunca había visto como era el proceso de creación. Me agrada que el proceso sea, en cierta forma, un poco didáctico 😅.
Eso es correcto querido amigo. Tampoco te voy a decir que soy programador o informático porque es mentira, sin embargo, logré descargarme un curso y he visto información en algunos foros y simplemente he puesto en practica lo aprendido. Obviamente, ésto, con las herramientas antes mencionadas, porque hay algunos programadores e informáticos que ya trabajan directamente el sistema binario o código de la ROM y eso requiere ya un conocimiento de programación qe la verdad, de momento, yo no lo tengo.
Pero es super bonito y divertido aprender cosas nuevas y yo estoy aprendiendo con éstas herramientas y adicionalmente me divierto en el proceso.
Gracias por comentar por cierto. Espero que los que deseen en la comunidad, prueben la ROM.
Todo lo que es este gran universo del Rom haking me parece bastante interesante, yo tambien estaba haciendo diseños hace muchos años pero lo deje a un lado, tu trabajo se ve bastante bueno, me recuerda mucho a otros esfuerzos que han hecho varios canales de youtube, Siempre todo lo realtivo al mundo de pokemon me gusta mucho, saludos sigue con tu trabajo :)
Muchas gracias por tus palabras Julio, las aprecio mucho. Es un mundo que requiere estudio y disciplina, y creo que el tener la motivación de aprender sobe algo que te gusta, es una buena razón para explorar y quizás sumergirse en éste océano de conocimiento.