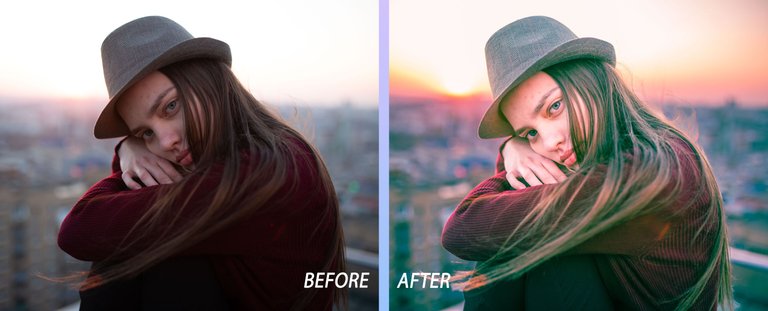
¡Un saludo a todos! Hoy estoy devuelta con una edición más en Photoshop, específicamente utilizando la herramienta de adobe camera raw y para esta oportunidad les enseñare como pueden editar y mejorar un retrato. Así que sin más preámbulos ¡comencemos!
Greetings everyone! Today I am back with one more Photoshop edit, specifically using the adobe camera raw tool and for this opportunity I will show you how you can edit and enhance a portrait. So without further ado, let's get started!
Una vez más, realizare la edición en Adobe Camera Raw, ya que estoy trabajando con una fotografía del mismo formato. Para quien no lo sepa, adobe camera raw es la herramienta que permite importar y mejorar las imágenes sin procesar (en formato Raw) que se traduce en español como “crudo”. En Sony este formato tienen las siglas ARW, pero para los efectos de este post, seguiremos hablando de RAW. Al grabar fotografías en formato RAW se conservan los archivos digitales originales, sin variación. Por esta razón suelen ser mucho más pesados que otros formatos, puesto que este preserva la resolución tal cual como fue capturada la foto, a diferencia por ejemplo, de un jpg, que es un formato comprimido y que pasa por un procesador de señales digitales que automáticamente corrigen los errores (Por eso a veces una imagen jpg se ve mejor que una imagen en raw). Y como en el formato RAW, las fotografías son grabadas tal cual, como las captura el lente, es obligatorio corregir y editar los errores y la fotografía como tal en post producción.
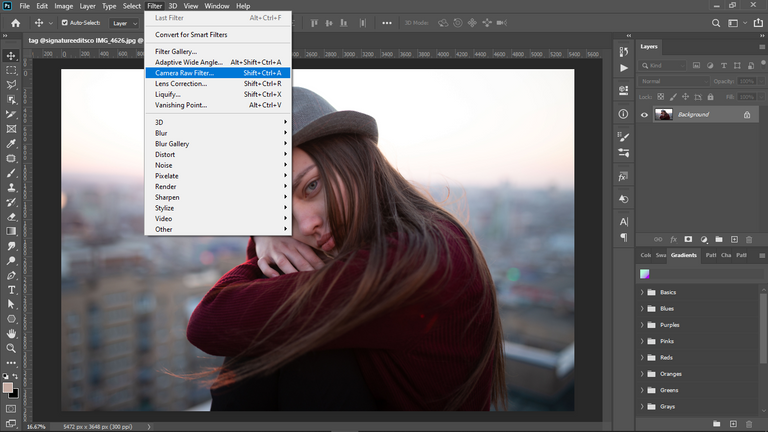
Si la imagen fue tomada en formato raw, automáticamente se les abrirá el filtro de adobe camera raw, cuando intenten abrir la imagen en Photoshop. Si no, damos click en “Filter/Filtro y seleccionamos “Camera Raw filter/Filtro de Cámara Raw”.
Once again, I will perform the editing in Adobe Camera Raw, since I am working with a photograph in the same format. For those who don't know, adobe camera raw is the tool that allows you to import and enhance raw images (in Raw format) which translates in Spanish as "crudo". In Sony these images have the acronym ARW format, but for the purposes of this note, we will continue talking about RAW. When recording photographs in RAW format, the original digital files are preserved, without variation. For this reason they are usually much heavier than other formats, since this preserves the resolution as the photo was captured, unlike, for example, a jpg, which is a compressed format and goes through a digital signal processor that automatically corrects errors (That is why sometimes a jpg image looks better than a raw image). And as in the RAW format, the photographs are recorded as they are, as captured by the lens, it is mandatory to correct and edit the errors and the photograph as such in post production.
If the image was taken in raw format, it will automatically open the adobe camera raw filter when you try to open the image in Photoshop. If not, click on "Filter/Filter" and select "Camera Raw filter/Filtro de Camera Raw".
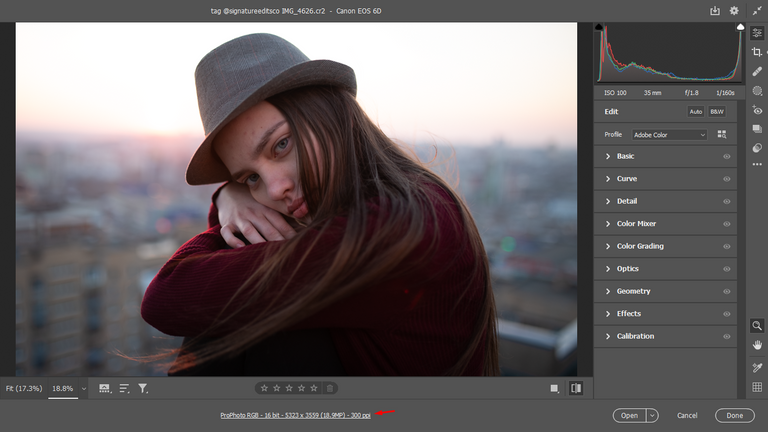
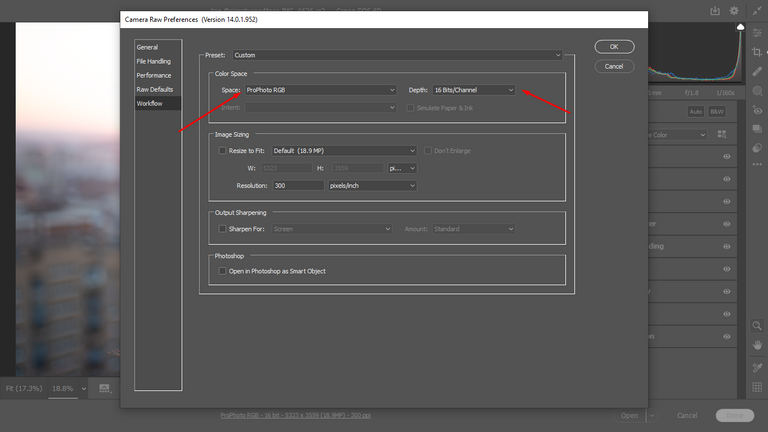
Antes de empezar a editar, damos clic en las letras en la descripción del archivo que se encuentran abajo y nos aseguramos que en las casillas que les estoy señalando en la imagen diga en space:" Prophoto RGB", y en depth diga: "16 bits/channel". Esto lo hacemos para que a la hora de editar no perdamos calidad.
Before we start editing, click on the letters in the file description below and make sure that in the boxes I am pointing out in the image it says in space:" Prophoto RGB", and in depth it says: "16 bits/channel". We do this so that we don't lose quality when editing.
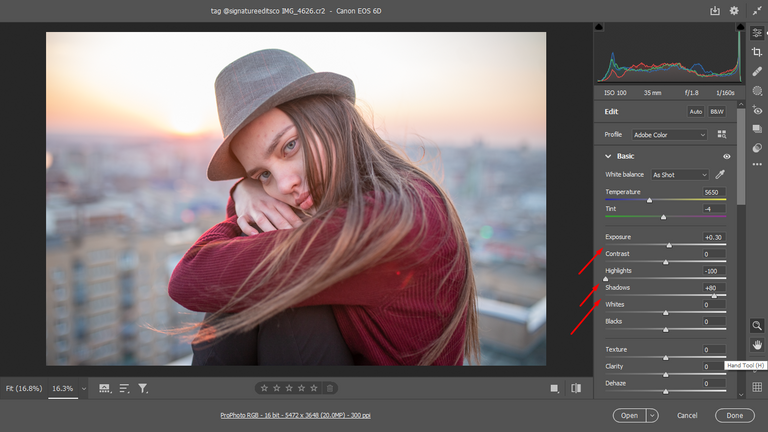
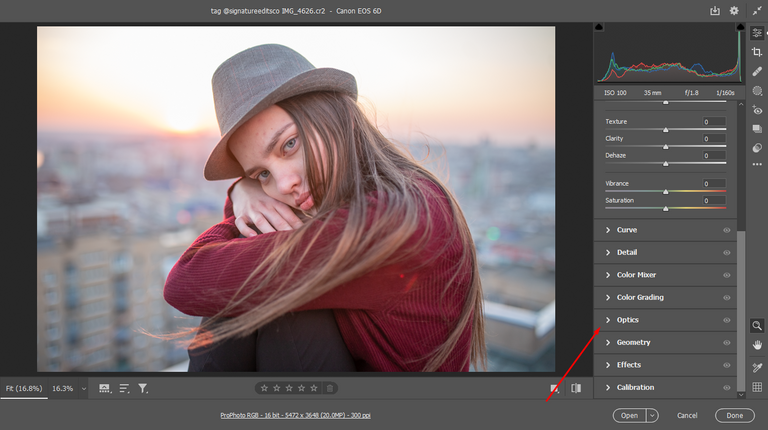
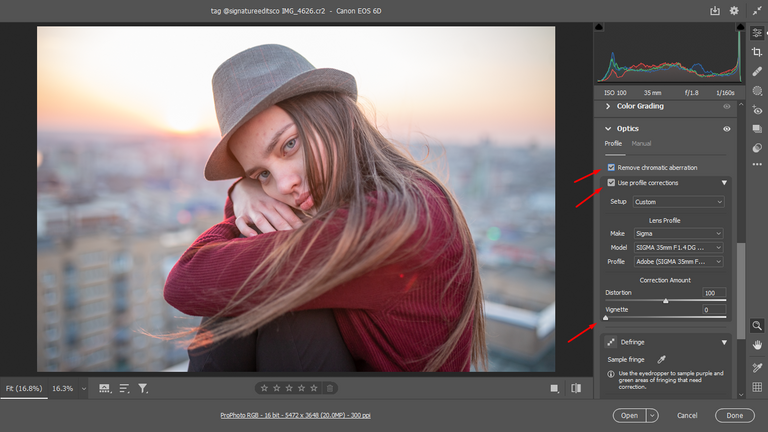
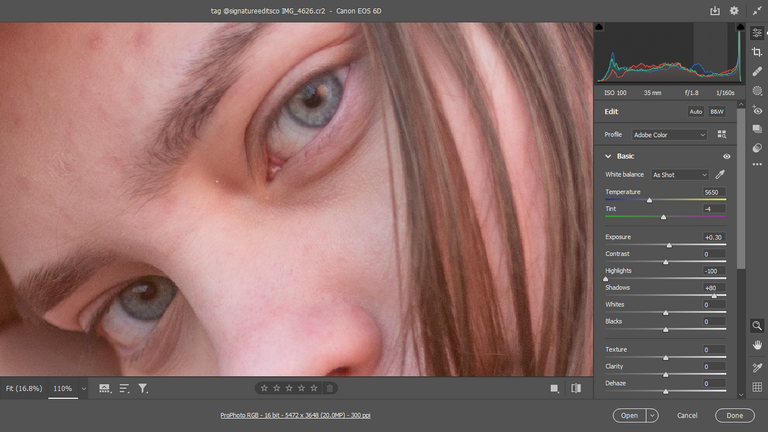
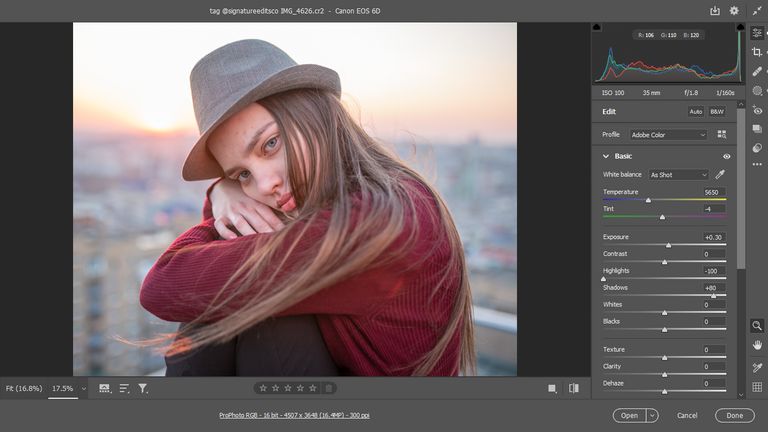
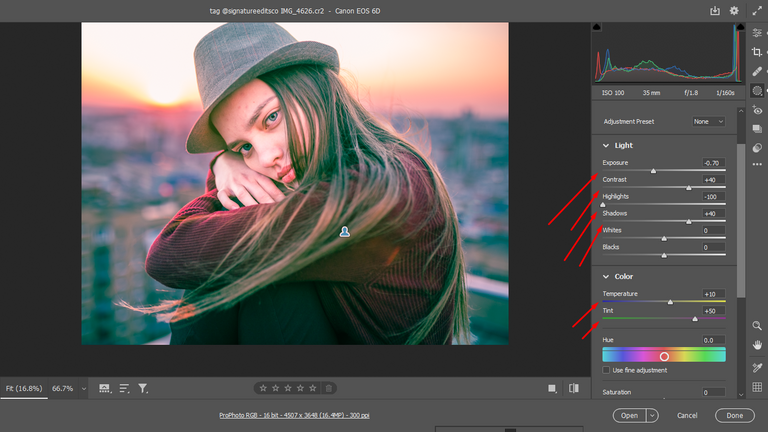
Ahora si, empecemos y lo primero que hice fue disminuir las sombras llevando el panel hacia la derecha, luego disminuí las luces y aumenté la exposición. Hecho esto, me dirigí al panel de ópticas, y di click en “remover aberraciones cromáticas”. Esto lo que hace es eliminar los errores de entonación en algunas partes de la fotografía, por ejemplo , si tenemos la fotografía de un lago y en una parte de esta notamos que hay un color purpura que se ve extraño, pues este panel lo elimina. De no hacerlo tendremos que hacerlo de manera manual, moviendo los colores en panel "Manual" que encontramos justo al lado de "Profile/perfil".
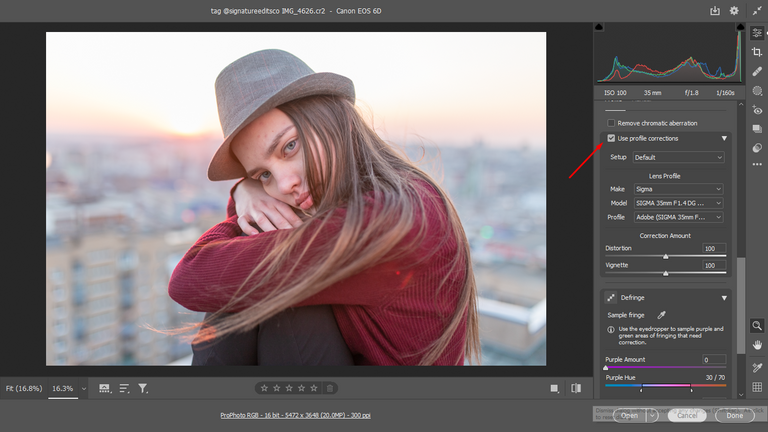
Luego active la casilla de “utilizar la corrección del perfil” esto lo que hace es quitar el efecto abombado de la cámara en las fotografías producido por la forma del lente, así como las viñetas, que se ven producto por las formas de los lentes de la parte interna de las cámaras. Luego le devolví las viñetas porque particularmente me gustan como se ven en algunas fotos y listo! ya con eso hemos hecho la edición básica de una fotografía adobe camera Raw.
Now, let's get started and the first thing I did was to decrease the shadows by moving the panel to the right, then I decreased the highlights and increased the exposure. Once that was done, I went to the optics panel, and clicked on "remove chromatic aberrations". For example, if we have a photograph of a lake and in one part of it we notice that there is a purple color that looks strange, this panel removes it. If not, we will have to do it manually, moving the colors in the "Manual" panel that we find next to "Profile/profile".
Then activate the "use profile correction" checkbox, which removes the camera's bulging effect in the photographs produced by the shape of the lens, as well as the vignettes, which are produced by the shapes of the lenses on the inside of the cameras. Then I gave back the vignettes because I particularly like the way they look in some photos and that's it! with that we have done the basic editing of an adobe camera Raw photo.
A la hora de tomar una fotografía tenemos la posibilidad de seleccionar los puntos de enfoque y en el caso de un rostro, los lugares mas importantes para enfocar, son los ojos. Para comprobar si los ojos están bien enfocados, nos acercamos a la imagen para ver si se nota el reflejo del camarógrafo en ellos. Si esto es así, vamos bien, pero siempre es bueno darle un poco más de enfoque a estos cuando fotografiamos un rostro o retrato.
When taking a photograph we have the possibility of selecting the focus points and in the case of a face, the most important places to focus on are the eyes. To check if the eyes are in focus, we approach the image to see if we can see the reflection of the cameraman in them. If this is the case, we are fine, but it is always good to give them a little more focus when photographing a face or portrait.
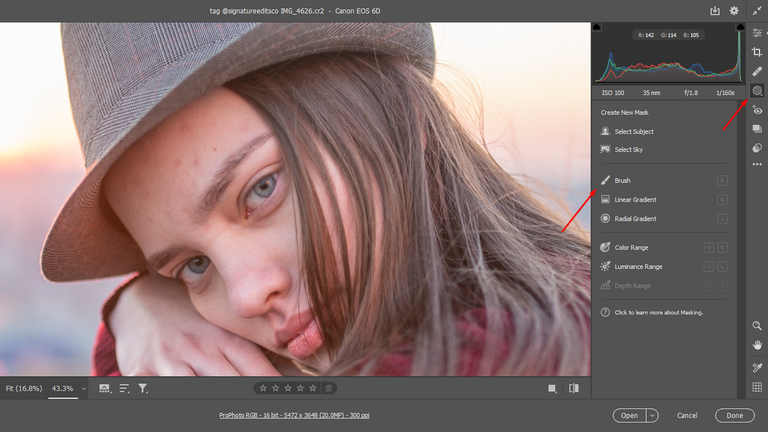
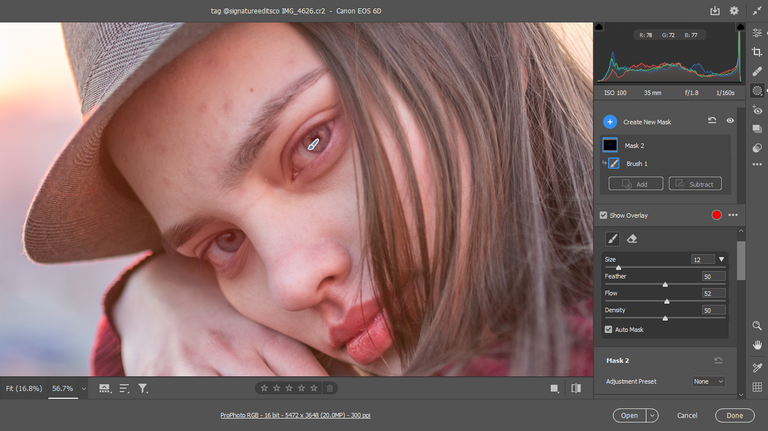
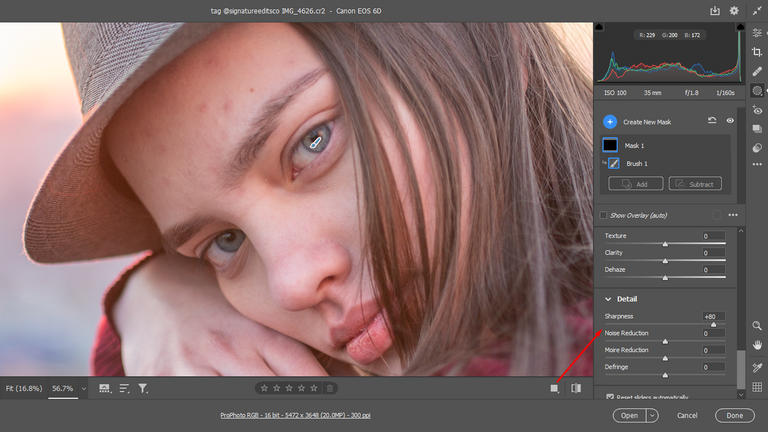
Hecho esto, damos click en mascara y seleccionamos la brocha. Para disminuir o agrandar el tamaño de la brocha, pulsamos alt + la rueda del ratón. Ahora, ya que queremos darles más enfoque a los ojos, pues le damos click a estos o también podemos ir pintando dejando presionado y arrastrando el cursor por las zonas que queremos editar. Pueden notar que los ojos y en este caso la boca (Que también quería enfocarla un poco más) se tornan de un color rojizo muy sutil. Esto es simplemente para mostrarnos que estamos haciendo, no quiere decir que estamos pintados la fotografía como tal de ese color.
Then click on mask and select the brush. To decrease or enlarge the size of the brush, press alt + mouse wheel. Now, since we want to give more focus to the eyes, we click on them or we can also paint by pressing and dragging the cursor over the areas we want to edit. You can notice that the eyes and in this case the mouth (which I also wanted to focus a little more) become a very subtle reddish color. This is simply to show us what we are doing, it does not mean that we are painting the picture as such in that color. Then click on mask and select the brush. To decrease or enlarge the size of the brush, press alt + mouse wheel. Now, since we want to give more focus to the eyes, we click on them or we can also paint by pressing and dragging the cursor over the areas we want to edit. You can notice that the eyes and in this case the mouth (which I also wanted to focus a little more) become a very subtle reddish color. This is simply to show us what we are doing, it does not mean that we are painting the picture as such in that color.
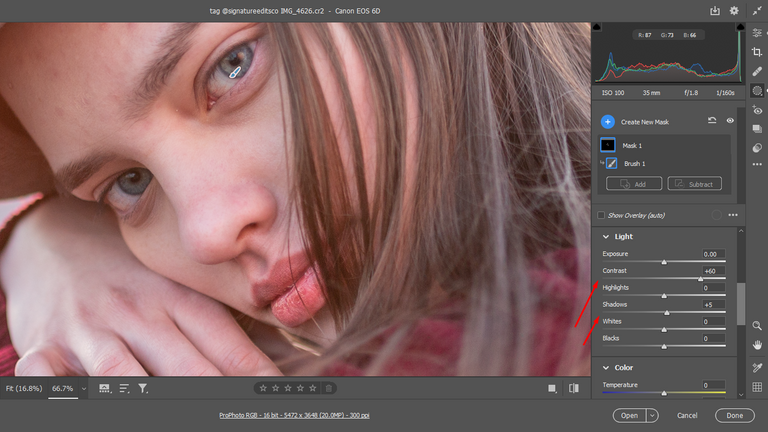
Ahora, vamos hacia el panel que diga “Details o Detalles”, desplegamos y aumentamos su enfoque en “Sharpness o Enfoque”. Además de hacer esto, aumenté el contraste y disminuí un poco las sombras.
Now, we go to the panel that says "Details", pull down and increase its sharpness. In addition to doing this, I increased the contrast and decreased the shadows a bit.
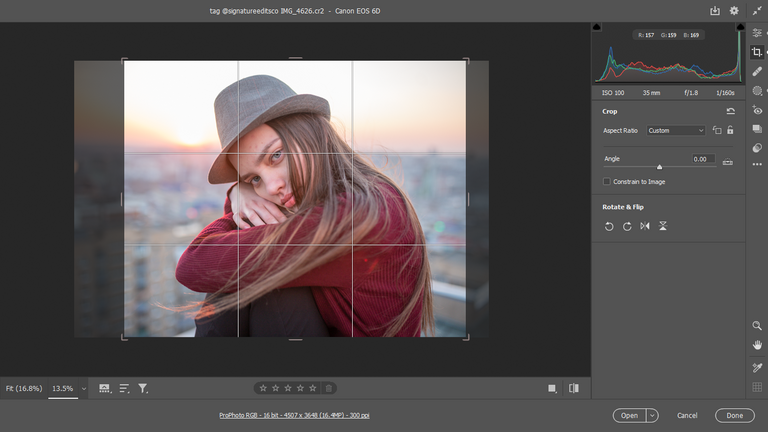
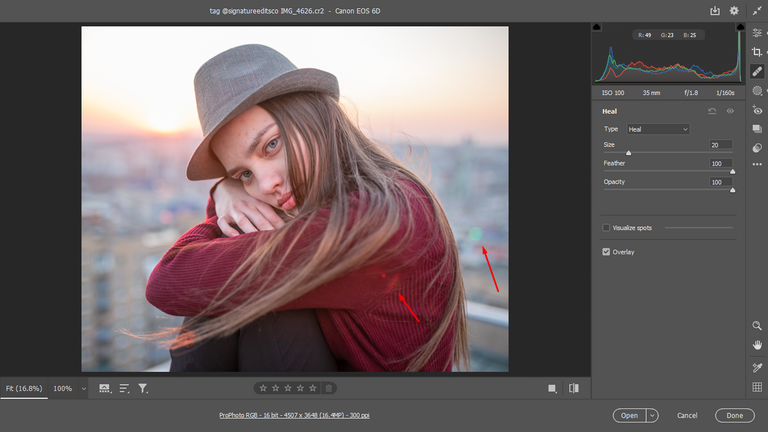
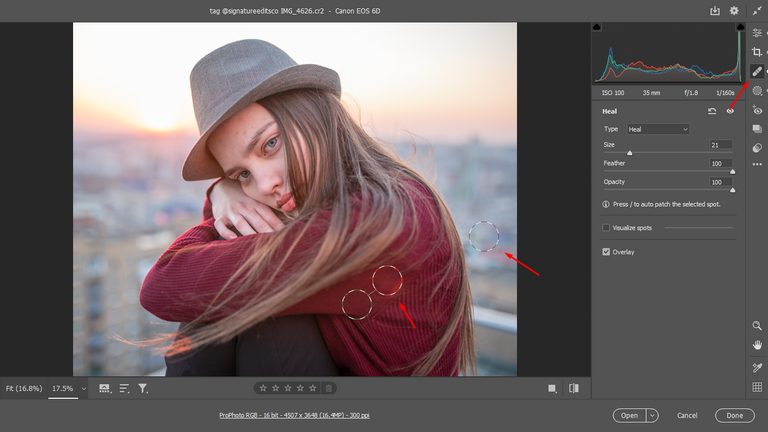
Luego recorte un poco la imagen ya que habían unas manchitas que me parecía que había que quitar. Y en casos en donde no podía recortar, porque las manchas estaban muy pegadas a la chica, utilice la herramienta de “Spot cural/punto de cura”. Esto lo que hace es clonar los pixeles de alguna parte de nuestra fotografía que nosotros escojamos y luego camuflarlo y fusionándolo con el entorno. Simplemente damos clic, seleccionamos un área (el programa tambien puede seleccionar un area de forma automatica), damos enter y listo.
Then I cropped the image a little bit because there were some spots that I thought needed to be removed. And in cases where I couldn't crop, because these spots were too close to the girl, I used the "Spot cural" tool. What this does is to clone the pixels of some part of our photograph that we choose and then camouflage it and merge it with the environment. We simply click, select an area or the program does it for us, hit enter and that's it.
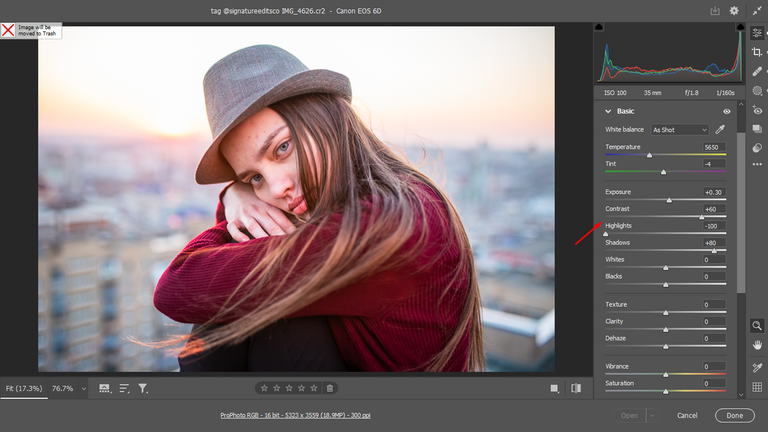
También aumente el contraste para que los colores se vieran mucho más vivos.
I also increased the contrast to make the colors look much more vivid.
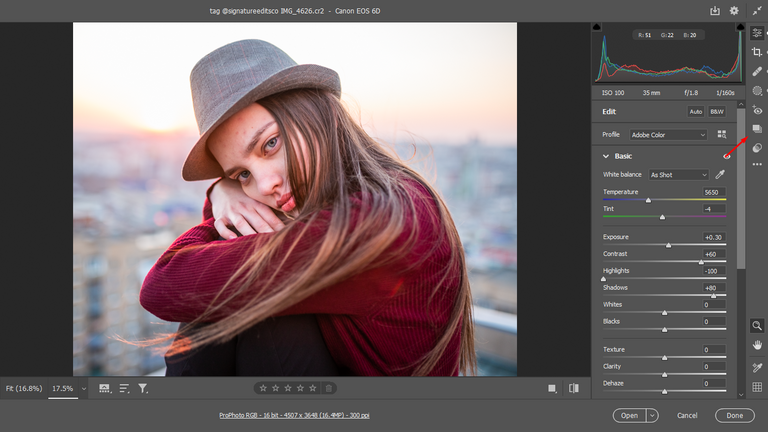
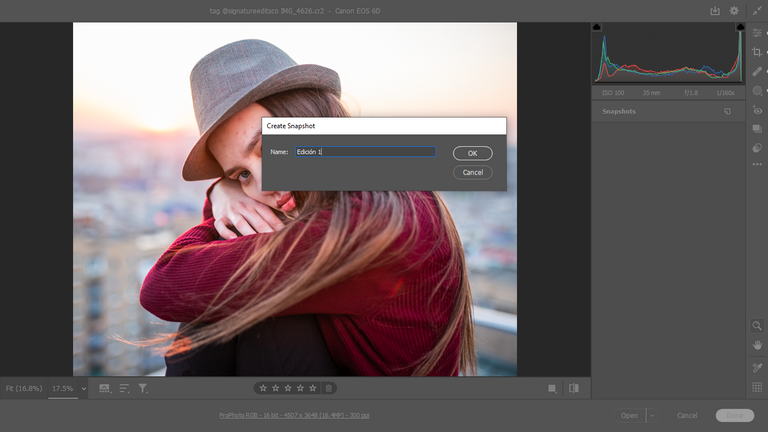
Para guardar nuestras ediciones y tener distintas versiones de nuestra fotografía usamos la herramienta “Snapshots o instantáneas”. Esta es muy útil, ya nos permite guardar nuestro proceso y sobre todo elegir entre las distintas versiones que decida ir guardando.
To save our edits and have different versions of our photograph we use the "Snapshots" tool. This is very useful, as it allows us to save our process and above all to choose between the different versions that we decide to save.
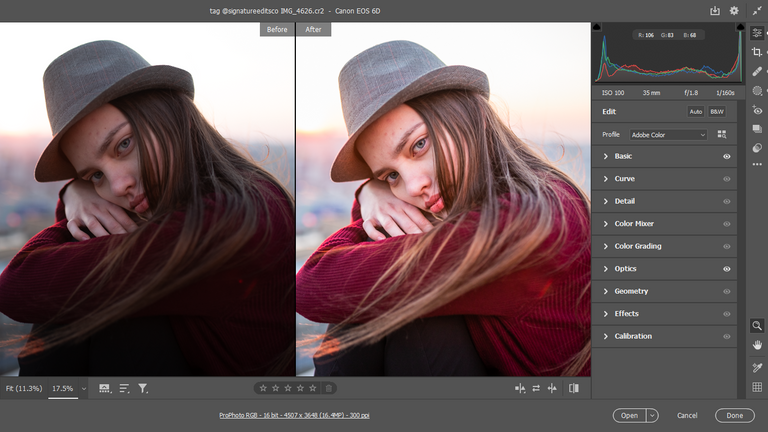
Lo que quiero hacer ahora es editar la fotografía utilizando la herramienta de “color grading/gradación de color”. Esta herramienta nos permite dar una coloración a las imágenes a partir de la edición de las sombras, tonos medios y luces. Con esta herramienta se suelen a hacer el etalonaje o gradación de color de las escenas de películas, lo que nos permite crear efectos y ambientes muy interesantes dependiente de los queramos transmitir o el gusto que tengamos.
What I want to do now is to edit the photograph using the "color grading/color grading" tool. This tool allows us to colorize the images by editing the shadows, midtones and highlights. With this tool we usually do the color grading of movie scenes, which allows us to create very interesting effects and atmospheres depending on what we want to transmit or the taste we have.
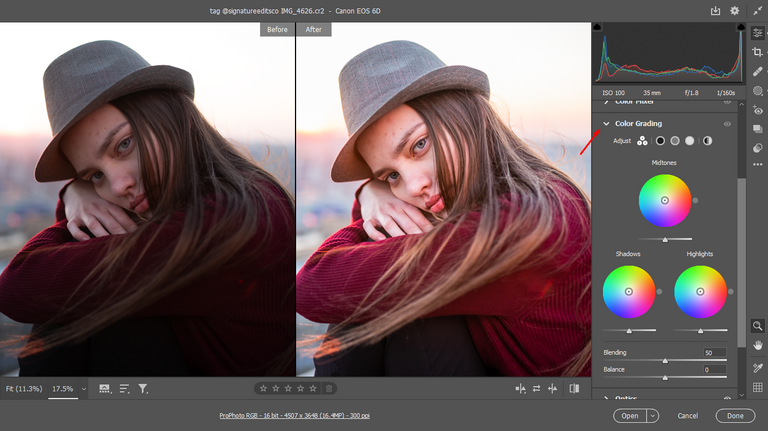
La herramienta deslizante de abajo de cada uno de los círculos cromáticos, se usan para controlar la aplicación de color y saturación a los negros, blancos y tonos medios. Por ejemplo, si en esta fotografía quiero que las sombras sean azules, arrastro el punto blanco al color que deseo y muevo el panel deslizante de luminosidad hacia la derecha, para iluminar los negros y aplicar el color azul. Si quiero hacer lo mismo con las luces. Escojo un color y arrastro el panel de luminosidad hacia la izquierda para oscurecer las luces y aplicar el color. Y por supuesto se puede hacer lo mismo con los tonos medio.
Si queremos volver a los ajustes predeterminados, simplemente nos posamos sobre los paneles que hayamos editado y hacemos doble clic en ellos.
The slider tool below each of the chromatic circles is used to control the application of color and saturation to blacks, whites and midtones. For example, if in this picture I want the shadows to be blue, I drag the white point to the color I want and move the lightness slider panel to the right to lighten the blacks and apply the blue color. If I want to do the same with the highlights. I choose a color and drag the luminosity panel to the left to darken the lights and apply the color. And of course you can do the same with the midtones.
If we want to return to the default settings, we simply hover over the panels we have edited and double-click on them.
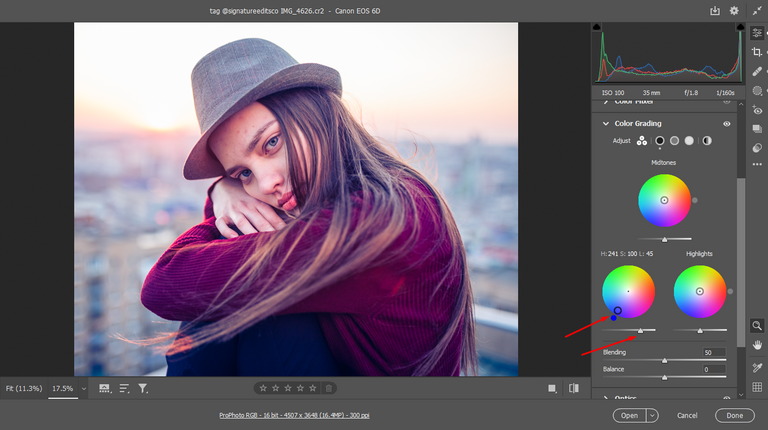
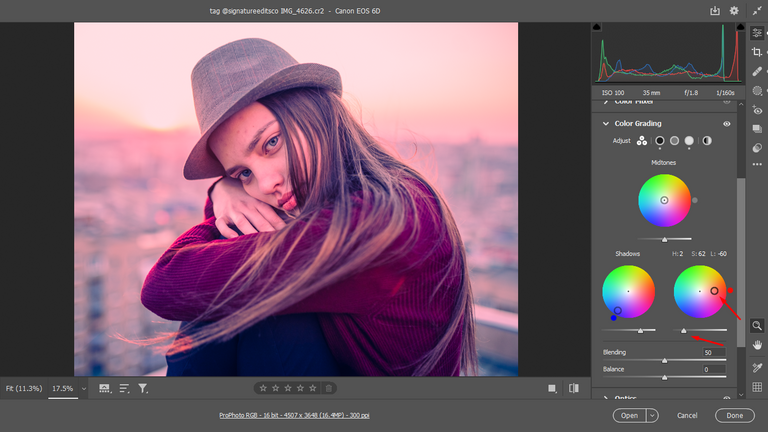
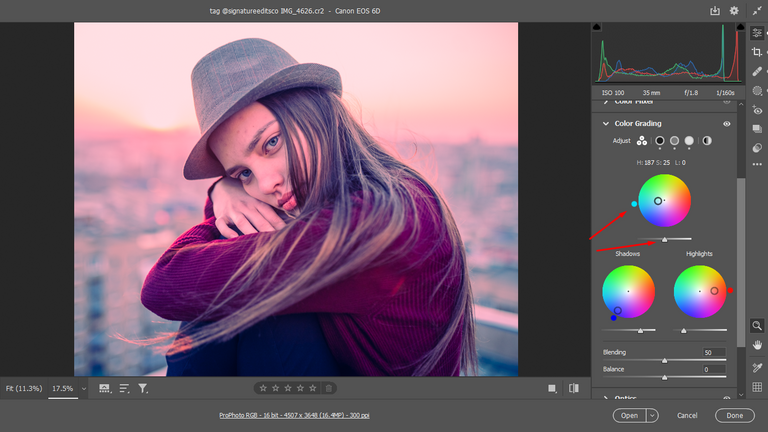
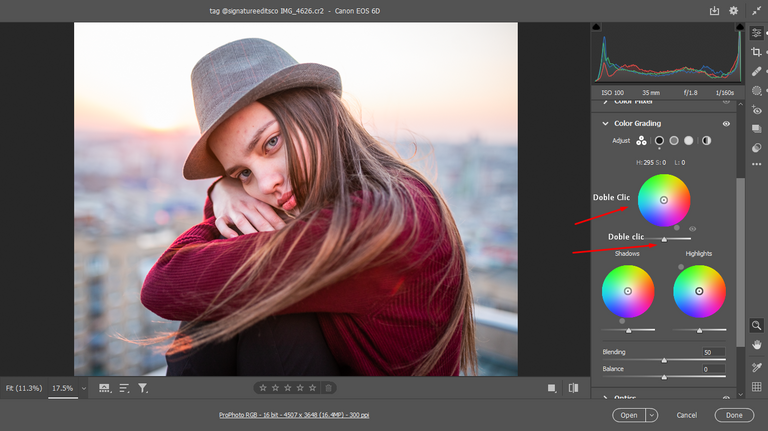
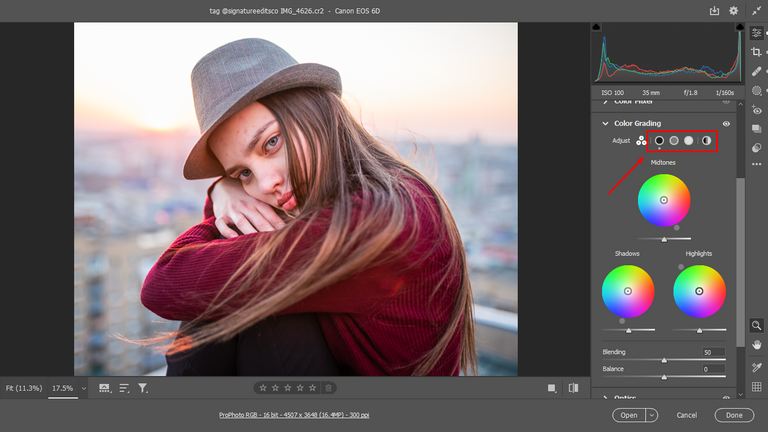
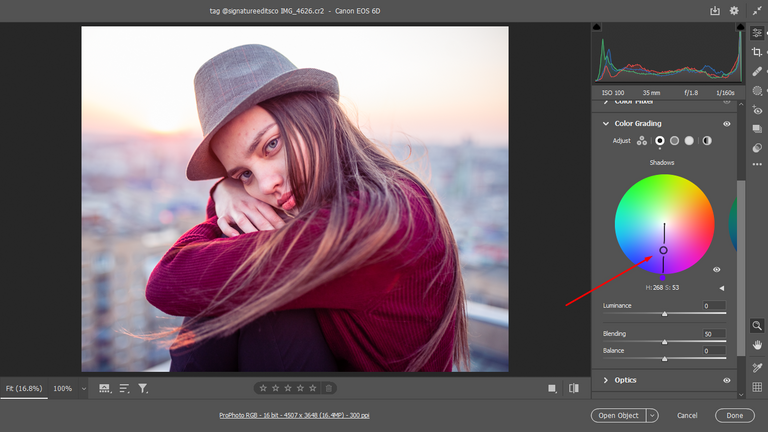
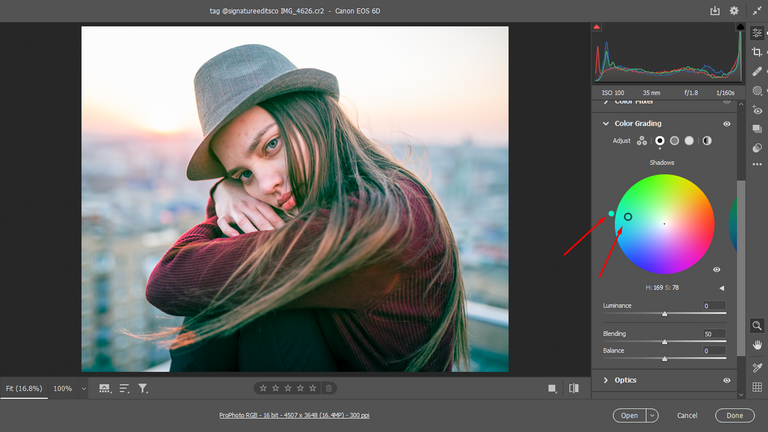
Ahora si, empezaré a editar la fotografía y para acceder a los círculos cromáticos individuales, simplemente damos click en alguno de los tres iconos que les señalo en el recuadro rojo. En mi caso elegí primero las sombras. Luego di click en el circulo del medio y lo arrastré un poquito. Si mantenemos ctrl o comand, bloqueara el tono para que no se pueda agregar saturación. Y manteniendo shif, aparecerá una línea donde podrán arrastrar y controlar el nivel de la saturación y no alterar el tono del color.
En mi caso elegí un color entre cian y verde y escogí ese nivel de saturación, dándole la apariencia de una fotografía un tanto vintage. Básicamente, esto es como si estuviéramos trabajando en Instagram.
Now I will start editing the photo and to access the individual color circles, simply click on one of the three icons that I point out in the red box. In my case I chose the shadows first. Then I clicked on the middle circle and dragged it a little bit. If you hold ctrl or command, it will lock the tone so that you can't add saturation. And by holding shif, a line will appear where you can drag and control the level of saturation and not alter the hue of the color.
In my case I chose a color between cyan and green and chose that level of saturation, giving it the appearance of a somewhat vintage photograph. Basically, this is as if we were working on Instagram.
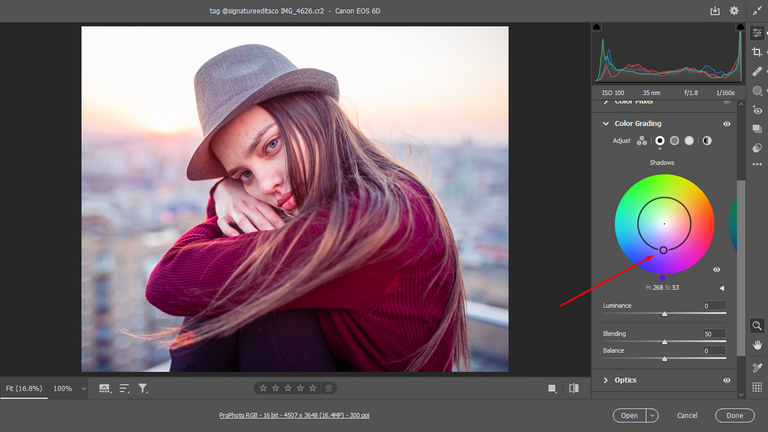
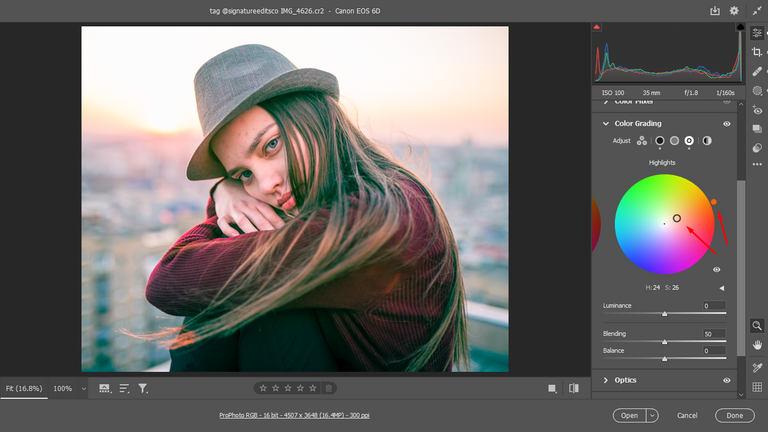
Para las luces escogí un color anaranjado, con un nivel de saturación muy sutíl. También aumente el nivel de “Blending/mezcla”. Esto es la fusión de la superposición entre sombras y luces. Si arrastramos el control deslizante a la izquierda tendremos menos superposición y lo contrario hacia la derecha.
For the highlights I chose an orange color, with a very subtle saturation level. I also increased the level of "Blending". This is the blending of the overlap between shadows and highlights. If we drag the slider to the left we will have less overlap and the opposite to the right.
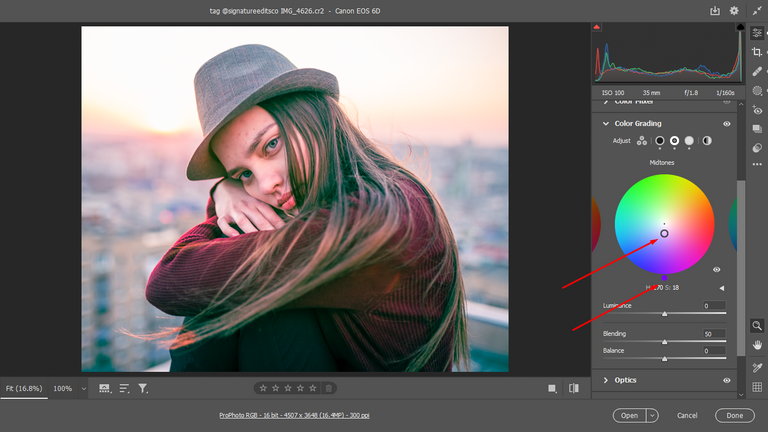
Finalmente, para los tonos medios me fui por un color morado con un nivel de saturación aun mas sutil que el de las iluminaciones.
Finally, for the mid-tones I went for a purple color with an even more subtle level of saturation than the highlight.
Hecho esto, me fui a las instantáneas y guarde mis ajustes con el nombre de edición 2.
That done, I went to snapshots and saved my settings under the name edit 2.
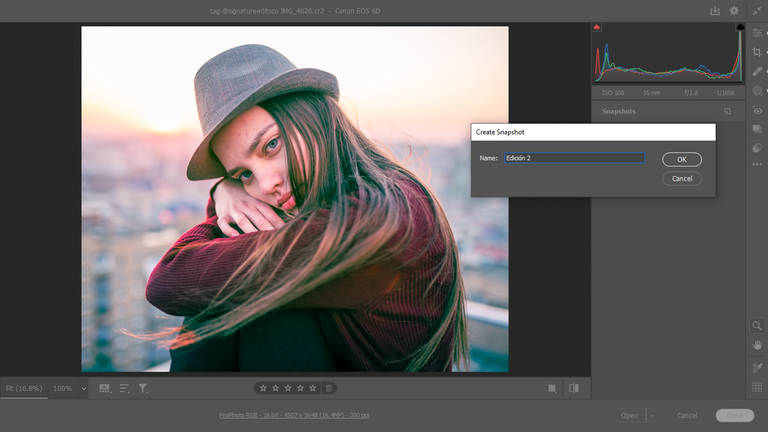
Si me poso en edición 1, me muestra los ajustes de la edición 1. Y si poso el cursor en edición 2, me muestra los ajustes de la edición esa edición 2.
If I hover on edition 1, it shows me the settings of edition 1. And if I hover on edition 2, it shows me the settings of that edition 2.
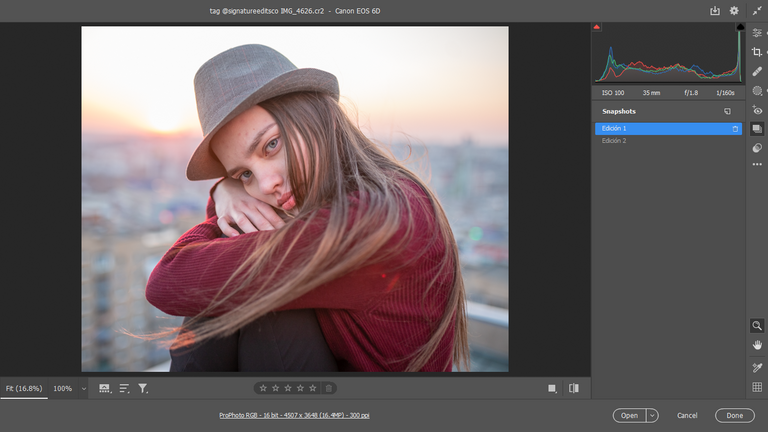
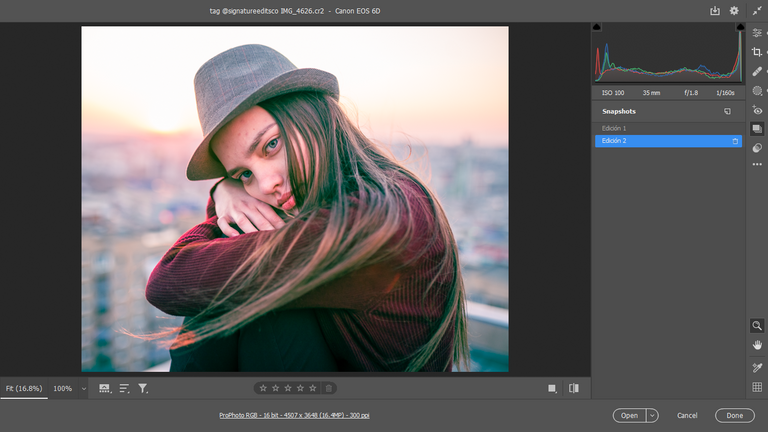
Algo que yo veo en esta fotografía, es que estas partes del fondo están más iluminadas que el rostro, y esto no debería ser así. Pues al tratarse de un retrato, el rostro siempre debe ser nuestro protagonista. Para levantarle mas luz a mi personaje, puedo hacerlo con la herramienta “Radial gradient / Filtro radial”. Damos click en “Mask/Mascaras” añadimos una nueva mascara y seleccionamos radial gradient.
Something that I see in this photograph is that these parts of the background are more illuminated than the face, and this should not be so. Since it is a portrait, the face should always be our protagonist. To give more light to my character, I can do it with the tool "Radial gradient". Click on "Mask", add a new mask and select "Radial gradient".
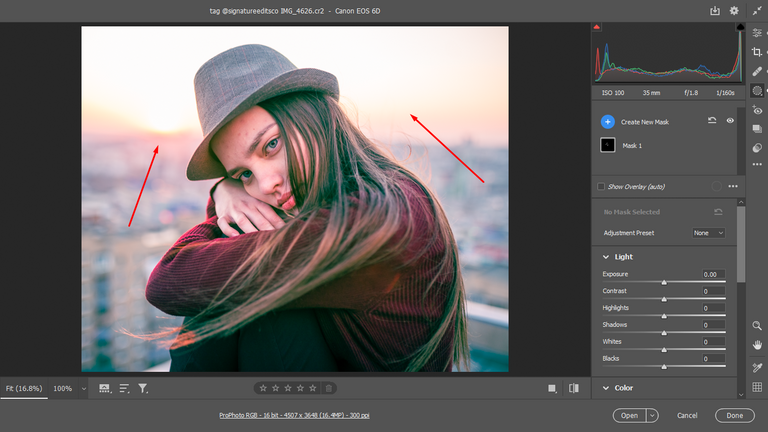
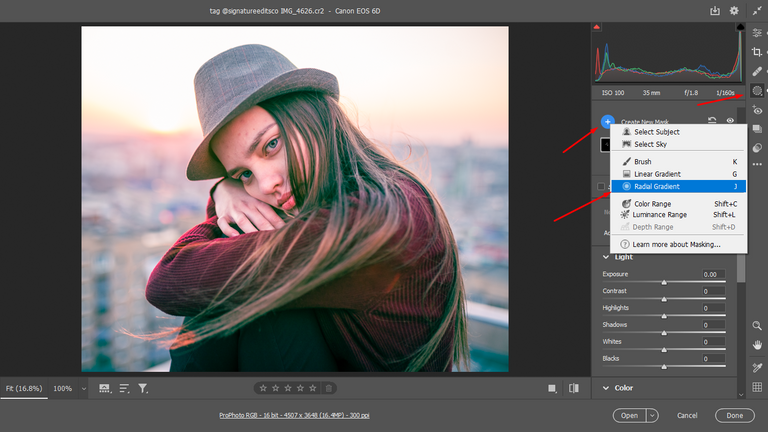
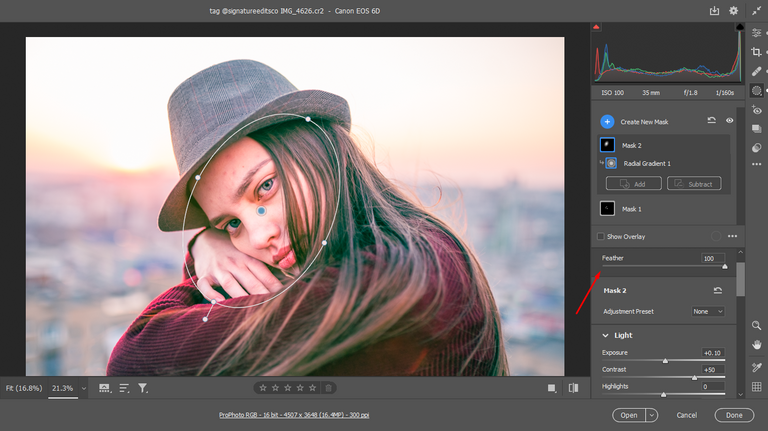
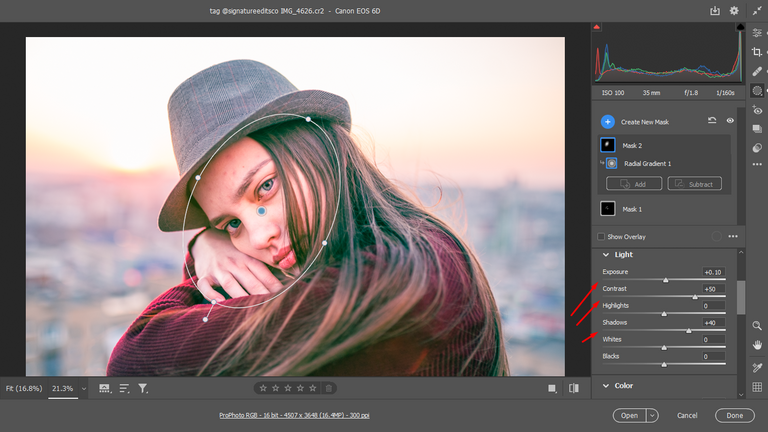
Asegúrense de que el feather/Suavizado este al 100 para que los ajustes se noten de manera sutil. En este caso, aumente solo un poquito la exposición, le di mas contraste y levante las sombras y ya con eso el rostro está mucho más iluminado.
Make sure the feathering/softening is set to 100 so that the adjustments are subtle and noticeable. In this case, I increased the exposure just a little bit, gave it more contrast and raised the shadows and with that the face is much more illuminated.
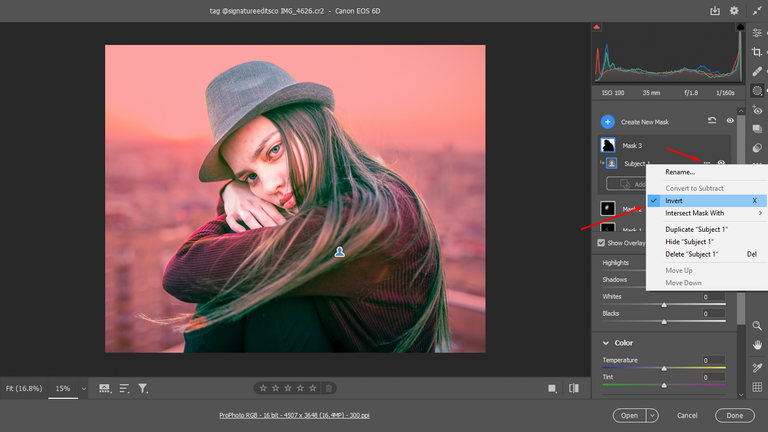
Por último, quiero oscurecer un poco el fondo para darle aun mas protagonismo a mi personaje. Para eso voy a mascaras y seleccionó la herramienta de “select subject / seleccionar subject”. Luego le doy click en los 3 puntos y le doy invertir.
Con el fondo ya seleccionado, disminuí la exposición, aumente el contraste, levante las sombras, disminuí las luces y aumente un poquito la temperatura.
Finally, I want to darken a little the background to give even more prominence to my character. For that I go to masks and select the "select subject / select subject" tool. Then I click on the 3 dots and invert.
With the background already selected, I decreased the exposure, increased the contrast, raised the shadows, decreased the highlights and increased the temperature a little bit.
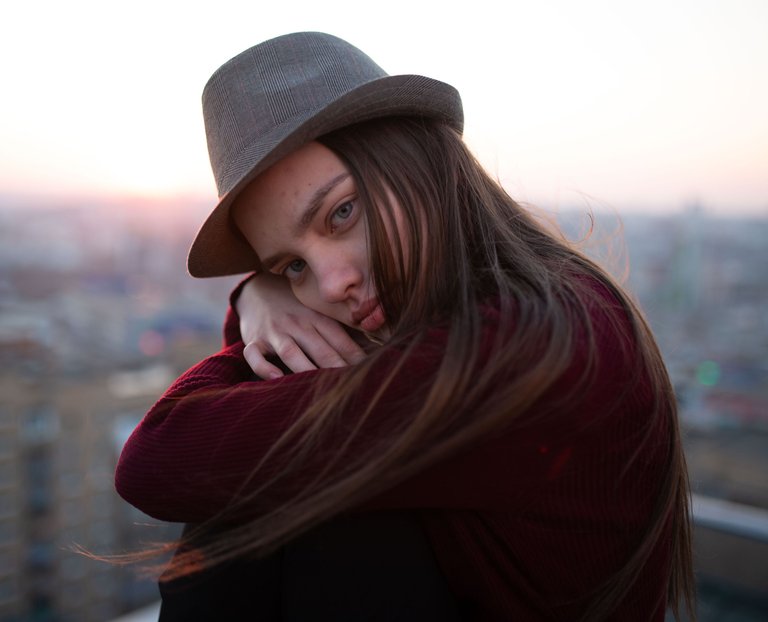
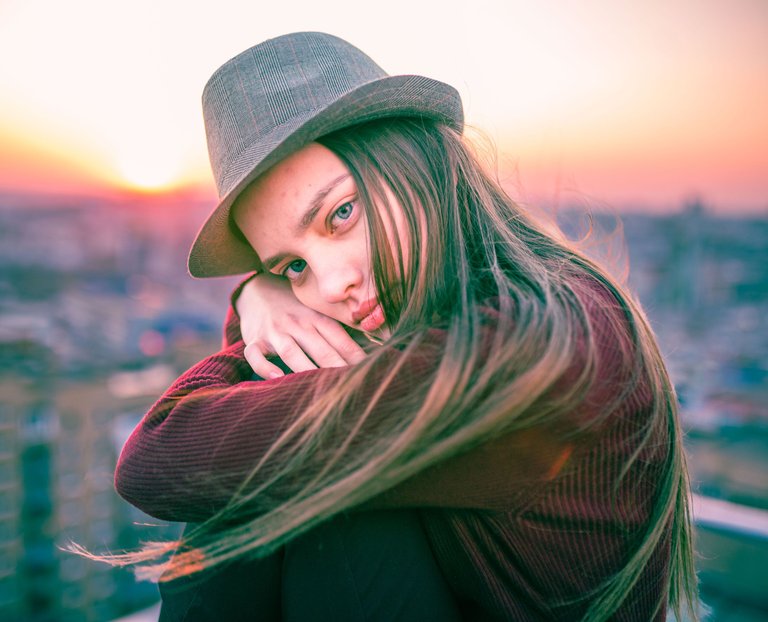
And that's it! The editing of this portrait is officially finished.
A mi parecer, Photoshop es el mejor programa para editar fotografías, tu publicación es una prueba. Hace tiempo lo utilicé para determinar el color en muestras de alimentos mediante coordenadas colorimétricas.
Completamente de acuerdo contigo, gracias por el apoyo!
Gracias por el apoyo!
Congratulations @johstingmzk! You have completed the following achievement on the Hive blockchain and have been rewarded with new badge(s):
Your next target is to reach 4000 upvotes.
You can view your badges on your board and compare yourself to others in the Ranking
If you no longer want to receive notifications, reply to this comment with the word
STOPCheck out the last post from @hivebuzz: