Hello Hive Diy!
Every moment we live is unique and special, and when it comes to surprising someone, it is important to give our best. Remember that even the smallest detail, created with our own hands, can have great meaning, since it is full of the best wishes and affection for that special person.
In this post I want to share with you a simple, beautiful and easy-to-do idea that will allow you to go out of the ordinary and surprise someone. This post was not only made to inspire you to create, but it will also motivate you to innovate and explore new opportunities. Every day is a new opportunity to learn, improve and do something unique.

In my case, I love working with foami, a material that allows me to give life to what I want to create, giving my best to each object, implementing the best shape to make it look more beautiful.
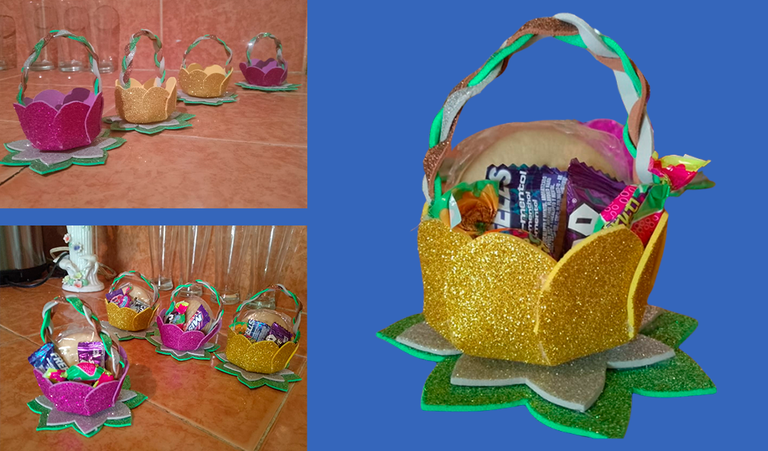
This little detail is ideal to offer them at beautiful moments such as: meetings, parties or simply to share a special moment with the aim of leaving a deeper mark on the hearts of those who receive them.

Materials

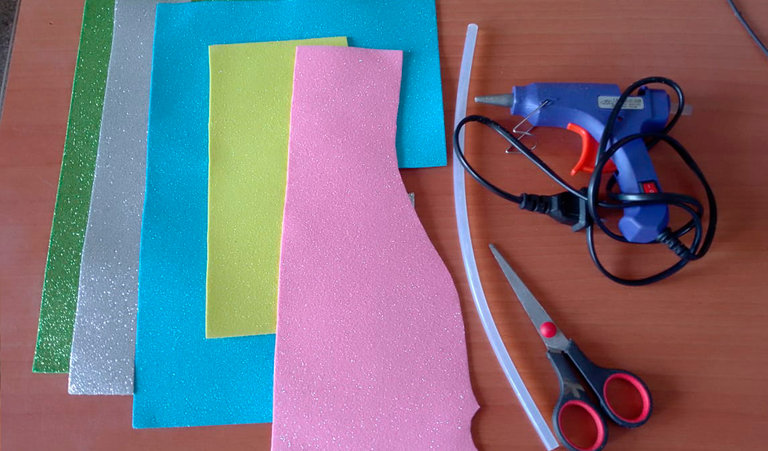
silicone gun
Silicone
Gray frosted foam
Green frosty foam
Fuchsia frosted foam
Mustard frosted foam
Brown frosted foam
Paper
Pencil
Scissors
Step by step
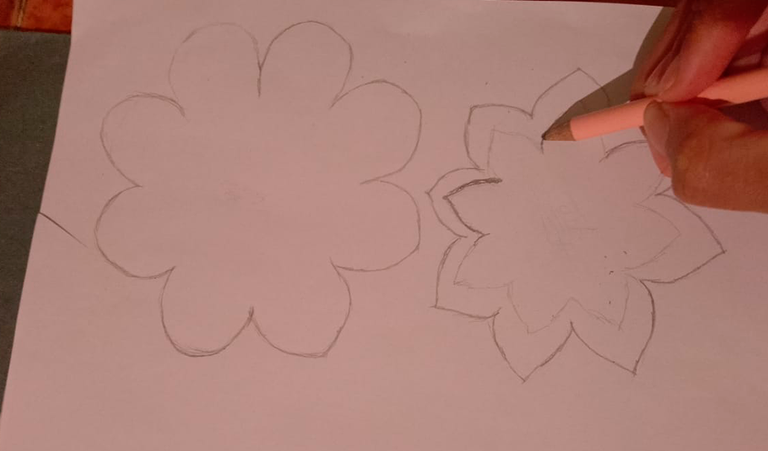
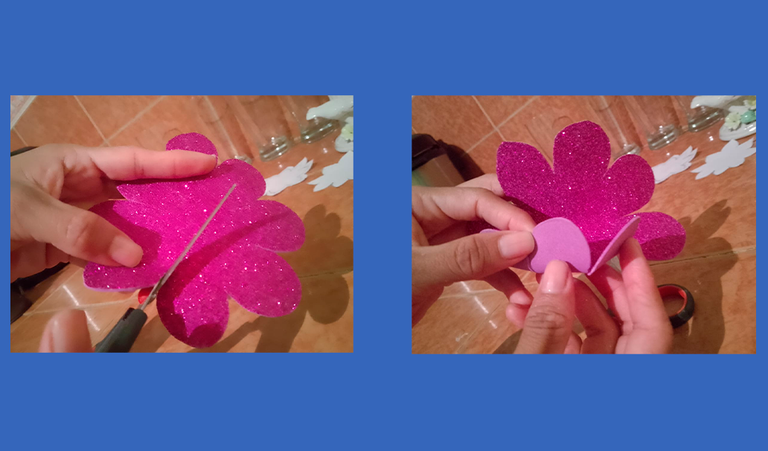
Passed 1: We begin to draw a flower with eight petals of approximately 13 cm and two sepals, one 10cm and the other smaller 8cm wide.
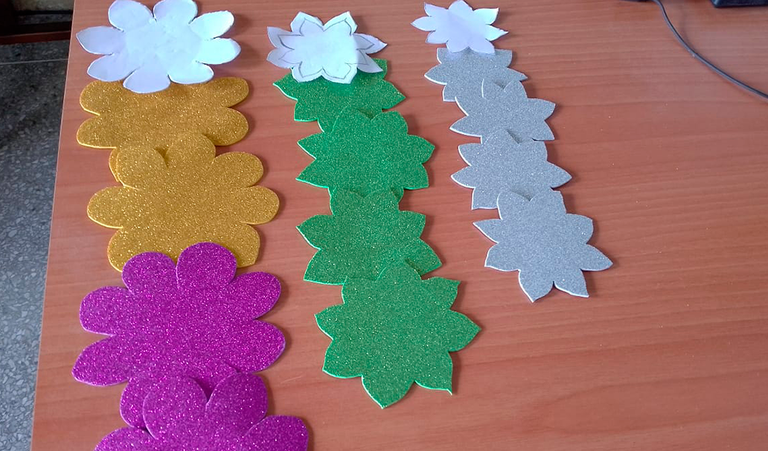
Passed 2:After the shaped flowers I cut out 2 fuchsia-colored ones, two mustard-colored ones, and from the sepals I cut out four of each one.
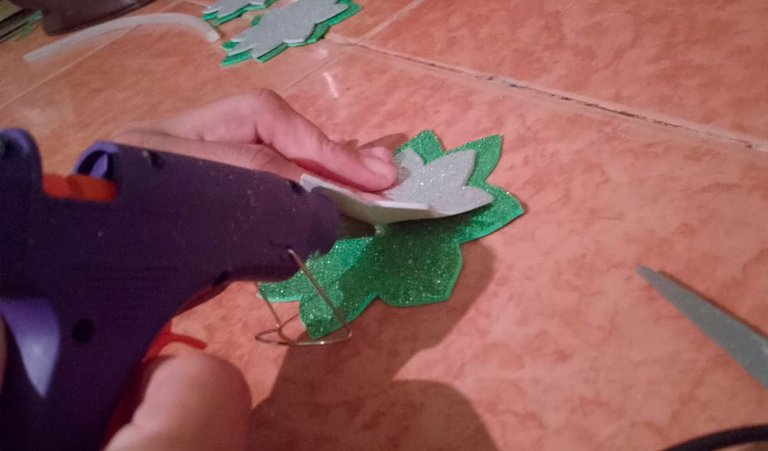
Passed 3:We take the sepals and glue the gray one on top of the green one and it will look like this:
Passed 4:We take the petals and begin to cut about 1 and a half centimeters into the flower (these are reference measurements, you can make them larger). Try to ensure that the opening you make is so that each petal is manageable enough to form a kind of basket, just as you see in the images.
Passed 5:Once we went deeper into the cut between the petals, we began to glue them one next to the others and they would look like this.
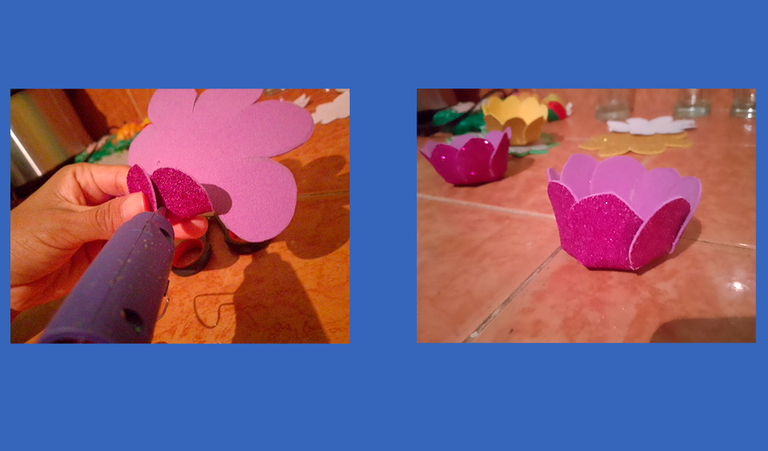
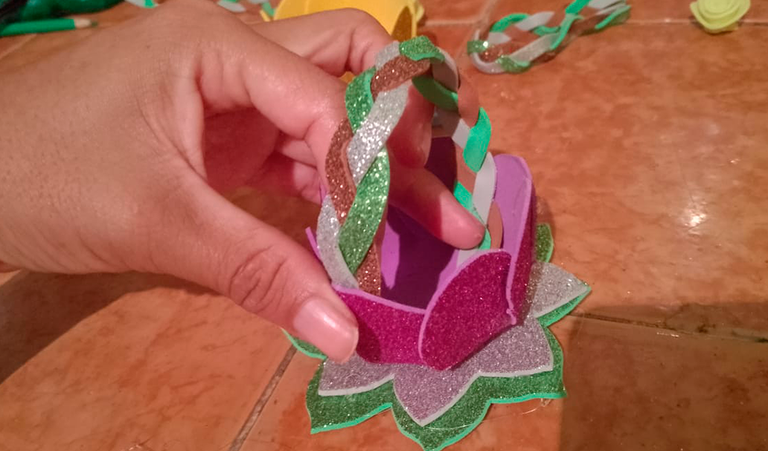
Passed 6:Once the petals have been glued and placed like a small basket, we are going to start gluing them with the sepals.
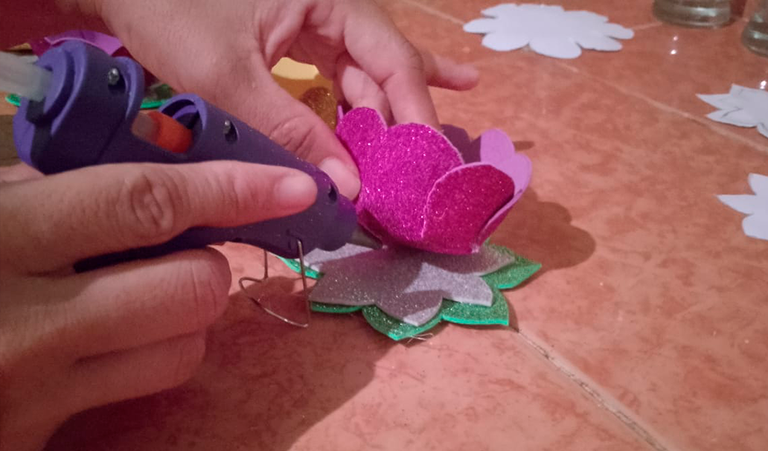
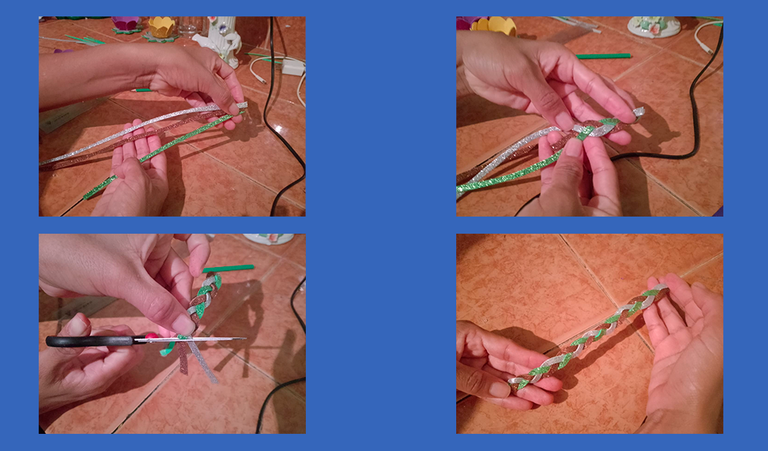
Passed 7:Now we are going to form a small braid, for this I am going to use three elongated sheets of foam, one green, one silver and one brown, measuring 13 cm long and half a centimeter wide; reinforce by gluing the ends of the braid.
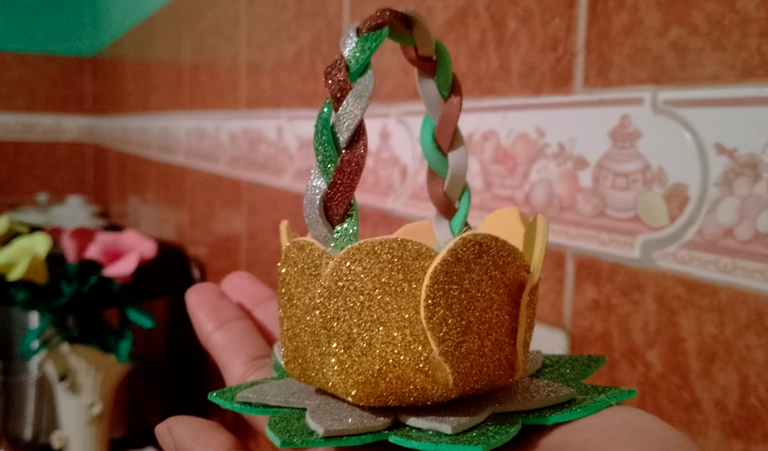
Passed8:Now we are going to glue the braid as a handle to the flower like this:
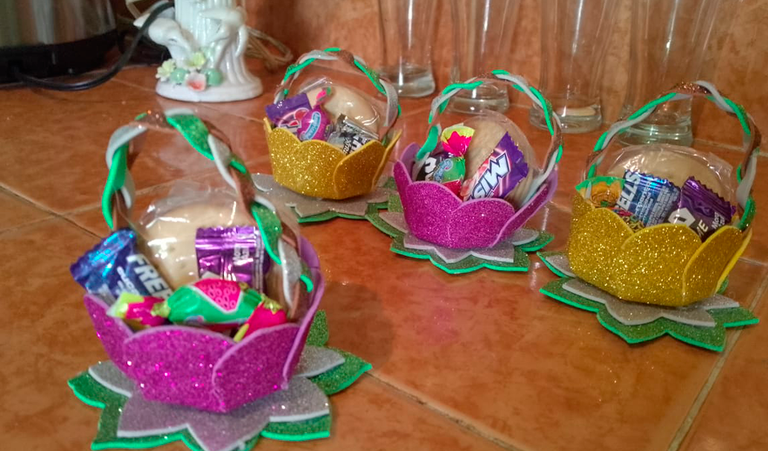
Well friends, this is how these little details turned out for me. I made four, where I can place whatever I want to give to that special person. It can be bracelets, earrings, other accessories, a cute keychain, candies, among others.
In addition, this detail is not only a visually attractive gift, but it can also have a special meaning. You can personalize the flower with colors that that person likes or add a sweet message inside. Imagine opening the flower and finding a note that expresses your feelings or a small poem dedicated to him or her. Spectacular!
Well Hive Diy was a pleasure to publish again in this beautiful community, I love you very much.
💖Until next time Hivers!💖

ESP
Crea detallitos que sorprendan y abran oportunidades
¡Hola Hive Diy!
Cada momento que vivimos es único y especial, y cuando se trata de sorprender a alguien, es importante dar lo mejor de nosotros. Recuerda que incluso el más pequeño detalle, creado con nuestras propias manos, puede tener un gran significado, ya que está lleno de los mejores deseos y cariño hacia esa persona especial.
En este post quiero compartir contigo una idea sencilla, hermosa y fácil de realizar que te permitirá salir de lo común y sorprender a alguien. Este post no solo lo realizó para inspirarte a crear, sino que también te motivará a innovar y a explorar nuevas oportunidades. Cada día es una nueva oportunidad para aprender, mejorar y hacer algo único.
En mi caso, me encanta trabajar con foami, un material que me permite darle vida a lo que quiero crear, dando lo mejor de mí en cada objeto, implementando la mejor forma para que luzca más bonito.
Este detallito es ideal para ofrecerlos en momentos bonitos como: reuniones, fiestas o simplemente para compartir un momento especial con el objetivo de que dejan una huella más profunda en el corazón de quienes los reciben.
Materiales
Pistola de silicón
Silicón
Foami escarchado gris
Foami escarchado verde
Foami escarchado fucsia
Foami escarchado mostaza
Foami escarchado marrón
Papel
Lápiz
Tijera
Paso a Paso
Paso 1: Comenzamos a dibujar una flor de ocho pétalos de aproximadamente 13 cm y dos sépalos uno de 10cm y el otro más pequeño de 8cm de ancho.
Paso 2:After the shaped flowers I cut out two fuchsia-colored ones, two mustard-colored ones, and from the sepals I cut out four of each one.
Paso 3:Tomamos los sépalos y lo pegamos el del color gris sobre el del color verde y nos quedará así:
Paso 4:Tomamos los pétalos y comenzamos a recortar como 1Cm y medio hacia dentro de la flor (estas son medidas de referencia, puedes hacerlos mas grande). Trata de que la abertura que hagas puedas lograr que cada pétalo sea manejable como para formar especie de una cesta, así como lo ves en las imágenes.
Paso 5:Una vez profundizando en el corte entre los pétalos, comenzamos a pégalos uno al ladito de los otros y me quedaran así.
Paso 6:Una vez pegado los pétalos y colocándolos como una pequeña cesta vamos a comenzar a pegarlos con los sépalos.
Paso 7:Ahora vamos a formar una pequeña trenza, para ello voy a utilizar tres pliegos de foami alargados uno de color verde, otro plateado y otro marrón, con unas medidas de 13 cm de largo y medio centímetros de ancho; refuerza pegando las puntas de la trenza.
Paso 8:Ahora vamos a pegar la trenza como un asa a la flor de esta manera:
Bien amigos, así me quedaron estos detallitos. Realicé cuatro, donde puedo colocarles lo que quiera regalarle a esa persona especial. Puede ser desde pulseras, aretes, otros accesorios, un lindo llavero, caramelos, entre otros.
Además, este detalle no solo es un regalo visualmente atractivo, sino que también puede tener un significado especial. Puedes personalizar la flor con colores que le gusten a esa persona o agregar un mensaje dulce. Imagina abrir la flor y encontrar una nota que exprese tus sentimientos o un pequeño poema dedicado a él o a ella.¡Espectacular!
Bueno Hive Diy fue un placer volver a publicar en esta hermosa comunidad, los quiero mucho.
💖¡Hasta una próxima oportunidad Hivers!💖
Love the design and you are a great artist which your artwork clearly shows. thanks for sharing with us.
!discovery 35
This post was shared and voted inside the discord by the curators team of discovery-it
Join our Community and follow our Curation Trail
Discovery-it is also a Witness, vote for us here
Delegate to us for passive income. Check our 80% fee-back Program
Congratulations @yohadice! You have completed the following achievement on the Hive blockchain And have been rewarded with New badge(s)
Your next target is to reach 6000 upvotes.
You can view your badges on your board and compare yourself to others in the Ranking
If you no longer want to receive notifications, reply to this comment with the word
STOPCheck out our last posts:
Estupendo trabajo, te quedo muy llamativo tu manualidad, ideal para un cumpleaños, sobre todo con la forma que tienen.
Escrito por lionsaturbix / Written by lionsaturbix
¡¡¡Buen trabajo!!! Gracias por publicar tu excelente contenido en Hive Diy.
Congratulations @yohadice! You received a personal badge!
You can view your badges on your board and compare yourself to others in the Ranking
Check out our last posts: